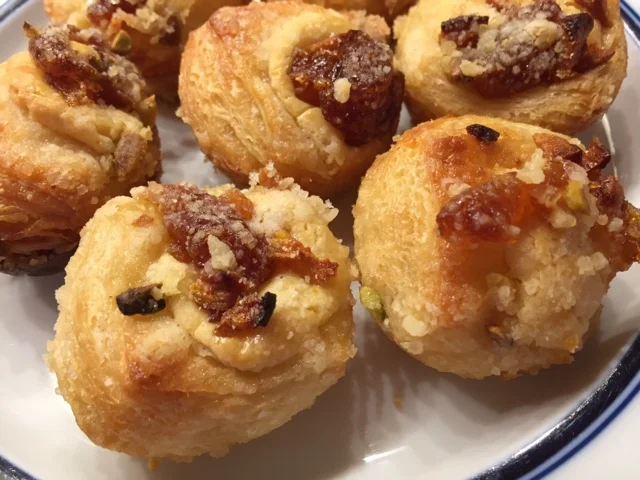
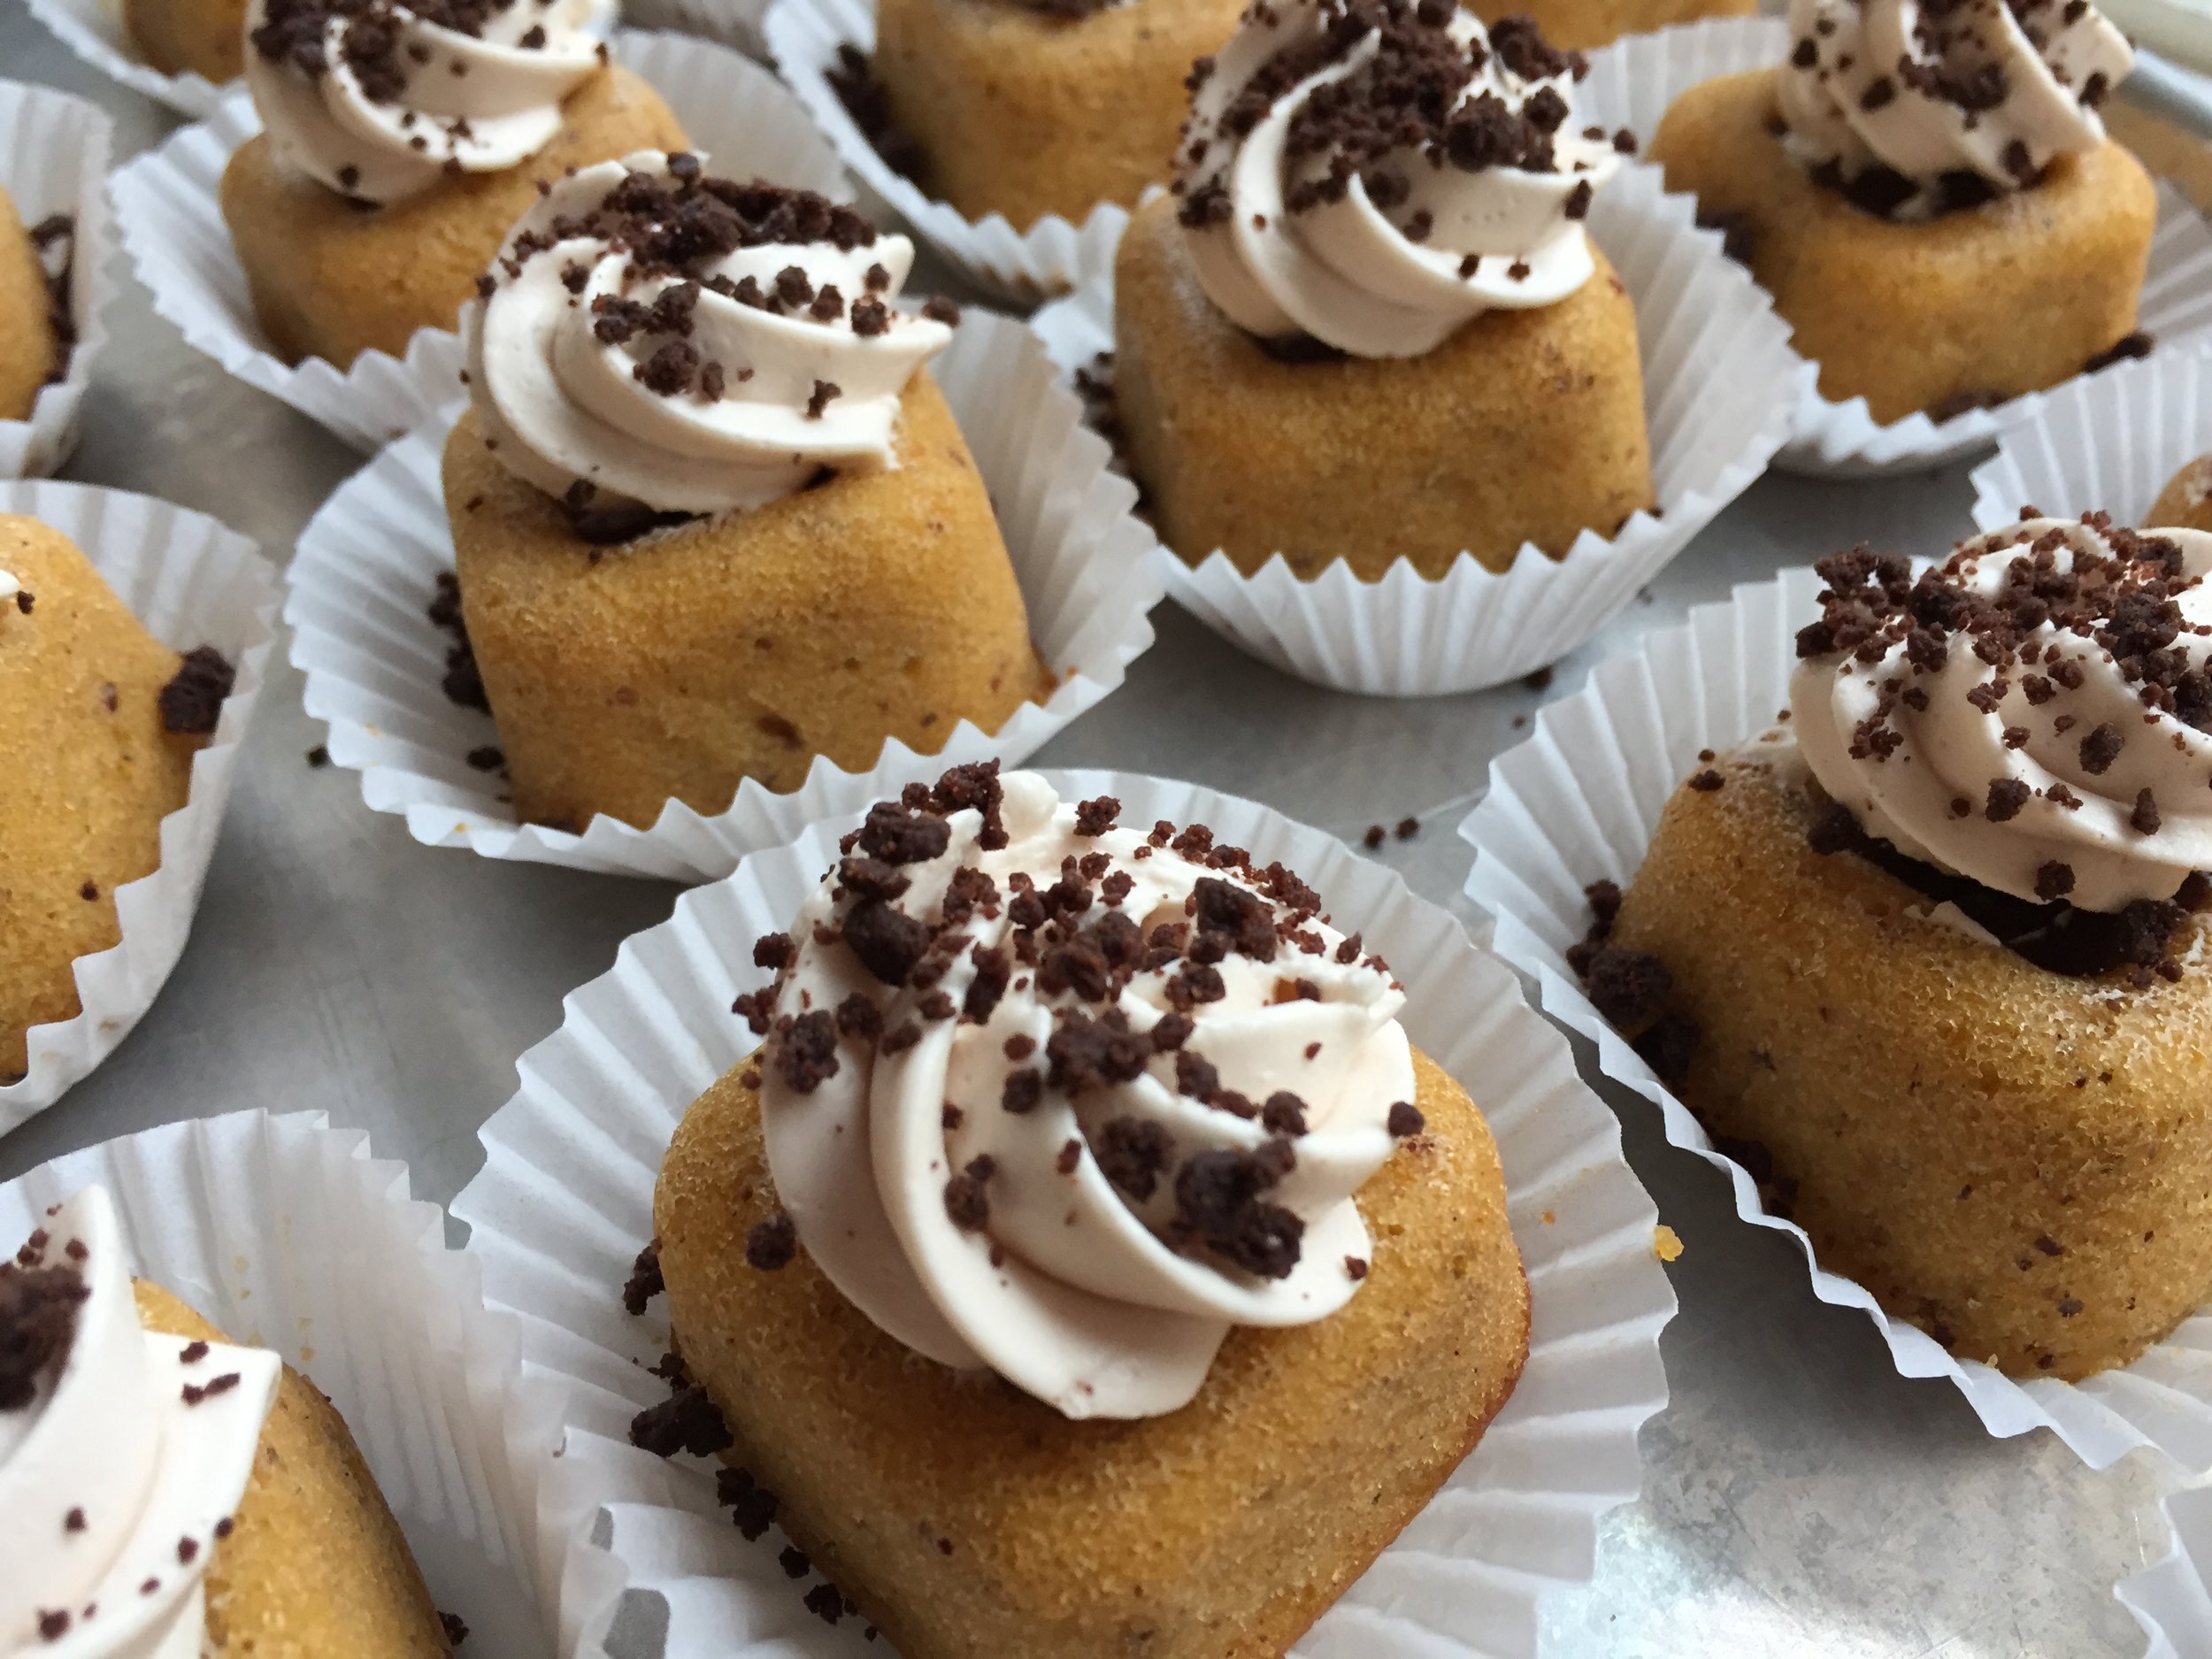
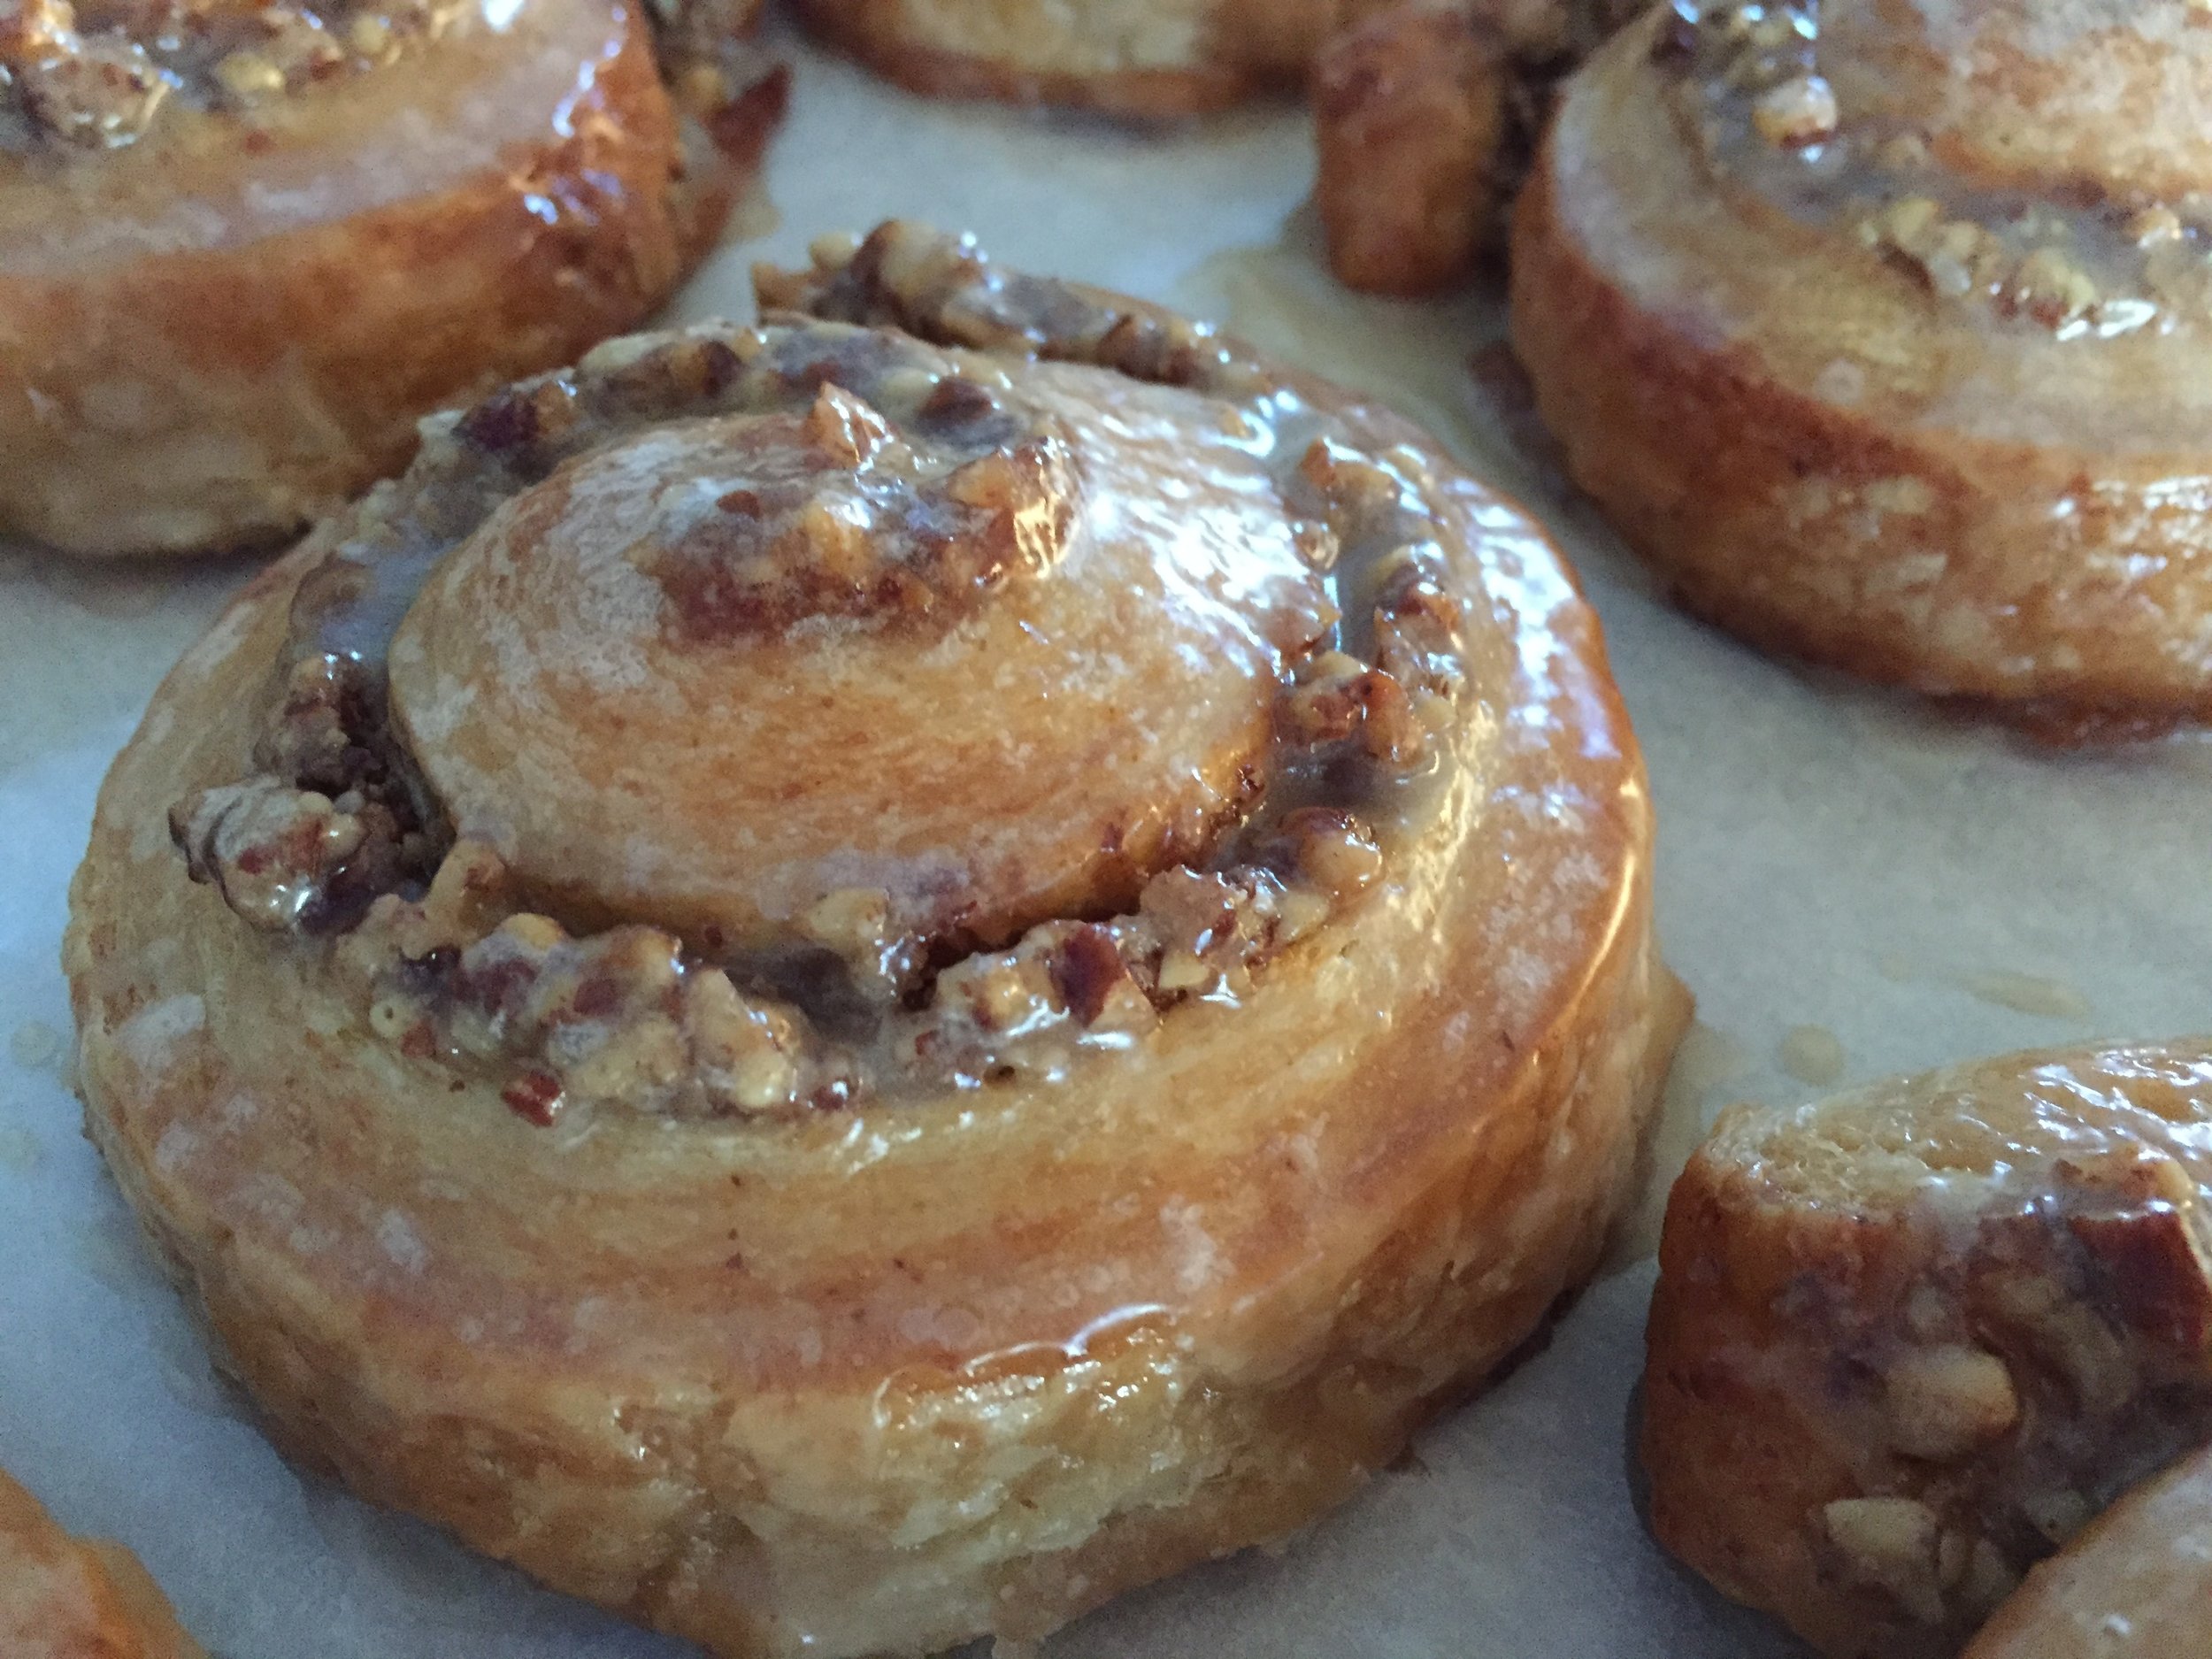
Maple pecan brioche spirals

IMG_2575.JPG

These babies were really fun to make, particularly if you enjoy the whole laminated dough experience (as I certainly do!). 

IMG_2535.JPG

On my regular walks I pass a small woods near the Lincoln School here in Grand Rapids, Michigan and recently noticed they had put out the sap buckets for maple syrup. I have no idea how much sap/syrup they get from this late winter project, but it's cool nonetheless. It reminds me of our days of living in Vermont when it was tree-tapping-sap-running time and the sugar shacks were in full swing. Oh the memories.

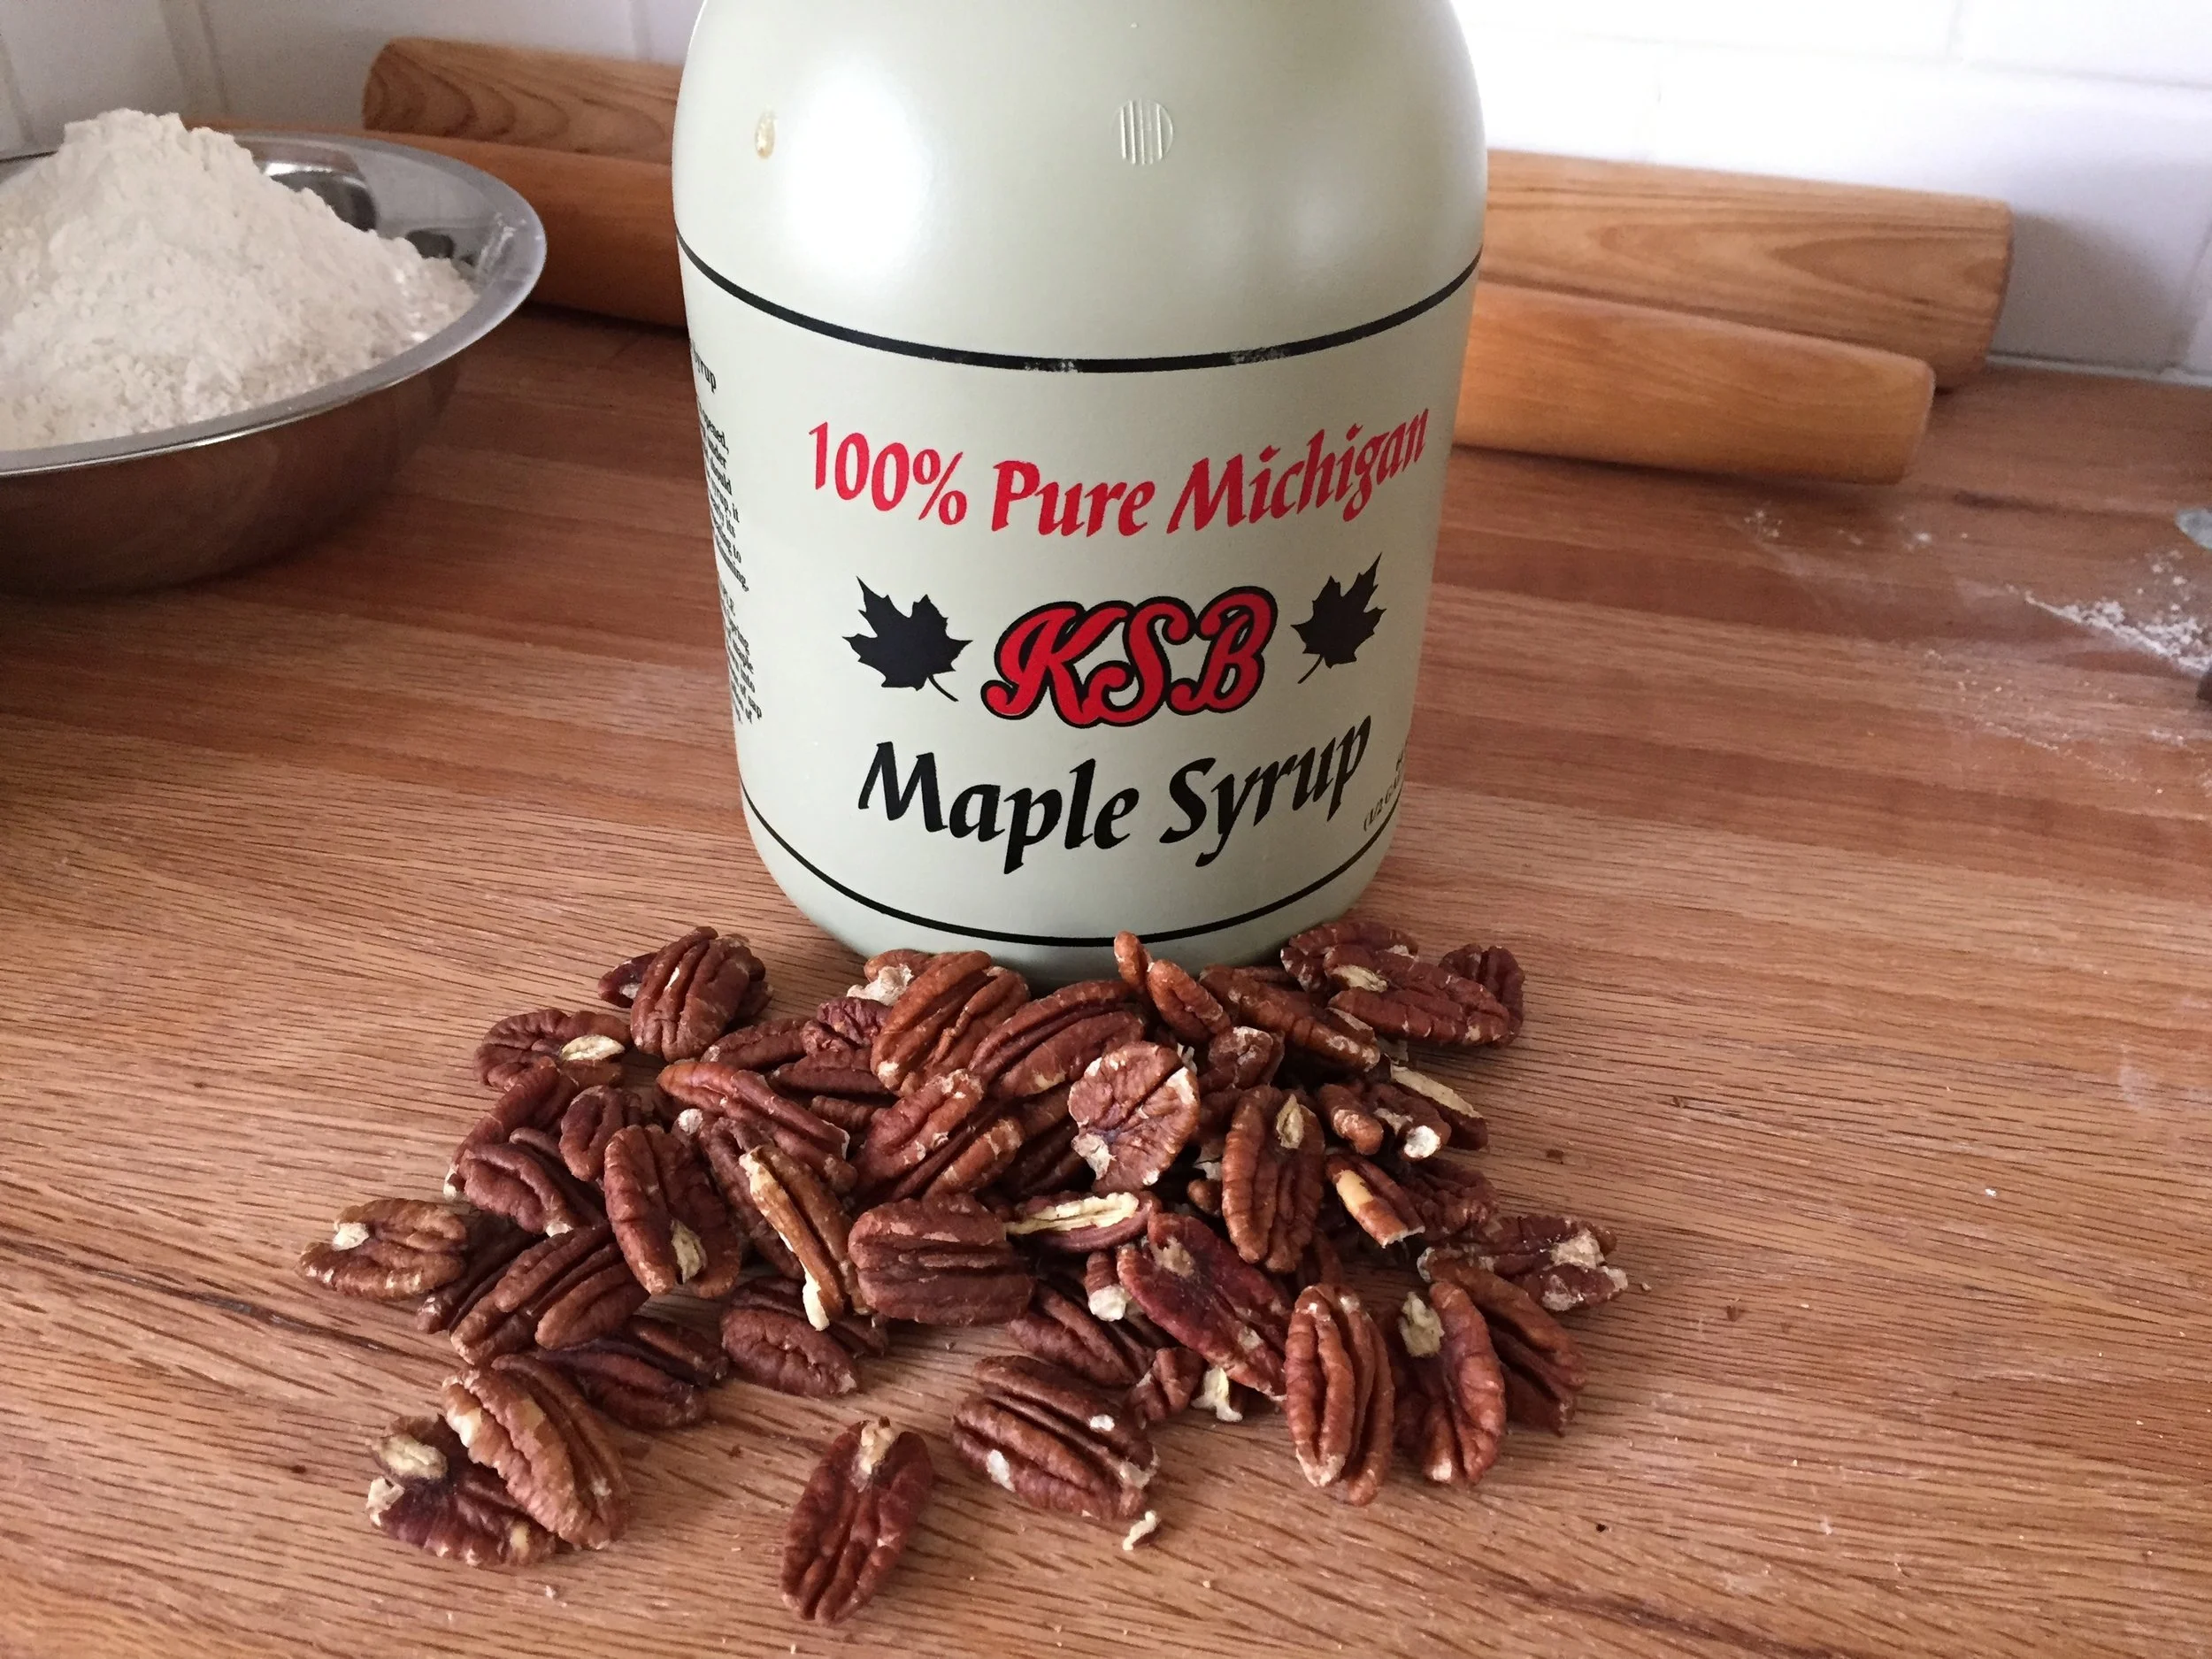
Since we just happened to have a jug of Michigan maple syrup in the fridge, the maple pecan version of a laminated brioche roll was born.

IMG_2495.JPG

This post isn't so much about the process of making laminated brioche dough (which I wrote about here), but about the variety of goodies one can make with the same base dough.

Think pain au raisin, which is one of the classics for sale in many French pâtisseries. Typically made with croissant or brioche dough,  the dough is spread with pastry cream and sprinkled with rum soaked raisins, rolled up into a log, sliced, proofed and baked. This maple pecan version is simply another take on a delicious buttery dough, spread with an even greater filling. Yeah!

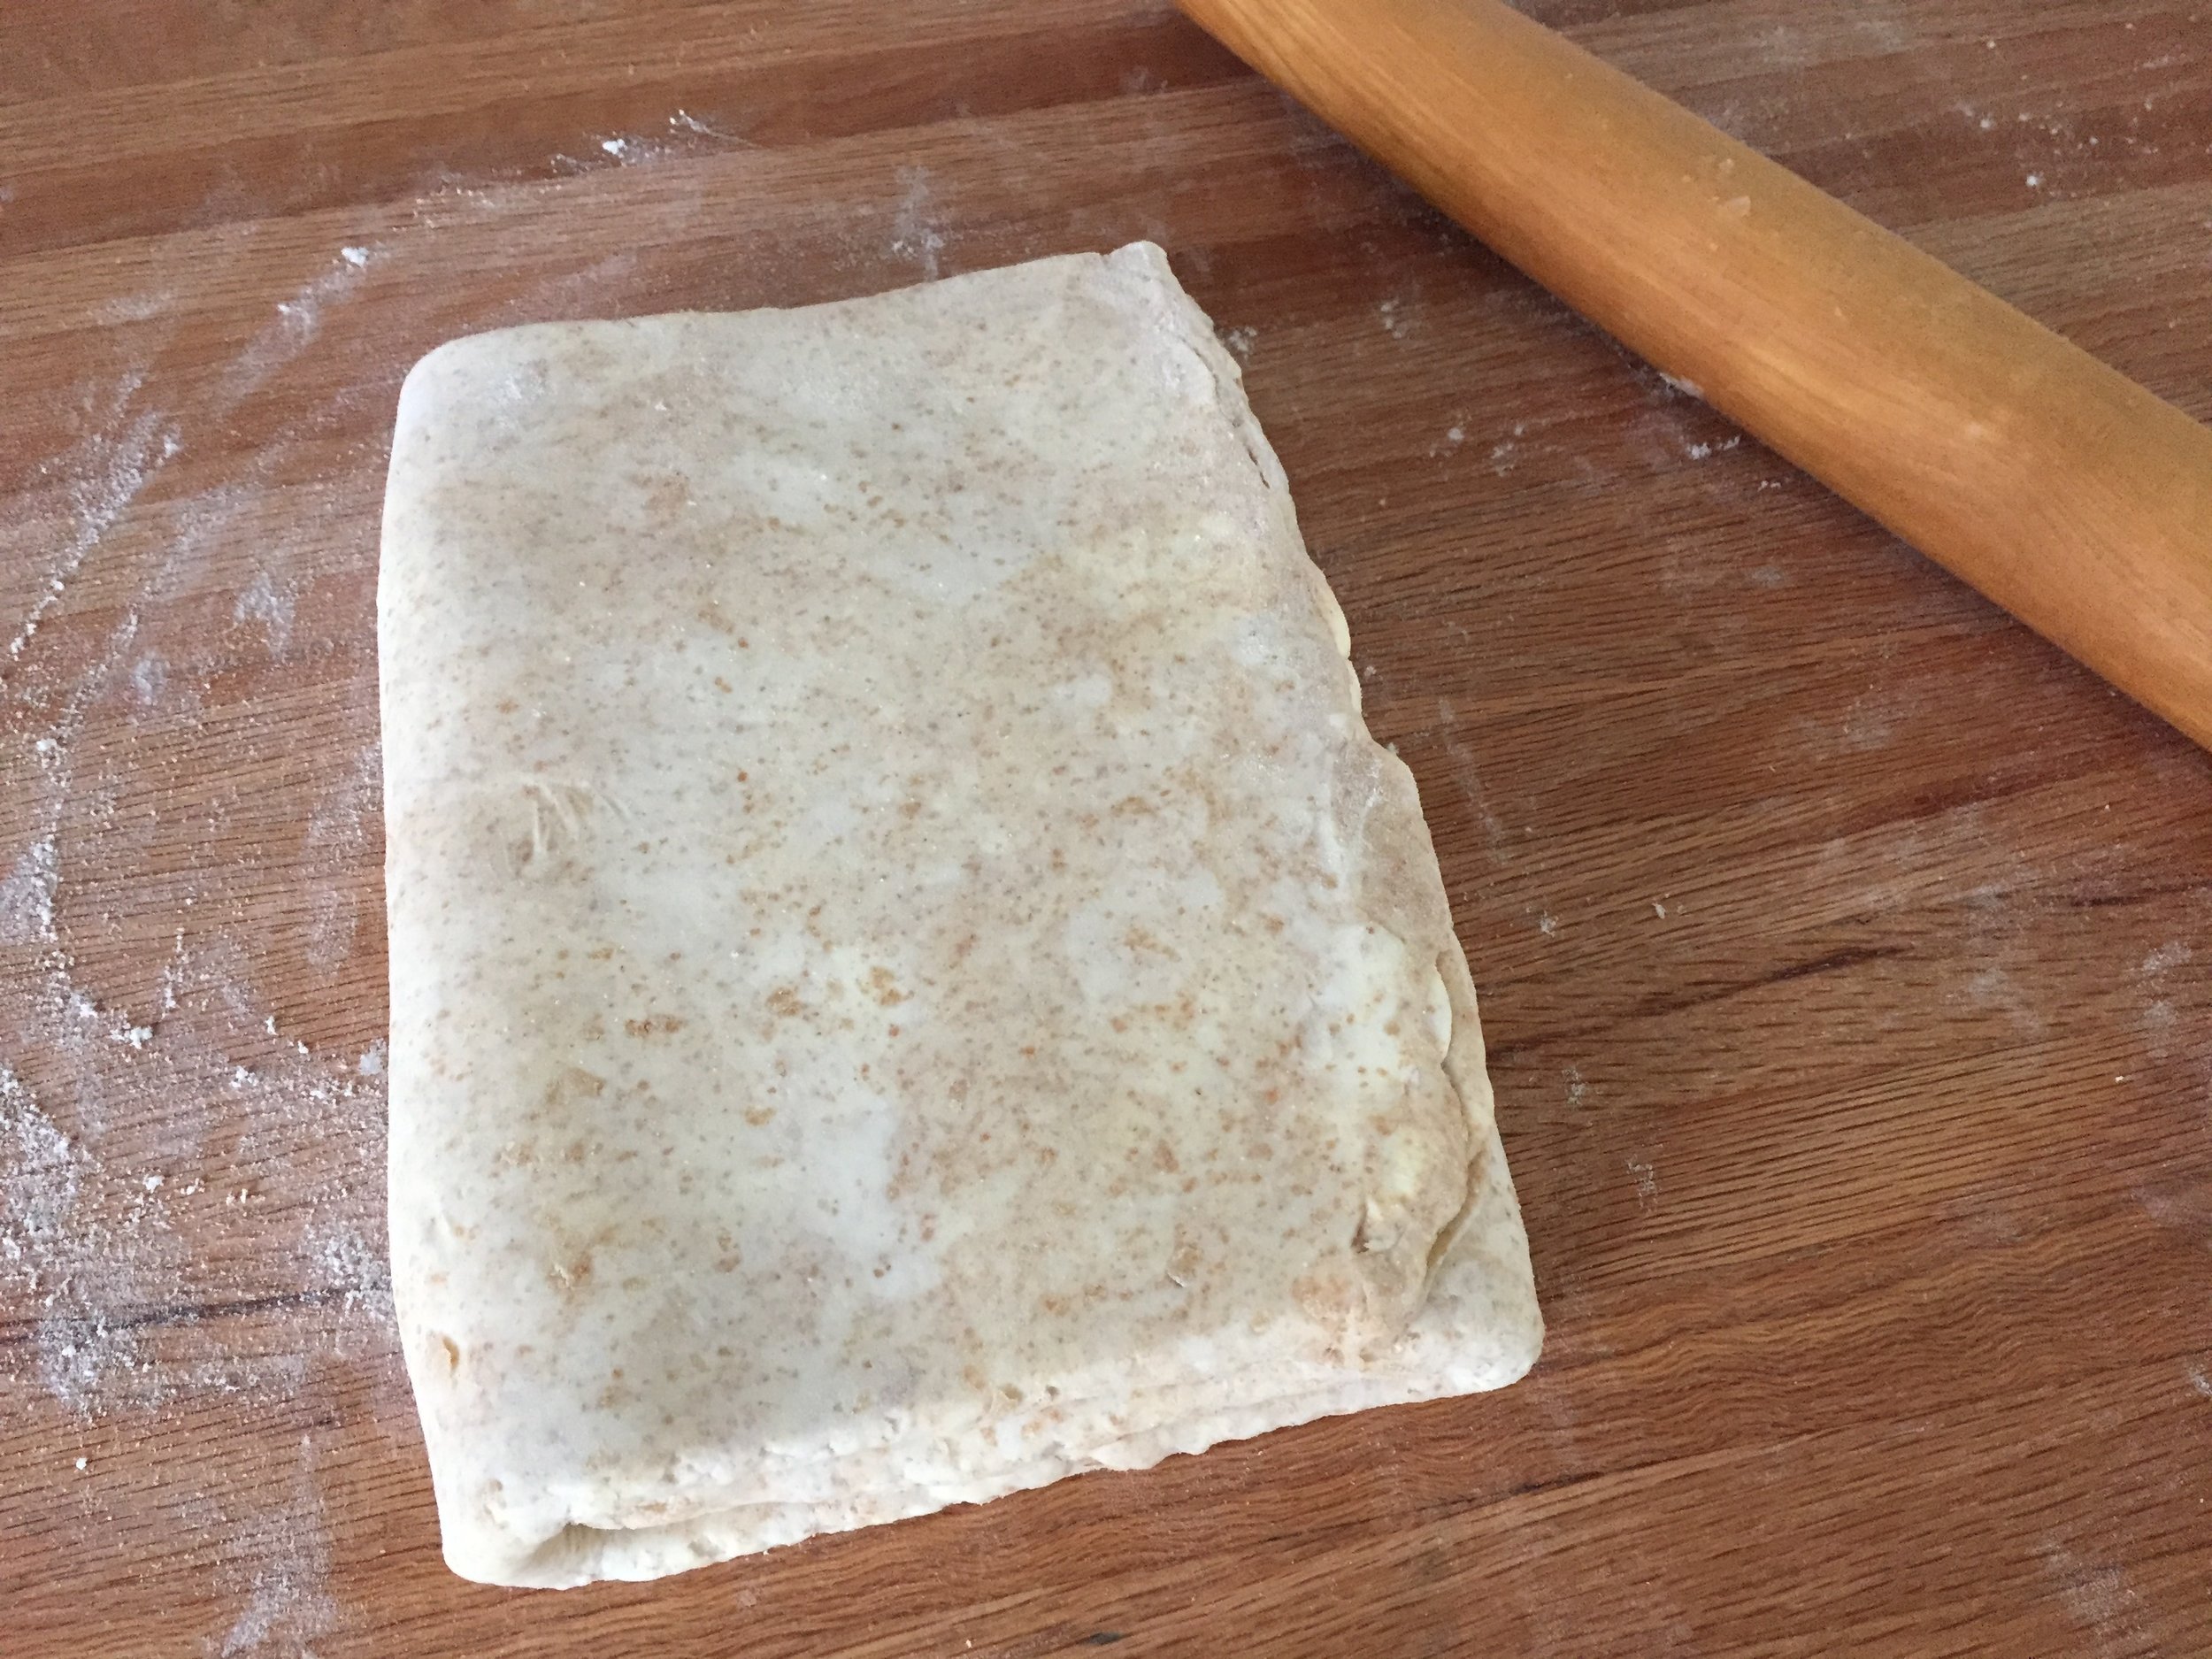
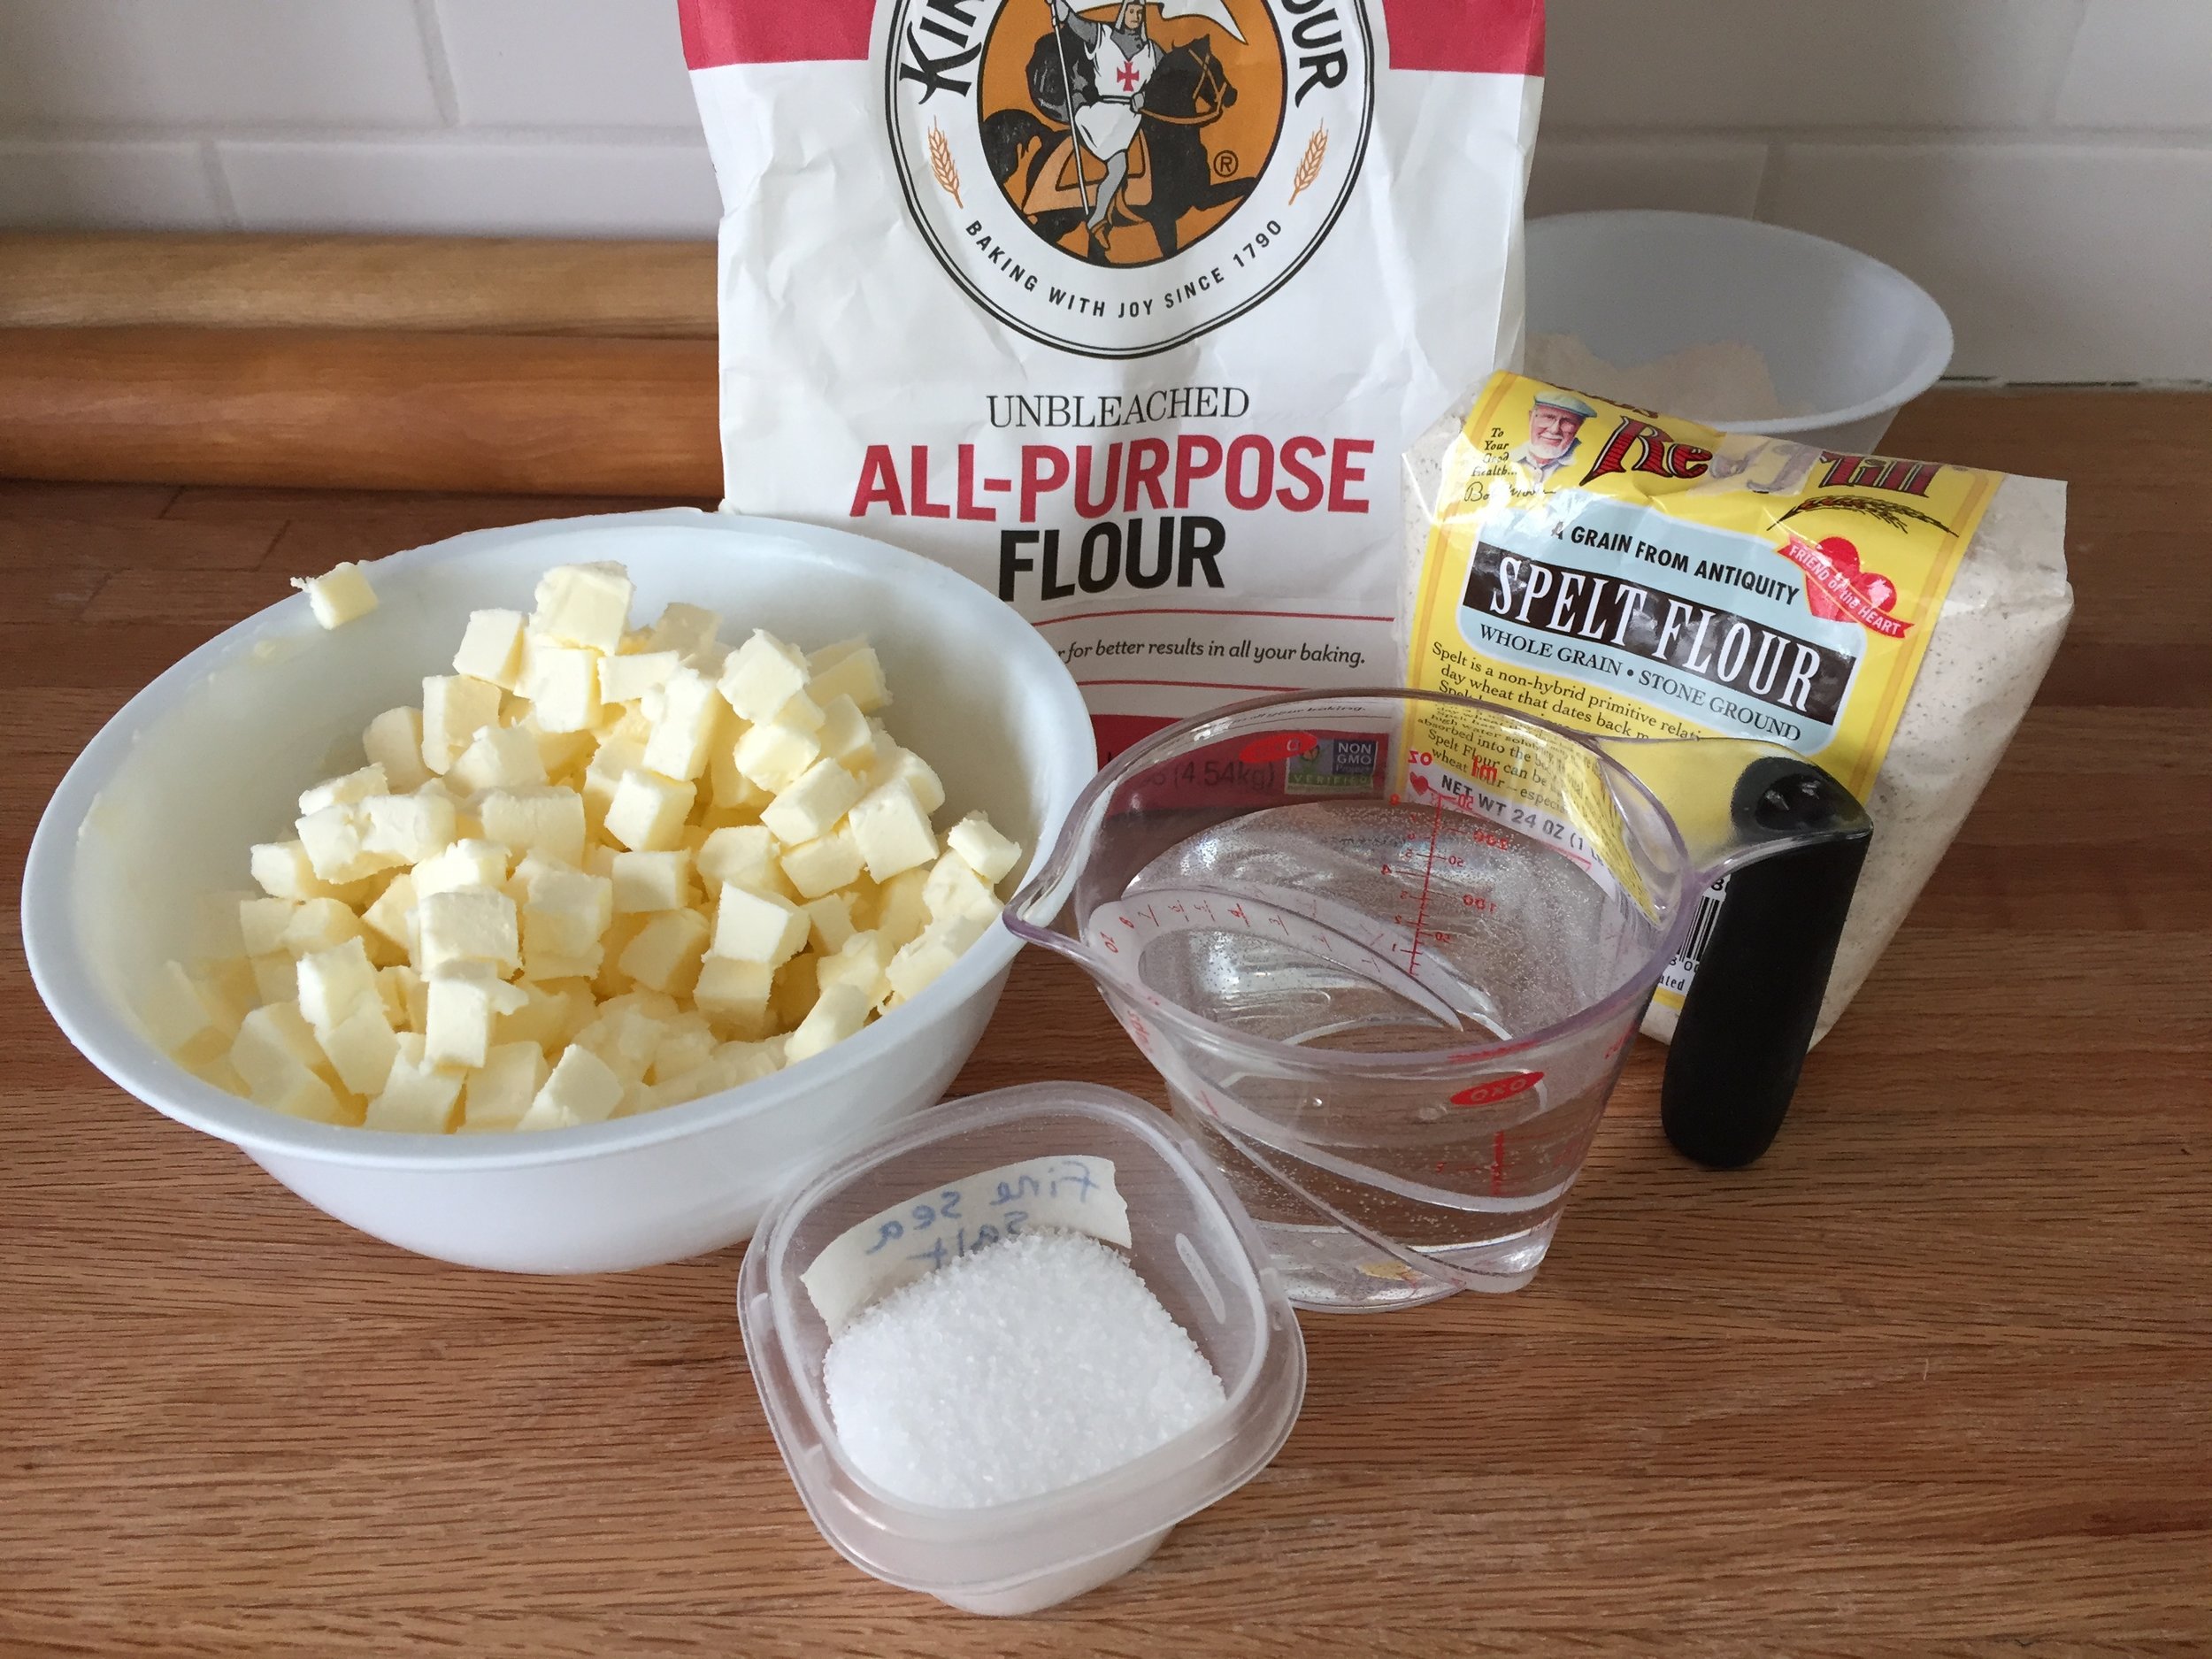
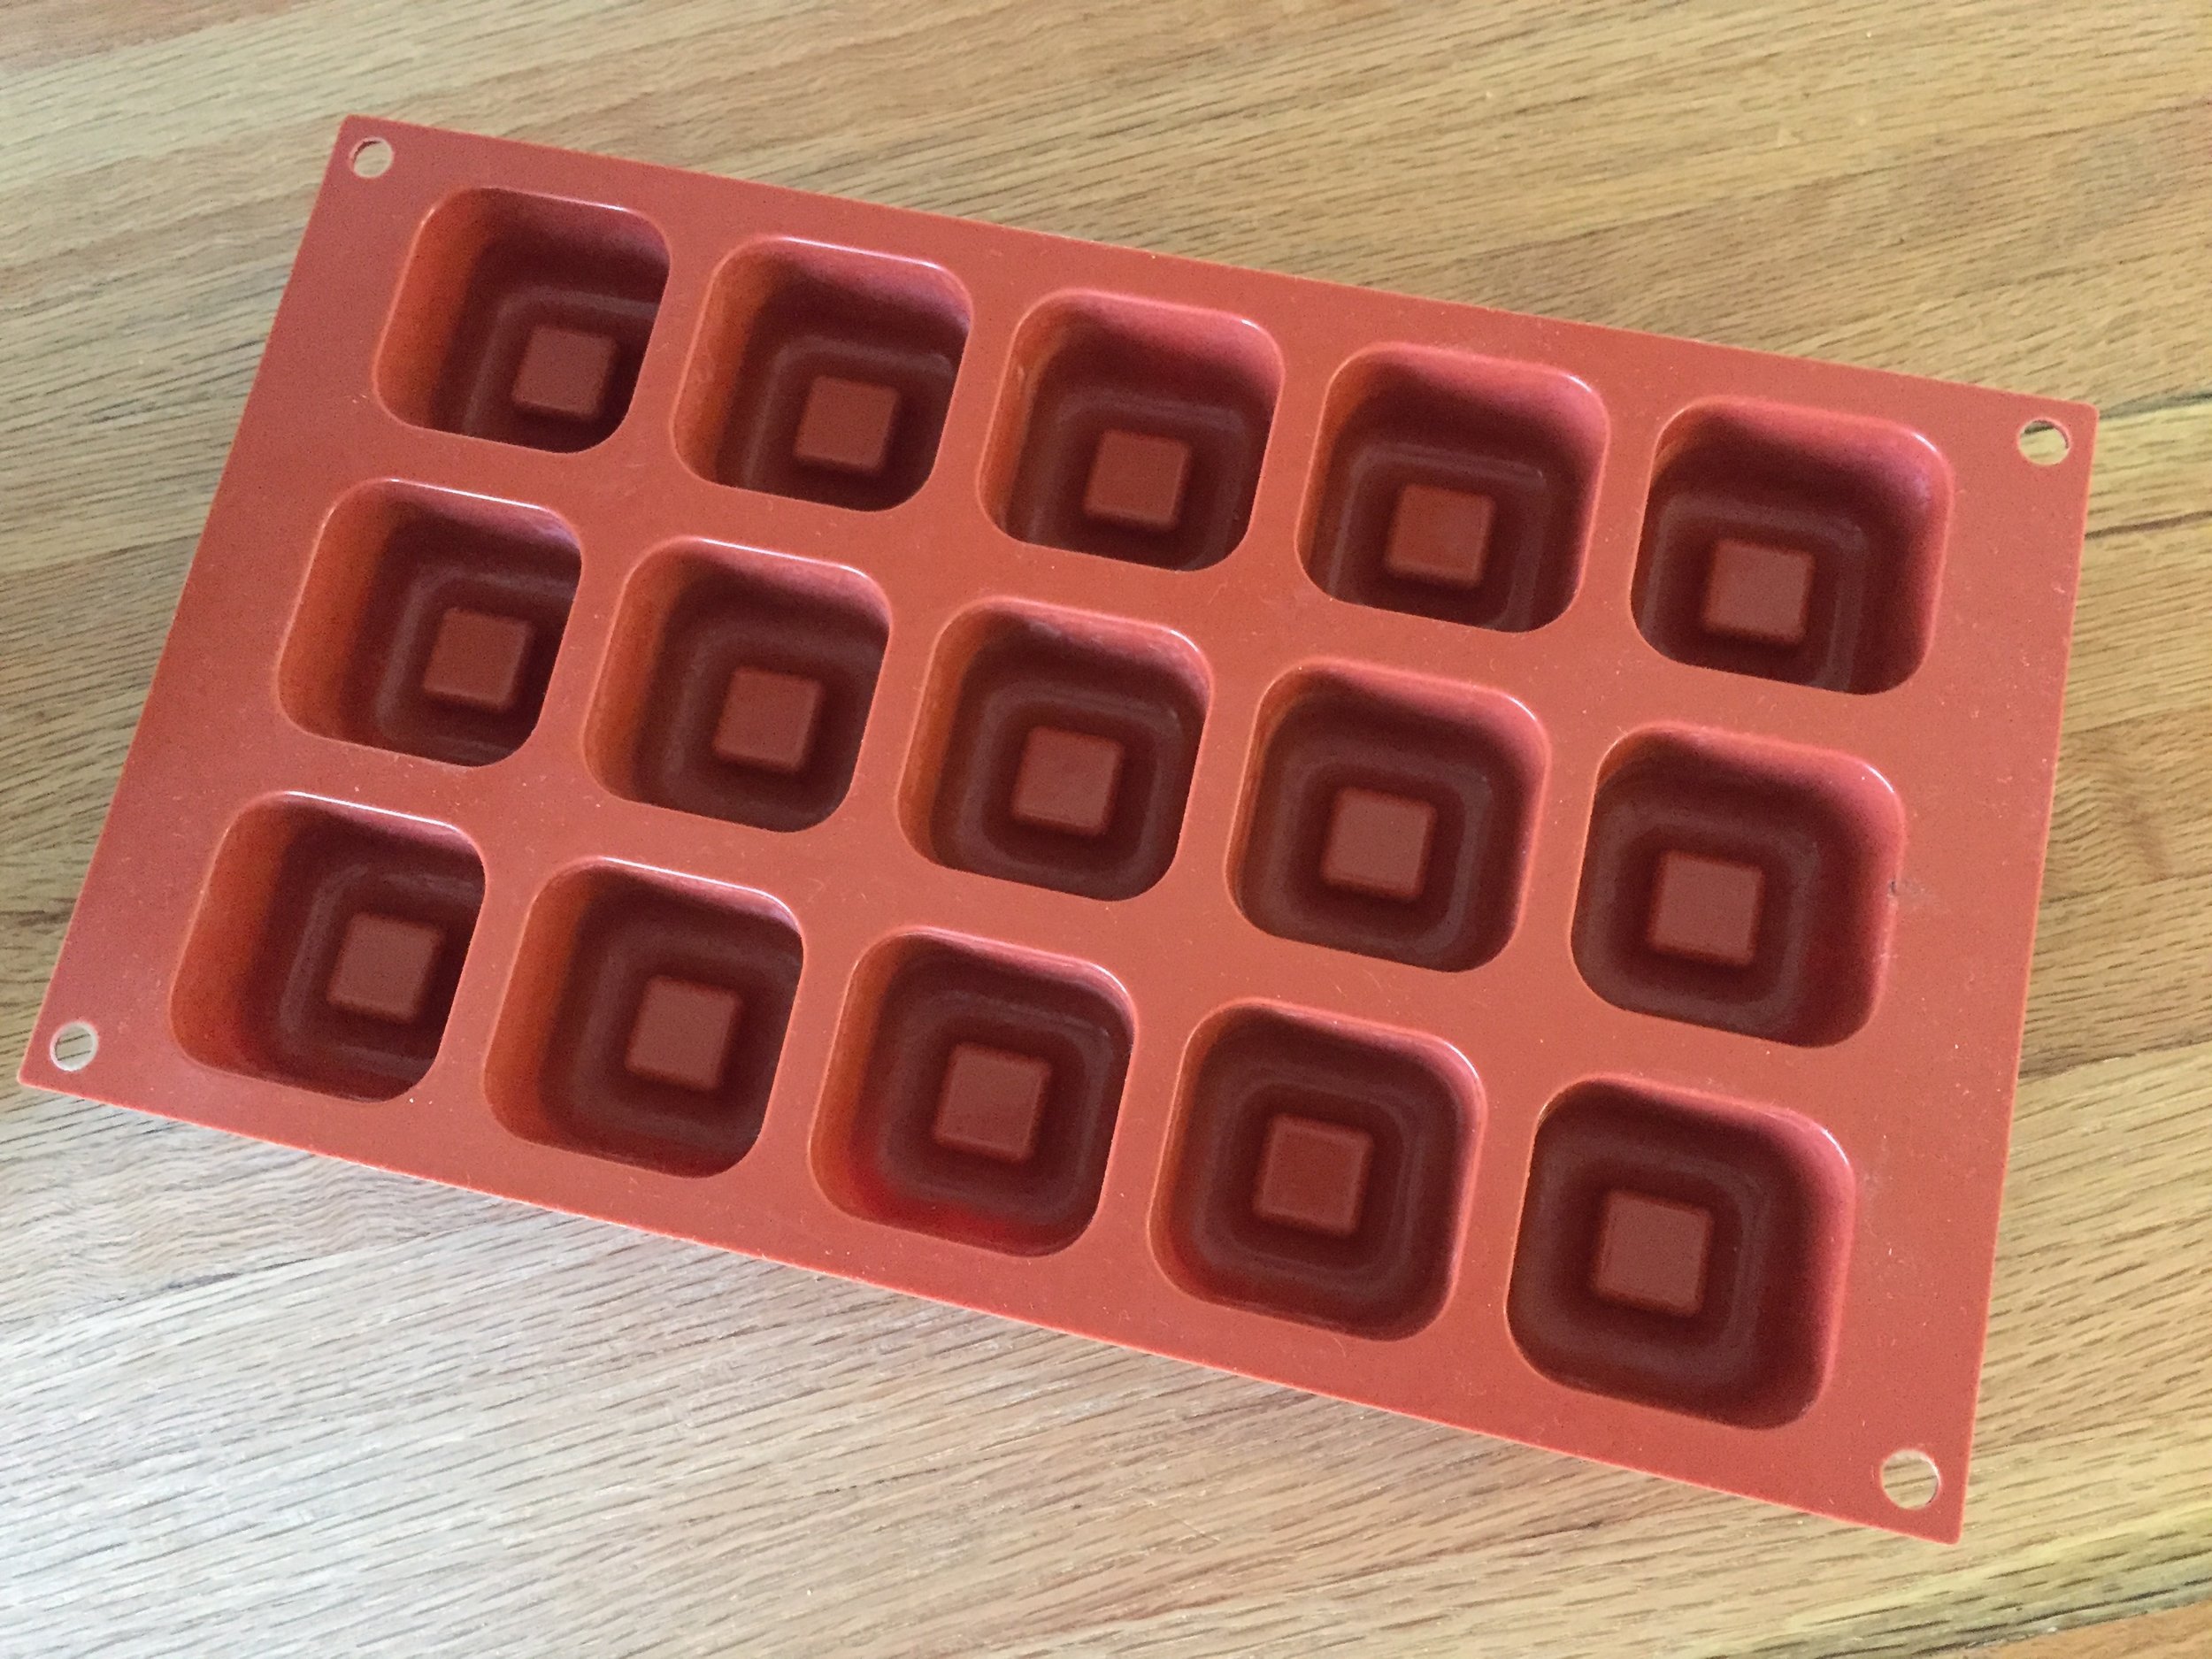
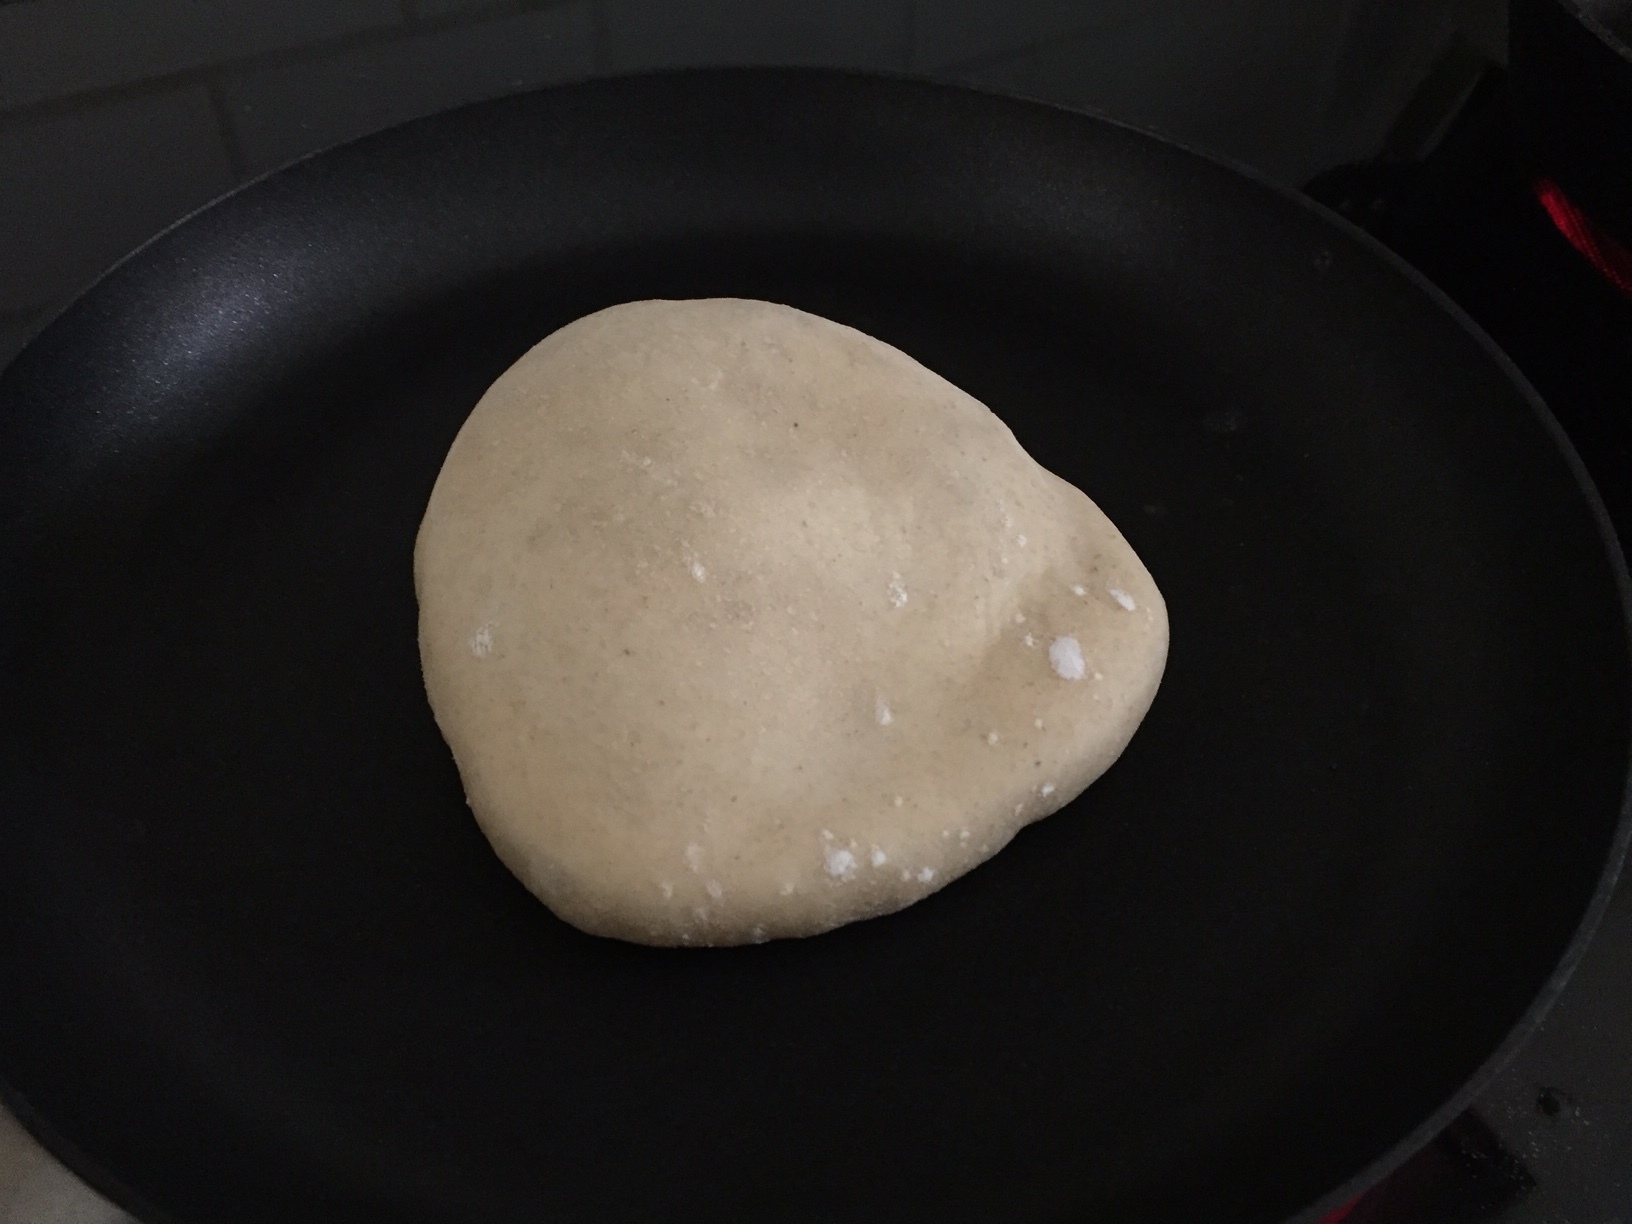
I made my brioche base dough, completed the beurrage and four 3-folds then wrapped it up to chill in the fridge overnight.

Going through the folds

Going through the folds

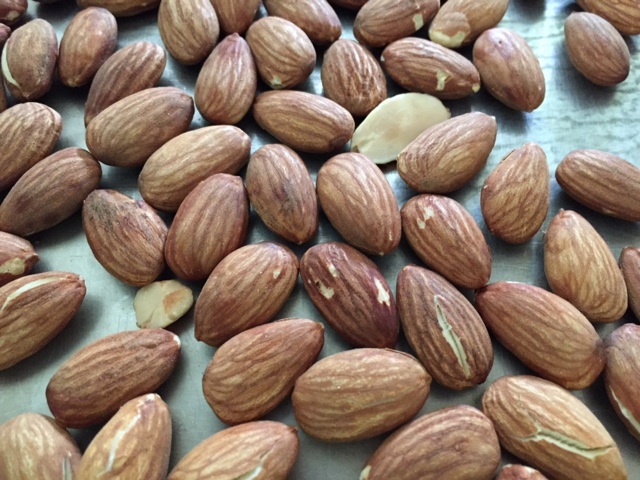
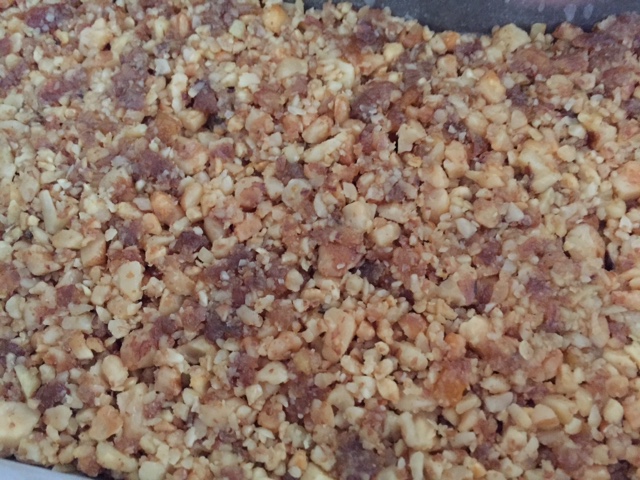
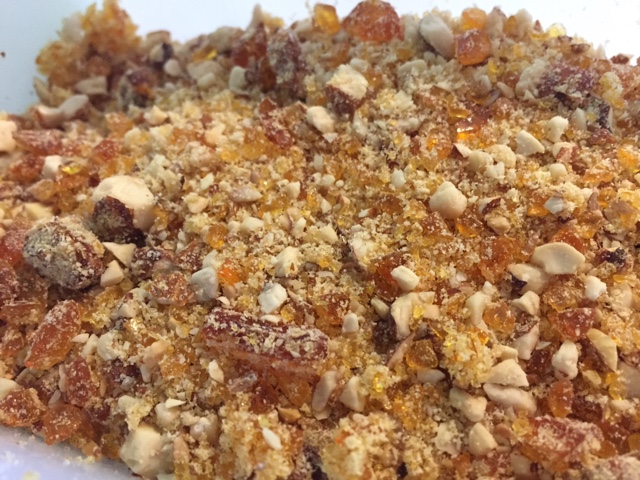
I had chosen pecans for my project, but you can certainly substitute your favorite nut instead. Toast up about 250 g pecan halves and let cool. I divided those into 150 g to coarsely chop and 100 g to grind into a meal for the filling.  The filling was inspired by a recipe in the French book Viennoiseries & brioches by Parisian pâtissier/chocolatier Laurent Duchêne who has been awarded the coveted MOF title (Meilleur Ouvrier de France) and has his own pâtisserie in the 13th arr.

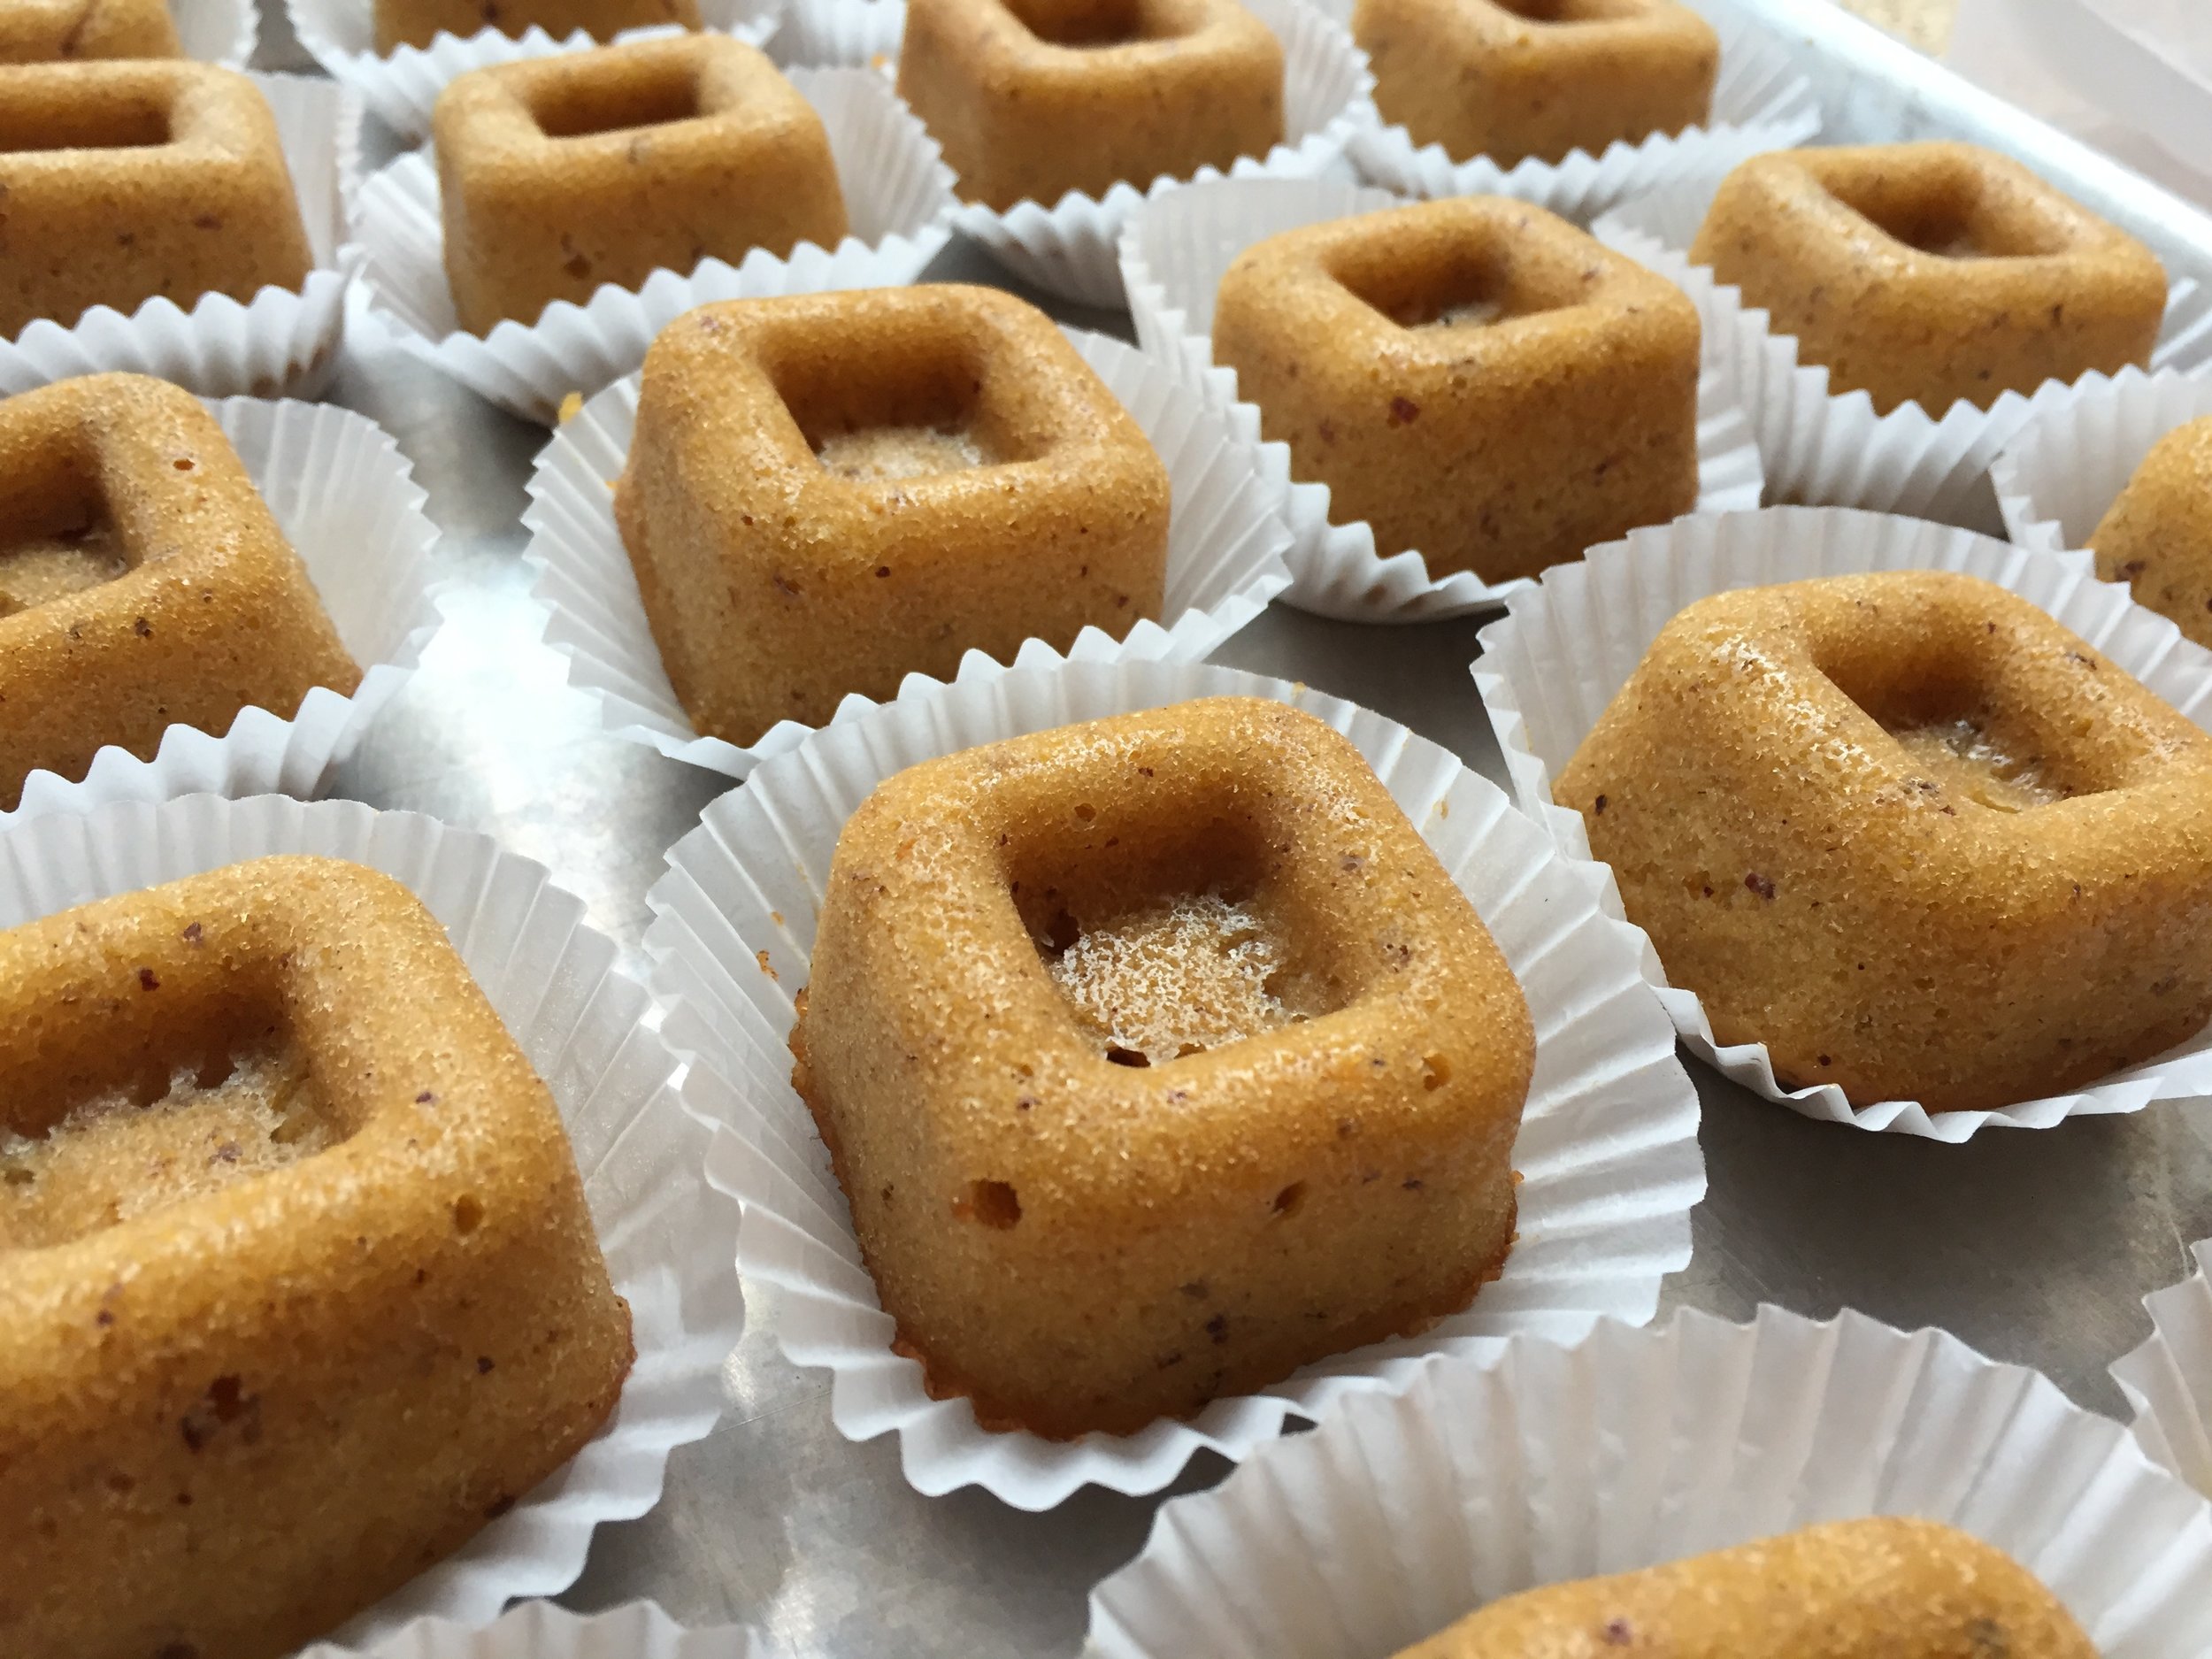
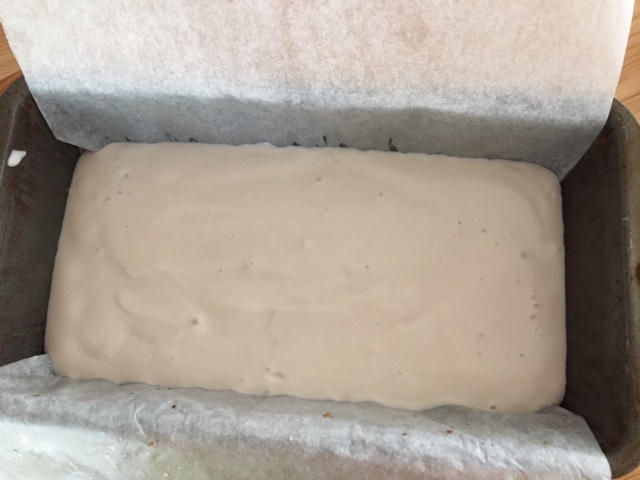
After the dough's overnight rest in the fridge I rolled it out into an approximately 25 cm/10" by 50 cm/20" rectangle and spread the filling in a thin layer all over. The filling is made very simply by combining 85 g egg whites, 100 g ground toasted pecans, 85 g sugar and 30 g maple syrup. Then I sprinkled 150 g of toasted and coarsely chopped pecans over the filling and rolled it all up into a neat log.

IMG_2506.JPG
 
IMG_2507.JPG
 
IMG_2508.JPG

When I do this sort of log/slice/proof/bake approach, I typically pop the log into the freezer for 15 or 20 minutes to firm things up. It's a bit easier to slice without having the filling ooze out as much as it might otherwise.

IMG_2510.JPG

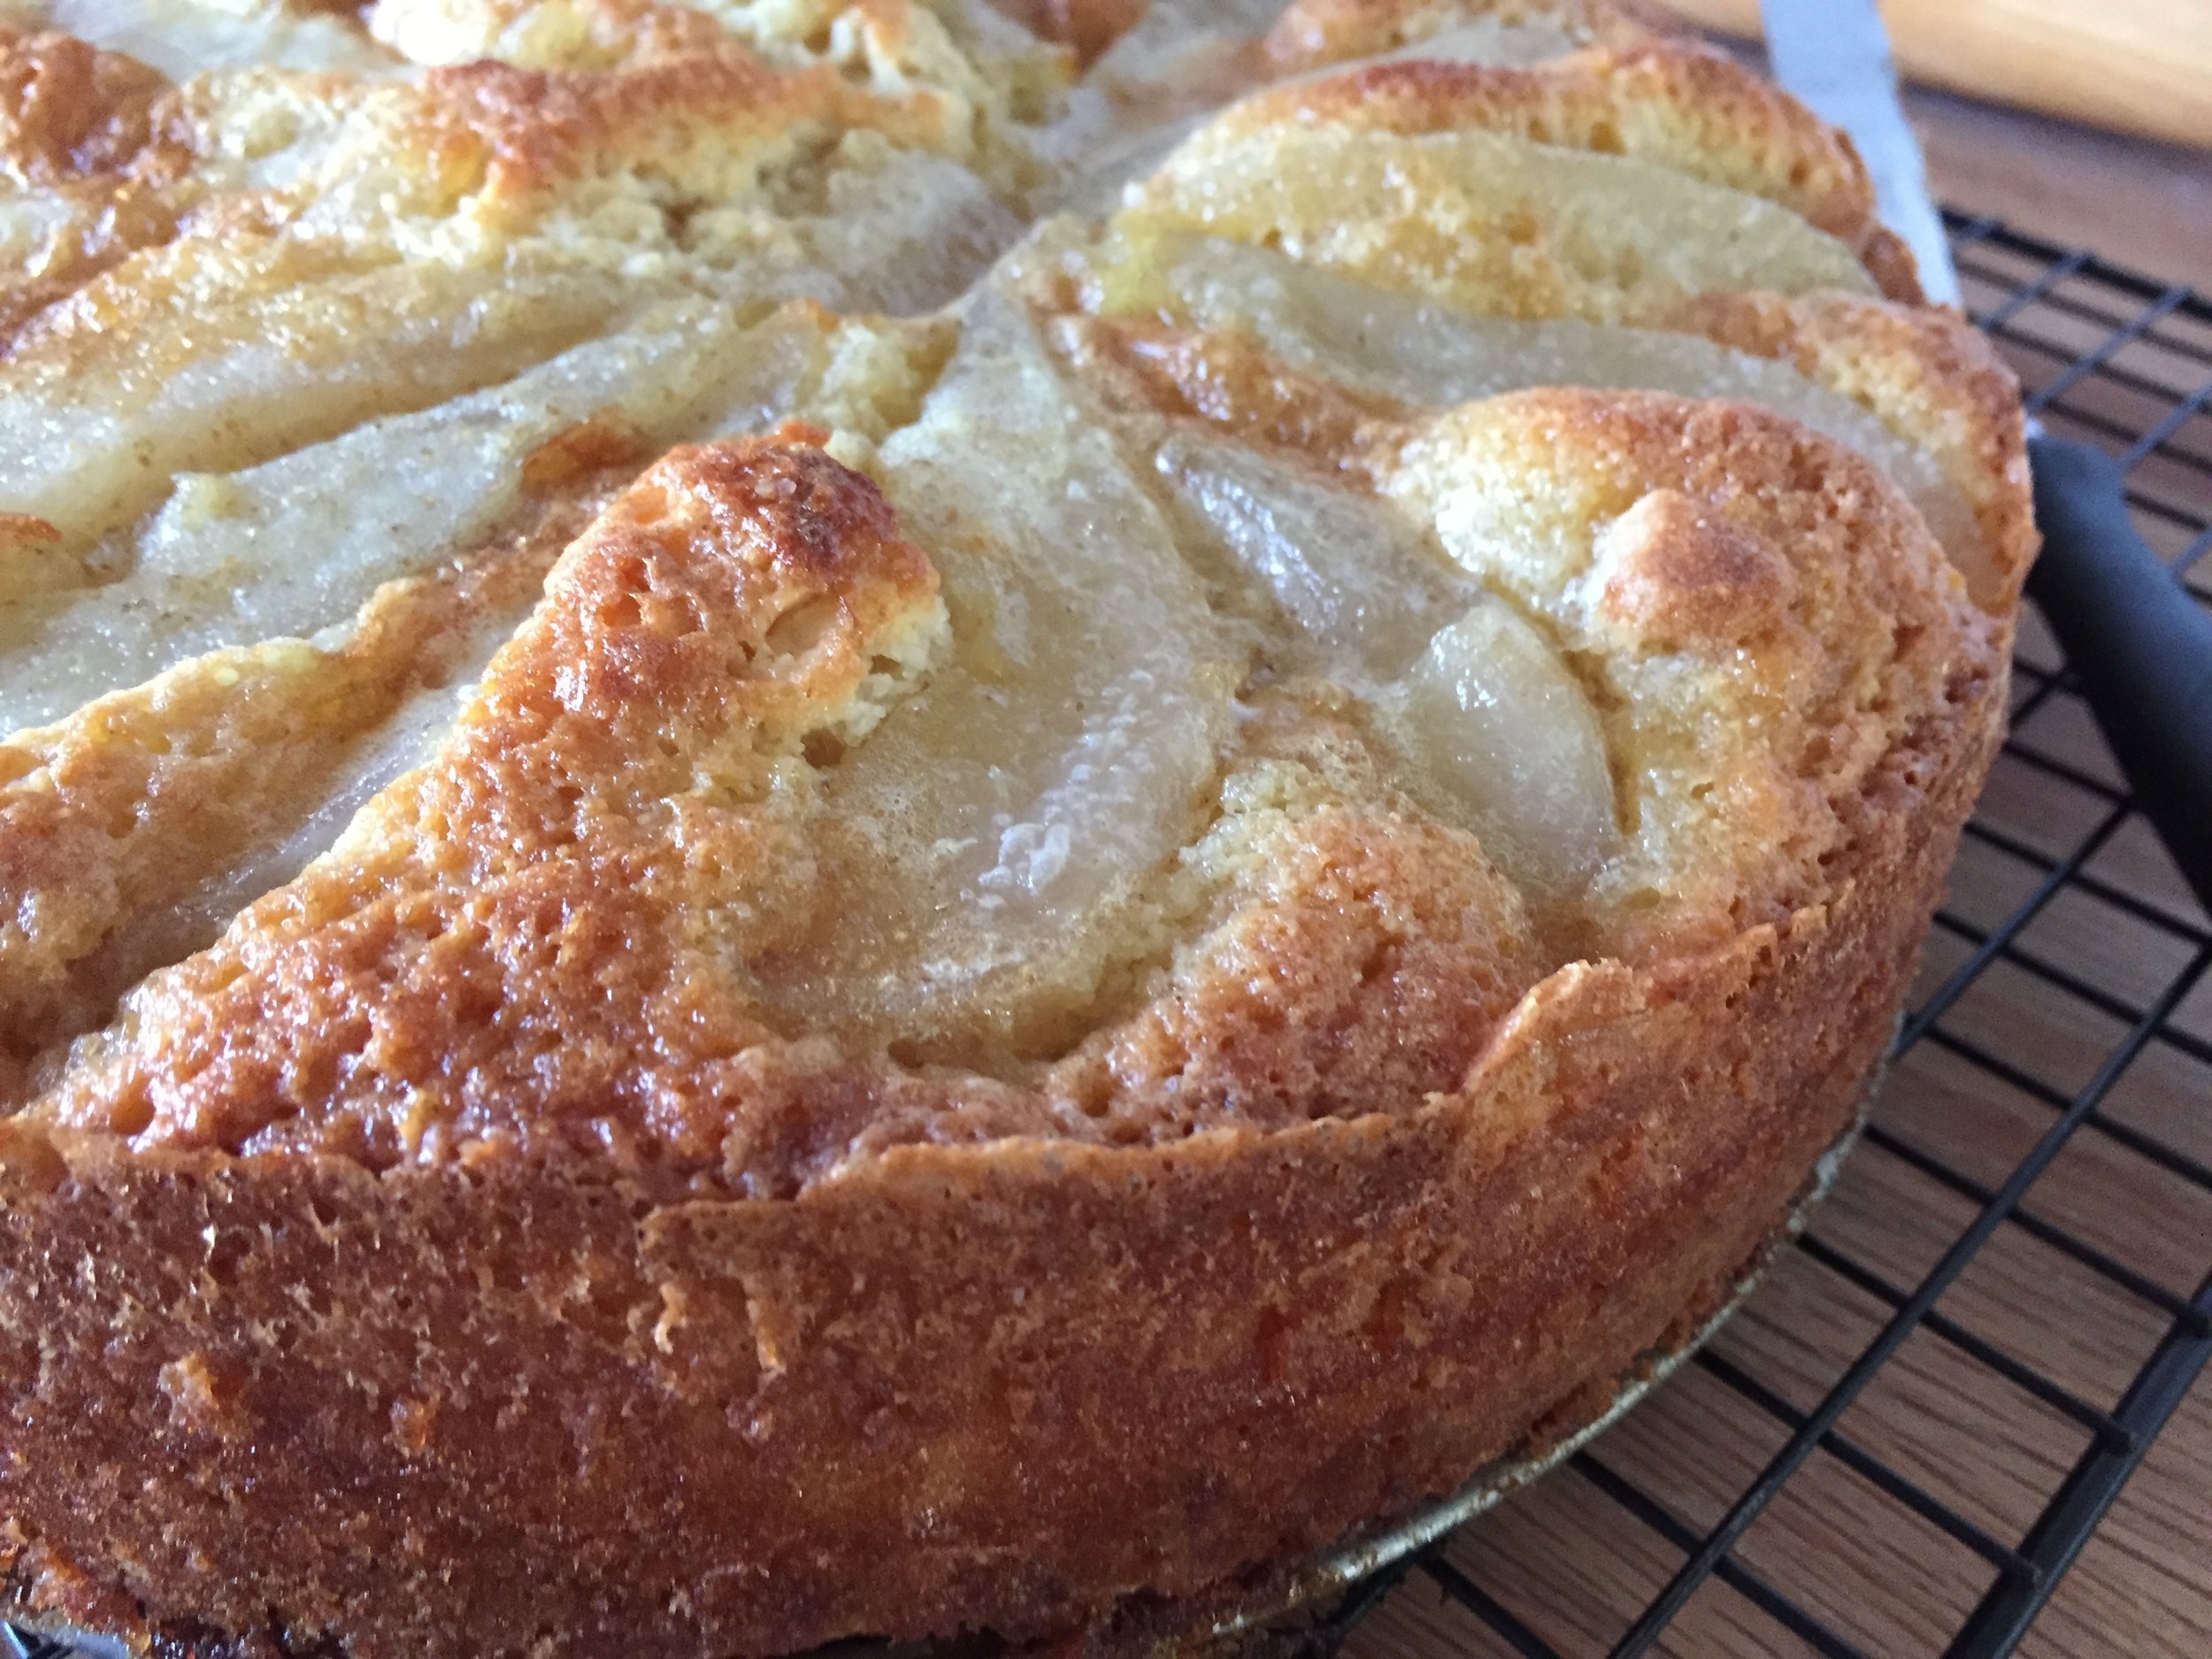
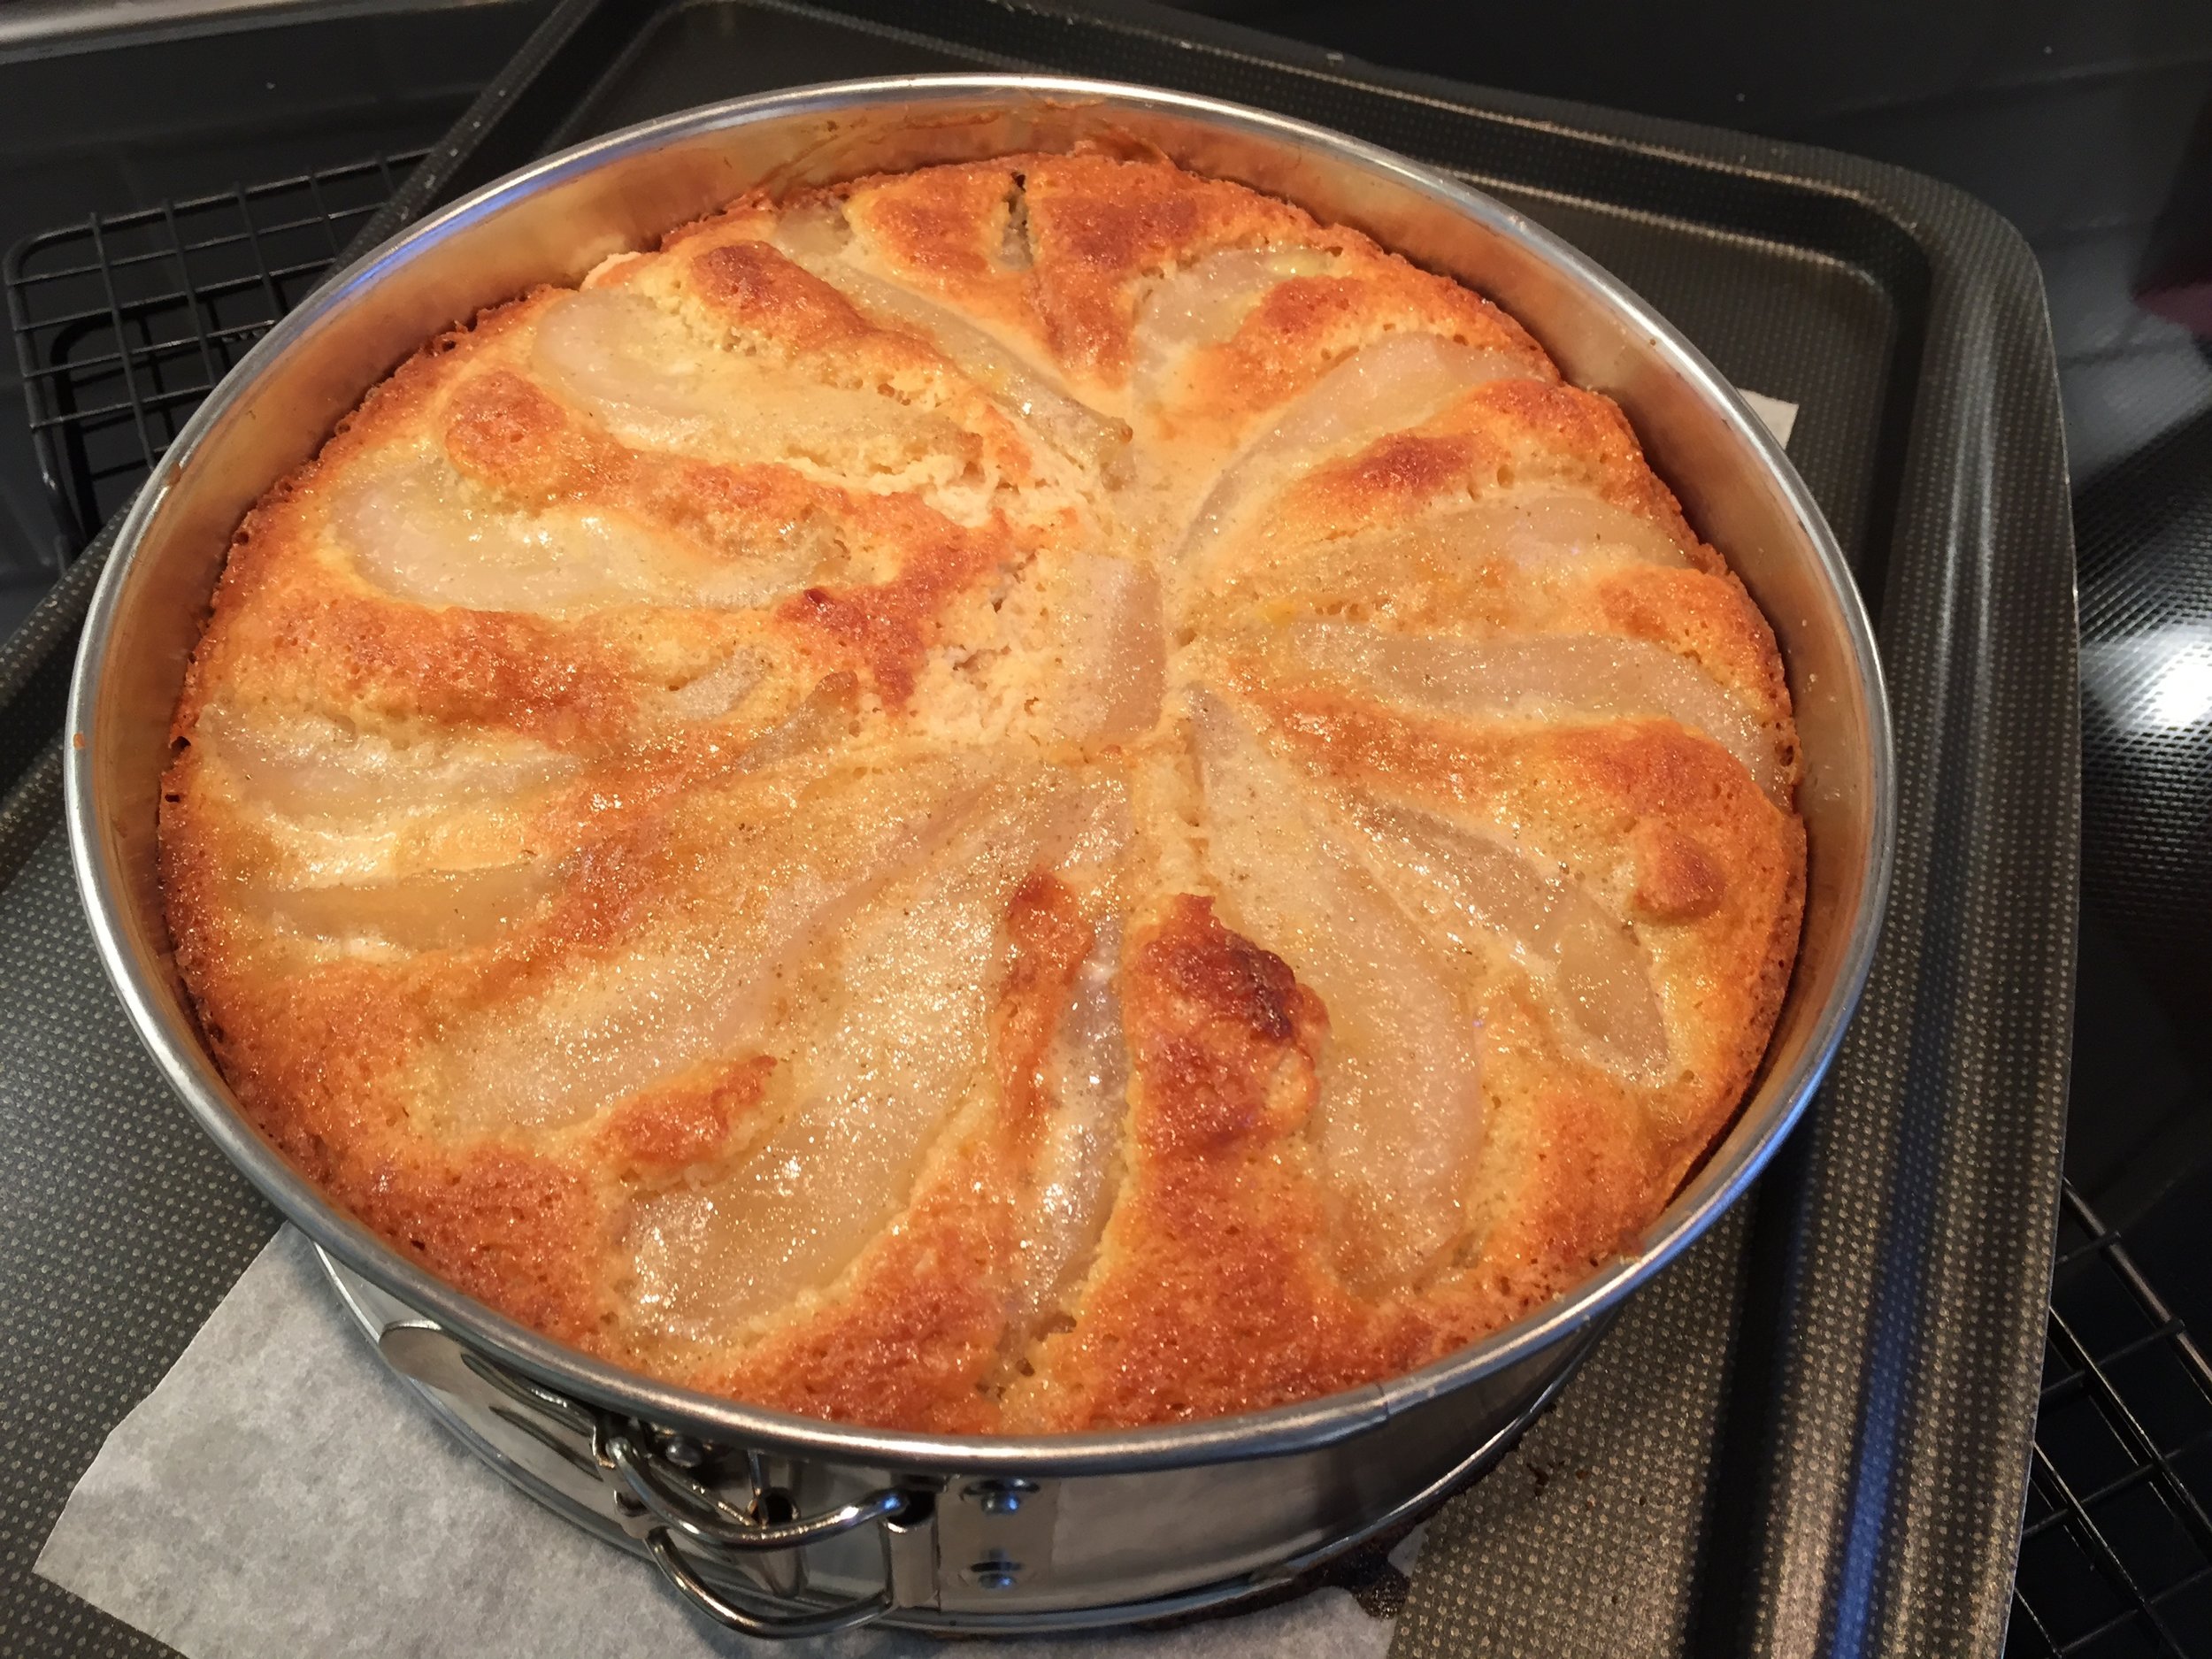
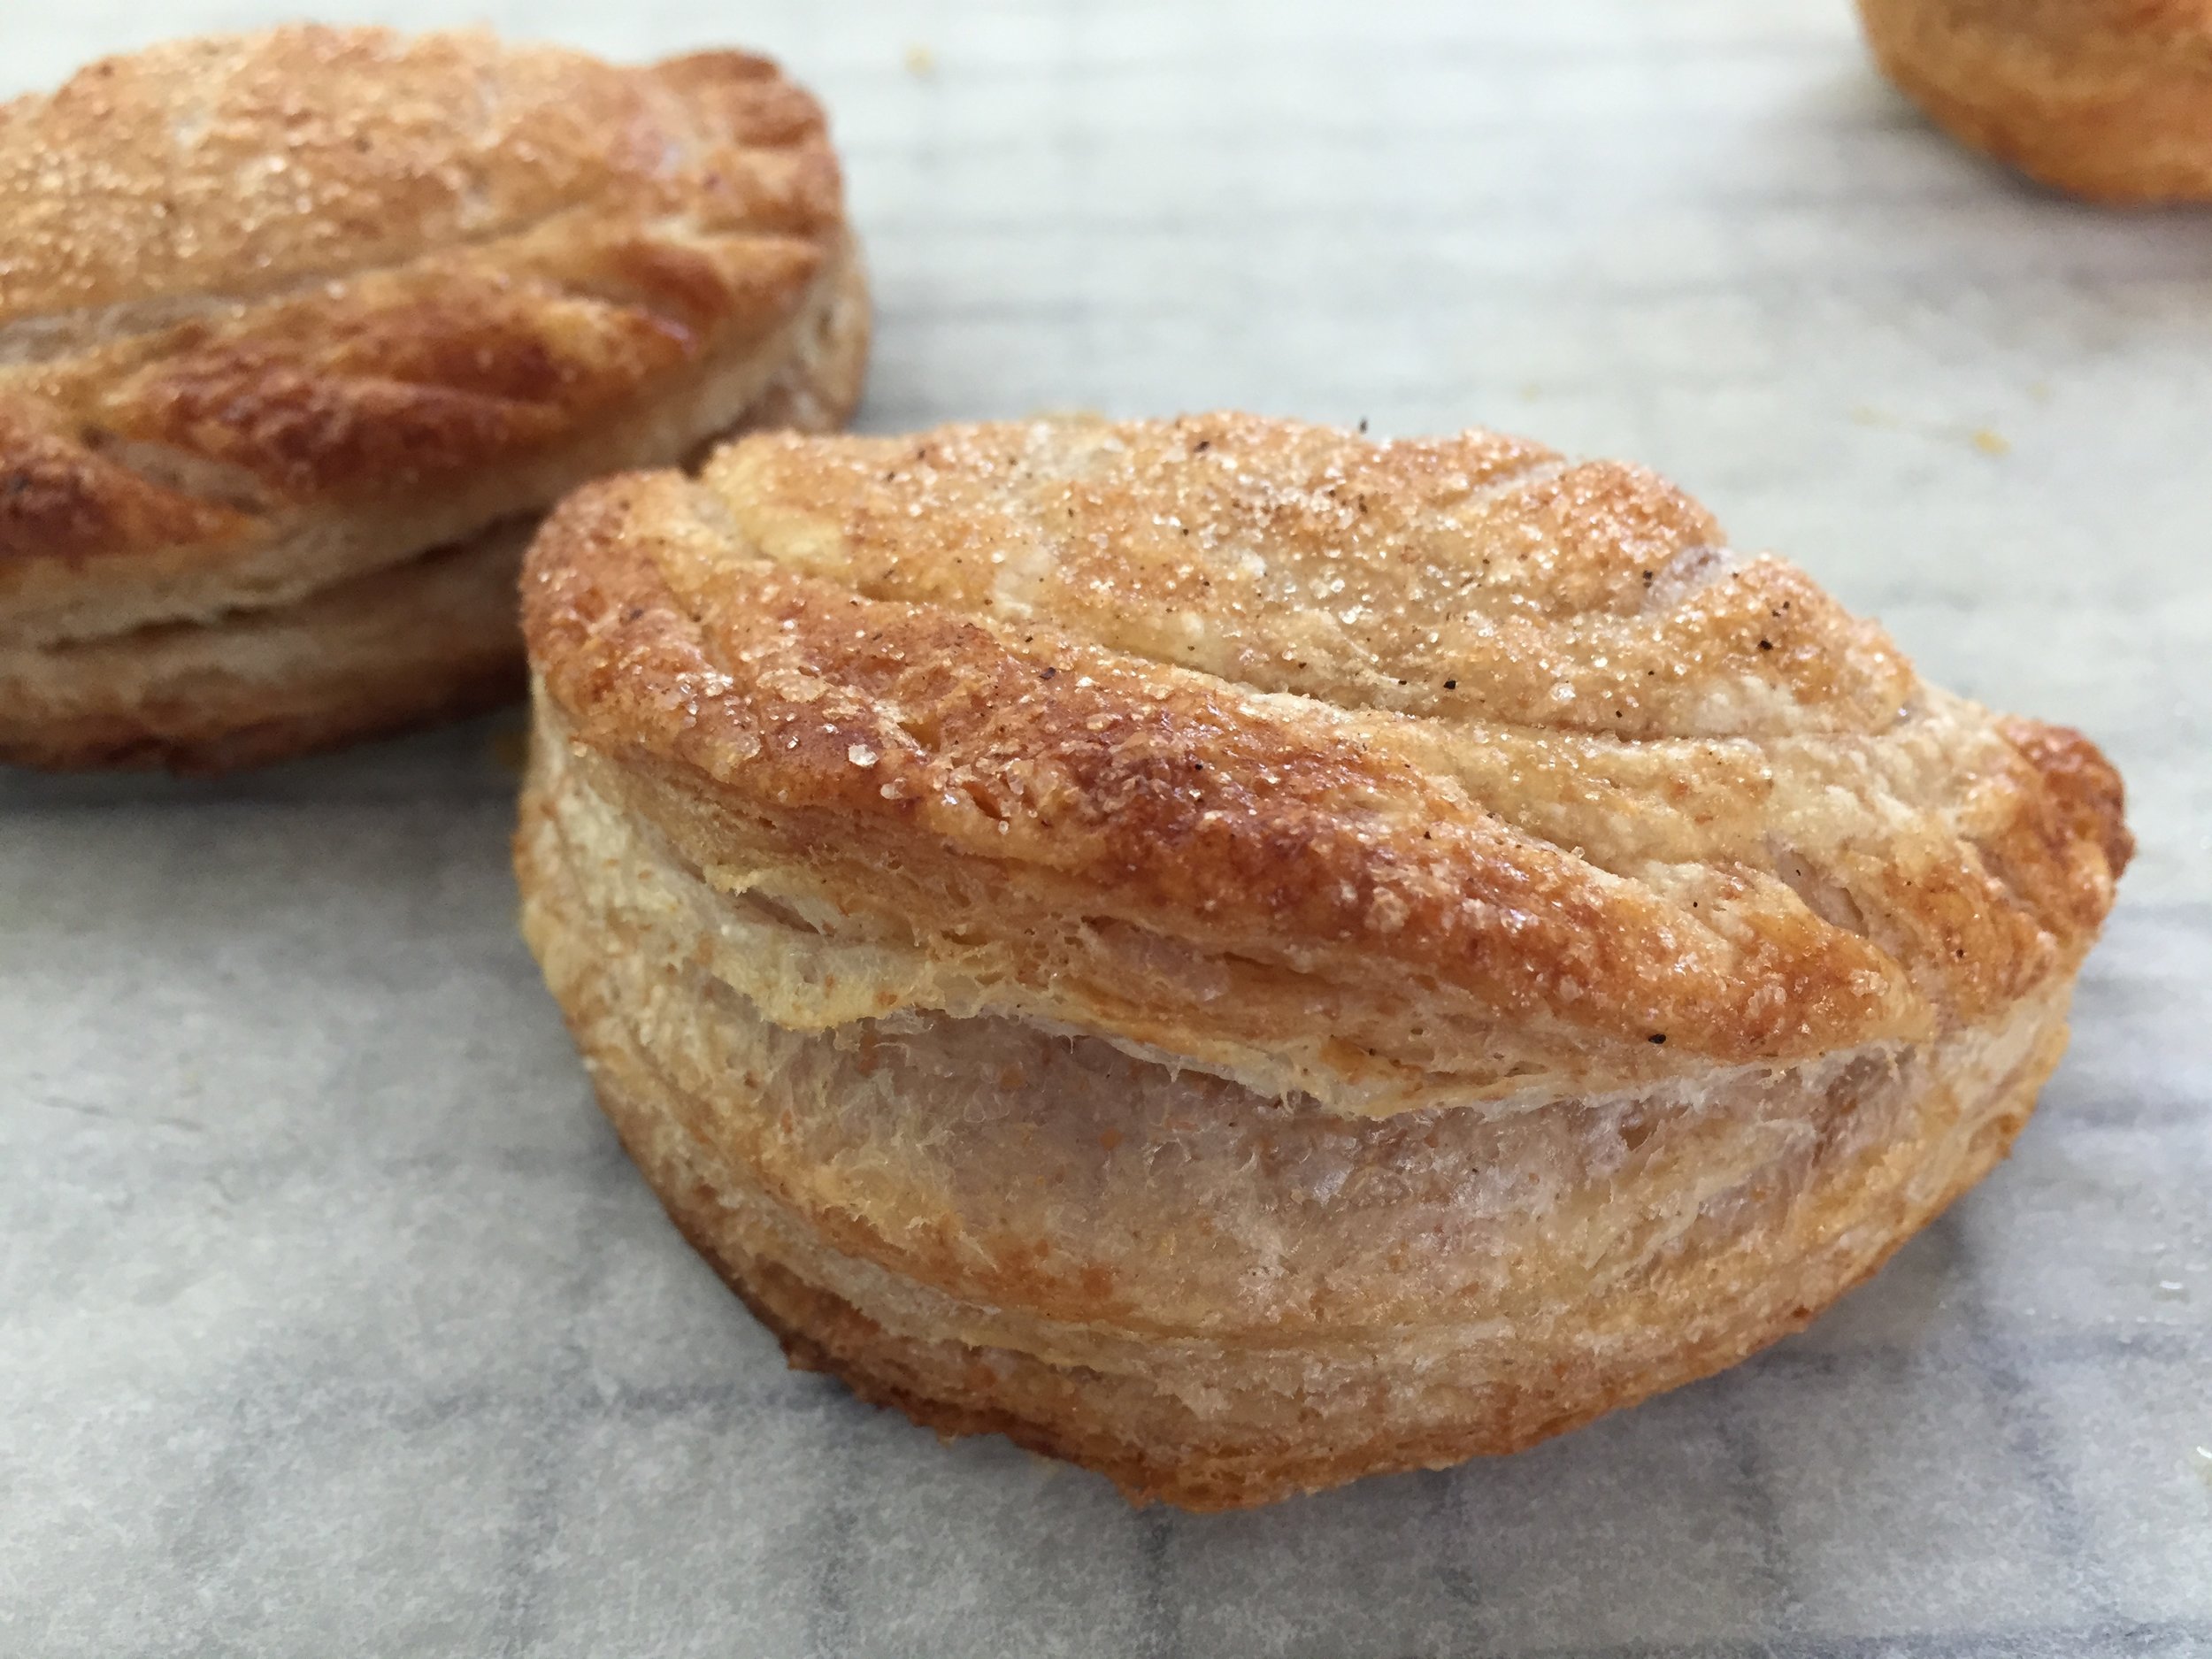
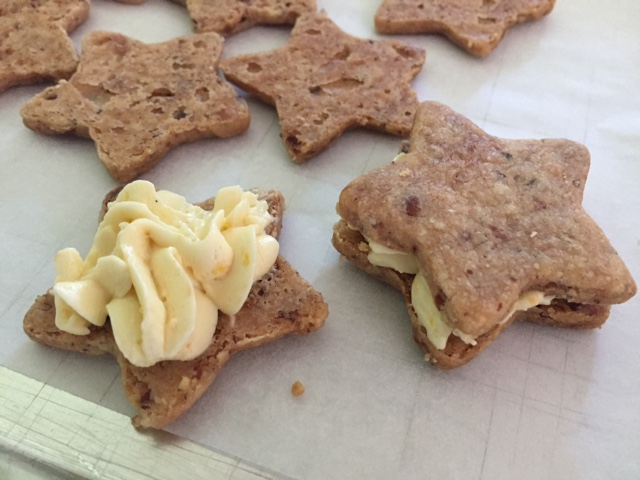
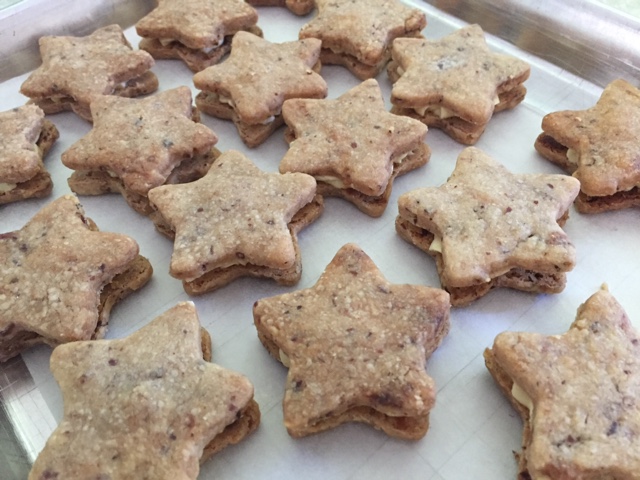
I sliced my spirals about an inch thick and, after trimming the irregular ends, had a yield of 16 slices.

IMG_2511.JPG
 
IMG_2514.JPG

Then it's on to a proof of about an hour under cover of lightly buttered film wrap, heating the oven to 350ºF and baking for about 25 minutes until nicely browned.

IMG_2518.JPG

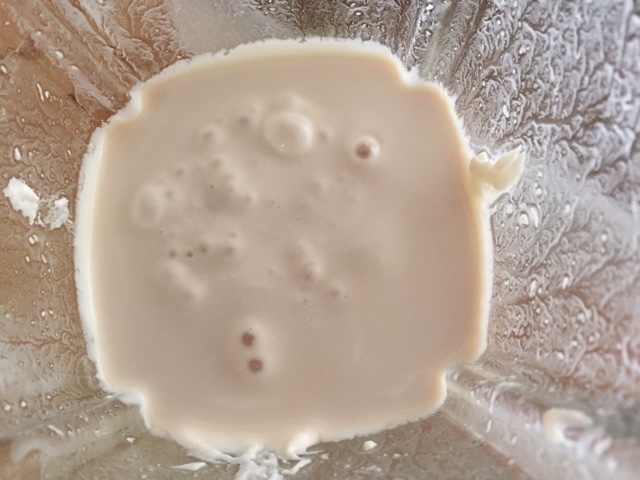
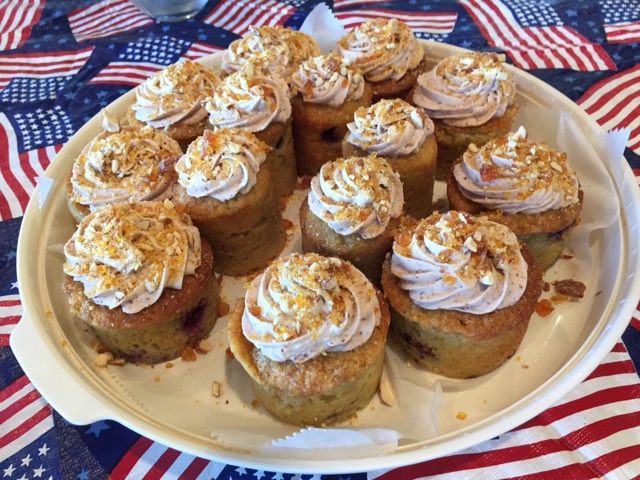
I must admit I feared they might be a tad dry, so I brushed on a mix made with 4 tablespoons melted butter and 4 tablespoon maple syrup right when they came out of the oven.

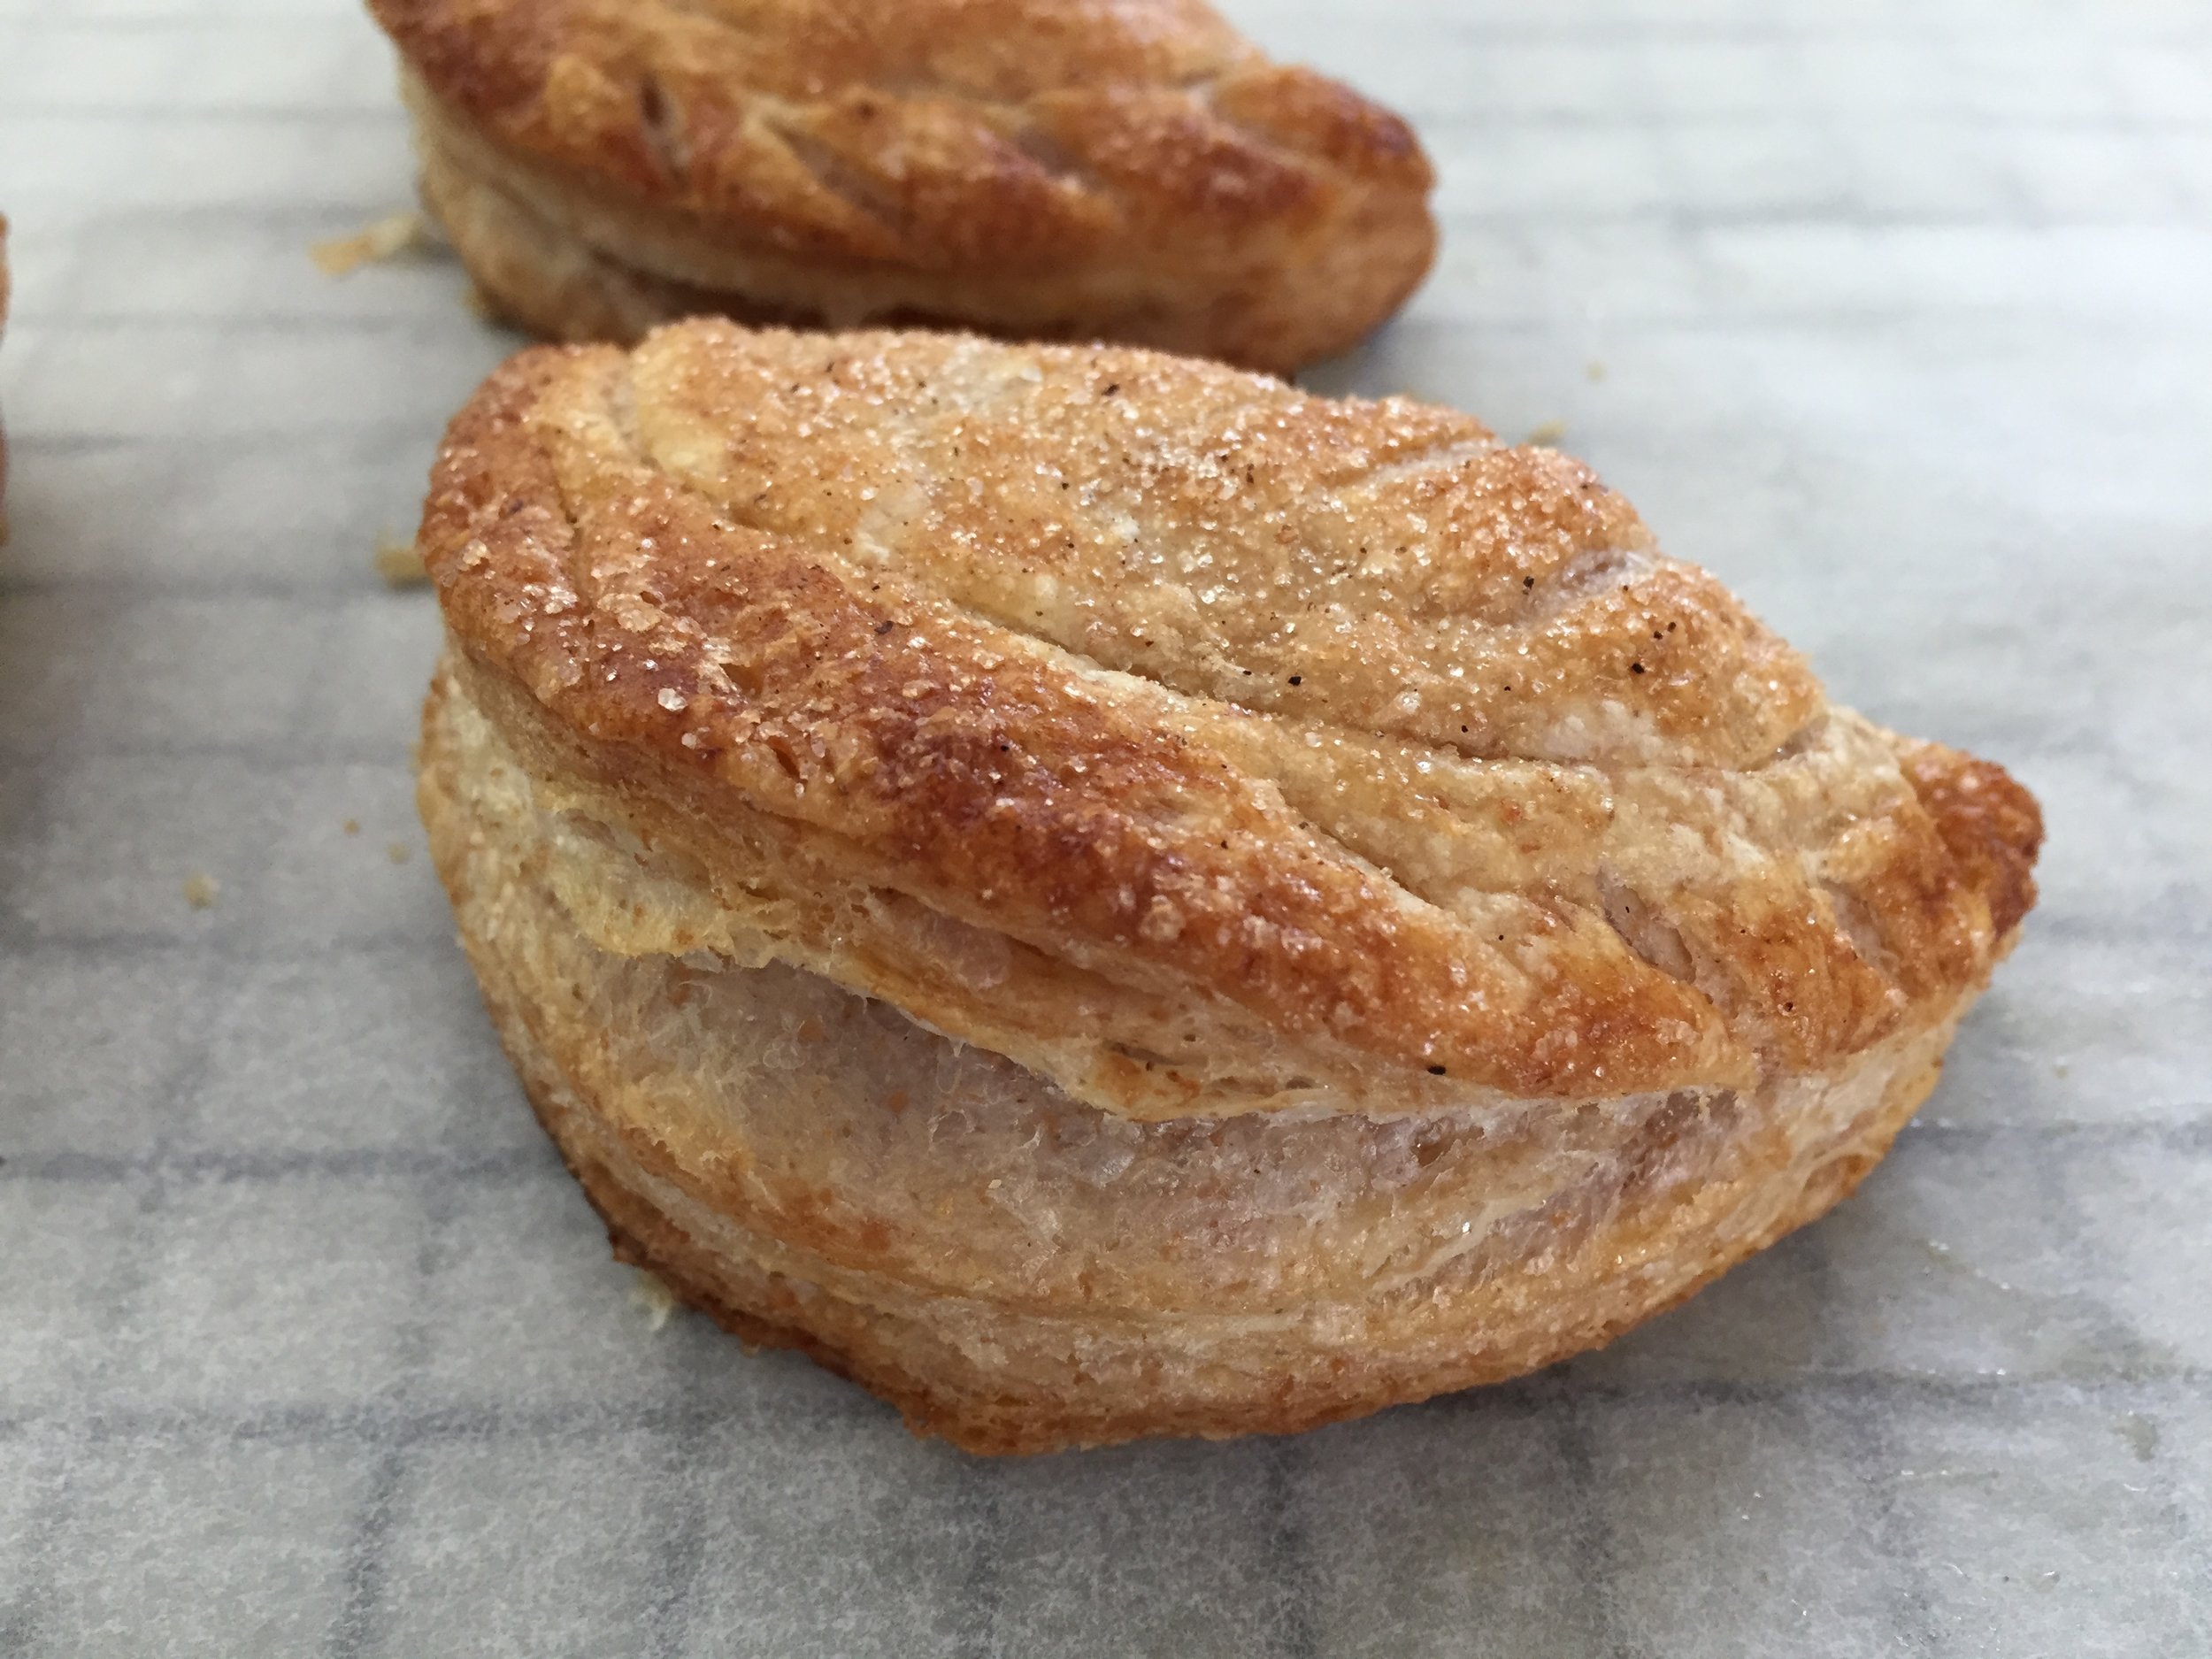
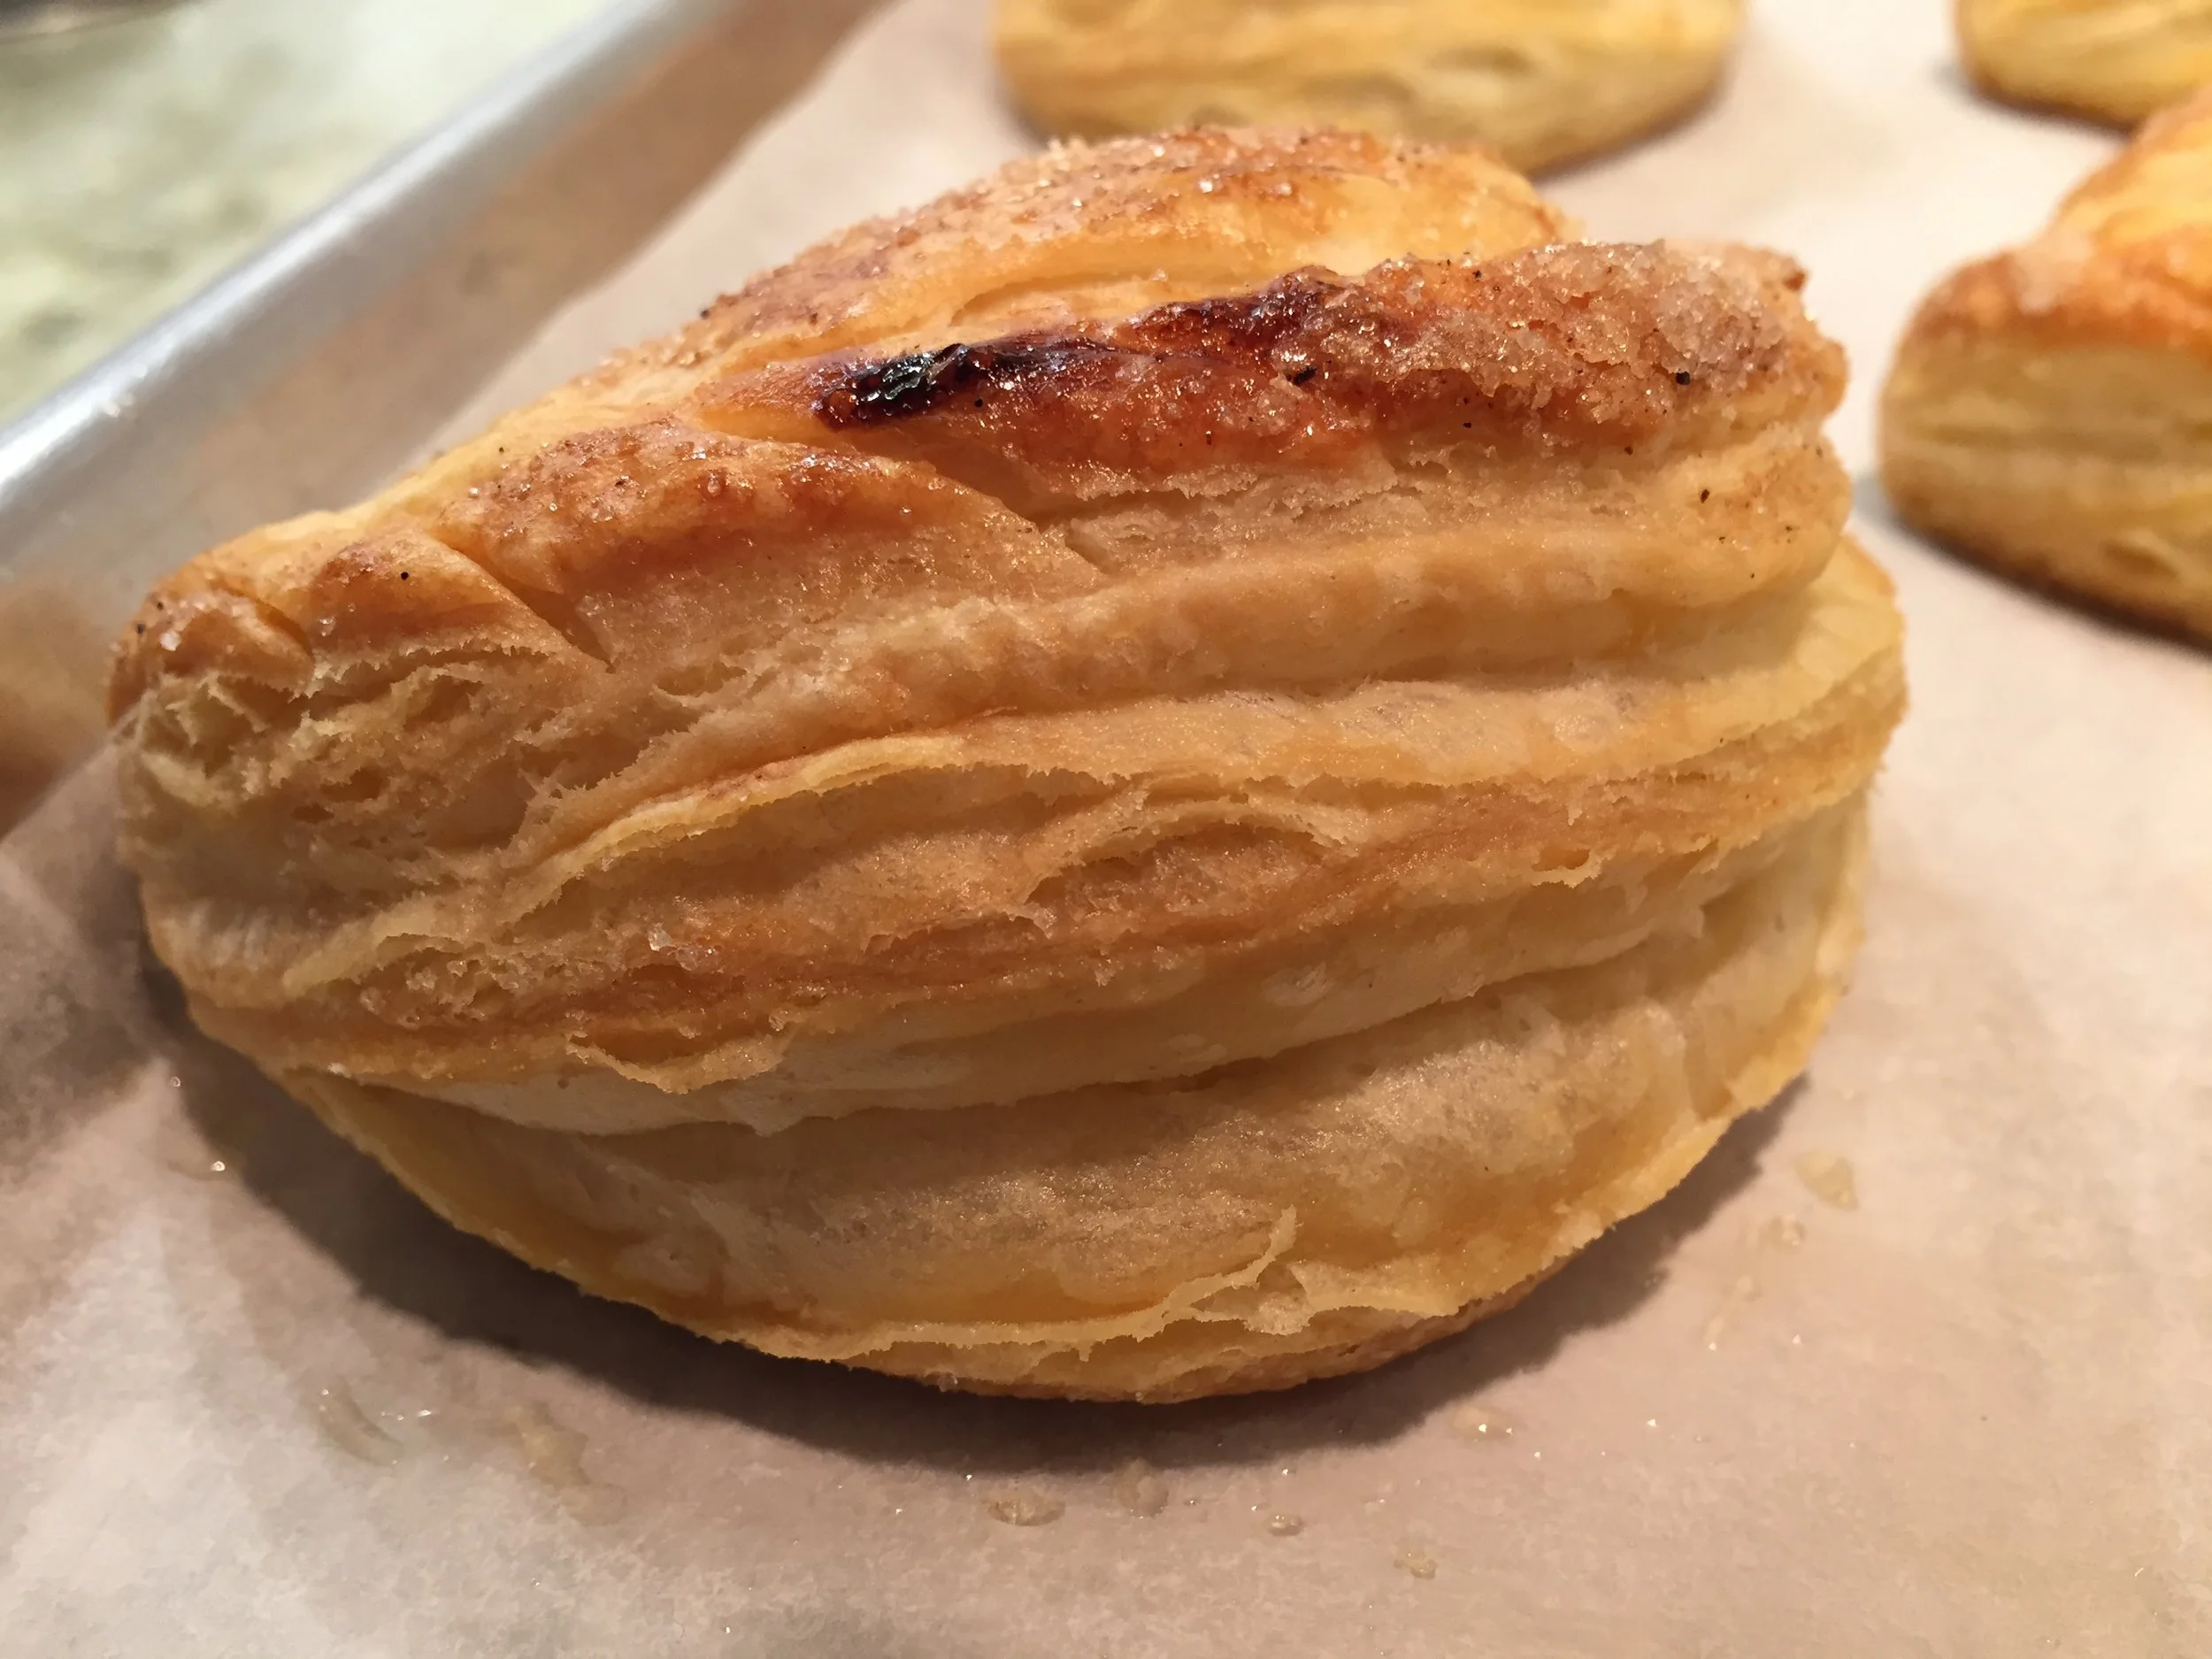
Once cooled, Steve and I did a taste test. Our diagnosis: something is missing! And so, back to the drawing board. This time I made a glaze with confectioner's sugar mixed with maple syrup and a bit of milk to a thin enough consistency that I could brush on a nice coating. Then back into the oven for a few minutes to set the glaze and voilà. It was the perfect solution!

IMG_2573.JPG

These spirals did not disappoint. Not too sweet, just the right hint of maple, a pleasant nutty crunch and a lovely texture to the dough all made for a delicious treat. Steve gave them a thumbs up, particularly with that last glaze addition.

IMG_2581.JPG

Now it's time for you to choose your favorite brioche dough and make your own version of spirals. How about a spread of lemon curd and a sprinkle of candied pistachios? Or a raspberry version of pastry cream along with mixed berries and some chopped white chocolate? Or crème d'amande with chopped candied orange peels and toasted sliced almonds? So many choices!

Whatever you decide, have fun. That's what counts.


Pear almond cake

pearalmond


This cake is inspired by a recipe in Ottolenghi and Goh's book "Sweet" - an apricot almond cake that I decided to change up to a pear version.

Although I usually think of pears as a fall/winter fruit, their flavor and usefulness in desserts still speaks to me now, with hints of spring in the air. This pear almond cake is dense, moist and oh so delicious! Truth be told, I baked this one in late January and am just getting around to writing about it now. Oh, how time flies.

Bartlett, Bosc or D'Anjou are my usual pear choices, although I must say I usually end up veering toward the Bosc end of the pear spectrum. I simply enjoy their flavor and texture.

I generally prefer to poach my own pears, especially since those that one buys in the grocery store are generally rock hard and need days to ripen appropriately. Poaching helps to coax out that ripened texture and allows them to be used sooner than you would if waiting for them to ripen naturally.

I create a poaching liquid using 2 parts water to 1 or 1.5 parts sugar, giving me a light-ish syrup. I like to add in some lemon zest, a grate or two of nutmeg and perhaps a pinch of ginger and a few pieces of star anise. Nice and lightly spiced. I peel, core and halve my pears. 

The key with poaching is low and slow. The most helpful thing for me is the cartouche -  essentially a round of parchment paper with a small hole created in the center to allow steam to escape, placed cozily over the pears to keep them submerged. It prevents sides or ends of pears from sticking out of the poaching liquid and developing an unsightly brown tinge. We simply can't have that, now can we?

pearpoach

I let them go until I see a change from a dense whitish color to a more translucent, buttery color. I then stick a fork in to see if the tines go in easily. We're done!

See the translucence!

See the translucence!

The cake is made with your basic ingredients - butter, sugar, egg, flour, a bit of salt, lemon zest, vanilla and almond extracts and some sour cream. A sprinkle of almond flour and the pears are nestled on top of the batter and then covered with an intriguing topping concoction made with butter, sugar, spices, salt and egg. Hmmm - this should be interesting.

Batter in!

Batter in!

Almond Flour sprinkled!

Almond Flour sprinkled!

Pears and topping on! ready to go into the oven

Pears and topping on! ready to go into the oven

Here it is just out of the oven. Looks good!

Here it is just out of the oven. Looks good!

pearalmondcake

Let's do the recipe! I outline the steps/ingredients below but you can click here for a PDF of the recipe.

1. Butter a 9" springform pan and line the bottom with parchment. Heat the oven to 375ºF.
2. Drain and blot dry your poached pears, then slice each half into quarters. You'll need a couple of pears total (more or less, depending on how you like to arrange your slices).
2. Make the topping: in a medium microwave safe bowl, melt 56 g (4 tablespoons) unsalted butter; stir in 100 g/1/2 cup granulated sugar, 1/2 teaspoon ground coriander, a pinch of ground ginger, a large pinch of salt; cool for a few minutes then stir in two large lightly beaten eggs and set aside.
3. For the cake, put 84 g/6 tablespoons unsalted, room temperature butter with 200 g/1 cup granulated sugar in your mixer bowl with the paddle attachment and beat on medium-high for a couple of minutes; add 2 large eggs, one at a time, blending each one in and scraping down the sides of the bowl a couple of times; blend in the zest of one lemon, a teaspoon of vanilla extract and 1/4 teaspoon almond extract.
4. In a separate bowl sift 220 g/1 3/4 cups all purpose flour with 10 g baking powder and 1/2 teaspoon salt; have 2/3 cup sour cream standing by as well.
5. With the mixer on low add the flour mixture to the butter/sugar/egg mixture alternating with the sour cream, beginning and ending with the flour.
6. Scrape the batter into the prepared pan, smooth the top with an offset spatula. Sprinkle 35 g/1/3 cup almond flour over the batter, then arrange your pear slices in a design of your liking.
7. Now spoon/pour the topping mixture over the whole shebang!
8. Bake this baby for about an hour until a tester into the middle comes out clean. Always watch what's going on in there folks!. Cool in the pan for about 20 minutes before unmolding. 
9. Serve warm or at room temperature.

I chose to top it with some lightly sweetened whipped cream (although my cream seemed to have lost some of it's whip!).

This was absolutely delicious! And Steve liked it too. Yay!!!

IMG_2410.JPG

Quick puff pastry adventures

quickpuff

For several years now my standard approach to puff pastry making has been the reverse approach, or, as the French call it, pâte feuilletée inversée. It comes out so wonderfully flaky and light, buttery and delicious. Check out my post about the process here.

Chausson aux pommes (apple turnovers) are perhaps my favorite goodie to make with puff - the marriage of tart apples sautéed in vanilla sugar, butter and a generous squirt or two of my caramel sauce and then encased in the buttery goodness of puff is a marriage made in heaven.

As I continue to incorporate more whole wheat into my baking, I decided to give a spelt version of quick puff pastry a try. Spelt is considered one of the "ancient grains" descended from wheat. It has a mild, nutty flavor and, although it contains gluten, it has less than whole wheat or white flour. Substituting spelt flour for white flour may make baked goods more tolerable and enjoyable for people with gluten sensitivity. 

Spelt quick puff in progress

Spelt quick puff in progress

As usual, I compared various recipes for classic puff, reverse puff and quick or "rough-puff" versions. Generally the flour to butter ratio is close to 1:1 in puff recipes. The other ingredients are water and salt and, while those quantities vary a bit, the water can range from 0.3 to 0.5 of the flour by weight (it's generally lower in quick puff than in classic puff).

IMG_2428.JPG

The process with quick or rough puff pastry is simply to cube up the butter, "sand" it into the flour and salt, add the water and then turn it out onto a work surface to form it into a rough, crumbly rectangle. It eliminates the steps required in classic puff pastry of creating the butter block and enveloping it in the dètrempe before proceeding with the folds.

You put the crumbly rectangle through three 3-folds, during which it starts becoming a cohesive dough. Let it rest wrapped in the fridge for 30 minutes or so and repeat three more 3-folds. Give it an hour rest in the fridge and you're ready to go.

My plan was to make a half recipe and analyze the result. I went with a version using a higher ratio of butter to flour, along with a little less water than a classic puff.

My half recipe called for 320 g cold unsalted butter, 140 g all purpose flour, 145 g spelt flour, 1 teaspoon salt and 120 ml cold water. So, as a conscientious pastry chef will do, I weighed everything out, cubed up my butter and prepared to make my dough.

Into the mixer bowl go the flours, salt and cubed butter which are mixed until the butter begins to break up into smaller pieces. Add the water and mix briefly to incorporate with a resulting crumbly concoction.

OH NO!! Too much water. In my attempts at weighing precision, I neglected to reduce the water in the full recipe by half and in went the FULL amount. As soon as I added it, I realized what I had done. What was supposed to be a crumbly mixture was wet indeed. What to do? Regroup, of course.

I weighed out an additional 140 g all purpose and 145 g spelt flour, blended it in to my wet mixture and turned out the now crumbly dough onto my work surface, forming a rough rectangle. Essentially I moved up from my intended half recipe to a full one. 

I then cubed up another 320 g butter, started the first 3-fold, putting a portion of the butter on a third of my rectangle which I then enclosed by finishing the fold. Are you confused yet? 

speltquickpuff

After the first 3-fold was completed I distributed the remaining butter on top of it. 

IMG_2430.JPG

I pressed the butter into the dough then rolled it out and did my second 3-fold. I think this is going to work! Crumbly but OK.

fullsizeoutput_1a0.jpeg

You don't need to see every step, but, the good news is this dough came together very nicely with the ensuing folds. Amazing how dough can be transformed, isn't it?

IMG_2435.JPG

I divided the finished dough into three pieces, wrapped them well and popped them into the freezer until I was ready to give the quick spelt puff a try.

My first practice session with this dough involved chausson aux pommes and a simple blind baked tartlet shell, just to see how it would behave.

chausson
quickpuff
quickpuff

As you can see there's pretty good puffing going on here. The tartlet shell was really puffed up in the center, even though I pricked it all over with a fork and weighted it for most of the baking time. Once I removed the weights and finished the bake, it kept on a'puffing! What you see above is after I had pushed down the center layers to make room for a filling.

Although the chausson puffed up very nicely, I do have to admit that chausson made with reverse puff bake up oh so loverly, as the Brits would say. Witness that very thing in the photo below.

Isn't that just beautiful??

Isn't that just beautiful??

I truly enjoyed the flavor of the quick spelt puff - a bit more nutty and wheat-y than puff made with traditional all purpose flour. It's all about experimenting, eh?

The bottom line? Making mistakes is a great way to learn, and weighing ingredients is very helpful when having to correct those mistakes. Yes indeedy.

Quick puff is fun to make and has a very useful place in the pastry kitchen, particularly for things like tarts (both sweet and savory), quiches, turnovers and even cheese straws and palmiers. Go for it!

Here's the basic quick puff recipe (the FULL one!).

640 g cold, unsalted butter in 1/2 inch cubes
280 g all purpose flour
290 g spelt flour
2 teaspoons salt
240 ml cold water

1. Place the flours and salt in the bowl of a stand mixer with the paddle attachement
2. Add the butter and mix on low speed until the butter is coated and starting to break up into smaller pieces
3. Add the water and mix briefly to incorporate. The dough will be crumbly.
4. Turn the dough out onto a lightly floured work surface and form into a rectangle about an inch thick.
5. Use that wonderful bench scraper of yours to assist in performing a three-fold. Turn the dough 90 degrees and press it again into a one inch thick rectangle. Do another three fold, then repeat the steps one more time, giving you a dough with 3 three folds. As you go, it should start holding together more and more.
6. Wrap the dough in plastic wrap and chill for an hour.
7.  Now with the help of your favorite rolling pin, roll the dough into a rectangle about 1/2" thick, do a three-fold, turn 90 degrees and repeat another one. Turn 90 degrees again and do the last three-fold. You'll now have a finished dough with a total of 6 three-folds.
8. Wrap in plastic wrap and chill an hour before using. You may also wrap and freeze it for later use.

Now get into that kitchen of yours and play!

IMG_2456.JPG


Nutty apricot tea cakes

apricotcake

Some of you may realize by now that I'm always reading baking and pastry books and lately have been thinking of ways to increase my use of nuts, seeds and whole grains in my baking endeavors. Often my projects come about as a way of using up ingredients I happen to have in my fridge or cupboard. What's not to like about that, eh?

This time I was intent on some apricot purée that's been in my freezer for a few months - time to make something tasty! And, to top it off, I had some buttermilk in the fridge that simply HAD to go into something hearty, healthy and delicious.

apricotteacake

This is my take on a pretty basic tea cake recipe that turns out deliciously moist with a bit of crunch from nuts and pumpkin seeds. It actually reminds me of both date nut and Boston brown bread that we used to eat when we were kids - hard to describe the fruity side of those, but if you've eaten those particular goodies, you know what I'm talkin 'bout.

For this project I used both whole wheat pastry and all purpose flours, along with some of my favorite spices, coriander and ginger, plus a dash of cinnamon. I generally tone down or don't use cinnamon at all in my baking, since the Steve-meister holds an odd aversion to that particular spice.

It's a straight forward cake process - whisk together the dry ingredients in a separate bowl, cream the butter and sugars, add the fruit puree, add the eggs, then alternate the addition of the dry ingredients and buttermilk. Pretty basic. With this one, some of the chopped walnuts, pecans and pumpkin seeds are added to the dry ingredients and a small portion are set aside for garnish before baking.

Two of my favorite straight-sided Silikomart flexi-molds were given the honor for the baking process - one smaller/taller and one wider/shorter - both muffin style and shapes I find just so right for tea cakes.

Ready for the oven

Ready for the oven

All baked up

All baked up

These babies baked up moist and dense from the presence of the apricot purée, and the nuts and pumpkin seeds added just the right crunch.

nuttyapricot

Here's the recipe PDF as well as outlined below. This makes two 9"x5" loaves or many small cakes, depending on the size mold you choose.

  • Approximately 45 g (1/2 cup) each walnuts and pecans (or choose your own nuts)

  • 85 g (scant 3/4 cup) pumpkin seeds

  • 290 g (2 1/4 cup) all purpose flour

  • 150 g (1 1/4 cup) whole wheat pastry flour

  • 2 teaspoons baking soda

  • 2 teaspoons baking powder

  • 1 1/2 teaspoons salt

  • 1 teaspoon ground coriander

  • 1/4 teaspoon ground ginger

  • several fresh grates of nutmeg (you decide - I prefer my nutmeg on the subtle side)

  • a pinch of cinnamon (or more to your taste)

  • 227 g (8 ounces) unsalted butter, room temperature

  • 185 g (scant well packed cup) brown sugar (I used light but try dark if you'd prefer)

  • 200 g (1 cup) granulated sugar

  • Approximately 350 g (~12 ounces) apricot puree (or try pear or pumpkin!)

  • 4 large eggs, room temperature

  • 180 ml (3/4 cup) buttermilk, room temperature

1. Heat the oven to 350ºF.
2. Spread walnuts, pecans and pumpkin seeds on a sheet pan. Toast for about 10 minutes until fragrant. Once cooled, do a medium-fine chop.
3. Reduce the oven to 325ºF. Have your silicone molds at the ready (no buttering necessary), or, if using two 9"x5" loaf pans, butter and flour them.
4. In a separate bowl whisk together the two flours, baking soda, baking powder, salt and spices.  Stir in the chopped nuts and seeds but reserve a few tablespoons for garnish.
5. In the bowl of a stand mixer fitted with the paddle attachment, combine butter and sugars and mix on medium high until will blended. Scrape down the sides of the bowl.
6. Add apricot purée and mix for a couple of minutes until incorporated. Add in eggs, one at a time, mixing each until blended before adding the next.
7. Now add the flour/spice mixture alternating with buttermilk, beginning and ending with the flour. Mix until just combined and finish off by hand with a spatula.
8. Pour the batter into your chosen molds or pans, smooth tops, sprinkle reserved nuts/seeds on top and pop into the oven.
9. Bake small cakes around 20 minutes - remember - it's your job to keep an eye on things! You're looking for a tester inserted in the center to come out clean. Large loaves bake 50-60 minutes.
10. Let your cakes cool on a wire rack for 15-20 minutes before unmolding, then let cool completely before storing in an airtight container. These will keep at room temp for several days, or wrap and freeze them for up to two months.

Enjoy!

nuttyapricot

Cran-oat-almond shortbread

Before we jump in, don't forget to check out this month's specialties - Valentine's goodies and my favorite chocolate ganache tart!

cranoat

Recently inspired by Yotam Ottolenghi and Helen Goh's book "Sweet", I put together these absolutely wonderful shortbread cookies (or biscuits as the Brits would say) full of cranberries, oats and almonds. You can choose whether you'd like a white chocolate garnish or prefer them au naturel. Either way they are SO GOOD.

cranoat

Some of the ingredients require a bit of prep before putting the final dough together - chop cranberries and soak them in OJ; toast, cool and chop almonds; have butter at room temp - that kind of stuff. Simple but requires some planning on your part. It comes back to that important and well worn advice - always read the recipe through at least twice before you begin.

cranoat

I tweaked the recipe, which calls for both all purpose and whole wheat flour, to create my own version using white whole wheat flour and whole wheat pastry flour. As I continue to experiment with different whole grain flours, it's fun to learn about the various nuances of each.

White whole wheat flour is ground from hard white whole wheat, whereas whole wheat pastry flour comes from whole grain soft white wheat. Each contains all the nutrients that come from the whole grain, including the outer bran full of fiber, B vitamins and trace minerals and the small central germ containing antioxidants, vitamin E, B vitamins and healthy fats.

Whole wheat pastry flour is softer and thus lends itself well to things like scones, biscuits, flaky pie and tart crusts and fluffy pancakes. I'll be playing around with different combos and variations as time goes on. Cool. Always so much to learn.

cranoat

Now for my version of the recipe and many thanks to Yotam and Helen!

1. Heat your oven to 350ºF. Have a couple of 1/2 sheet pans lined with parchment at the ready.
2. Chop 125 g dried cranberries in half (unless they're already chopped), place them in a microwave safe bowl in 25 ml of orange juice and zap for about 10 seconds. Let them soak while you're getting other things ready. 
3. Place 150 g natural raw skin-on almonds on a baking sheet and toast for 10 minutes. Let cool, rough chop and place in a large bowl.
4. Add 175 g white whole wheat flour, 50 g whole wheat pastry flour, 150 g old fashioned oats and 1/4 teaspoon salt to the bowl with the almonds. Set aside.
5. Put 227 g room temperature unsalted butter, 100 g granulated sugar into which you've rubbed the zest of one or two large oranges (use two for that extra citrus zip!) into a mixer bowl with the paddle attachment. Beat on medium about 2 minutes until blended and light.
6. Add the nut-oat-flour mixture and beat on low to bring it together.
7. Add in the cranberries along with the orange juice and combine on low to mix in.
8. Turn the dough out onto a lightly floured work surface, bring it into a ball and divide in half. Roll each half to about 1/4 thick. I find it works well, particularly with a slightly sticky dough, to roll between two pieces of film wrap - keeps things neat!
9. Chill the dough for an hour or so before cutting out. Choose whatever shape and size you'd like, cut and place on the parchment lined sheets. As you can see I tried some different versions.
10. Bake about 18 minutes until lightly browned. Cool completely.

cranoat

If you choose to garnish your cookies with white chocolate, either drizzled, edge-dipped or spread in a layer, I found it worked best for me to microwave my Guittard wafers at half power for 30-45 second bursts, stirring until melted. My results are rustic for sure, but I. LOVE. THESE. COOKIES.

cranoat

Multi-grains and seeds bread

multigrain

It's the new year and wouldn't you know it's time to bake bread again? The wonderful news is that Steve and I just purchased our tickets to Paris for April!! Yippee yo-kiyay my friends. And to top it off I've signed up for a 4 day bread class at Le Cordon Bleu, my alma mater. Yessirree.

This bread is chock full of seeds, grains, cranberries and walnuts and is thanks to a recipe on King Arthur Flour's website. As I continue to focus on adding more whole grains into my baking, I often turn to KAF for suggestions and products. Thus I am now the proud owner of a couple of their different grain blends. 

One is a whole grain flour blend containing all sorts of goodies.

wholegrain

Here's a closer look at the ingredients. What's not to like, eh?

flourblend

The other is their Harvest Grain Blend full of good stuff.

harvestgrain
harvestgrain

The recipe makes two typical loaves, baked in standard loaf pans. It has a fair amount of molasses in it, giving it a dark, hearty appearance.

wholegrain

I made some adjustments in the recipe to tailor it to the ingredients I had on hand. It's a straight forward direct dough method of mixing, rising, etc.

Once everything is mixed together, the dough can be kneaded either by hand or in a stand mixer with the dough hook for 7-10 minutes to achieve a springy yet sticky dough. This step is always the most challenging for me - knowing just when a wet/sticky dough is at the right stage. Gotta just keep on doing it over and over and over!

The dough goes into a lightly oiled bowl, covered, and allowed to rise for a couple of hours "until noticeably expanded". Recognizing THAT stage is another step that comes with lots of practice!

Before the first rise

Before the first rise

I hope you can appreciate the expansion of the dough - it may be subtle, but not as much of the bowl is visible now.

After the first rise

After the first rise

Deflate the dough, divide and shape into two logs. Place them in lightly oiled loaf pans.

multigrain

Cover the pans and let rise 1-2 hours until the center of the loaves is about an inch above the rim of the pans. I'd say these babies have poofed up nicely.

multigrain

Toward the end of the second rise, heat your oven to 350ºF. Bake 40-50 minutes, tenting with foil about half way through to prevent over browning (it's that molasses, don't ya know!). The internal temperature should be 200ºF.

Take the loaves out of the oven and turn them out of the pans onto a cooling rack.

multigrain

Waiting for freshly baked bread to cool is sooooo hard! But wait I did. I enjoyed my first slice just plain . . . .

multigrain

 but the second received a well deserved thin layer of butter. Yum.

multigrain

And a nice slice of cheddar cheese ain't bad either.

This is definitely worth a repeat. I gave a loaf to friend Margaret for her birthday and we both agreed that the molasses was a bit over the top. Buuuuuttt . . .  otherwise it's a hearty, crunchy, full of goodness loaf. Next time I'll replace a portion of the molasses with honey and see where it takes me. The adventure is always good.

Here's my version of the recipe.

1. Whisk together 454 g tepid water, 1 large egg and 170 g molasses in a large bowl (your stand mixer bowl if kneading that way).
2. Add 16 g Kosher salt, 13 g instant yeast, 113 g softened butter, 142 g Harvest Grains Blend and 340 g Whole Grain Flour Blend. Stir to combine.
3. Stir in 113 g finely chopped walnuts and 128 g dried cranberries. Add 454 g bread flour and mix until it comes together.
4. Knead for 7-10 minutes until springy but still quite sticky.
5. Place dough in a lightly oiled bowl, cover and let rise about 2 hours until noticeably expanded.
6. Deflate the dough, divide in two and shape each half into a log. Place each log in a lightly oiled pan.
7. Cover and let rise 1-2 hours until the center of the dough has risen about 1" above the pan rim.
8. Heat oven to 350ºF. Bake for 40-50 minutes, tenting with foil about half way through. The internal temperature should be 200ºF.
9. Remove the loaves from the oven, turn out of the pans onto a cooling rack.
10. Let cool , slice and enjoy!


Hazelnut dacquoise tarte

hazelmeringue

This little project came about as a way of creating a dessert for another recent family dinner at cousin Jen's house. Steve, as usual, requested something with chocolate, and since I wanted to keep it on the lighter side, I decided on a nutty meringue base (known as dacquoise) as the launch for what was to come. Cue in chocolate ganache, chocolate crunchy crumbs and fresh berries. Not a bad way to go.

I used my rectangular tart form to outline the shape in which I wanted to pipe my meringue. The pics below give you a nifty technique with which to create the area you'd like to fill.

Place your desired form/shape on your lined sheet pan (I'm using silpat here since it's my fave for baking meringues), dust around the edges with powdered sugar . . . 

tartform

then simply lift off the form and your outline is staring you right in the face. How cool is that?!

tartform

Now pipe away!! The powdered sugar won't hurt a thing since the meringue receives a dusting anyway before going in the oven.

All piped out

All piped out

The meringue bakes at 350ºF for about 20 minutes until nicely browned.

dacq

The beauty of meringue is its make-ahead-ability. Do it several days ahead and freeze it or, if doing it the day before, just lightly wrap it at room temperature until you're ready for the next step.

Time to assemble. For this one I poured a thin layer of a standard 1:1 ganache made with 61% Guittard chocolate over the base, inside the raised edge. I let it set a bit.

dacq

Then a light layer of chocolate shortbread crunchy crumbs . . .

dacq

and to finish off a whipped chocolate ganache made with the same Guittard chocolate in a 3:1 cream to chocolate ratio, more crunchies and some lovely fresh berries.

hazelmeringue

And just to show you another version, here's a small round base I made with the same hazelnut meringue. This one got a sprinkle of chopped hazelnuts too. Create your own and top it with whatever your little heart desires!

dacq

Here's the PDF of the recipe for the hazelnut meringue, also listed below. It makes just the right amount to create both the 11"x4" rectangle and the 6"-ish/16 cm round forms you see here. Play around with your own shapes and sizes.

  • 198 g egg whites (about 6 large) at room temperature

  • 50 g cane sugar (many use superfine sugar for meringues - sometimes I do, sometimes I don't)

  • 198 g hazelnut flour or meal

  • 150 g powdered sugar

  1. Heat the oven to 350ºF (or 325º convection)

  2. Whisk the hazelnut flour and powdered sugar together in a medium bowl.

  3. Place the egg whites in the bowl of a stand mixer fitted with the whisk attachment. Whisk on low for several minutes until a nice foam starts developing, then shower in the granulated sugar on medium-low speed until it's all added.

  4. Up the speed to high and whisk to medium stiff peaks.

  5. Fold in half of the hazelnut mixture, then add the second half and fold until nicely combined.

  6. Pipe or spread your meringue in the shape of your choice.

  7. Bake about 20 minutes until nicely browned. Pay attention to what's going on in that oven!!

Once your base is cool proceed with your choice of filling. The sky's the limit. And remember you can sub in pretty much any nut flour for the hazelnut in the meringue recipe. Even do half-and-half of two different nuts. Yes!

Here are just a few filling ideas: a simple lightly sweetened Chantilly cream topped with fresh berries; a tangy citrus curd lightened with whipped cream and topped with tropical fruits and maybe even a little toasted coconut; any whipped ganache using white, milk or dark chocolate topped with your own version of shortbread crumbs - how about chai or ginger - and your favorite nut, seed or sesame brittle; a standard pastry cream topped with lightly poached pear slices, some candied nuts and a drizzle of caramel.

It's up to you!

Looking back, looking ahead

Shortbread assortment

Shortbread assortment

As 2017 comes to a close, it's always fun to look back over the year and remember some of the goodies that came out of The French Tarte's kitchen.

As we contemplate the new year ahead, here are a few images for you, some from posts actually written and some from just playing around in the kitchen, trying a new thing or two.

Enjoy and Happy New Year!

Beer bread

Beer bread

Apricot croissant bites

Apricot croissant bites

Matcha raspberry hearts

Matcha raspberry hearts

Chocolate pecan babka

Chocolate pecan babka

Ganache brownie bites

Ganache brownie bites

Cherry blueberry yogurt cake

Cherry blueberry yogurt cake

Cheesy asparagus tomato pizza 

Cheesy asparagus tomato pizza 

Classic dinner rolls

Classic dinner rolls

Peach blueberry galette

Peach blueberry galette

Ice cream quartet

Ice cream quartet

Peach apricot jalousie

Peach apricot jalousie

Petite almond croissant

Petite almond croissant

Caramel pear apple tart

Caramel pear apple tart

Autumn shortbread gift boxes

Autumn shortbread gift boxes

Chocolate cherry pecan clusters

Chocolate cherry pecan clusters

Cheesy knot rolls

Cheesy knot rolls

And last but not least, my latest in shortbread trials. Chock full of cran-chewy, almond-chunky, oat goodness with a lovely complement of subtle smooth white chocolate. I think I like these! 

Cranberry almond white chocolate shortbread

Cranberry almond white chocolate shortbread

Here's to a year of health, contentment, good times with family and friends and, of course many new adventures in baking. Cheers!

Buckwheat cranberry cake

buckwheatcrancake

These little babies came about as a result of a number of on-hand ingredients that helped bring the project together: a few packages of dried cranberries in the cupboard that were originally intended for another use; leftover dark and white chocolate ganaches from a couple of different projects; buckwheat flour on hand and a can of pumpkin purée on the shelf.

I know, I know. My Thanksgiving post was a pumpkin related theme but what the heck - let's do something just a little different.

I recently gave a presentation for OLLI (Osher Lifelong Learning Institute) at Aquinas College here in Grand Rapids on flours, grains and seeds. This only served to fuel my desire to bake more with healthier-for-you whole grains and flours, be they wheat/gluten based or gluten free. In this case buckwheat flour is the star (yes - it's gluten free) and gives these moist-with-hints-of-spice gems an earthy, not too sweet quality.

buckwheatcran

As I've mentioned in the past, I adore silicone flexi-molds for baking cakes. This time I used my individual 15-well canelé (sometimes spelled cannelé) mold - LOVE that shape. And it worked out quite nicely when it came time to do the ganache garnishing.

buckwheatcran
Bull's eye!

Bull's eye!

The recipe is my version of Alice Medrich's "dark and spicy pumpkin loaf" from her book Flavor Flours, of which I've become a huge fan. As the name implies, the base recipe is baked in a standard loaf pan, but, being a fan of les petits gâteaux, given the choice, I go small.

The recipe is straight forward and the batter very easy to put together.

  • Heat the oven to 350ºF. The flexi-molds need no preparation - COOL! Although if you decided to bake a loaf you should line the bottom and sides of an 8 1/2" x 4 1/2" loaf pan with parchment paper. 
  • Combine 113 g (1 stick) unsalted melted butter, 190 g (scant 1 cup) sugar and 2 large eggs in the bowl of a stand mixer fitted with the paddle attachment. Beat on medium about 2 minutes until lighter in color.
  • Add 120 g (3/4 cup) white rice flour, 40 g (1/3 cup) buckwheat flour, 1/2 teaspoon baking soda, 1 teaspoon baking powder, 1 teaspoon cinnamon, 1/2 teaspoon ground nutmeg, 1/4 teaspoon salt, 170g (3/4 cup) pumpkin purée and 70 g (1/2 cup) dried cranberries (or raisins or currants or what-have-you) and blend on low speed until smooth. I had considered also adding some chopped toasted pecans but I forgot!!
  • Scoop or pipe the batter into the flexi-molds, filling about 2/3 full.
  • Bake about 20 minutes (or 45-50 minutes if baking a loaf) until a tester inserted in the center comes out clean. Remember to pay attention to what's happening in your oven! Do I say that often?  Mais, oui!
  • Cool in the flexi-molds on a rack for a good 30 minutes (or two hours for a loaf) then gently un-mold.
  • Enjoy soon or, once cooled, freeze well wrapped and enjoy later. They'll also keep in the fridge well wrapped for about 5 days.

I opted to coat my cooled cakes with dark chocolate ganache. Once that had cooled a bit I filled the center with white chocolate ganache. Not bad, eh? Another option is to blend 4 oz  cream cheese (or mascarpone) with 1/4 cup Greek yogurt and 1 tablespoon honey and spread a schmear on your mini-cake or your slice if you've gone the loaf route. You decide.

buckwheatcran

I find these cakes very pleasing - a moist and tender crumb, hints of spice, nuggets of cranberry, rustic buckwheat, a sense of pumpkin without being overwhelming (although Steve, the pumpkin disliker, might argue that point) and a flavorful marriage of chocolates. I like 'em.


Seed crackers

seedcrackers

I ask myself why it's taken me so long to get on board the whole-grain train! But there's no time like the present, right?

While I've been using more whole wheat and white whole wheat flour in my breads and rolls, I hadn't yet embraced the wonderful array of whole grain flours available these days. This photo of the vast selection of Bob's Red Mill products alone can make one's head spin!

Bobsredmill

Whole grains are better for you. Period. Gluten or not, the whole grain contains the germ and bran which are where the important nutrients are. And the fiber! Yes.

Making your own crackers is a satisfying project, plus you can vary your toppings and additives depending on your whims. Cool.

This recipe is my variant of Peter Reinhart's crispy rye and seed crackers from his book artisan breads everyday.

seedcrackers

As you see in the photo above, we've got pumpkin seeds, sunflower seeds, sesame seeds, flaxseed meal, just to name a few. You might notice my spice grinder in the upper right - I'll be grinding the pumpkin and sunflower seeds for this one.

Here we go.

  • Grind 43 g (1/4 cup) sunflower seeds and 43 g (1/4 cup) pumpkin seeds in a spice grinder. Pulse and don't blend too long or you'll have seed butter.
  • Use 29 g flaxseed meal like I did OR grind 29 g (3 tablespoons) flaxseeds separately.
  • Combine the above seed powders with 57 g (6 tablespoons) sesame seeds, 227 g (1 3/4 cups) rye flour or whole wheat or white whole wheat (in my case, I used the latter), 1/4 teaspoon salt, 2 tablespoons vegetable oil, 1 tablespoon honey and 170 g (3/4 cup water) in a mixing bowl.
  • Mix either in a mixer with the paddle attachment or by hand with a large, sturdy spoon for 1-2 minutes. The dough should form a ball quickly.
Easy peasy!

Easy peasy!

Divide the dough into four pieces. Each piece provides enough for one 1/2 sheet of crackers.

seedcracker

Heat the oven to 300ºF. Line sheet pans with parchment (one pan for each quarter of dough you plan to bake).

Roll out one portion of dough on a lightly floured surface, lifting the dough and re-flouring as needed to prevent sticking. The dough may resist so give it a few minutes rest before continuing, to achieve a thickness of about 1/16th inch. 

Partially there

Partially there

Once you're happy with the thickness, cut your crackers in a shape that appeals to you. Diamonds are always nice (you know what they say about diamonds). Think about any garnish you might want to add to the top. You'll need a wash of some sort so that your seeds or herbs of choice stick to the top. Options are an egg white wash made by whisking one egg white with 2 tablespoons water or a sweet wash made by whisking 1 tablespoon honey with 3 tablespoons water.

seedcracker

I went for the sweet wash and a garnish of sesame and poppy seeds.

Bake for 10 minutes, rotate the pans and bake for another 10 minutes. You may need another 5 or 10 depending on how thinly you rolled your crackers and your oven. They're done when they've turned a rich, golden brown and are dry and crisp. The beauty is that you can always return them to the oven to crisp them up.

Oh boy!

Oh boy!

These are lovely - not at all sweet, although a hint of honey comes through - crisp, seedy and subtle. Good.

I chose to bake a couple of sheets this go around. Just wrap the unused dough and either refrigerate it for a week or freeze it for several months. Reportedly the flavor improves after a couple of days in the fridge. I have 2 portions in my freezer as we speak. Maybe I'll bake them for the New Year!

Give it a try. It's fun.

Pumpkin financier

pumpkinfinancier

OK so I'm a little late in posting this Thanksgiving dessert but hey, it's still the holiday weekend so I'm going for it!

Having often extolled the virtues of the classic French financier, I'm a sucker for the many petite versions one can create. The base is easy to prepare, can be held in the fridge for a few days until you're ready to bake it and you can embellish it as you so choose - fruit, purées, different nut flours, cocoa powder, citrus zests - you name it.

For Thanksgiving I went for traditional pumpkin made with half almond and half hazelnut flours, with a medley of the usual spices - cinnamon, nutmeg, allspice, ginger. I love using my Silikomart savarin molds with a center well - they just beg to be filled and topped with all manner of goodies.

squaresavarin

When making financiers I use this base recipe, an adjustment to the one I learned at Le Cordon Bleu in Paris with less sugar. I've since figured out a variety of flavor options that work quite nicely. The pumpkin version utilizes the addition of canned pumpkin to the base, along with the above mentioned spices of course.

Before baking the cakes themselves, I consider the components I wish to incorporate in the finished dessert, always focusing on textures and flavors. This time I went for a dark chocolate ganache to fill the small wells in the cakes, topped with a caramel Swiss meringue butter cream swirl and chocolate shortbread cookie crumbs. 

Here's the build up.

The baked cakes

The baked cakes

The ganache filled wells

The ganache filled wells

The buttercream swirls

The buttercream swirls

the chocolate crunchy topping

the chocolate crunchy topping

Et voilà - c'est fini!

Now I know that not everyone likes pumpkin, Steve being the prime example. There's something about the spices used that just don't work for him. But I, on the other hand, don't mind a pumpkin creation every now and again (mostly around Thanksgiving, don't ya know!).

This creamy, smooth, mellow-chocolate-y, spicy, crunchy, pumpkin-y combo hit all the right notes for me - not too sweet, not too heavy. Not bad for a beautiful Thanksgiving time with family. You can't ask for much more.

Happy Thanksgiving everyone!

Mocha custard tart

mocha.JPG

Fall is definitely in full swing here in west Michigan, even though we've had some unseasonably warm days of late. But we'll take it! Winter will be here soon enough.

This weekend's dinner for the Galloway household consisted of Steve's layered onion/carrot/garlic/chicken/potato dish oven-cooked low and slow in our Staub enameled cast iron cocotte. Mom contributed a spinach strawberry salad, and I opted for a tart recipe I've had my eye on for awhile. I mean really, it's all about tarts for The Tarte!

I believe I've previously mentioned Alice Medrich's book Flavor Flours which I discovered in our local library some months ago. I've since purchased my own copy and am so satisfied with the recipes I've made so far. The book focuses on a number of alternate flours like teff, sorghum, chestnut, rice, oat and corn as well as nut flours (which I am totally on board with!).

The tart recipe calls for a GF teff chocolate crust, but I opted to use my stand-by chocolate short dough from the CIA's Baking and Pastry book. It was the first book I purchased after completing my Diplôme de Pâtisserie and mon stage in Paris in early 2007. Even though it's an older 2004 edition I still turn to it time and time again for all sorts of tips, techniques and recipes.

And I've been using this chocolate short dough ever since. 

Tart ring lined and ready to bake

Tart ring lined and ready to bake

After fork-pricking the dough all over, chill the lined ring in the freezer for 15 minutes or so while heating the oven to 325ºF. The chill stabilizes the butter and helps the dough keep its shape during blind baking. Line the firm dough with a round of parchment, fill it with dried beans and bake for 12-15 minutes with weights, then another 5-8 minutes without weights. The crust should be set and look dry. Remember - it's your job to watch what's going on in that oven!

All baked and ready to fill

All baked and ready to fill

Lower the oven temp to 300ºF for the next phase of the project.

Just a note here. If you'd like to change things up a bit, you can use any pie or tart dough your little heart desires - choose your favorite pâte brisée or pâte sucrée (and it doesn't even have to be chocolate) or even a chocolate wafer or graham cracker or toasted coconut crumb crust. Add some chopped nuts if you want - you decide. Just remember to blind bake it first.

The KEY part to this tart is THE FILLING, and, once you make it, you'll know what I mean. So easy and so deliciously smooth it involves heating 1.5 cups heavy cream, 130 g sugar, 35 g cocoa powder (Dutch process or natural) and 55 g unsalted butter in a saucepan on the medium heat, stirring until everything is blended and it starts to simmer around the edges.

Remove from the heat and whisk in 1 teaspoon instant espresso powder and 3/4 teaspoon pure vanilla extract. Set aside.

Once the blind baked shell is out of the oven, whisk 1 large egg plus 1 yolk into the cream mixture and pour the filling into the hot crust. It's pretty loose so steady yourself for gentle placement into the oven without sloshing. You can do it.

Filled and ready for the oven

Filled and ready for the oven

Bake for 10-15 minutes or even longer. I baked mine around 18-20 minutes before I was content with a nice wiggly/jiggly custard without waves rippling across the surface.

Cool on a rack and serve slightly warm or at room temperature. Here's my cooled tart - kinda reminiscent of a moonscape don't ya think? 

mochatart.JPG

While Alice dusts her tart with cocoa powder I was going for a bit more pizazz. I usually have some baked cookie or streusel crumbs in my freezer to use at a moment's notice whether it's to top ice cream, add a crunchy layer to a cakey-creamy type of concoction or to garnish a tart. Yup.

Out came the chocolate shortbread cookie crumbs which I sprinkled over the top of the tart, leaving a clear edge around the periphery.

mochatart.JPG

Next up -crème Chantilly! But of course. Steve claims that anything is better with whipped cream on it, and, in this case, he was absolutely right. But then I pretty much knew that already.

For one cup of heavy cream I add 1-2 tablespoons powdered sugar and a splash of pure vanilla extract. Whip to medium soft peaks, enough so it will hold its shape, and spread or pipe as you wish.

mochatart.JPG

Soft, pillowy mounds of cream like a string of rustic pearls entice us to dig in. And dig in we did.

mochatarat.JPG
mochatart.JPG

This is one of the BEST fillings I have had in a long time. Smooth, luscious, creamy yet light with just the right intensity of chocolate and a hint of espresso - aaaaahhhhh. And the chocolate short crust, chocolate crumbs and whipped cream provided just the right marriage of textures and flavors. Oh boy.

mochatart.JPG

Yes there were leftovers but the good news is this will keep covered in the fridge for a couple of days. Don't waste a bite of this one folks.

Before I leave you I'd like to share a few autumn images from our corner of the planet. Enjoy the season wherever you are and take care.

Pita bread

IMG_1987.JPG

Oh how I love the smell of freshly baked bread. No matter how often my attention turns to pastries, I still come back to bread - whether I'm reading various bread baking books or actually working with bread dough with my own two hands - it's such a rewarding process.

For the past few weeks we've been providing a weekend meal for my cousin Jen and family as they care for my Uncle John at home ( he's recovering from a stroke and a fractured hip.) Last weekend Steve made an excellent chili recipe from NYT and baked some rice to go along with it (rice and beans, don't ya know?!). Mom provided a fruit salad medley, and I decided pita bread was just the needed addition to the meal.

I've been contemplating flat breads for awhile now, especially after a delicious supper of grilled naan topped with burrata, avocado, roasted tomato, corn, salad greens and pesto vinaigrette at Dick and Dor's in Massachusetts over Columbus Day weekend. What a wonderful combination of flavors and textures. Thanks D&D!

I reviewed recipes from my various bread books as well as online resources and debated over naan vs. pita. As I read and absorbed the steps for these goodies, I opted for pita for my first foray into flat bread (although it's really a lot like pizza after all!).

pita.JPG

The pita preparation process involves either baking in a very hot oven on a baking stone or preheated sheet pan or cooking in a skillet on the stove top. Both involve flipping the pita half way through and cooking one or a few at a time. As I contemplated opening a hot oven and flipping a number of baking pita, I opted for the cast-iron-skillet-on-the-stove-top approach.

The online recipe I chose was very straight forward. Containing water, yeast, olive oil, salt and flour, the dough came together beautifully in the stand mixer, and, after a 5-6 minute knead, felt lovely, springy and soft.

pita.JPG

After a 1 1/2 hour rise, covered in a lightly oiled bowl the dough is turned out onto a floured work surface and divided into approximately 80 g pieces. I had doubled the recipe that typically makes 8 pita, so I ended up with 16 pieces.

pita.JPG

Each piece is formed into a nice ball and they're all covered with lightly oiled plastic wrap to rest for 30 minutes.

pita.JPG

Each rested ball is then patted into a circle about 1/4 inch thick and rests for another 5 minutes. I shaped all my circles and layered them on a parchment sheet pan so I'd by ready to go.

pita.JPG

Although the recipe instructed brushing the cast iron skillet with olive oil and heating to medium-high heat, I soon learned that it was way too hot with lots of smoking going on. Whoa baby, time to turn it down!

I did burn a couple of them (that's why I made a double batch, heh, heh) until I finally reached just the right low heat.  I cooked each one about 2 minutes on the first side during which the puffing begins, then flipped it over to cook for another couple of minutes until lightly golden.

pita.JPG
pita.JPG

While the one-by-one cooking process seemed a bit daunting at first, it actually went pretty well once I got the hang of it and was very reminiscent of crêpe making. At Steve's suggestion I also put my non-stick ScanPan skillet into service which gave me a dual cooking process for quicker results. Yeah.

Once cooled I cut one in half and was able to separate the edges for a real pocket. Cool!

pita.JPG
I know, this one is a touch over done, but still deelish!

I know, this one is a touch over done, but still deelish!

The bottom line: the end result was soooo good! For the first tasting test I tore a couple up into pieces, dipped them in some hummus and had some roasted tomatoes on the side - man oh man!

Later that evening with our chili and rice dish, I cut them into strips for a perfect vehicle, either to spoon a bit on or dip them into the bowl. 

Definitely a keeper.  

pita.JPG

Here's the recipe for 8 pita breads:

1. Place 7 gm instant or active dry yeast in the bowl of a stand mixer and add 1 cup tepid water (~100ºF) and 130 g all purpose flour. Whisk together and let stand about 20 minutes during which this loose sponge will begin to bubble and foam.
2. Add 1.5 tablespoons olive oil, 7 g salt and 228 g all purpose flour (I used half all purpose and half white whole wheat) to the sponge and mix with the dough hook on low speed until incorporated. Add up to 1/4 cup additional flour if the dough is especially sticky.
3. Knead on low speed for 5-6 minutes until springy and soft, then turn out onto a floured work surface and form into a ball.
4.Lightly oil the bowl with 1/4 teaspoon olive oil, place the dough ball in and turn it around to coat it, cover the bowl with cling film and let rise 1.5-2 hours until doubled in size.
5. Place the dough on a floured surface, pat into a rectangle, divide into 8 pieces of about 80 g each and form each into a ball. Cover with lightly oiled cling film and let rest 30 minutes.
6. Pat each ball into a circle about 1/4" thick and let rest about 5 minutes.
7. Brush a cast iron skillet with olive oil and place on medium-low heat. Place pita bread in skillet and cook about 2 minutes then flip over and cook another 2 minutes. The bread should puff up and develop some golden brown spots and blisters. Flip again and cook another 30-60 seconds.
NOTE: if smoking happens and your pita starts to char, turn the heat down! Lesson learned.
8. Repeat with all pita and stack them on a plate tented with foil. Once cooled, enjoy!

I froze some of the cooled pita and enjoyed one a few days later, toasted, with hummus. Yup.

Why don't you give it a try?

pita.JPG


Tartelettes aux myrtilles et tarte aux prunes

Petite blueberry (myrtillestartlelettes
Plum (prunes) tarte
While I'm still on the summer fruits kick, I'd like to introduce you to just two of the many fruit-custard tarts that you can create pretty easily. Pâte brisée on hand in the freezer, summer berries or stone fruits of choice, a straight forward custard filling and off you go!


Michigan blueberries have been in plentiful supply (and wouldn't you know - I now have a number of bags stashed in my freezer).  They're especially tasty when baked into custard, so why not some tartlettes!


First I made my favorite pâte brisée using the by-hand flaking method with a couple of three folds for good measure. The process makes for such a wonderfully buttery, crisp yet flaky crust that is simply fantastic with custard and fruit. Visit this post for ALL the details.

You can make double or triple recipes of the dough, divide, wrap and stash in your freezer so you're ready to create to your heart's content. How great is that?!

For the custard, as is typically the case, one can find many versions of fillings out there in cyber space. Some involve simply whisking the ingredients together, pouring the custard over the fruit in your blind baked shell then baking til set. No stovetop prep there.

I opted for the stovetop method for a classic crème brulée type of custard. Heat the dairy (can be all cream or a cream/milk combo) in a saucepan, whisk egg yolks and sugar in a separate bowl, temper the yolk mixture into the dairy, then strain and set aside until ready to fill your tart. I went a step farther and cooked it to the anglaise stage before straining.

I just had to grate some fresh nutmeg and throw a pinch of coriander into the mix - so good with blueberries.

For my tartelettes I blind baked the pâte brisée in small brioche molds, popped in three berries, poured the custard over and baked them until the custard was set.

Once cooled, a dusting of powdered sugar adds just the right touch. Serve and enjoy.


Local yellow plums

My plum version came about due to the NEED to use up some ripe plums in my fridge. When browsing at the Fulton Farmers Market, I try sooooo hard to buy only the fruit that I'm pretty sure I'll use up quickly. Best laid plans  . . . .

I went with a variety of greenish-yellow, peachy and red fleshed plum varieties for this project . . .


and had just the right amount of dough on hand for my 16 cm square open tart form.

Lining a square form takes just a bit more finesse than a circle, since it's important to get the dough properly tucked into the corners. Dock the dough with a fork . . . .


then place the pan into the freezer while heating the oven to 400ºF.

Line the frozen dough with parchment, fill with dried beans or ceramic weights and bake for 12-15 minutes. Remove the weights and parchment then pop back into the oven for another 5-7 minutes until lightly golden.

Reduce the oven to 325ºF and proceed with final assembly.

Blind baked and ready for final assembly

I sprinkled some almond flour on the crust, placed the multi-colored plum slices just so . . .


and poured the custard over until it reached just below the top edge of the dough.


A final sprinkling of vanilla sugar and into the oven it goes.

Bake about 25 minutes until the custard is set and there's some browning and a hint of bubbling from the plums.

Just out of the oven

After a few minutes, lift off the tart form and finish cooling to room temperature.

Check out that flaky dough

Steve and I had a small sample after our pizza supper. Wonderful buttery, crisp crust, luscious custard filling and tartly sweet plums - yes indeed.

In a nutshell, here's the recap/ custard recipe.

  1. You choose what size and shape you'd like your tart or tartelettes to be.
  2. Have your pâte brisée ready to go (Visit this post).
  3. Roll your dough to about 3 mm thick and line your chosen tart tins or forms. Prick the dough all over with a fork and place in the freezer while you heat your oven. Pâte brisée bakes best at high heat, 400-425ºF.
  4. In general, blind baking requires 12-15 minutes with weights, then another 5-10 without until nicely golden (watch what's happening in that oven of yours!!!).
  5. Decrease the oven to 325ºF.
  6. You'll have to eyeball the fruit quantities you'll need for your given size. The tartelettes are easy - a few berries each. For the 16 cm square I used about 350 g of fruit - choose your favorite berry, stone fruit or combination thereof and have it prepped and ready to go.
  7. For the custard, heat 1 cup heavy cream and 1/2 cup whole milk to barely simmering. 
  8. In the meantime whisk 4 large egg yolks and 1/4 cup granulated sugar in a separate bowl; temper in half of the heated dairy, then return all to the saucepan and cook to the anglaise stage (82ºC or 180ºF). NOTE: I added a skosh of freshly grated nutmeg and good pinch of coriander.
  9. Strain into a 2 cup Pyrex-type pour spout container and set aside.
  10. Sprinkle a shallow layer of almond flour on the bottom crust, arrange the fruit to your liking, then pour the custard over til it reaches just below the top edge of the crust.
  11. Bake about 8-10 minutes for tartelettes and about 25 minutes for larger tarts until the custard is set with a hint of a jiggle in the center.
  12. Let cool.
  13. Enjoy slightly warm or at room temperature.
  14. Best eaten the day it's made but will keep covered in the fridge for a day or twol
Enjoy!!


Jalousie aux abricots et pêches

Hints of fall are in the air here in West Michigan - perfect baking weather. Yes sirree.

But even though we've turned the corner into September, there are still plenty of delicious Michigan summer fruits just calling out to be baked into something wonderfully luscious. Apricots and peaches to name just two.

Jalousie is literally translated as jealousy, but, in spite of my attempts at finding out why this particular pastry carries that label, the answer eluded me. I did see one reference to it being of Provençal origin, although when I went back to review that reference, I couldn't find it again. My oh my.

There's another version known as dartois that is usually filled with crème d'amande  along with fruit, although dartois appears to be used interchangeably with jalousie. Call it what you will, it's tasty.

In a nutshell it's a puff pastry case with slatted top, filled with fruit that is usually macerated or caramelized on the stove top with a bit of butter and sugar. Apricot is a classic and that's what I went for.

I reviewed a number of recipes and came up with quantities of puff pastry and fruit that suited my vision of the final product. The fact of the matter is that you decide how large or small you'd like to make your jalousie so there isn't really a specific recipe one has to follow.

I planned to use about 800 g of fruit and, since I didn't have quite that amount in apricots, I supplemented with a couple of peaches that were just waiting in my fridge.

I pitted and sliced the apricots and peaches . . . . 

. . . then sautéed the sliced fruit in 70 g butter and 70 g vanilla sugar to caramelize it. The apricots were so ripe that they broke down and produced a lot of juice, so I ended up straining the fruit-butter-sugar liquid off and cooling the fruit on paper towel to absorb any remaining liquid. I didn't want my jalousie to be soggy.

Oh my! Now what could I do with this bowl of deliciousness? I think I'll blend some into my homemade caramel sauce and see what THAT's like. Why not, eh?

While the fruit cooled I rolled out my favorite from scratch puff pastry and cut 2 rectangles approximately 28x11 cm each. Each piece weighed about 150 g, rolled out to about 3 mm thick. 

Start with slightly more than you need so you can trim up the edges as necessary. And be sure to save any scraps - they're great for making palmiers or rolled out as a crust for quiche or flan.

This should give you some guideline to determine how much dough you might use for a larger or smaller end result. Sometimes it simply a matter of experimenting and figuring it out. 

Fold one of the pieces in half lengthwise and cut slits about an inch or so apart, leaving the edges uncut.

Unfold it and set aside.

Place the other piece of puff on a parchment lined sheet pan, sprinkle with some almond flour (to help absorb any juice and protect the bottom crust) and top with the cooled fruit, leaving about 2 cm clear around the edges.

Brush the dough edges with a little water, place the slatted top over the fruit, press the edges together to seal and crimp with a fork.

I like to brush mine with a bit of milk and top it off with a sprinkle of vanilla sugar.

Freeze it for 20 minutes or so while heating the oven to 425ºF.

Bake about 25 minutes until puffed, golden brown and the fruit is bubbly.

Serve slightly warm or at room temperature.

Steve and I enjoyed a piece with some of my homemade peach ice cream - buttery, flaky, a hint of tartness to the apricot yet married so nicely with the sweetness of the peach - SO GOOD.

I kept the rest covered lightly with parchment paper at room temperature over the next couple of days. It was still good with morning coffee, especially warmed for a few minutes in the oven.

This one's a keeper.

Angel food cake


For the week of my mother's 90th birthday she had requested angel food cake with ice cream and fresh peaches for dessert. So it was absolutely time to make my first from-scratch angel food cake, something I've been contemplating for months!

I used my mom's classic angel food tube pan that's been in her hands for I don't know how many years - at LEAST 55 is my best guess. Maybe even 60!! She even has the small glass bottle that used to hold Welch's grape juice, a favorite drink of ours when we would take our sandwiches to eat outside in the summer time.

Even though the little metal tabs around the rim of the pan allow one to perch the cooling cake upside down, the bottle has that certain je ne sais quoi that seems to go with baking an angel food cake. Right Mom?


The tradition exists in our family of being able to choose our birthday meal, including cake of course. My sisters Joyce and Mary (and perhaps ME?) used to choose confetti angel food cake with colored frosting - pink or blue were faves. Truth be told I was more of a pound cake fan and would follow Mom's lead on the necessary ice cream and peaches accompaniment when it was time for my special day. 

Back in those days the confetti creation came out of a Betty Crocker box and was all the rage. After a bit of research I learned that BC's angel food cake mix was first introduced in 1953, followed by a "one-step" version in 1960, the one I suspect my mom made fairly regularly, at least for birthday requests.


I used a recipe from Mary Berry of "The Great British Bakeoff, Master Class" series and found it very straight forward. It's basically a stiff meringue to which some flour and additional sugar is added. It's all about beating the meringue to the right stage and being gentle with the folding in of the flour and sugar.

Now THAT's a stiff meringue

Ready for the pan

The batter goes into the UNgreased tube pan, since you want the cake to cling to the sides of the pan as it bakes.

Ready for the oven

It bakes for about 45 minutes at 335ºF conventional OR 300ºF convection (or "fan" as the Brits say on the GBBO).

Out of the oven and ready to be turned upside down

The pan was a bit tippy sitting on top of that little glass bottle, but I was able to support the pan edges with a couple of upturned drinking glasses that were just the right height.

Once cooled completely, out of the pan it came.


Sliced and served with my own homemade peach ice cream and fresh sliced peaches, it was delicous. The crumb soooooo light and airy and the cake with just the right amount of sweetness. A perfect accompaniment to creamy ice cream and one of our favorite local fruits.


Here's the recipe.

Have a standard ungreased 10" tube pan at the ready.

Heat the oven to 335ºF conventional or 300ºF convection.

Do your ingredient mise en place:

  • 10 large egg whites (remember meringues beat better when the eggs are at room temp).
  • zest of 2 lemons
  • 1 teaspoon cream of tartar
  • 1/2 teaspoon salt
  • 1 tablespoon lemon freshly squeezed lemon juice
  • 200 g caster (superfine) sugar (remember you can whiz standard granulated sugar in a grinder briefly to make your own superfine version).
  • 125 g all purpose flour
  • 100 g caster sugar

Follow the steps:

  1. Place egg whites, zest, cream of tartar, salt, lemon juice and 200 g caster sugar in a mixer bowl and beat on high using the whisk attachment until frothy.
  2. In a separate bowl mix the flour and 100 g caster sugar together and gently fold into the meringue.
  3. Place the batter in the ungreased tube pan
  4. Bake approximately 45 minutes (remember all ovens are different - pay attention to what's going on in there) until golden brown.
  5. Cool upside down.
  6. Remove from pan, slice and enjoy!
Happy Birthday Mom!!


And a big THANKS to Mary Berry too!!

Ice cream! Glace aux pêches, chocolat-amande, framboise-fraise, noix de coco-citron vert

Summer has certainly been in full swing and what better way to enjoy the season than to make some homemade ice cream. Absolutely!

I was on a major roll with this project, that's for sure. Part of it was spurred on by the fresh peaches and berries available at our favorite Fulton Farmer's Market.

Another part of it was the realization that family was coming to visit for my mom's 90th birthday celebration. Having several flavors of ice cream in the freezer seemed like just the thing for any impromptu dessert needs.

I've mentioned in previous posts that I've been using an ice cream base recipe from David Lebovitz for many years now. It's so straight forward and allows one to come up with all sorts of flavor options. He talks about infusing flavors, add-ins before the churning step and mix-ins at the end. SO GOOD.

The base contains 2 cups cream, 1 cup milk, 5 large egg yolks, 155 g sugar and a pinch of salt. The preparation method is that of a basic crème anglaise, cooled over an ice bath and then refrigerated for some hours or over night until ready to process. I love making the bases a day or two ahead so they can cure and thicken in the fridge, plus I have two canisters for my Cuisinart ice cream maker always at the ready in my freezer. Bring it on!

Peach was definitely at the top of the hit list.

When incorporating certain fruits in ice cream there's the possibility that the end result may be a bit icy. David suggests peeling and slicing the peaches, cooking them until they're nice and soft then puréeing them. I added just a whiff of sugar and a splash of lemon juice to what started out as a pound-and-a-half of peaches (before the peeling/pitting and slicing) and was very happy with the end result. Once my chilled base was ready to process, I blended in the cooled peach purée and churned away.

The peach flavor comes through nicely in this creamy, fresh summery treat. I served this one with my from-scratch angel food cake (YUM!) and some sliced fresh peaches. How can one go wrong with that combo?!

Of course it's great on it's own, one luscious spoonful at a time.

Now for chocolate almond, two of the most lovely flavors that one might put together, whether it's in ice cream or some other delectable baked good or chocolate confection.

This version took a little more time since the warmed dairy is first infused for an hour or so with a cup and a half of coarsely chopped toasted almonds. The only downside is that the almonds are discarded after the dairy is strained. Kind of sad.

BUT!! There's hope after all. Next time I'll rinse 'em, soak 'em in water overnight and make my own NUT MILK! I've been dying to try it. And an even more beautiful thing is once the almonds and water are ground and the milk is strained through cheese cloth, the almond meal can be spread out on a baking sheet, dried in the oven and used in baked goods. Now THAT'S a good deal all the way around.

In this case, once the ice cream base is cooked to the anglaise stage, 4 ounces of chopped and melted bittersweet chocolate (at least 60% is recommended) and 1/4 cup Dutch process cocoa are added to the warm mixture before cooling.

In addition, after the ice cream was processed, I mixed in coarsely chopped Ghiradelli 60% chocolate chips and some of my ground almond nougatine.

Now THAT made for a delicious finished version of creamy, chunky delight.

Next up - framboise-fraise!

With this version I prepared the strawberries in a similar fashion to the peaches mentioned above. Hull and cut up about 3/4 pound strawberries, add a couple of tablespoons of sugar and a splash of lemon juice and cook them on the stove top until somewhat thickened and jam-like. Then purée them and chill.

Since I was going for a strawberry-raspberry combo, I also puréed and strained about 8 ounces of fresh raspberries and added them in to the chilled base along with the strawberry purée. Then it's simply a matter of processing to a shear perfection of summery, berry goodness. YES.

Last, but not least, (although this was Steve's least favorite of the bunch, don't ya know!) is coconut lime.

For this version I infused the dairy with 170 grams of toasted coconut and the zest of two limes. After straining, proceed with the usual base prep, chill it over the ice bath and blend in 1/4 cup of freshly squeezed, strained lime juice. 

After churning, this one also got a mix-in of additional crushed toasted coconut to add another dimension to the mouth-feel experience. Quite frankly, in spite of Steve's lack of excitement, I found it nicely lime-y and coconut-y. I gave it a thumbs up.

There's just nothing like homemade ice cream! Now YOU come up with your own favorite flavor combos. You can do it!

Happy summer everyone!

What? Vegan raspberry dessert!


Steve and I met up with some of my old high school chums for dinner earlier in the summer. I was on the "what to bring" list for dessert and was up to the challenge when I learned that one couple is vegan and another long time friend is following a very restrictive diet, including no gluten. So what's a French style pastry chef to do?! Create of course.

On to the internet to research some options. I decided on a riff of a raspberry lemon chia "cheesecake" from the "Love and Lemons" blog. Curiously enough I also recently taught a vegan class at Sur La Table and found many similarities between this dessert and the one we made in class. The more I read about vegan desserts, the more I realize there are a number of ingredients that act as the base for many recipes. Cashews and Medjool dates are two of them.  While I don't plan to make many vegan desserts, it's good to understand the approach and what goes into them. It's all about learning.

This is basically a three layer dessert, and everything is raw. NO BAKING INVOLVED! Perfect for summer.

It's assembled in a basic 8"x4" loaf pan lined with parchment paper with a 1" overhang on each side.

First the walnut crust. 


This called for Medjool dates, but I used dried apricots instead (had 'em in the house, don't ya know). It's very simple. Measure 1 cup walnuts, choose 4-5 dried apricots and pop them in a food processor with 1/2 tablespoon coconut oil and 1/4 teaspoon sea salt. Process until crumbly then press into the lined loaf pan.


Pop the pan into the freezer while you make the "cheesecake" layer.

"Love and Lemons" gives two options for this layer. The first involves raw cashews soaked for 4 hours, drained and blended with a variety of other ingredients similar to option two. I chose the second option which utilized a store-bought vegan cream cheeze in place of the cashews.

Blend 8 ounces plain vegan cream cheese with 1/2 cup full fat coconut milk, 1/4 cup maple syrup, 1/4 cup fresh lemon juice, a tablespoon lemon zest and a teaspoon of vanilla extract.


Pour the filling over the walnut crust and freeze until firm, at least 2 hours.


The raspberry layer is thickened with chia seeds, but, since I didn't have those in my larder, I researched other ways to set a vegan dessert. Coconut flour is one of those thickening options, and guess what? I had some coconut flour at the ready.

Combine in a blender 12 ounces raspberries (fresh or frozen, either way), 1/2 teaspoon lemon juice, 2 tablespoons maple syrup and 2 tablespoons coconut flour mixed with an equal amount of water. Blend until smooth and pour over the frozen "cheeze" layer.


Freeze 4 hours or overnight.

When ready to serve, remove from the freezer about 20 minutes ahead, allowing it to thaw a bit. Lift it out of the pan by the parchment lining, slice and place on plates, letting the slices thaw another 15 minutes so they're not icy.


I must admit this was delicious! Cool and creamy with a nice lemony berry tang. And the group loved it too!  

Enjoy!


Cherry almond cornmeal cake and pecan toffee shortbread stars

OK. I admit I've been on a cherry kick lately, but we're in Michigan, it's summer and there are lots of fruits to be had. Yum.

Enough said perhaps? Probably not, cuz we're in blueberry heaven right now along with currants, raspberries and blackberries. And we still have peaches, plums, apricots and more coming!


Before July comes to a close I wanted to share the goodies I had made for our July 4th celebration out at Clear Bottom Lake, one of our regular family gathering spots. Better late than never, right?.

With cherries on the brain I opted for my own cherry almond cornmeal cake topped with cherry mascarpone cream. And why not!

As if that weren't enough, I was in the mood for delectable all butter shortbread cookies, thinking stars would be just right for the classic American holiday. Sandwiched with orange honey buttercream? Absolutely!


First the cake. 


A straight forward preparation very reminiscent of many cake recipes one can find out there in the baking world, this one includes almond flour and cornmeal with the all purpose flour so there's a nice hint of crunch going on. Plus there's some buttermilk to add just the right tang. And of course some chopped sweet cherries are folded into the batter.

I baked the cake in individual silicone molds and decided to dress these babies up with cherry mascarpone cream and caramelized almond crunchies.

I puréed some cherries . . . .


and folded the purée into a half and half mix of mascarpone whipped with heavy cream. A bit of added powdered sugar and vanilla gives it just the right light sweetness.


Pipe a nice swirl of cream on the cake and voila!


I made some almond nougatine by cooking 3/4 cup sugar with 2 tablespoons of water to an amber caramel, then stirring in 3 ounces of toasted almonds and spreading the mix out on a Silpat to cool.  Then grind it all up and you have a delicious crunchy addition to almost any dessert you can imagine.

It makes plenty for this purpose, but leftovers can be frozen in a zip top bag for other uses.


Now the cookies.


These shortbread came about as a result of my receipt of some leftover pecan toffee crumbs from Patty, the owner and chocolatier of Patricia's Chocolate in Grand Haven MI.

I used a similar base recipe to my standard shortbread, adding in a hint of cinnamon as well as the pecan toffee crumbs. Boy oh boy these are good! 

I wanted to gussy them up and happened to have some orange honey buttercream in my freezer. And thus it was that a stunning combination was born.


Delicious.

Now for the recipes.

Cherry almond cornmeal cake with cherry mascarpone cream and almond crunchies.

Cake:
  • Heat oven to 350º. Butter a 9" springform pan or use individual silicone molds of choice.
  • Stem and pit 3/4 pound of sweet cherries then cut into quarters. Set aside.
  • Melt 113 g (one stick) unsalted butter, let cool a bit then in a medium bowl whisk together with 1/2 cup buttermilk, 2 large eggs and 1/4 teaspoon almond extract.
  • In a separate bowl whisk together 130 g all purpose flour, 32 g almond flour, 70 g cornmeal, 2 teaspoons baking powder, 1/4 teaspoon baking soda and 1/2 teaspoon salt and 1/2 teaspoon ground coriander.
  • Blend the wet ingredients into the dry. Fold in the cherries.
  • Transfer batter to prepared pan or pipe into silicone molds.
  • Bake until a toothpick inserted in the center comes out clean, 45-55 minutes. NOTE: if using small silicone molds baking time will be decreased. 
  • Let cool.

Mascarpone cream:
  • Blend 113 g/4 oz mascarpone with 120 ml/4 oz heavy whipping cream. 
  • Add 1-2 tablespoons powdered sugar and a splash of vanilla extract. 
  • Whip as you would whipped cream to achieve medium soft peaks. Don't over whip or it will become grainy. 
  • Blend in 90 g puréed cherries. 
  • Refrigerate until ready to use.

Almond crunch: 
  • Cook 3/4 cup sugar with 2 tablespoons water to an amber caramel. 
  • Stir in 3 ounces toasted almonds. 
  • Spread out on a Silpat to cool then grind in a food processor.

Pipe decorative swirls on cake tops. If serving later, refrigerate and remove from fridge 30 minutes before serving to allow cake to come to room temperature. Sprinkle with almond crunch and serve.


Pecan toffee shortbread cookies:
  • In a mixer bowl blend 212 g room temperature unsalted butter with 75 g granulated sugar.
  • In a separate bowl mix 260 g all purpose flour, 1/2 teaspoon cinnamon and a pinch of salt.
  • Add flour mixture to butter/sugar mixture and blend until it comes together.
  • Blend in 100 g pecan toffee crumbs (a gift from Patty so I don't know the exact recipe for these!) In a pinch you could substitute a mix of toasted, chopped pecans and some chopped Heath bar.
  • Wrap dough and chill at least an hour then roll out and cut shapes of choice.
  • Bake on parchment lined sheet pans at 325º for about 12-15 minutes (watch your oven!)
  • Let cool then fill with desired filling. You'll find many recipes on line for Swiss meringue butter creams - use your flavor imagination and create your own!!
Whew! That was a mouthful. Literally.

Both treats were enjoyed by the group at Clear Lake, especially the pecan toffee shortbread. Yes.

Happy VERY belated 4th everyone!!


Thanks for reading Baking with the French Tarte. See you next time around.


Michigan fruits galette

Here we are in the thick of summer, and the beautiful fruits of Michigan are in abundance (with more to come!)

The rustic galette is one of my favorite fruit offerings during these not-so-lazy days, for life has a way of taking us on a whirlwind whether we like it or not.

While we've been busy with some home remodeling, I continue teaching at Sur La Table and baking my shortbread cookies at Patricia's Chocolate in Grand Haven, a lovely Lake Michigan community that attracts many tourists during the summer.

Yet in spite of the busyness of our days there is something that gives me pause - the ever ongoing passing of the generations. Our Aunt Fran Van Halsema (wife to my mother's brother Gerard) died on July 14 - the same day as the birthday of my sister Mary and our maternal grandmother Nellie. In the past 15 months we have experienced the loss of now five aunts and uncles on both my mom's and dad's sides of the family tree.

Let's remember to make the most of our days and seek out those things that give us a sense of peace and accomplishment. It's important, oui?

Baking is one of those things. The feel of the dough, the aroma of a lovely tart as it comes to the end of the bake, the luscious fruit and browned, buttery crust as one takes a bite and the sense of a job well done. Yes.

A galette (crostata in Italian) is so easy to prepare. Simply use your favorite pâte brisée or pâte sucrée, roll it into a circle of about 10" (or choose what size you'd like - bigger, smaller, it's up to you) and place it on a parchment lined 1/2 sheet pan. Then, in the center of the dough, pile about 4.5 cups of fresh fruits (I used blueberries, sweet succulent yellow plums and sweet cherries) that have been tossed with sugar to taste and a bit of flour as thickener, along with some lemon zest and a grate or two of nutmeg. Give yourself a good 2" edge of dough and pleat it up around the of the fruit which should remain visible in the center.

Brush the dough edges with egg wash or a bit of cream, sprinkle with raw sugar and place in the freezer to firm up and stabilize the butter in the dough while you heat your oven to 425ºF.

Bake about 20-25 minutes (don't forget to watch what's going on in there!) until the crust is golden brown and the fruit is bubbly and juicy.

Let cool for a bit and serve still warm or cool all the way and eat later. It's best the day it's made but will reheat in the oven (no microwave please) pretty nicely the next day too.  And don't forget the vanilla ice cream. Yeah boy.

A wonderfully delicious and straight forward summer dessert. And it's even good for breakfast.

Now my kitchen awaits, eager for the next baking adventure and blog post. In the meantime, as my husband Steve so often says, "life is short - go to Paris". Well said Steve.