French Tarte Faves (FTF) No. 2: pots de crème


OK! My first FT FAVE post was on financiers in early June. Next up - pots de crème!

Custards have been one of my favorite things since as far back as I can remember. Back in the 50s and 60s, as more and more foods became available in “convenient” form, Mom glommed onto Jello brand pudding mixes, making the stovetop-cooked versions which were WAY better than the instant variety that came later. Vanilla still warm, topped with chocolate chips so they got all melty; butterscotch with chopped walnuts; chocolate with mini marshmallows. Oh those were the days. I would always snag one of my sibs portions (thanks Joybell for not liking pudding!) for an extra treat.

As I contemplate which FTFs I’d like to post about, I realize that I’ve covered many of them over the years in some way, shape or form. I see it as my chance to review and share a bit more about them as I update recipes and links (which believe me is no small task!).

This particular topic begs to include a discussion of custards in general but that becomes a bit overwhelming. I did write up a mini primer on custards that will give you a sense of the range that ingredient portions can take and how you can adjust them.

The custards I make most commonly are crème anglaise for ice cream bases; crème pâtissière as filling for profiteroles and tartes (or blending with crème d’amandes for frangipane - think galette des rois) and this post’s (and my!) particular fave, pots de crème. Think Jello pudding a thousand times better.

Briefly: the first two custards mentioned above are stove topped cooked versions, the primary difference being that crème pat (as the Brits call it) contains a thickener like flour or cornstarch (or a blend of both) and is brought to a boil to thicken/cook it. Crème anglaise on the other hand contains only egg yolk, dairy and sugar and is cooked to the nappe stage (thick enough to coat the back of a spoon), not boiled ‘cuz the eggs will cook and curdle. My standard ice cream base is a version of crème anglaise - flavor variations are endless as you can see here.

Even on hot summer days, working in the cooler morning hours, one can whip up pots de crème in a low oven and have them ready for a dessert treat that evening. Even better - they keep for several days in the fridge!

My favorite pots de crème are chocolate, maple, butterscotch, cappuccino and lemon (links are to each recipe).

The header image is the maple version (recipe compliments of Sur La Table) which I adorned with maple walnut shortbread, Chantilly and toasted, chopped walnuts. Love it! Truth be told, the garnishing is half the fun. It doesn’t have to be fancy, no sirree. Fresh berries and a favorite crumble will do the trick.

Petite lemon pots

The steps of preparation are essentially the same for all recipes but I’ll talk a bit about a couple of variations that add that certain something to the end result. I don’t want to bore you with too much detail, but I’ll also provide a few process pictures.

Below is prep for the butterscotch version which starts by making an easy “caramel”: melt 56 g / 2 ounces unsalted butter in a medium saucepan then blend in 200 g / 1 cup brown sugar, one cup of heavy cream and a tablespoon of vanilla extract or vanilla bean paste until smooth. That step can be done a bit ahead and the mixture set aside. You’ll blend three more cups of heavy cream and 1/2 teaspoon salt into it and bring it to a simmer on medium heat.

Once I have my dairy/sugar mixture heating up, I separate my eggs as close to the tempering step as possible - that way they don’t sit too long and get shriveled. In this case the yolks are kept separate but note that some recipes have you whisk half of the sugar with the dairy and half with the egg yolks before the tempering step. In that case, whisk the yolk/sugar mixture thoroughly and aggressively until it becomes pale and thicker. If you let yolks and sugar just sit, the sugar can “burn” the yolks and they’ll get all grainy.

Preparing butterscotch pots de crème

When I first made butterscotch pots, I used a mix of 660 ml / 2.75 cups heavy cream and 300 ml / 1.25 cups milk. The end result wasn’t as thick as I like but the flavor was superb. And I saved some of the base, chilled it for a day or two in the fridge then processed into a most delicious ice cream. Yum! NOTE: the recipe link gives you an ALL cream version for pots de crème. If you want to make it into ice cream, use the cream/milk mix.

Butterscotch pots - too loosey goosey for me!

Here’s a lemon version so creamy and tart. The twist here is, rather than replacing a portion of dairy with freshly squeezed lemon juice and adding lemon zest, this one involves reducing a lemon zested simple syrup that is ultimately added to the custard at the end. A nice punch of flavor.

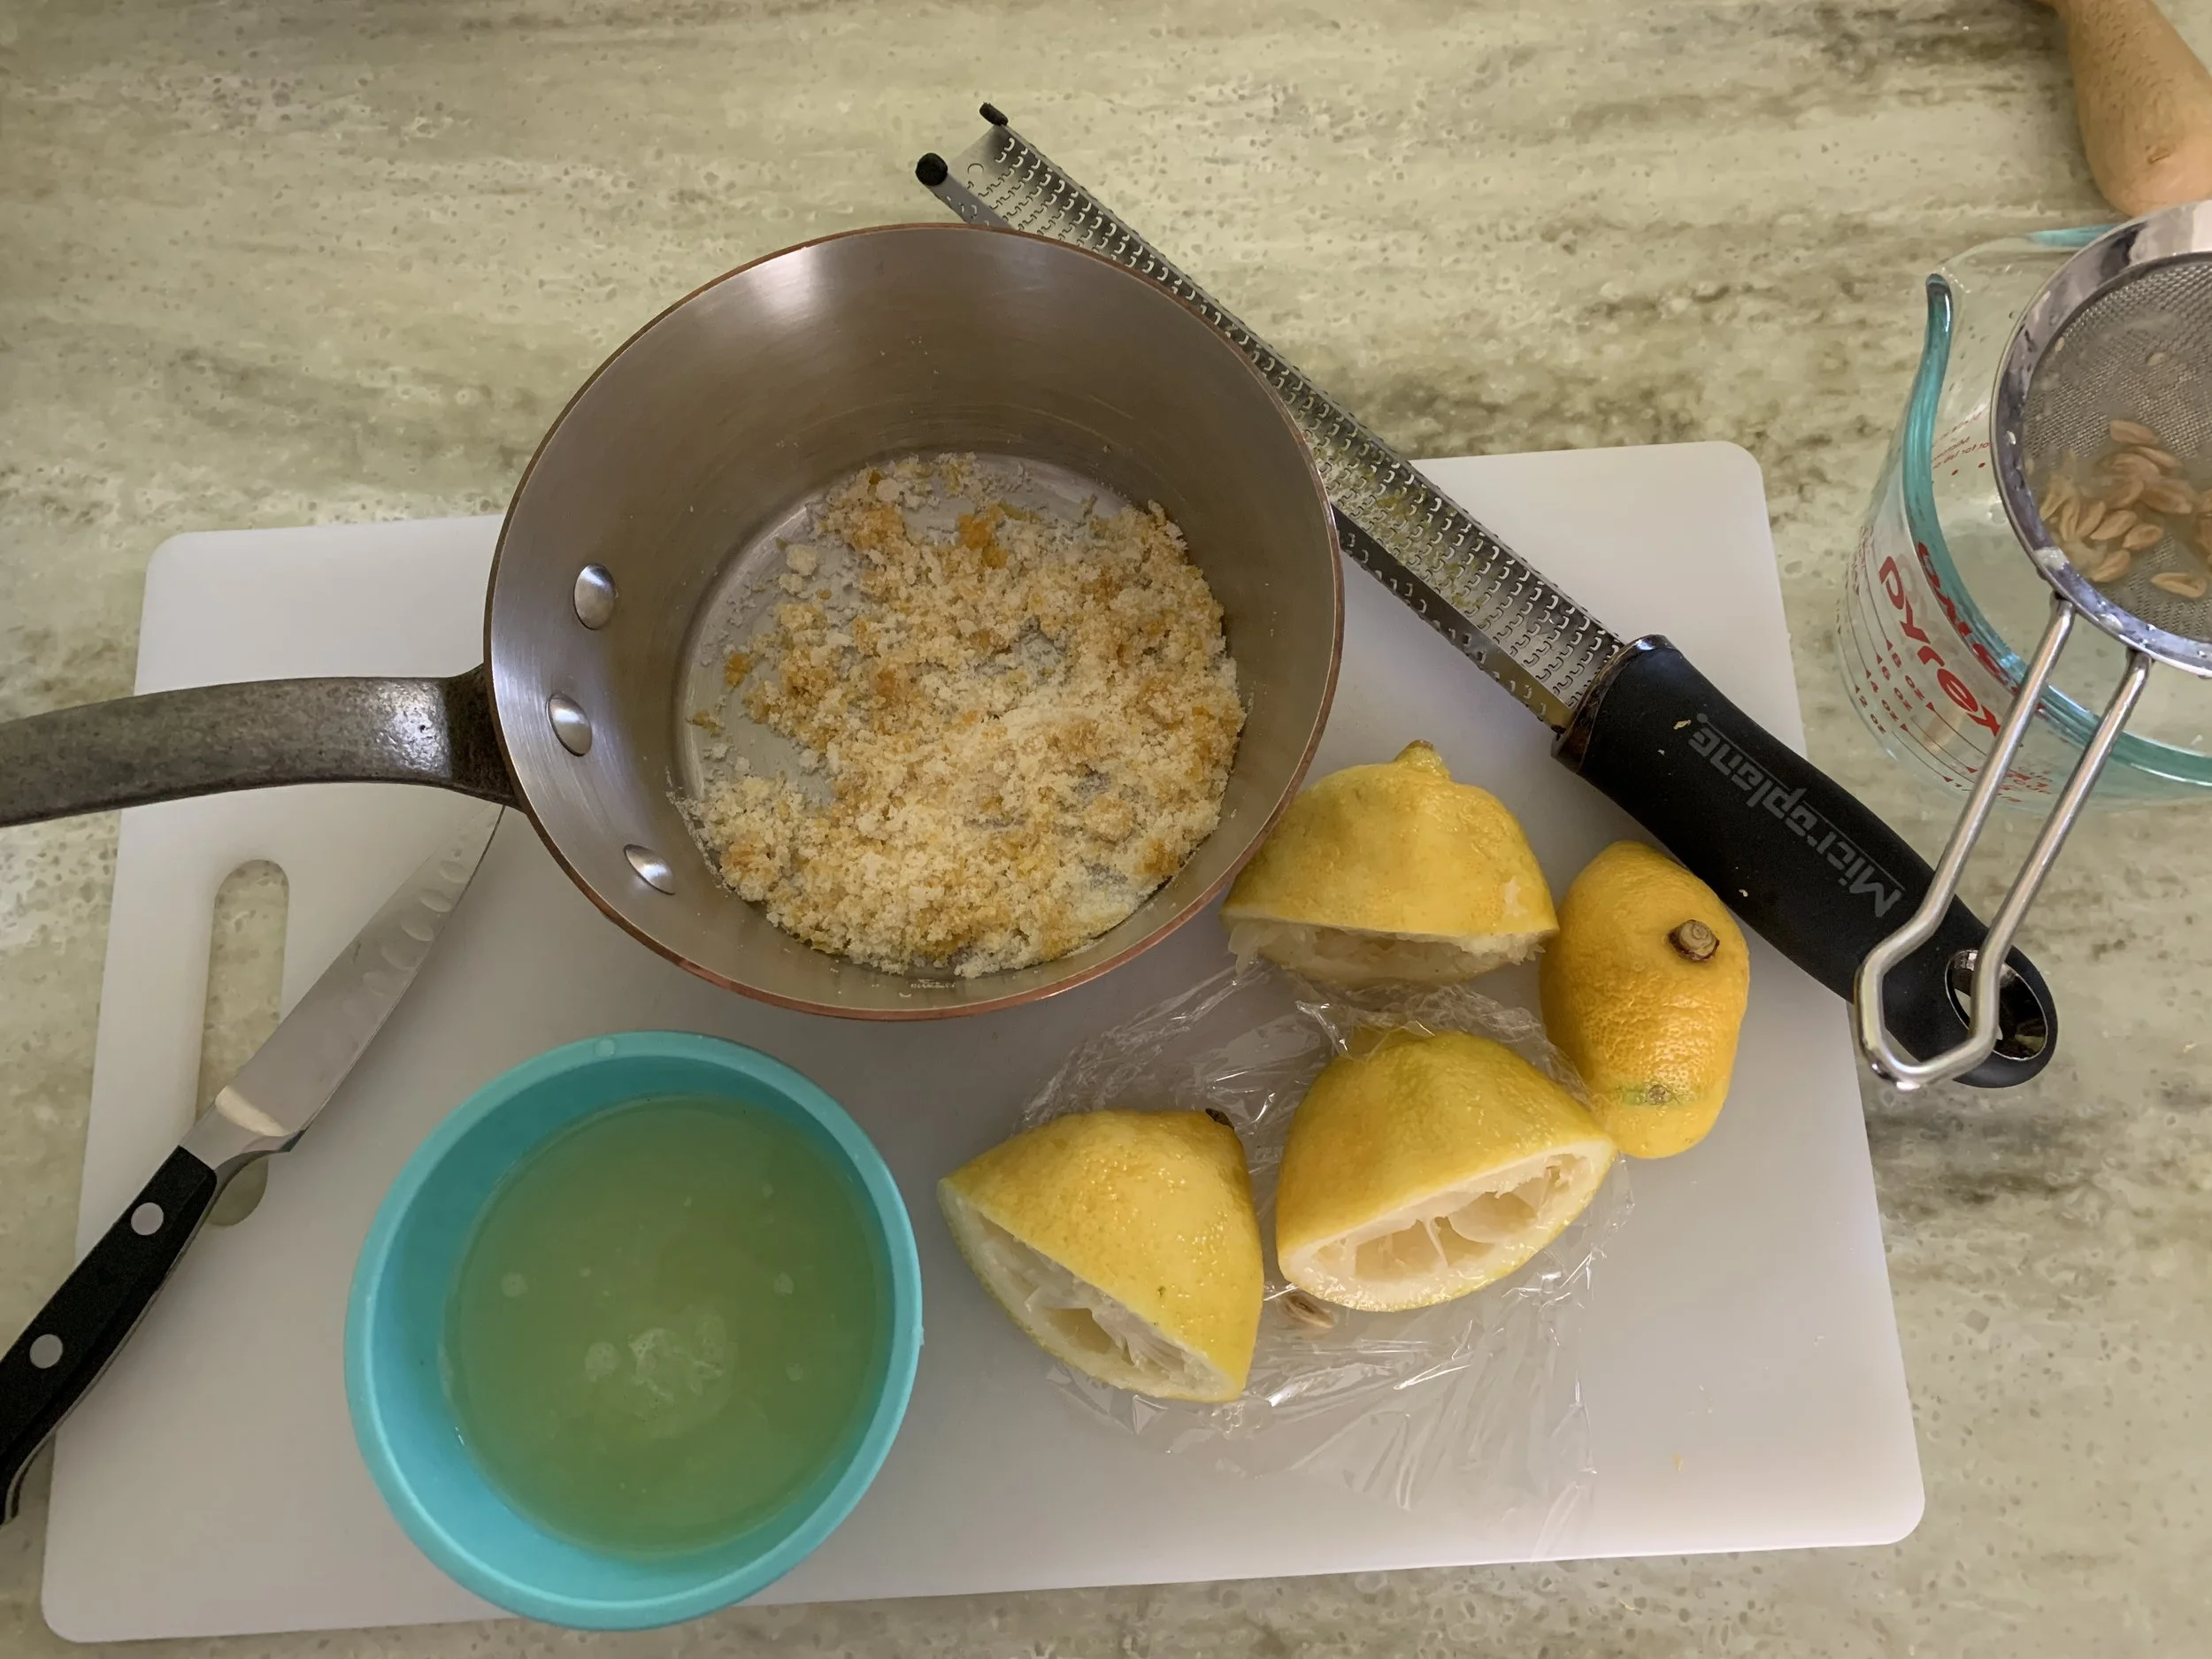
For the syrup you zest a couple of medium to large lemons and rub the zest into 50 g / 1/4 cup sugar; then squeeze yourself 180 ml / 3/4 cup fresh lemon juice and blend it all together.

Mise for lemon simple syrup

Bring to a boil then reduce the heat and continue on a low boil to reduce down to 1/2 cup, stirring periodically.

Coming along nicely

Then you’ll follow along with the base recipe, blending in the reduced simple syrup at the end.

I typically bake my pots at 325º F conventional OR 300ºF convection. Both work although total baking times vary.

Carefully fill the ramekins to about 1/4” below the rim.

Ramekins just filled and ready for the oven

Pour hot water into the baking dish until it reaches half way up the ramekins. No splashing!!

Cover loosely with foil and bake 35-45 minutes. Some pots take longer - I usually check things at about 25 minutes then continue checking until the edges are set and there’s a quarter size jiggly circle in the center. Remember - every oven is different!

Carefully lift the ramekins out of the water bath and place on a wire grid.

Just out of the oven, cooling

Once the custards have cooled to room temperature, chill them in the fridge for several hours. If not serving that day, cover with plastic wrap, keep refrigerated and enjoy over the next several days. So delicious!

I haven’t made the cappuccino version for awhile but looking back over my recipes, I found a note from way back in May of 2010 when I made a batch for a dinner gathering. I wasn’t taking photos of my stuff back then (Steve was my official pastry photographer). I garnished that one with almond nougatine and Chantilly cream. Basically you could add instant espresso powder to any base - hmmmm, should be good in butterscotch or chocolate or maybe even maple.

Chocolate is the flavor I make most often. Check out this post from early pandemic days (6/22/20) where I describe the steps and also create a frozen treat from the same base. Cool!

Enough of all that! I hope I’ve given you an understandable summary and some good recipe variations for you to try. Be creative with your garnishing and have fun with it.

Lemon/chantilly/raspberries with financier on the side

It’s September and baking season is comin’ at ya!

Wild grapes

Flan Parisien


OK! It’s time to get down to brass tacks. October is flying by, and I want to share one of my favorite baked goods ever. Being a huge lover of all things custard (think cooked vanilla pudding with melty chocolate chips as a child), my focus here is on le flan Parisien, essentially a custard baked in a crust. Yum.

Ever popular, flan has made its mark as a favorite le gouter after school snack for many French kiddos and is a staple in many pâtisseries across the country. There are many versions of flan across the globe - Mexico and Spain to name just two.

And let’s not forget the many classic custard based desserts that you’ll find world wide. Some of my favorites are crème brulée, pot de crème and my favorite ice cream base, crème anglaise, which I (and many!) consider the mother of custard sauces.

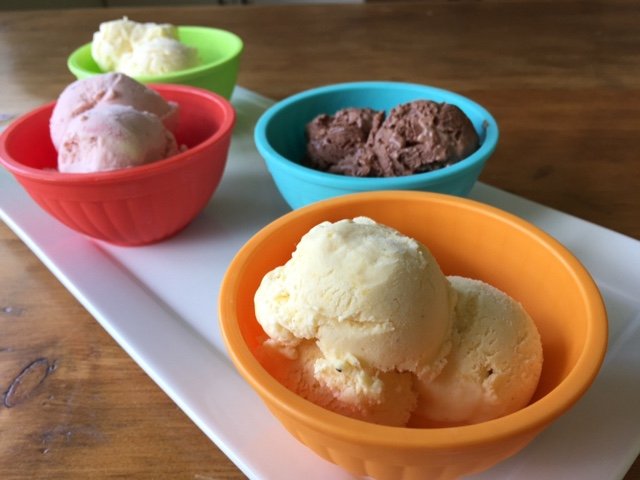
LIme coconut, raspberry/strawberry, chocolate almond, peach ice creams

I do digress. Sorry ice cream! I have to get back on track, but I couldn’t resist bringing you into the picture.

A custard is essentially a blend of dairy, egg and sugar with the occasional added thickener like cornstarch and/or flour, as is the case with crème pâtissière. You’ll see MANY variations in custard recipes using only milk, only cream, a blend of milk and cream, some yolks, some whole eggs - you get the idea. It would take me an entire post to try and explain the differences. Suffice it to say - all or mostly cream and all yolks in a custard make for a more unctuous mouth feel and richer taste. Switch in some whole milk for some of the cream and some whole eggs for yolks and you’ll experience a lighter, airier custard.

During my stage at Pâtisserie Pascal Pinaud in Paris’ 5th arrondisement, the house flan was made with puff pastry scraps for the crust and a simple crème pâtissière filling using whole eggs rather than yolks. Chef Pascal would line a 10-11 inch (25-28 cm) open ring with puff, hold it in the freezer and then I (oui moi!) would make the crème pâtissière that would be poured directly from the hot saucepan into the unbaked frozen shell. Into the oven it went. Always a hit.

At The French Tarte, my small shop in Pawtucket RI (2012-2014) , I occasionally made a version from Phillipe Conticini’s Pâtisserie des Rêves. His offered a unique approach whereby the custard filling was cooked, cooled then placed into unbaked puff lined rings and into the freezer for a couple of hours before baking. Right out of the freezer, directly into the oven! I looked back at my notes from July 25, 2013, having done a comparison between frozen and not - frozen won out for its creamier texture. Who knew.

I had already created my own flan custard base a few years back after doing a comparison of several recipes I had tried over the years. It incorporates whole milk, cream, eggs, yolks, sugar, cornstarch, vanilla bean. It was tasty back then so I went with it for this project. Plus, I hadn’t made a flan in forever!!

My goal here was not so much to revisit the custard portion BUT to compare using puff pastry scraps and my favorite pâte brisée for the shells. Blind baked or not and filling them with hot/cooled/frozen in the shell versions of the custard filling. While not a very scientific or well controlled experiment, it gave me the answers I sought.

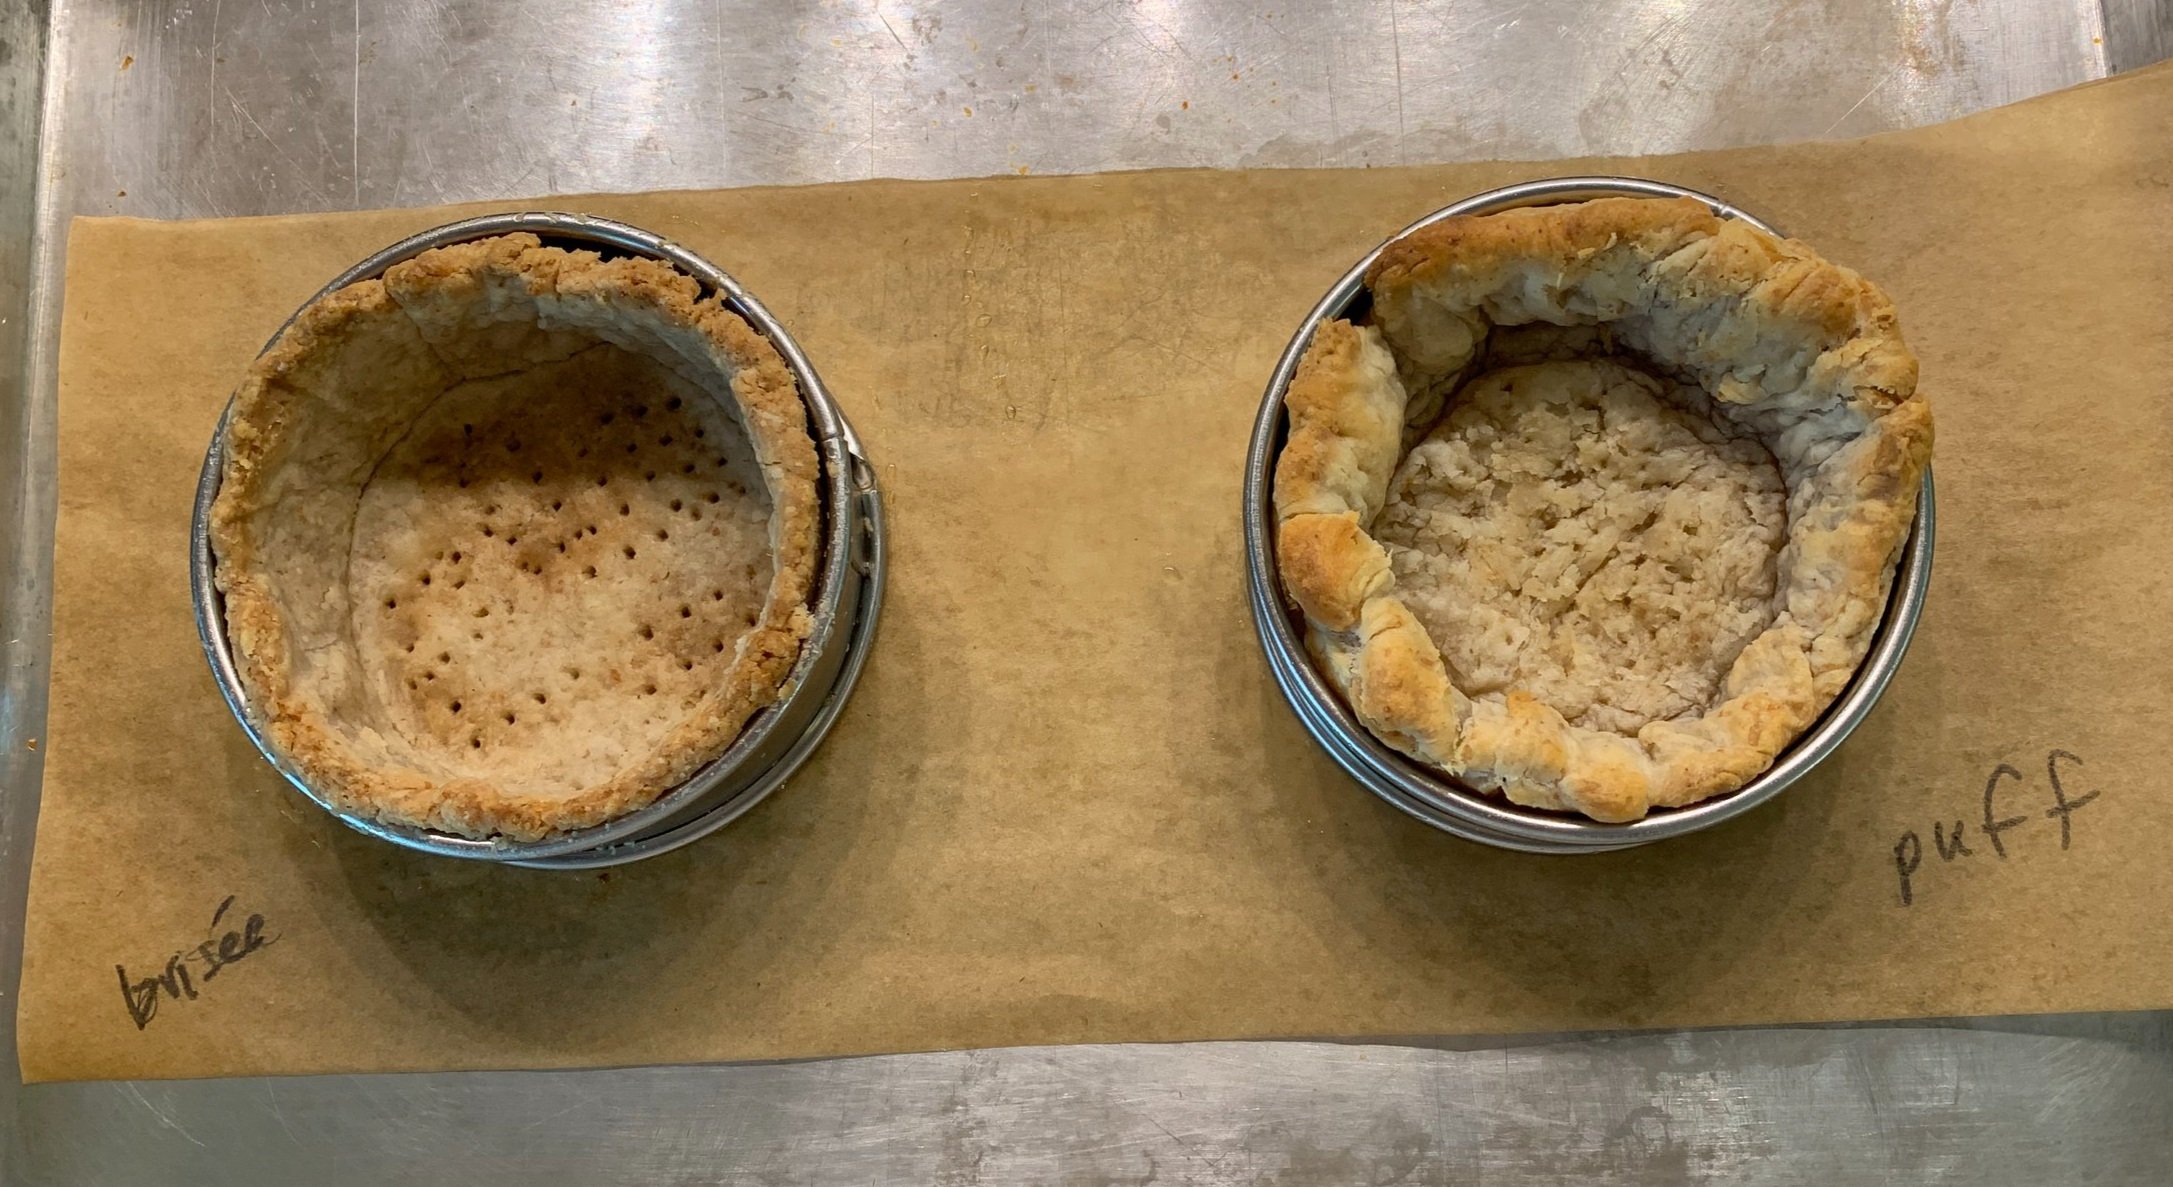
I used my 80 mm (3”) diameter, 2.5 cm (1”) high open tart rings, lining three with puff pastry scraps and three with pâte brisêe. I blind baked one each of brisée and puff and left the rest unbaked.

Ready for Baking

As I suspected it would, the puff puffed up in spite of the weights, resulting in a pudgy crust.


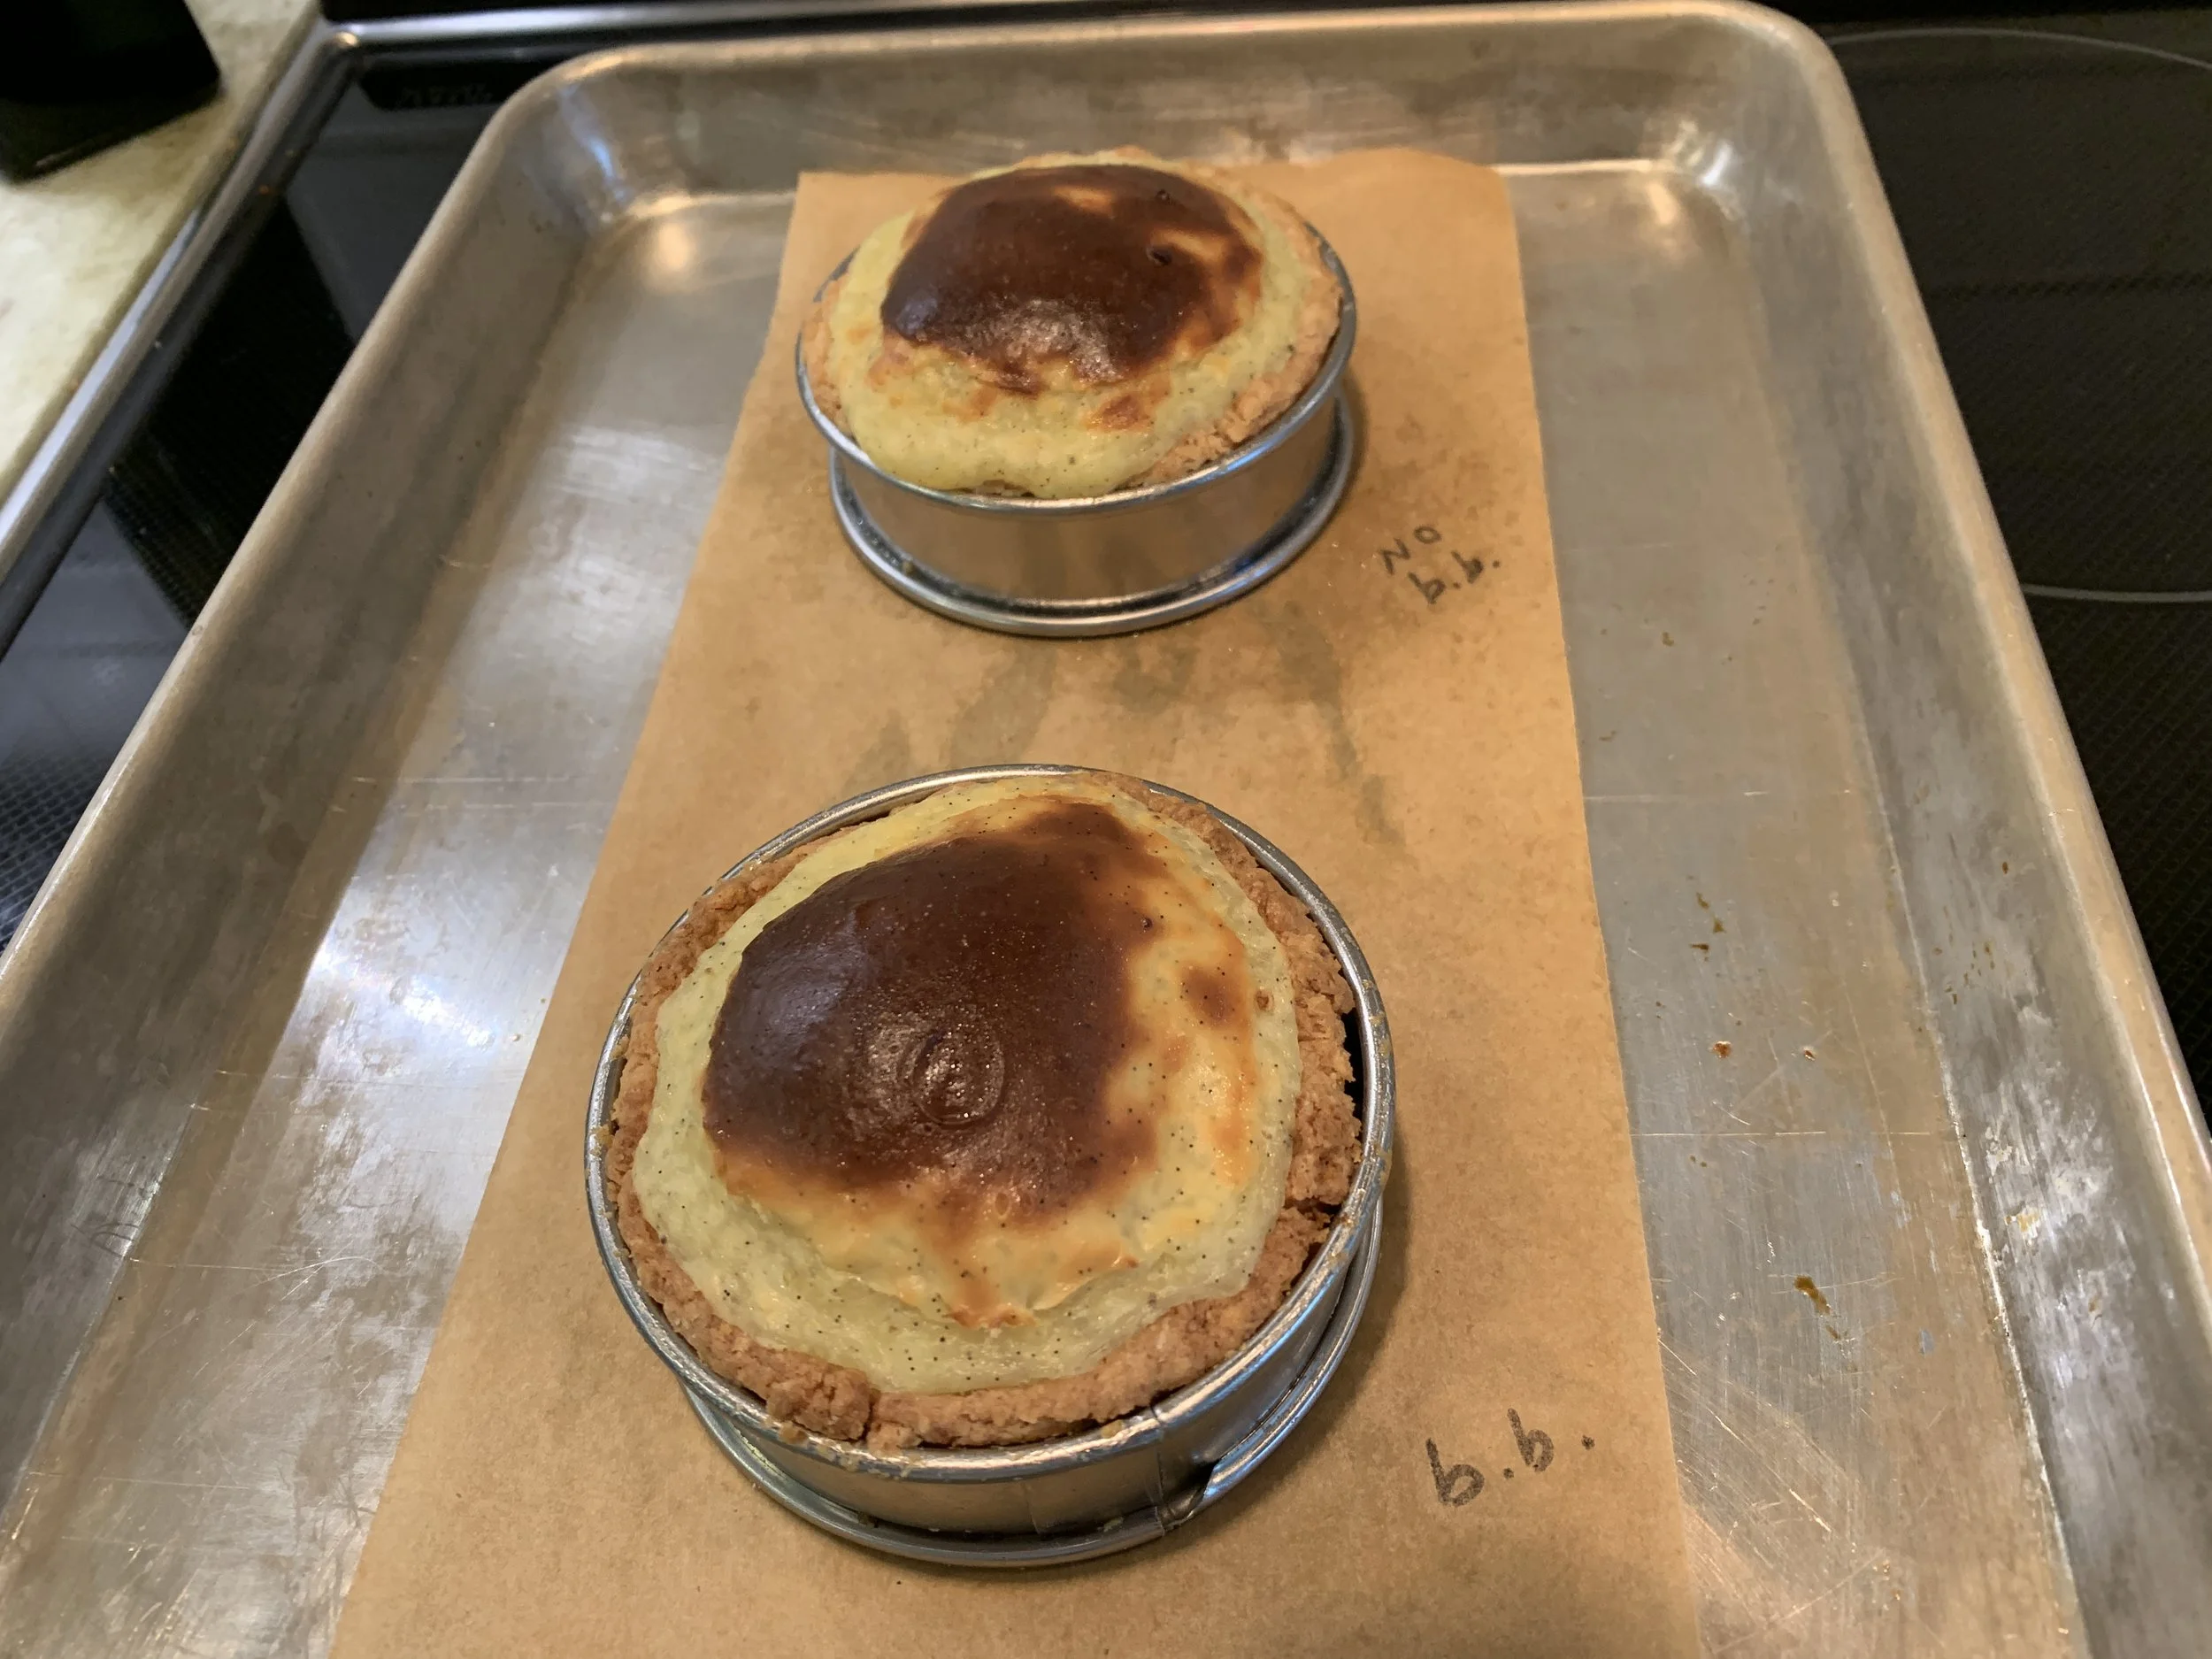
I then proceeded to make a batch of my flan custard, filling both a blind baked and an unbaked pâte brisée shell with HOT cream and then right into the oven.

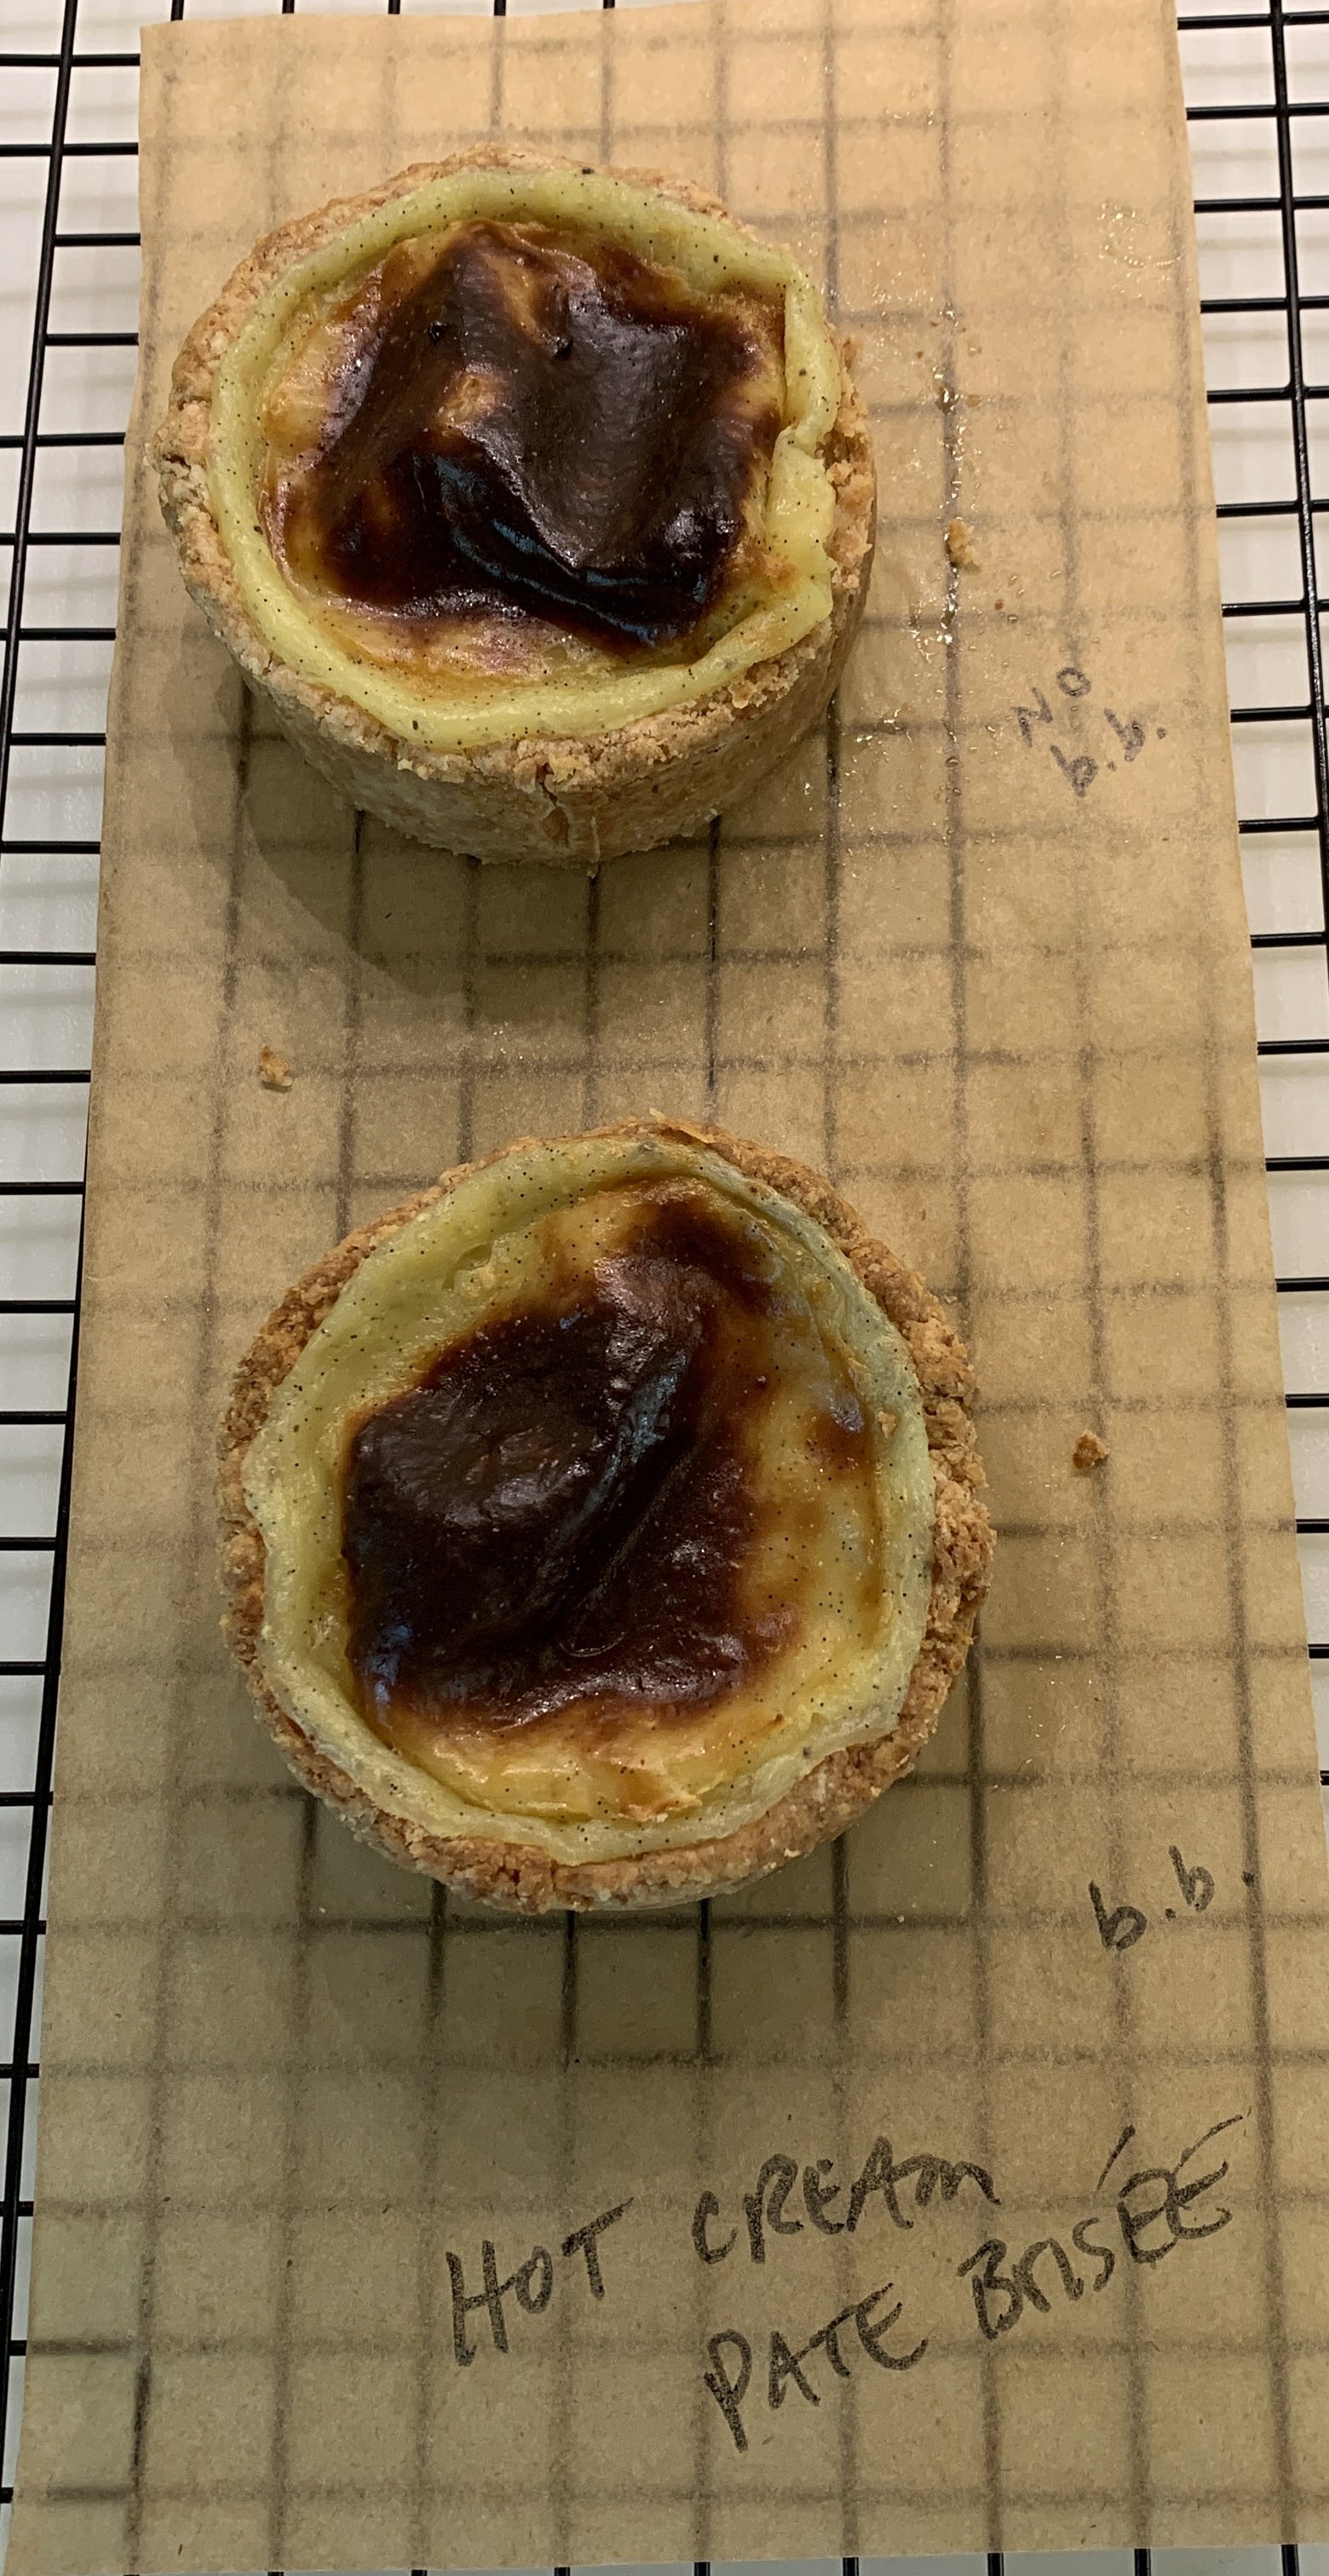
Look for the nicely browned (in some cases almost black) top and just a hint of jiggle in the otherwise set custard. Both crusts baked up brown and crisp, blind baked or not. Good to know.

pâte brisée/hot cream just out of the oven

The flans do deflate while cooling as seen below.

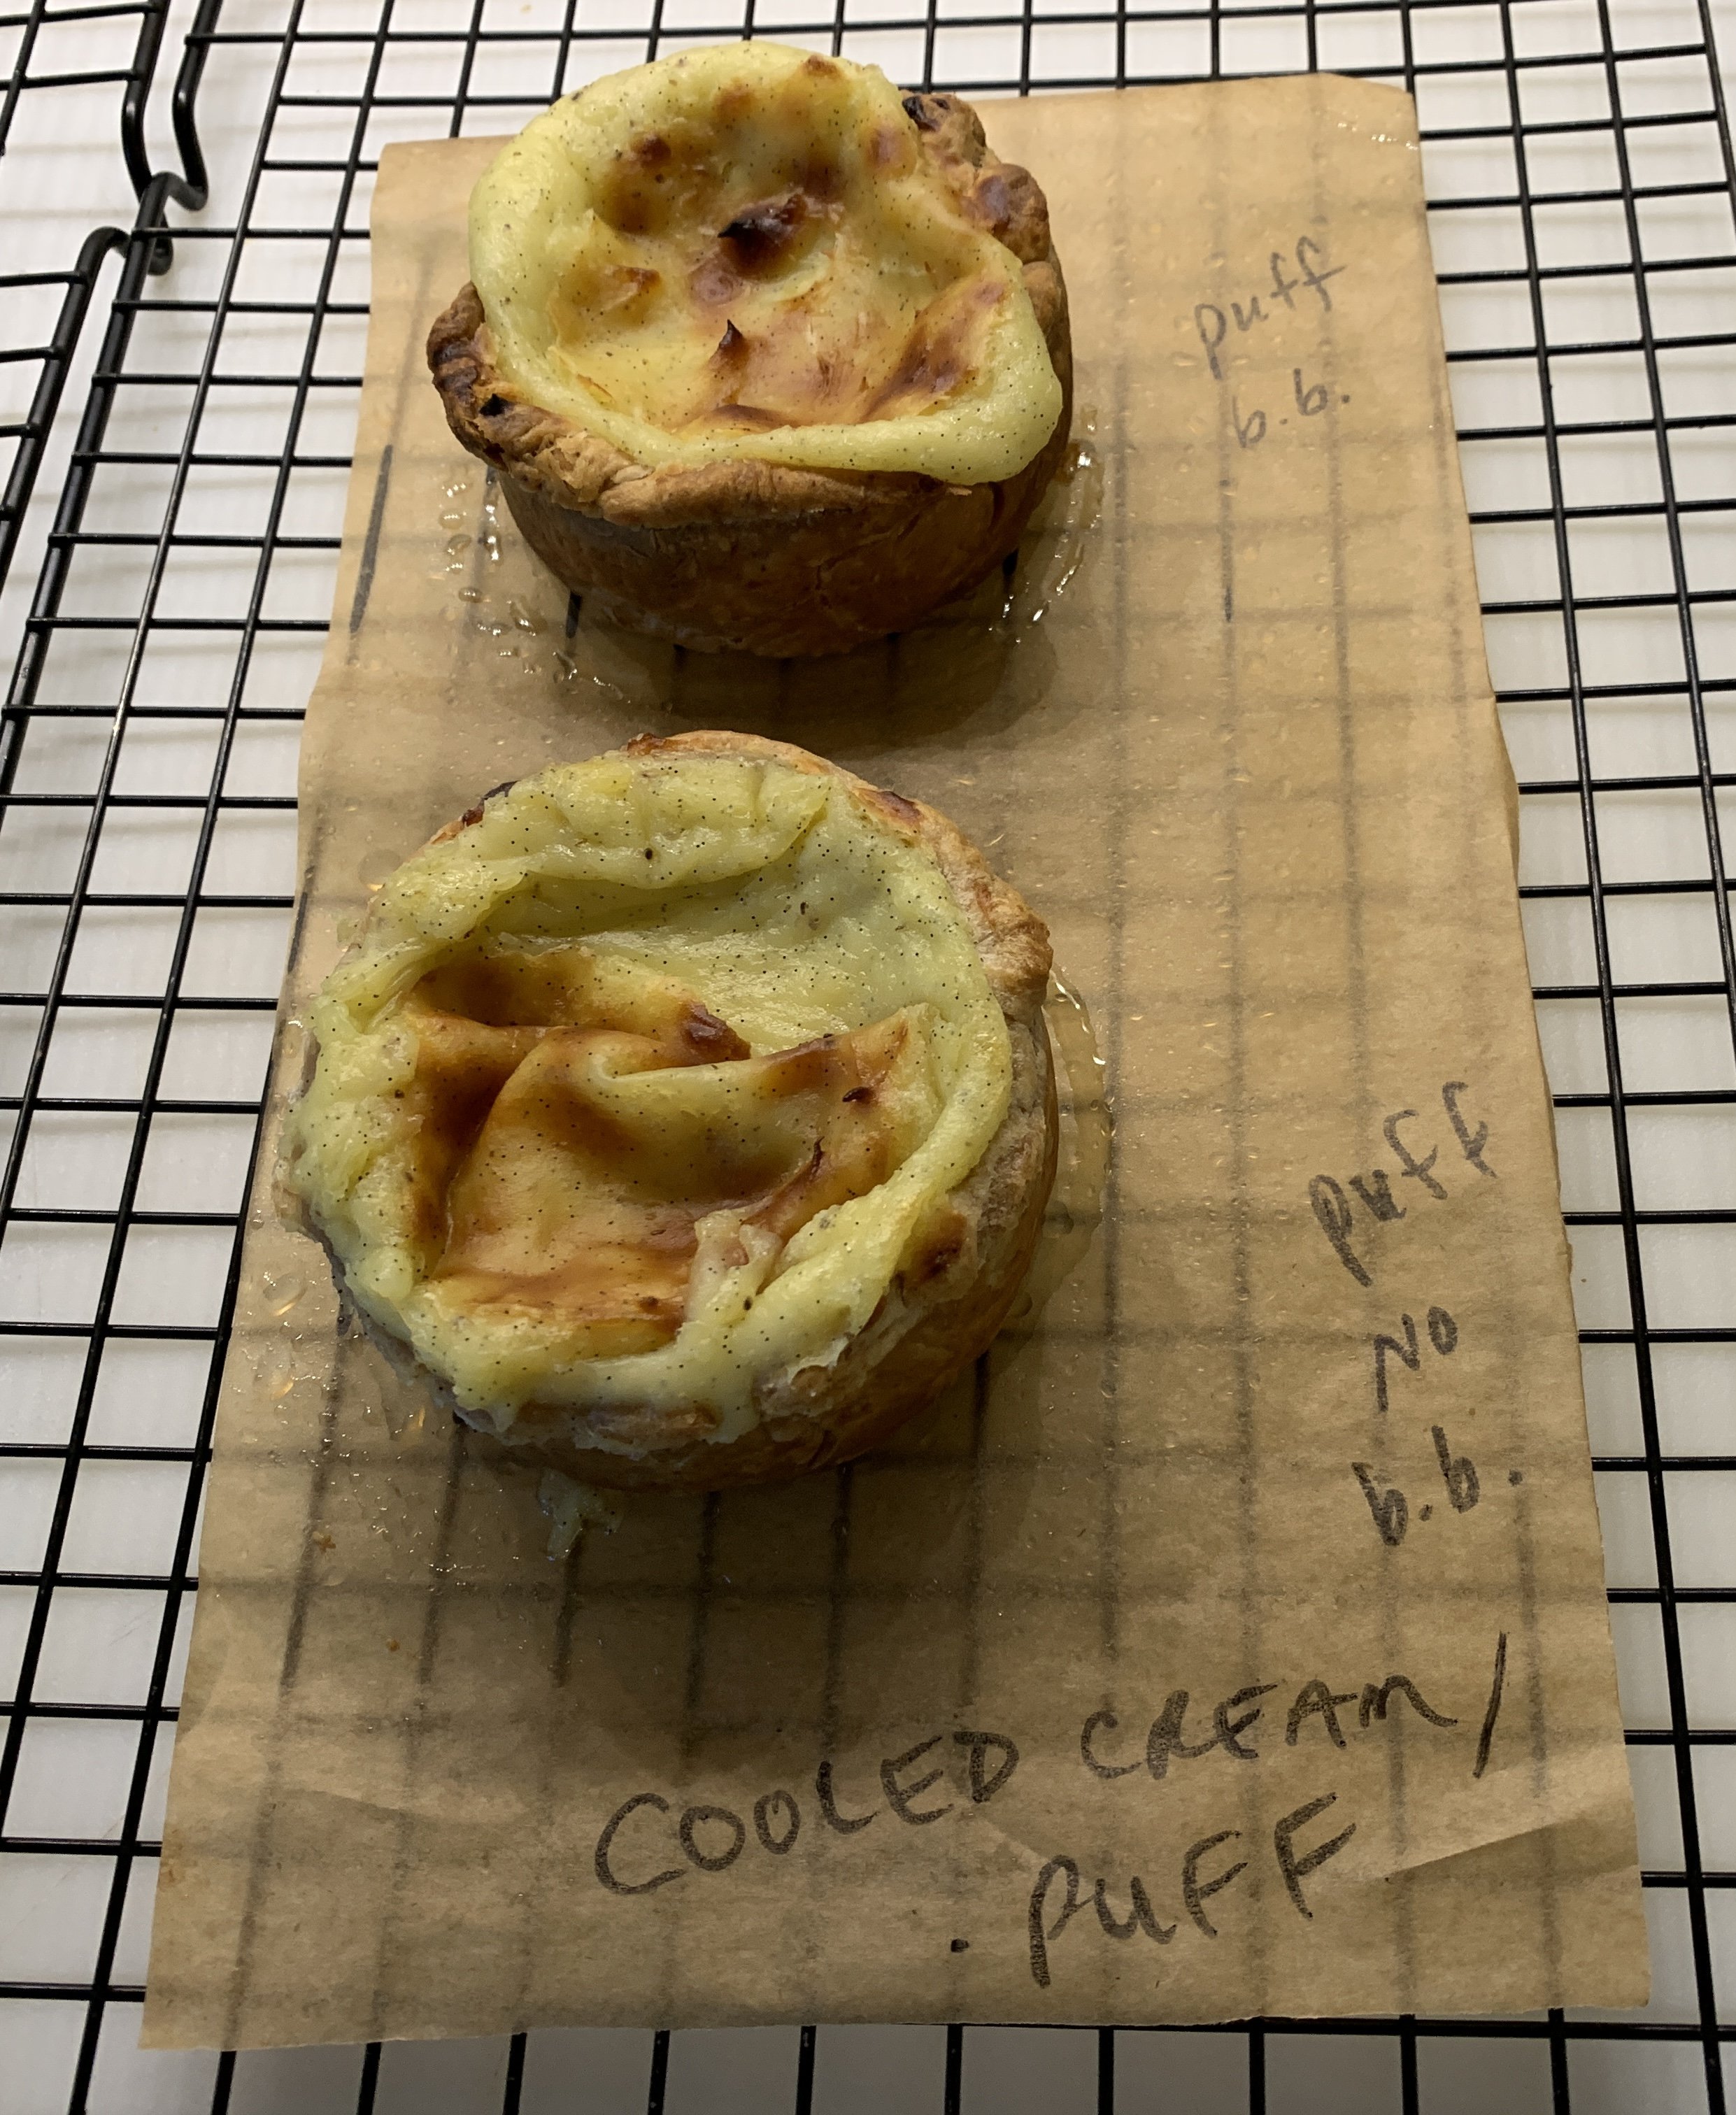
I allowed the remaining flan cream to cool about 30 minutes and filled a blind baked puff and an unbaked puff with the cooled cream.

Ready for the oven

Not a pretty picture since the unbaked puff puffed, essentially pushed the filling out and over the edges. Yikes! The blind baked one didn’t fare too well either. Too much filling on my part, although it did settle down once cooled.

rather a mess

Last but not least I filled my remaining two unbaked shells (one brisée and one puff) with cooled custard and froze them for a couple of hours before baking. I was a bit short on filling, but they were still good for the testing phase.


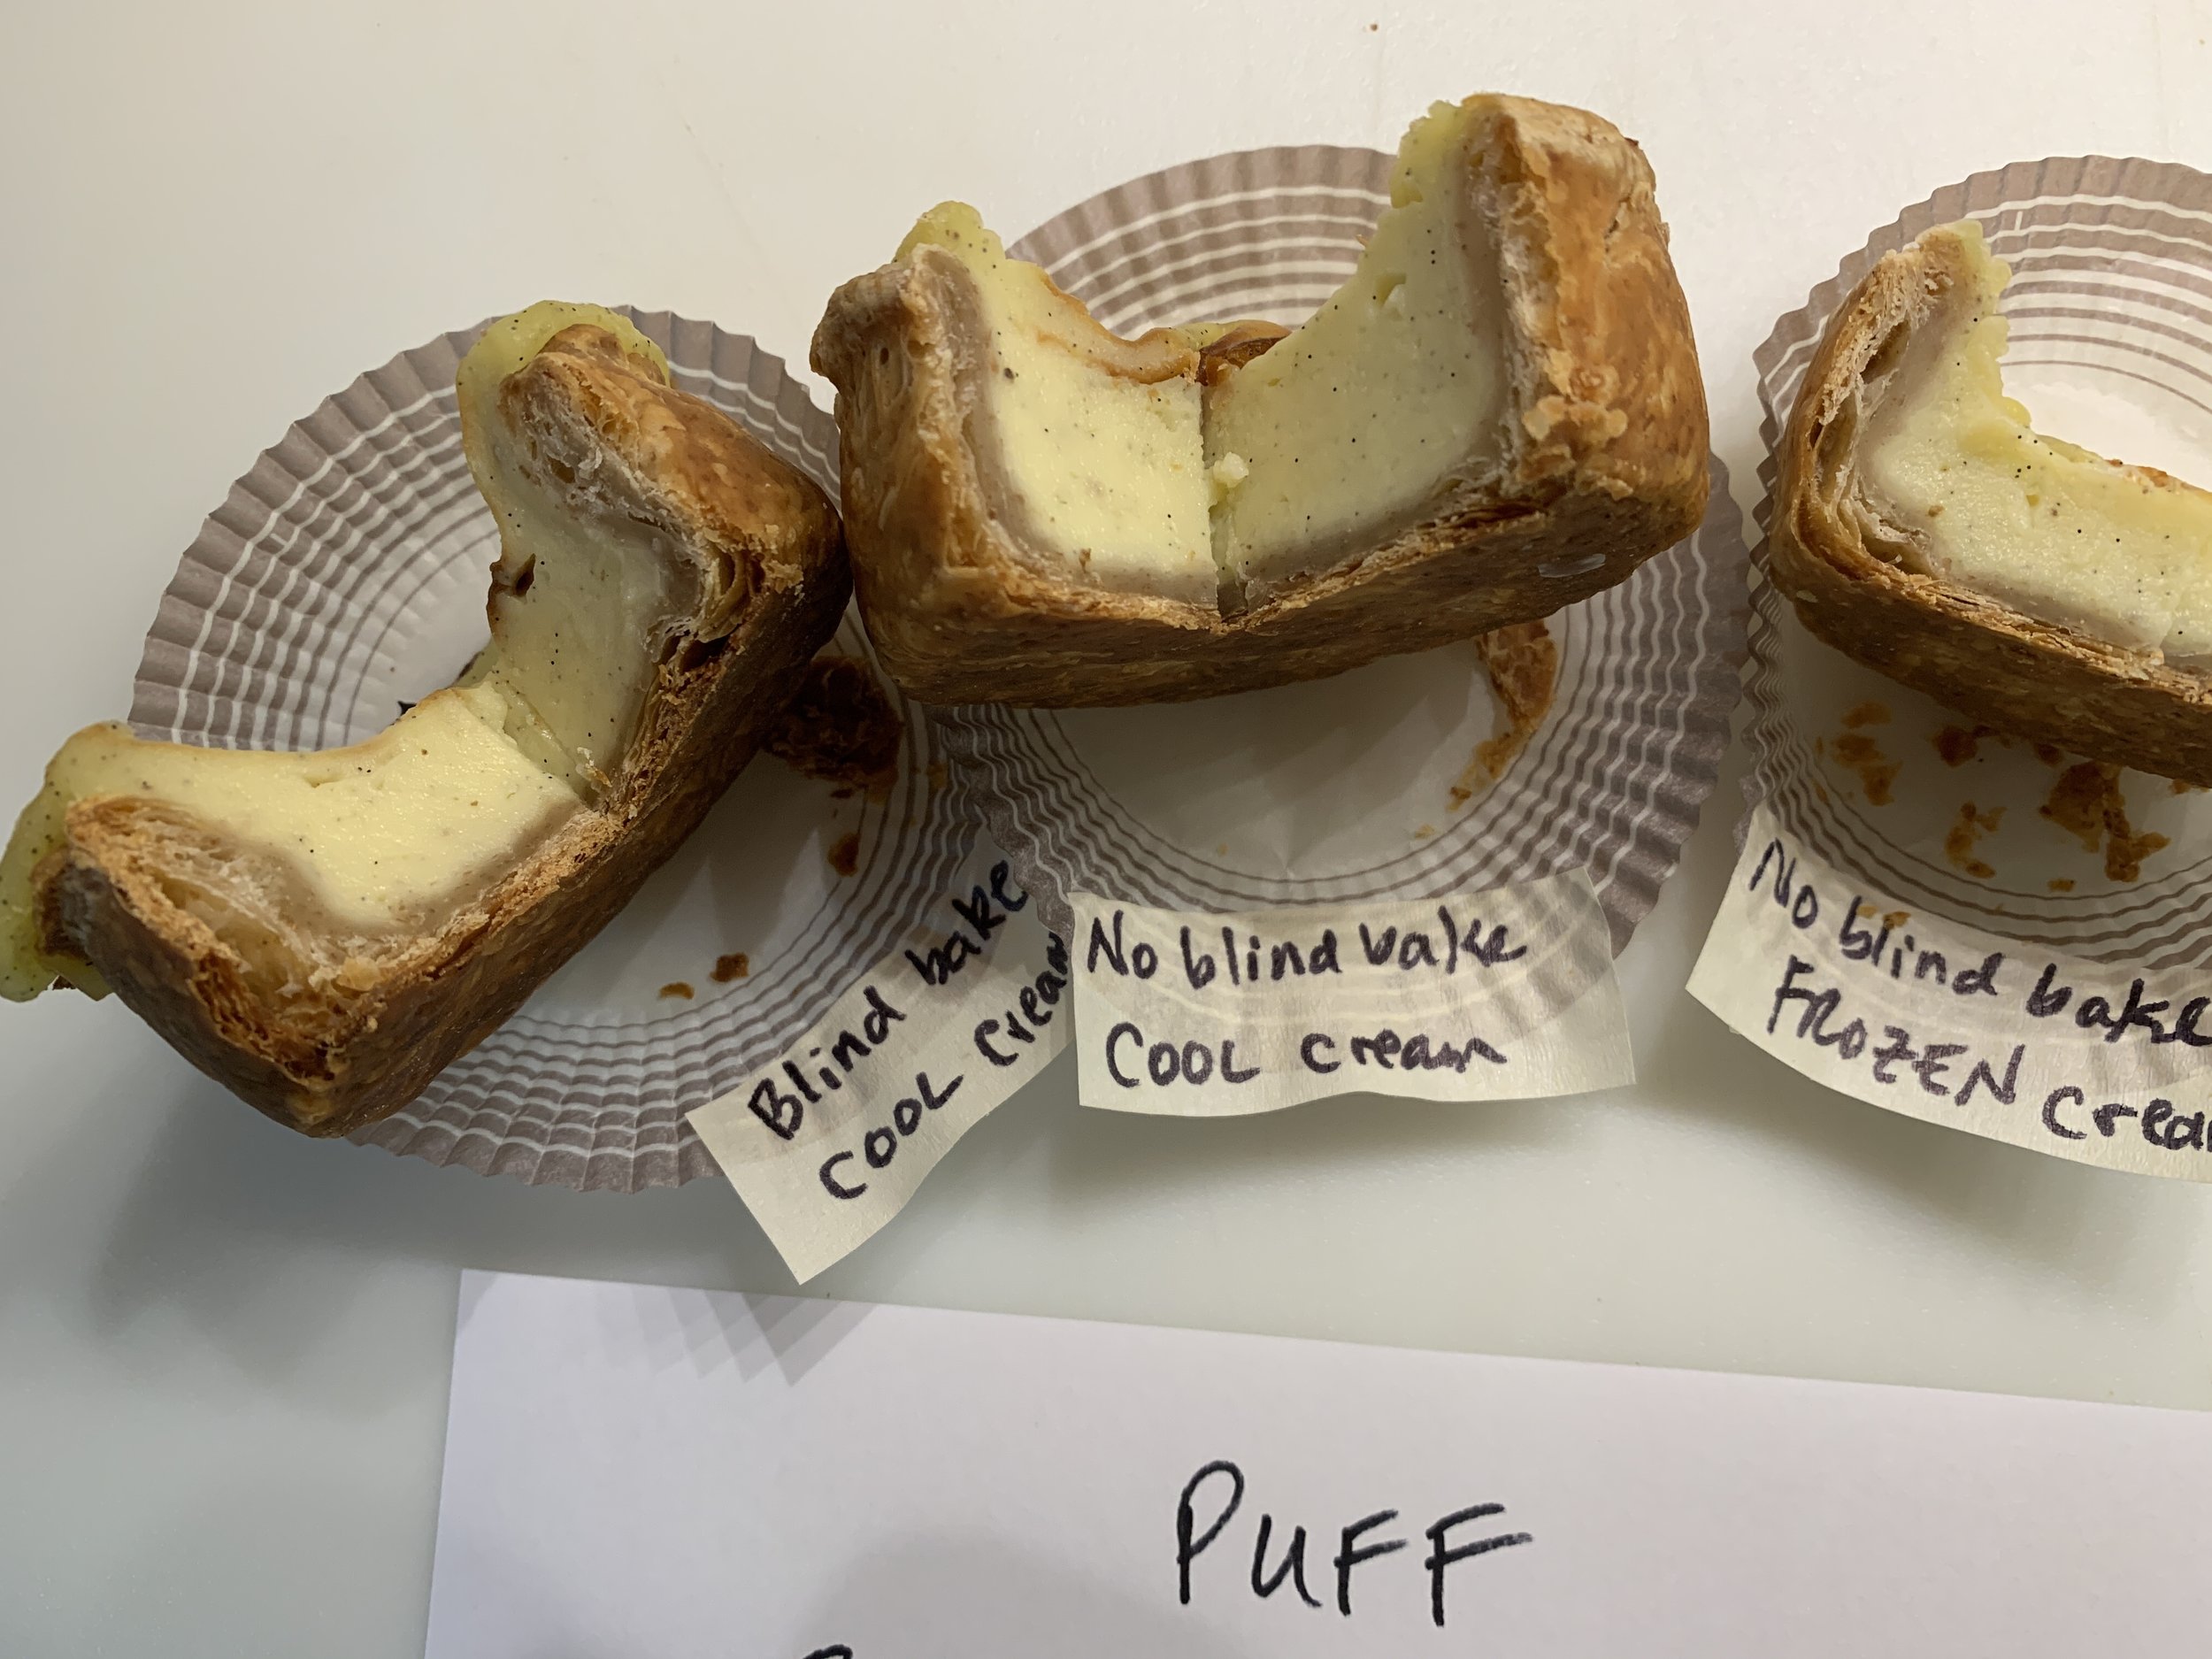
Taste test time! The first image is of the three puff crusted flans. You can see the inner layer of puff isn’t fully baked, even in the blind baked one. The custard was a winner in all versions, whether hot, cooled or frozen.

Here’s a closer view of the puff versions. Can’t have that doughy layer, no sirree!

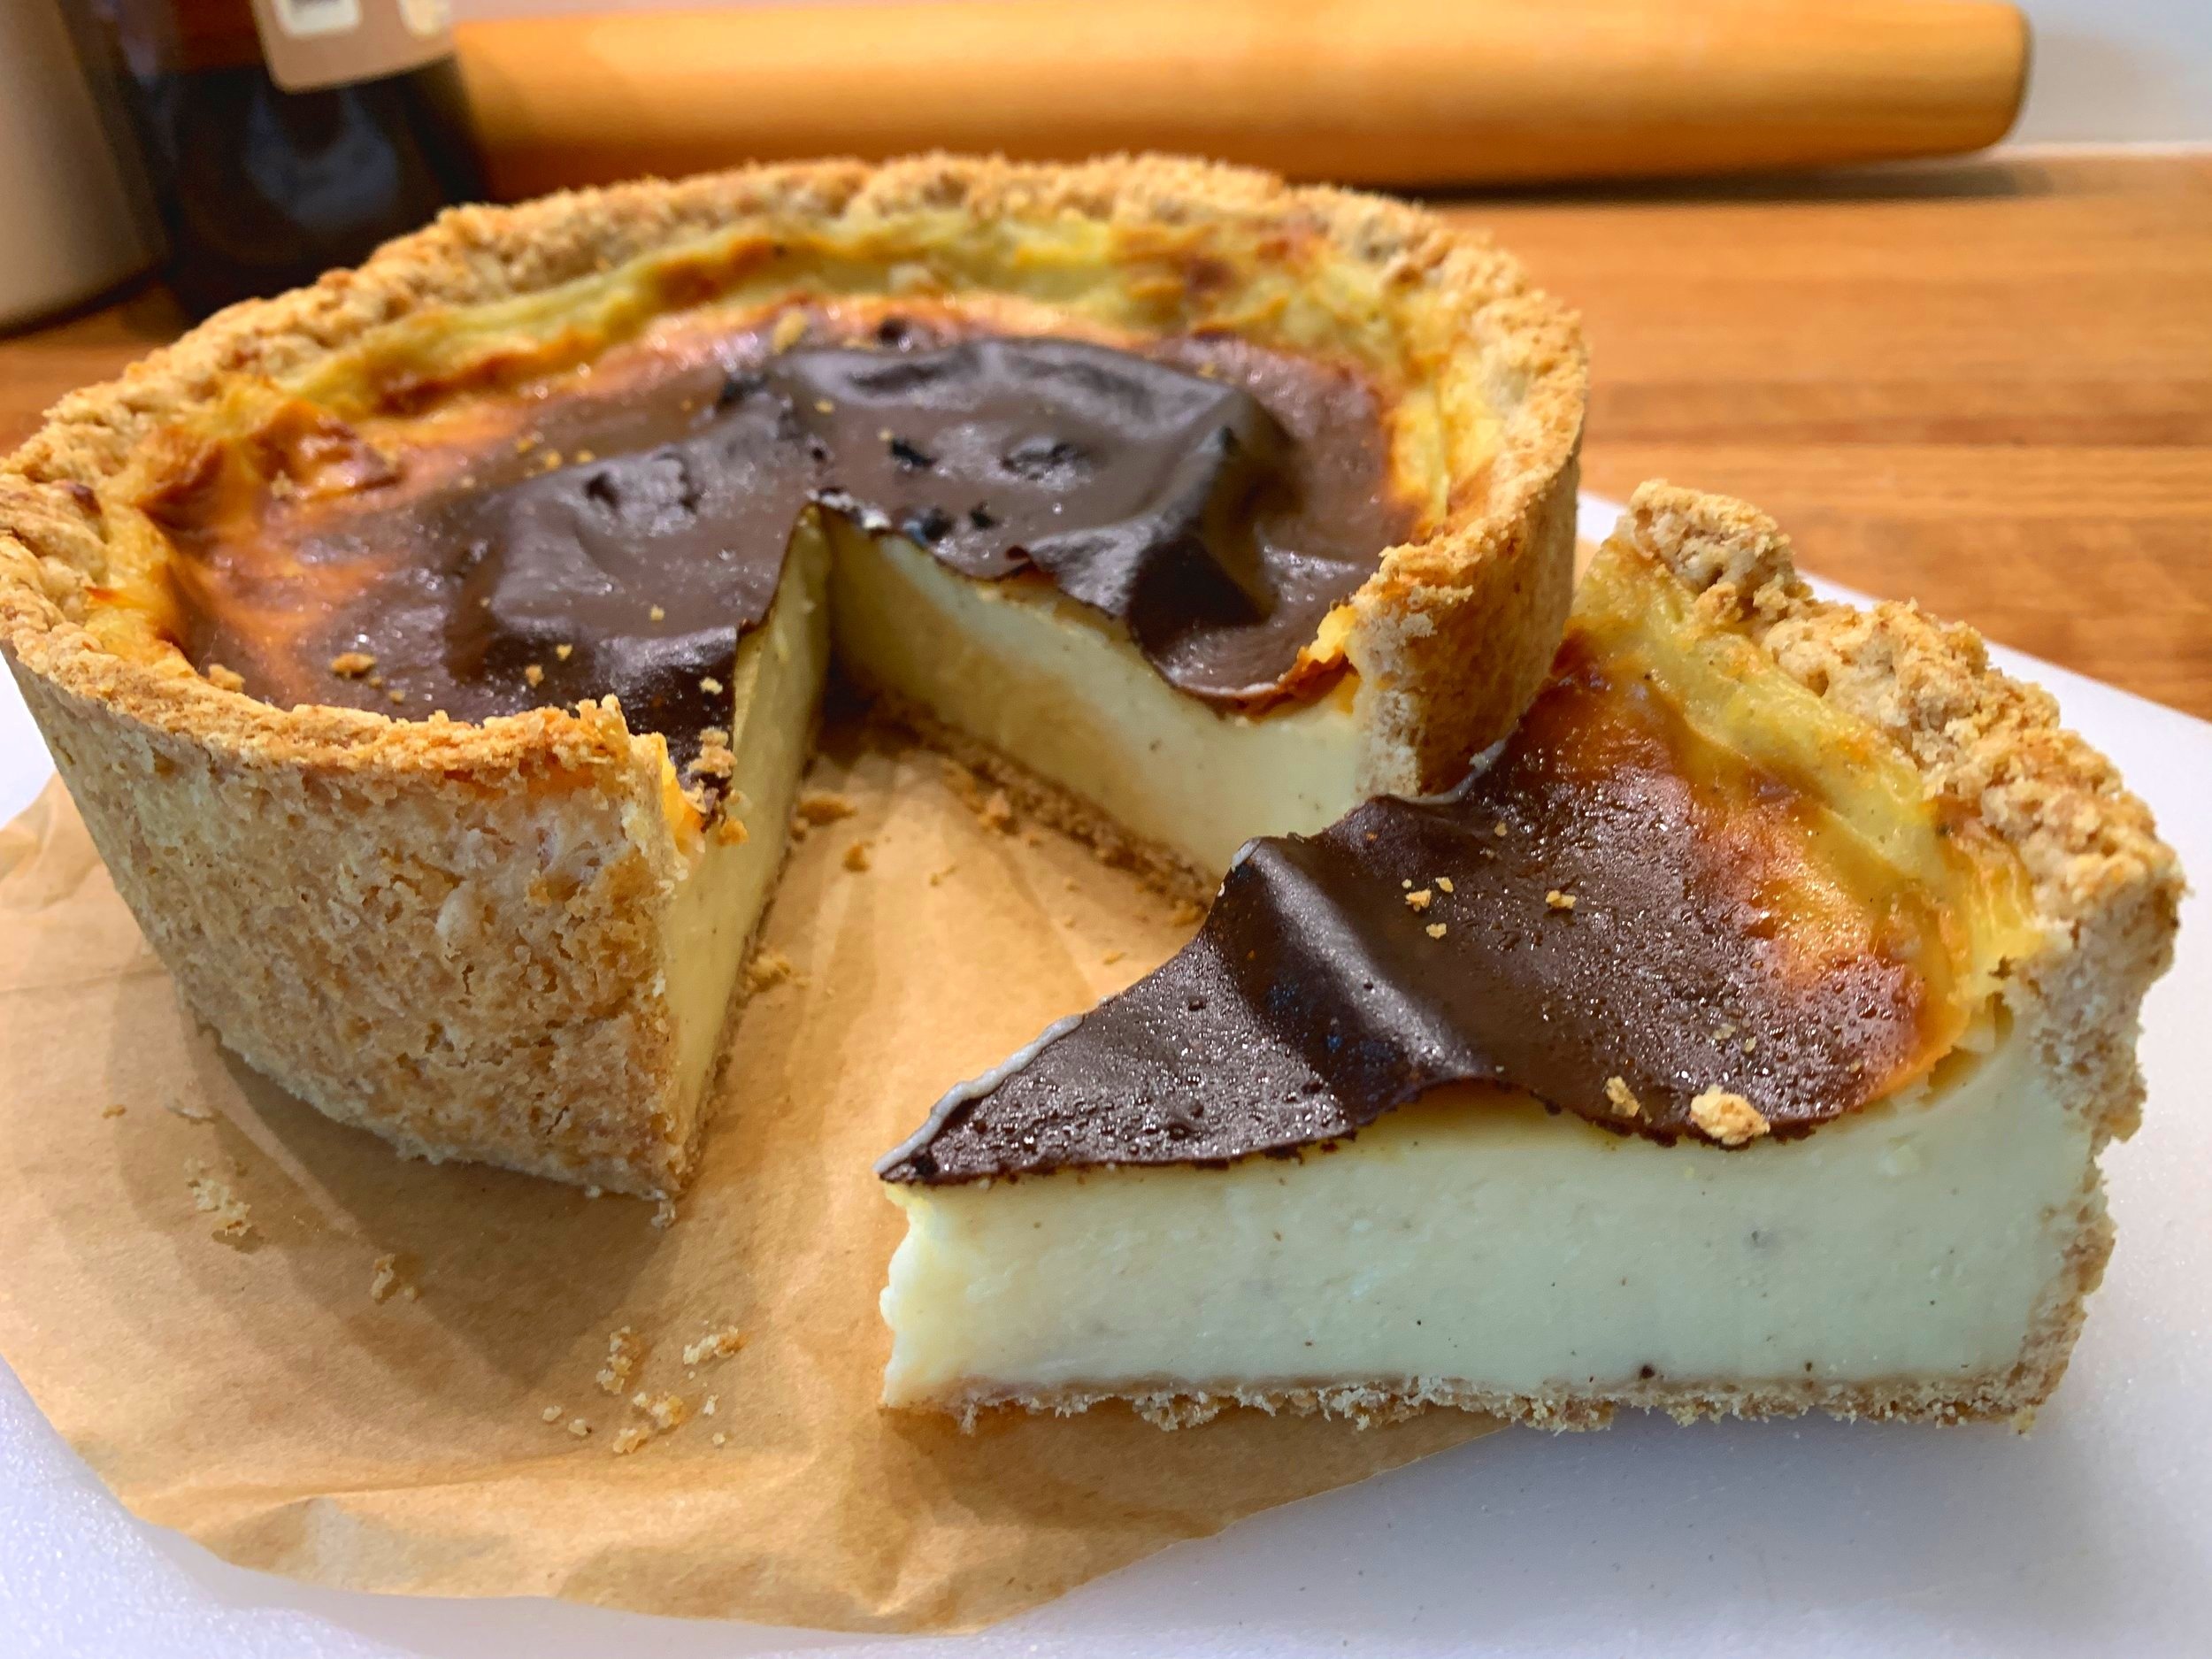
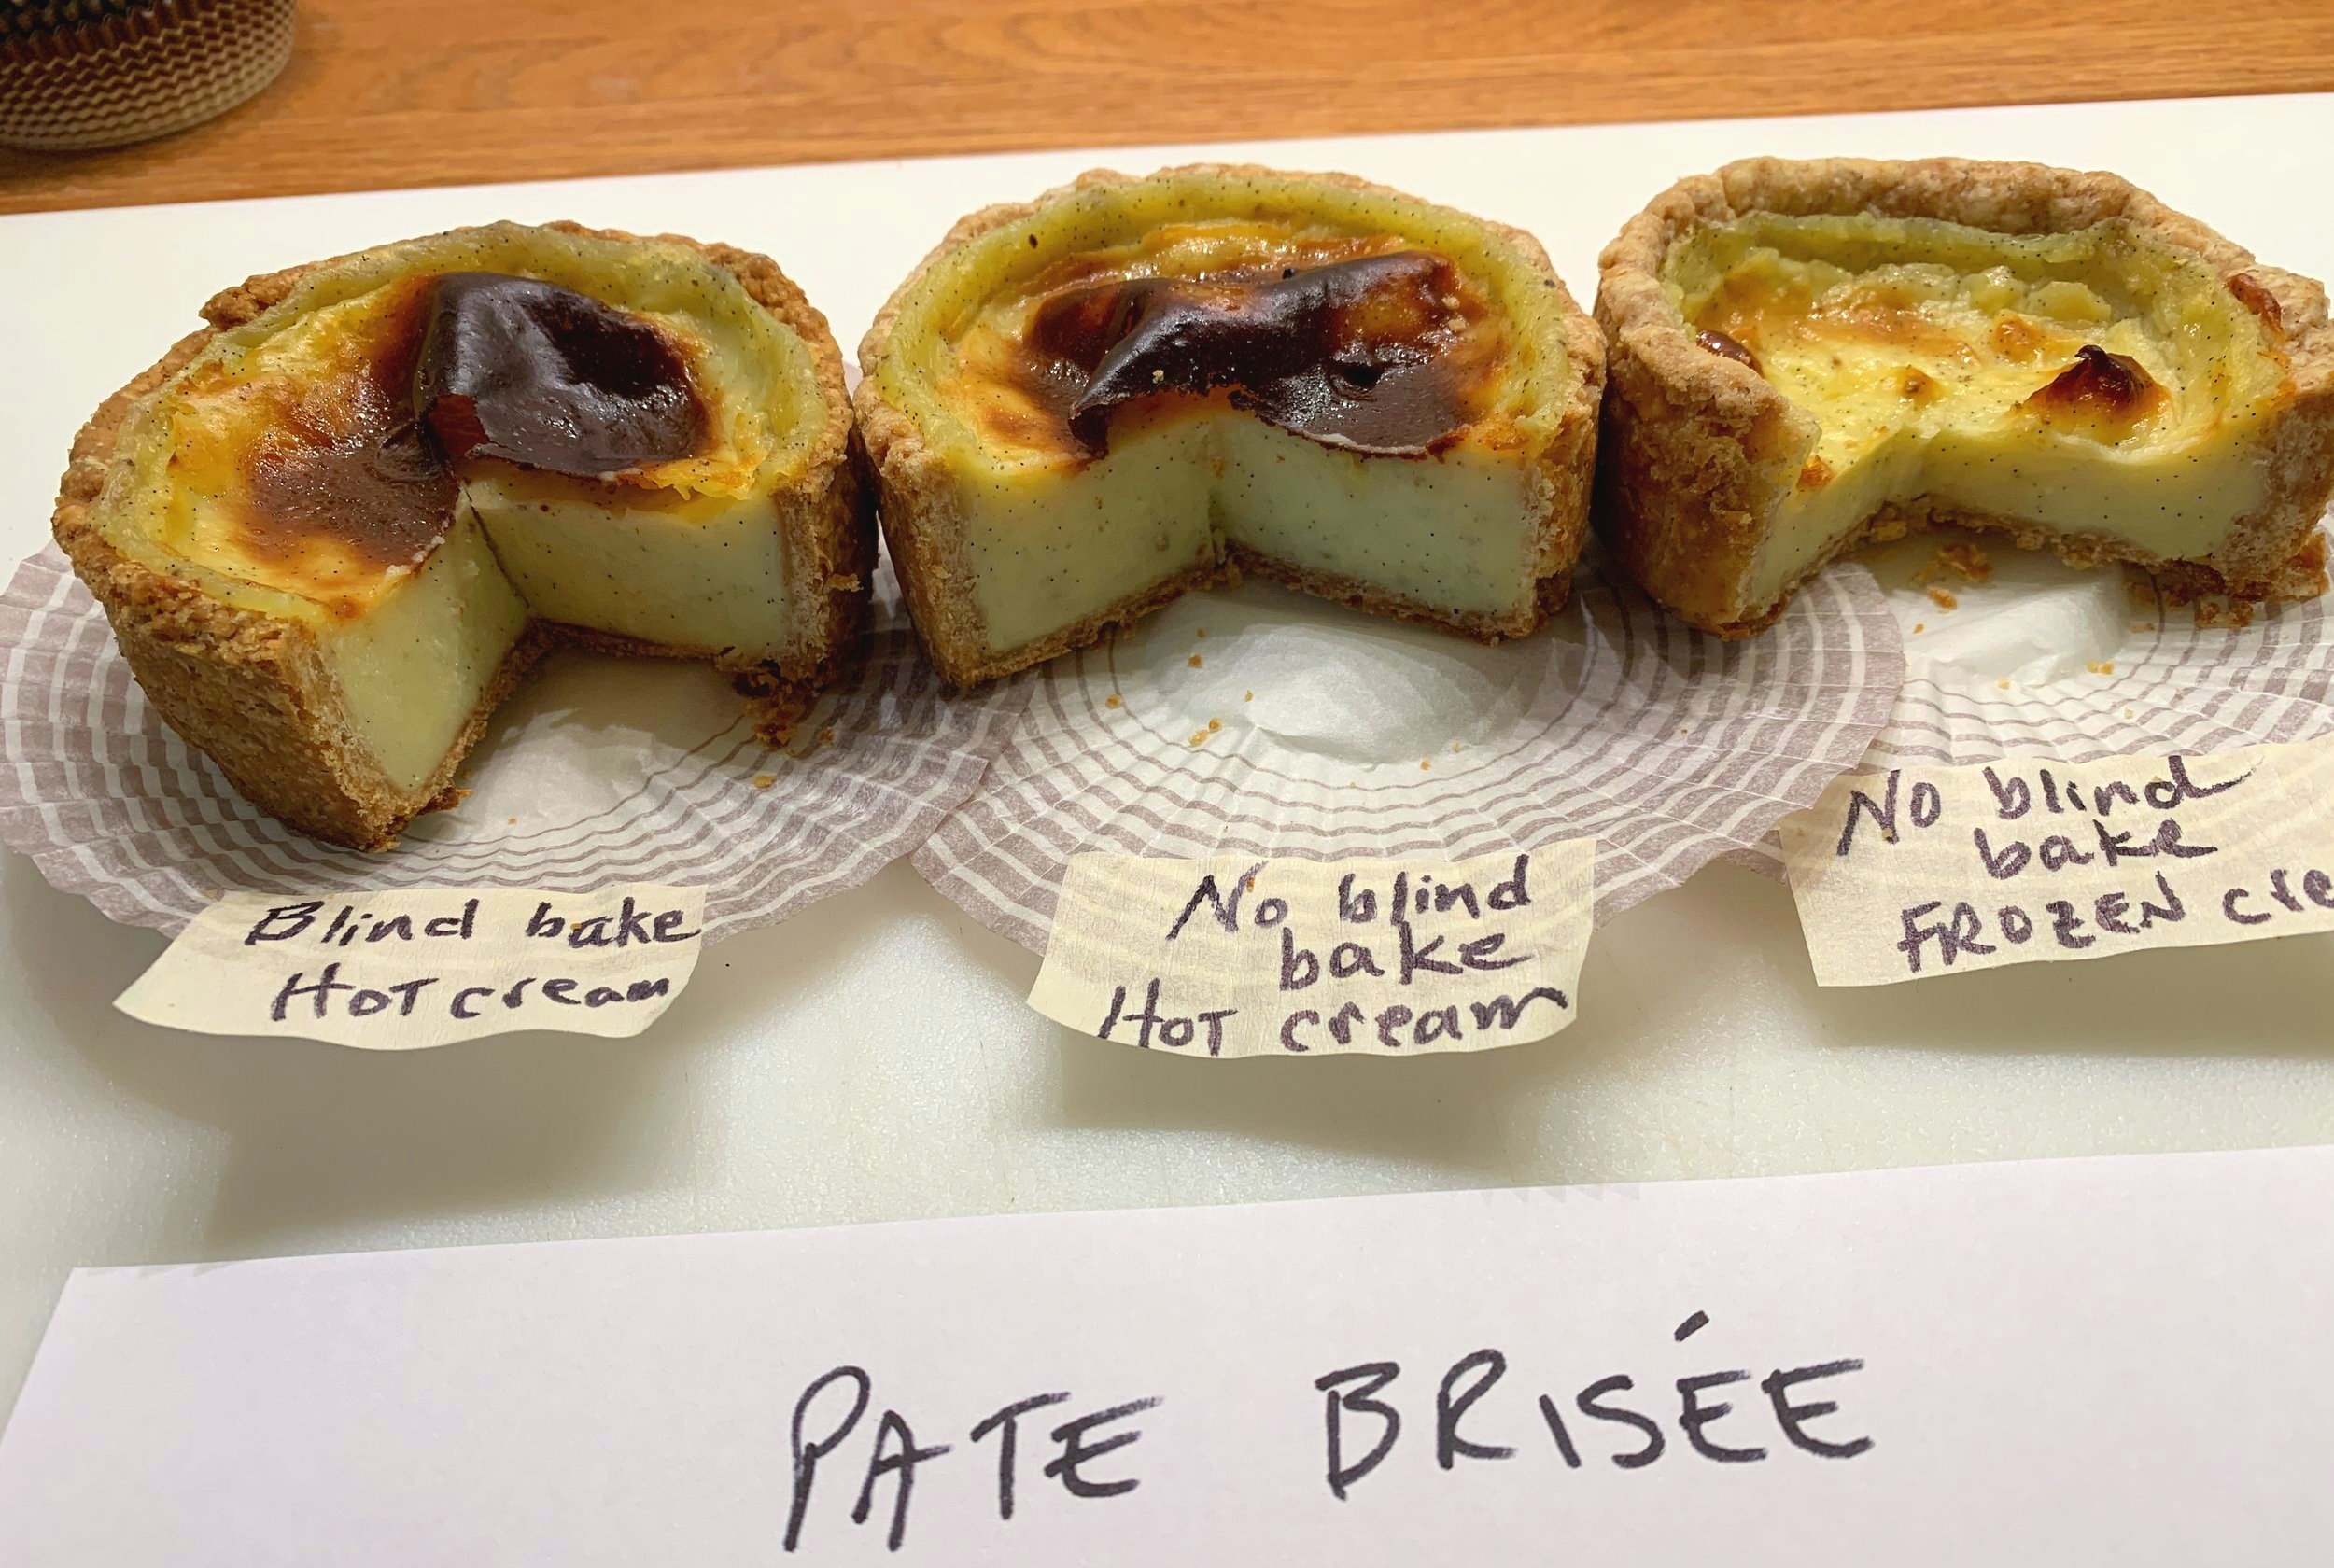
The brisée versions all baked up beautifully. The crust so nice and crisp, browned and buttery and the custard silky smooth with a lightness that seemed just right.


Here’s a closer look at the brisée crusts.


The final analysis? Pâte brisée, hot custard and no need to blind bake. Straight forward indeed.

I simply had to do one final version using a 16 cm open ring. As seen below, I did the let-the-raw dough-hang-over-the-edge-of-the-ring approach, something I’ve seen in a couple of different pastry books. Once the whole thing is baked and cooled, you carefully cut away the excess dough to create a clean edge. It worked OK but I wouldn’t bother with it in the future.

Over hanging dough approach

Place lined ring/sheet pan in the freezer while preparing the custard. Fill shell with hot cream and bake.

Ready for the oven

All Baked up

Crust trimmed

Once cooled, trim off the excess crust (snack on it!), lift off the ring and cool the flan in the fridge overnight. This holds well refrigerated over 3-4 days, and I’ll admit that Steve and I each enjoyed a daily slice during that time. A keeper.


Have fun making your own flan Parisien!

Before I go, let me share this photo of a beautiful double rainbow seen out of our west windows this morning. The rising sun in the east was hitting the trees/oncoming rain clouds to the west to give us a vision of nature’s finest. Until next time - happy baking!

This year's Thanksgiving tarts

IMG_3376.JPG

Thanksgiving is fast approaching and now’s the time to decide what you’d like on your holiday dessert table!

This year I’m offering pumpkin custard with sesame crunch, pecan caramel chocolate truffle and apple cranberry with brown sugar crumble in both 9-inch and my “sharing” 5.5 inch size (seen in the photos above and below) for those of you who might prefer petite portions or are hosting or joining a smaller group for the holiday this year.

IMG_3375.JPG

Let’s take a look at how these babies are put together, shall we? BTW - even though the images depict smaller tarts, the discussion is for making standard 9 inch tarts.

First up is pumpkin custard. Use your favorite pate sucrée recipe and add about 30 g toasted sesame seeds at the end of the dough prep. Blind bake the crust at 350ºF and set it aside while preparing the filling. Note: tart dough recipe is enough for two 9” tarts - wrap and freeze any extra for another time.

Reduce the oven temperature to 325ºF.

Make your favorite crème pâtissiére, adding 1-2 teaspoons or so of pumpkin pie spice mix (I use my own made-up mixture of spices) to the milk base. At the end of cooking blend in 1 cup pure pumpkin purée, 4 tablespoons of butter and two teaspoons vanilla extract. This base is more than enough for one 9 inch tart but you can use leftovers to make a bunch of mini-tarts or fill cream puffs. You can even divide what’s left into ramekins and bake them in a water bath for a lovely pumpkin custard for after the holiday.

IMG_3360.JPG

Fill the blind baked tart shell with the warm pastry cream, just barely shy of the rim and bake for about 20 minutes until set with a hint of a jiggle in the center. I did several test batch sizes as you can see below.

IMG_3366.JPG

Let cool then store covered in the fridge until ready to serve. In my case I garnished with whipped honey mascarpone cream and a sprinkling of sesame crunch. For a slightly different approach, change out the sesame seeds in the tart dough with toasted, finely chopped hazelnuts, almonds or pecans and use the same nut as a simple garnish with lightly sweetened whipped cream. Or simply leave out any dough additions and create your own version of topping.

Pumpkin custard tart

Pumpkin custard tart

Next up - pecan caramel chocolate truffle tart. And remember - this is for a nine inch tart. The approach is much the same: blind baked pate sucrée, cooled and waiting on the sidelines. For a chocolate crust, just add 30 g (~1/3 cup) unsweetened cocoa powder to the flour in the recipe.

Toast 100 g/scant cup pecans and either leave the halves whole or break them up coarsely. Blend them with a scant 2/3 cup caramel sauce (I make my own, although you can use a good quality purchased product from your local supermarket or specialty food shop).

Place 85 g dark chocolate (I use Guittard 61% discs) and 21 g unsalted butter in a heat proof bowl. In a separate heat proof container (I use a pyrex measuring cup) bring 120 ml heavy cream to a boil. Pour over the chocolate/butter and blend gently until smooth. Blend in 3/4 teaspoon pure vanilla extract. Note: double or triple your recipe to have more ganache on hand for your next truffle tart project!

IMG_3368.JPG

Layer the nut caramel mixture in the bottom of the baked shell. Once again I made some small trial versions - for taste testing, don’t ya know?!

IMG_3369.JPG

Pour the ganache over - start slowly to let it nestle into all the nooks and crannies and continue pouring until it’s to the rim edge. Some bubbles will invariable pop up to the surface - just pop ‘em with the tip of a paring knife.

IMG_3370.JPG

Leave at room temperature until the ganache has set and cooled. If you put it in the fridge before that, there’s a greater chance that beads of moisture will form on the surface - you don’t want that! Once cooled you can go ahead with any garnish or cover/refrigerate and garnish later.

I top mine with chocolate shortbread cookie crumbs, a light dusting of confectioner’s sugar and a few pecans in the center. Pull the tart from the fridge 30-60 minutes before serving to let it temper and bring out the flavors more fully. Feel free to add a dollop of lightly whipped cream atop each portion.

Pecan caramel chocolate truffle tart

Pecan caramel chocolate truffle tart

Last but not least - apple cranberry! A straight forward pâte brisée dough filled with a mixture of lightly sweetened sliced apples and dried cranberries and topped with a brown sugar crumble.

Heat the oven to 425ºF.

I typically line my tart rings, fork-prick the dough and hold them in the freezer while preparing the fruit. For a nine inch tart I plump 100 g dried cranberries in warm apple cider for 20 minutes or so while I peel, core, halve and thinly slice 4-4.5 cups of Jonagold apples (another good mix is Macintosh and Granny Smith). Drain and paper towel dry the cranberries and mix the fruit with a squeeze of lemon juice, 1/4 cup sugar (use brown if you’d like) and 2 tablespoons of flour. Then I mound the fruit into the lined ring. In this case Mr. Steve had reduced down a bunch of apple cider for me, creating a delicious apple cider caramel. I drizzled some of that on the fruit once the lined ring was filled. Yummy stuff.

IMG_3362.JPG

You might notice the scrap of rolled out dough on the sheet pan - I bake one every now and again just to see how the crust tastes au naturel. (In case you’re wondering, it was flaky, buttery and melt-in-your-mouth good.)

IMG_3363.JPG

Top with a standard crumble mixture of equal weights flour, brown sugar (light or dark is fine) and diced butter and cover the fruit with the mixture. Not a very thorough covering job on those small tarts, eh? As I’ve mentioned in previous posts over time, I like to make a bunch of crumble, bag it up and stash in the freezer where it’s at the ready to be used.

IMG_3365.JPG

Bake on the bottom rack for 10 minutes then reduce oven temp to 400 and move up to the middle rack. Give it another 10 minutes then ratchet down to 375 and continue baking for another 10-20 minutes (all ovens are different so pay attention!) until the crumble has browned and you see some bubbling around the edges. Cool a bit and serve slightly warm or at room temp with your favorite ice cream or whipped cream. Yippee!

apple cranberry tart

apple cranberry tart

IMG_3382.JPG

And there you have it! A delightful trio of seasonal tarts just waiting for the Thanksgiving table. Have a calm and peaceful holiday everyone.

Meanwhile here in west Michigan there are lots of rustling leaves along the pathways and the burning bushes are still burning brightly, even though many trees are now bare. Tis the season - and we may even see our first snow this weekend. Oh boy, oh boy!

IMG_3386.JPG

Blueberry & croissant bread pudding plus two summer ice creams

IMG_3114.JPG

This post is quite a mouthful (get it?) but here goes!

I've been experimenting in recent weeks, tweaking my tried and true croissant recipe in hopes of reaching the ultimate croissant perfection. Invariably I've had some croissants leftover, some of which were destined to become croissants aux amandes, one of Steve's (and many others by the way) favorite pastries. But that's not the only way to repurpose this lovely laminated goodie -  bread pudding here we come!

IMG_3102.JPG

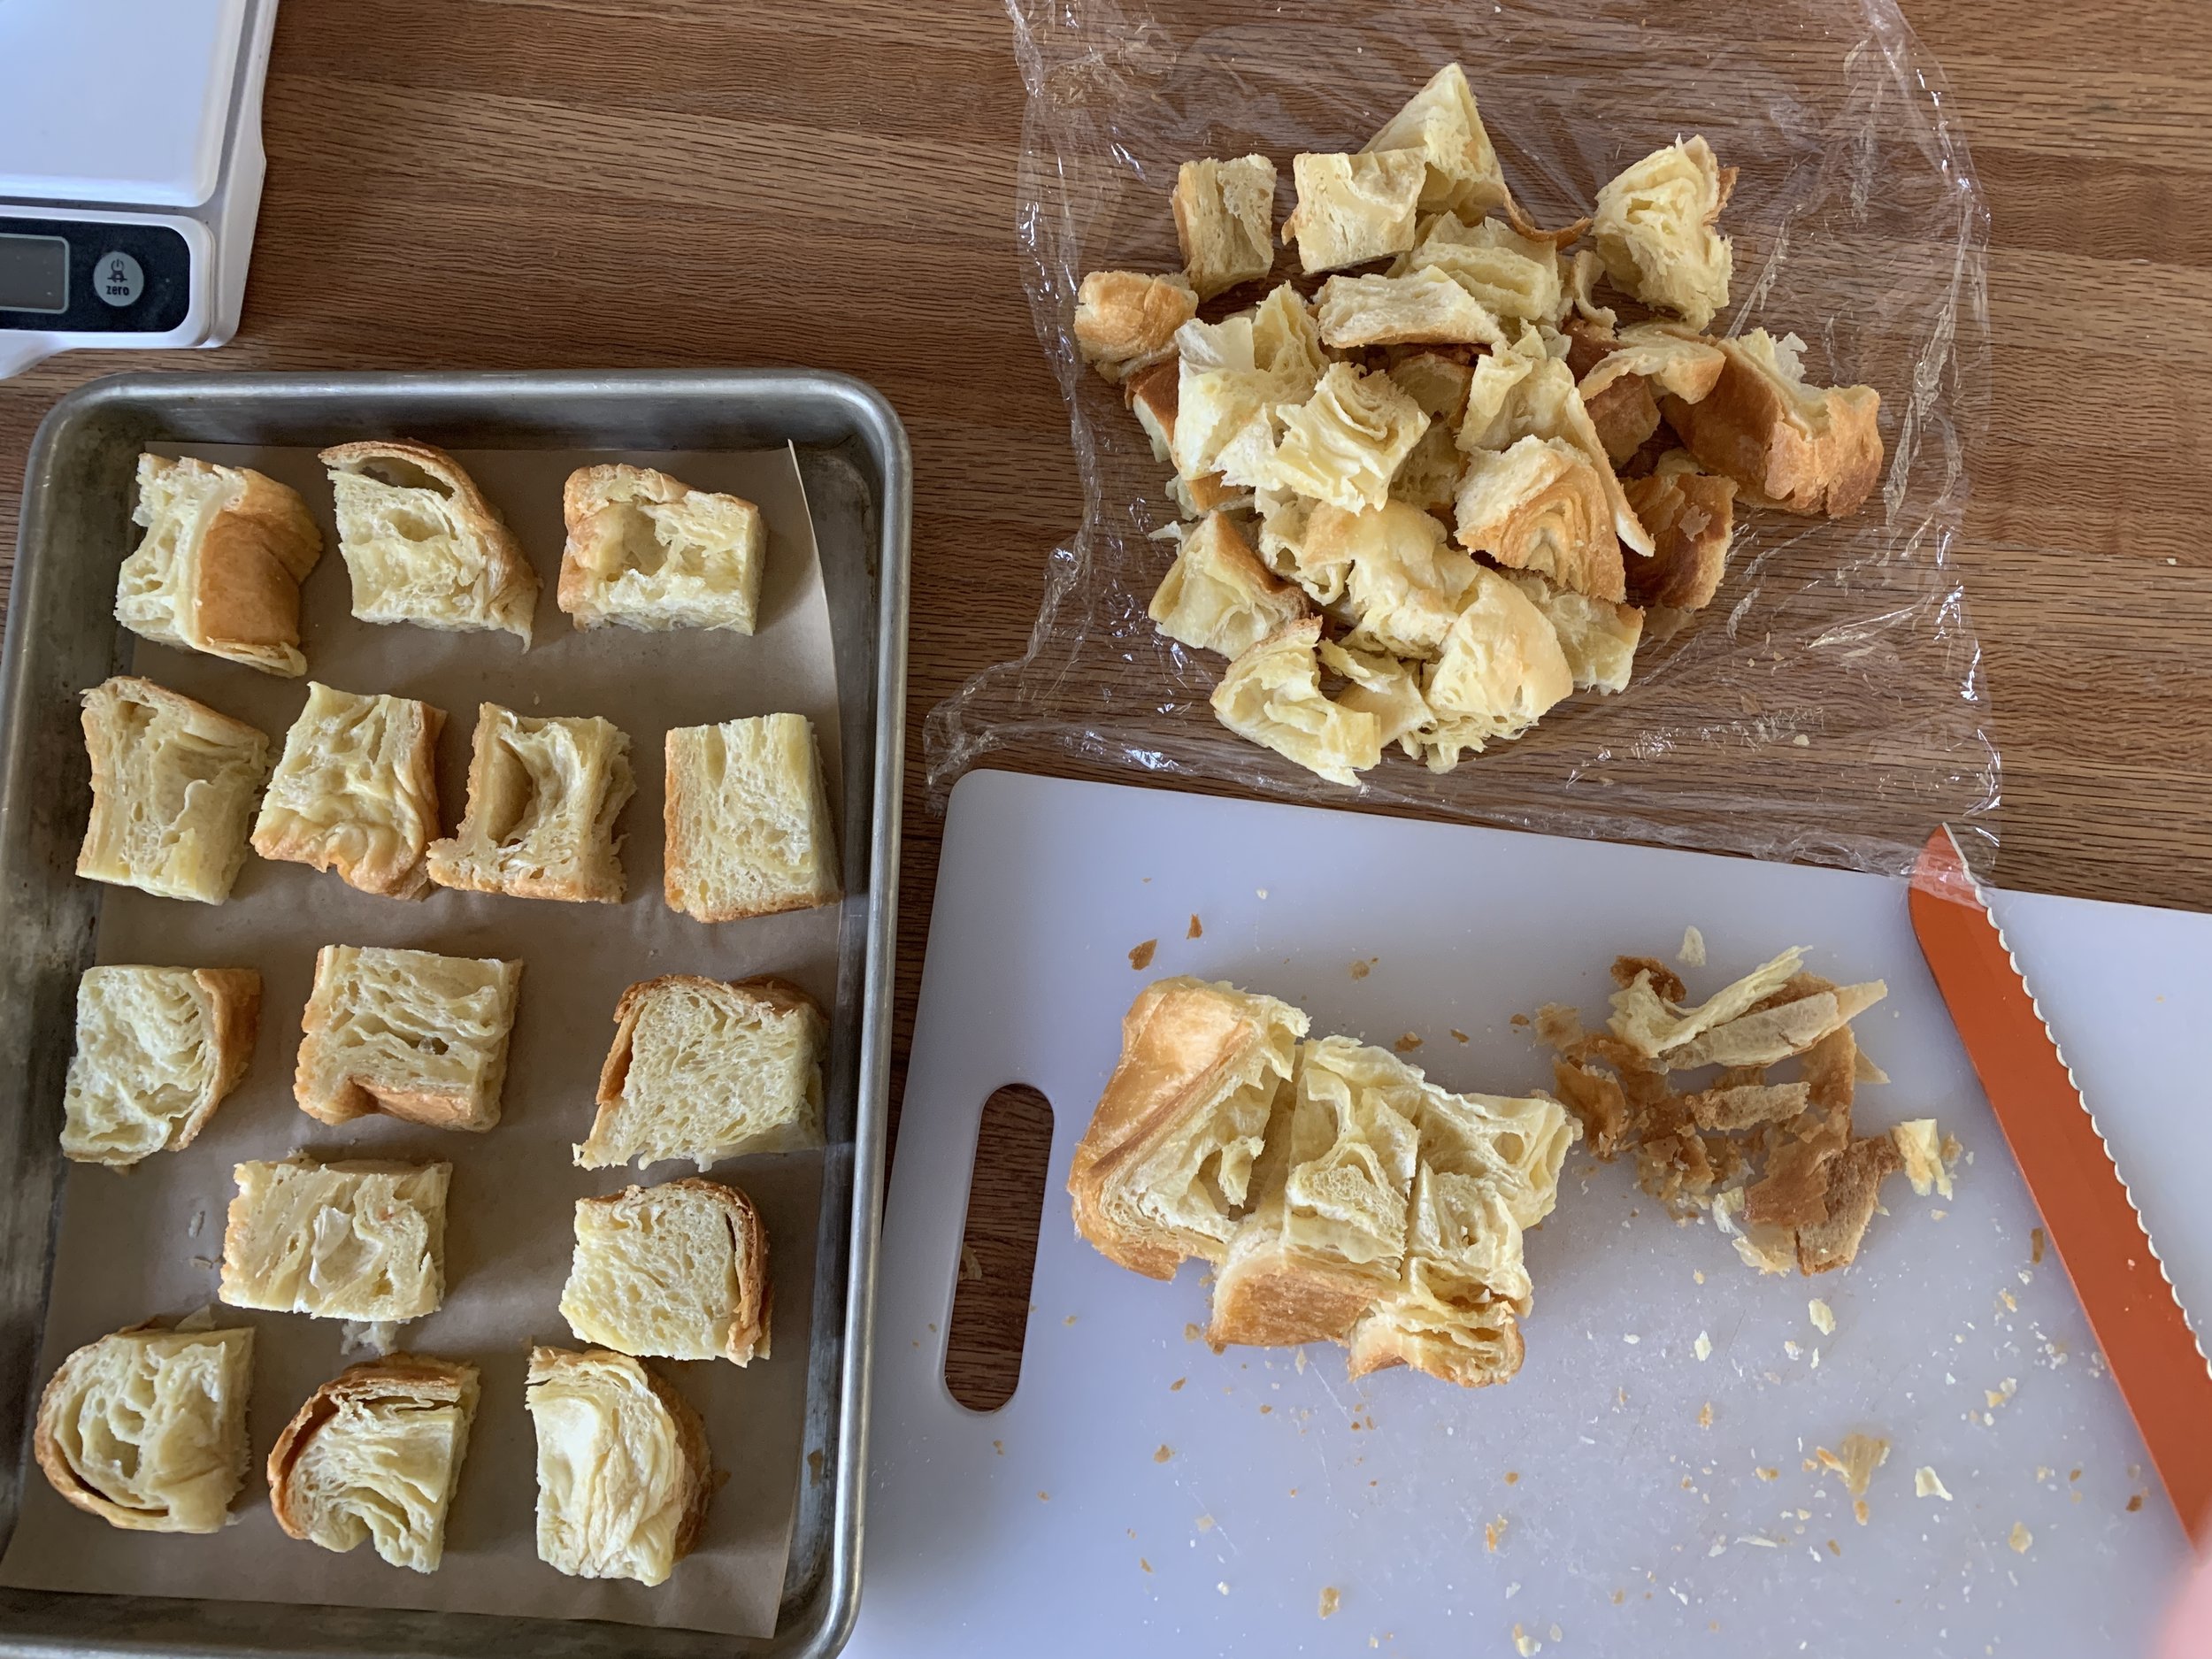
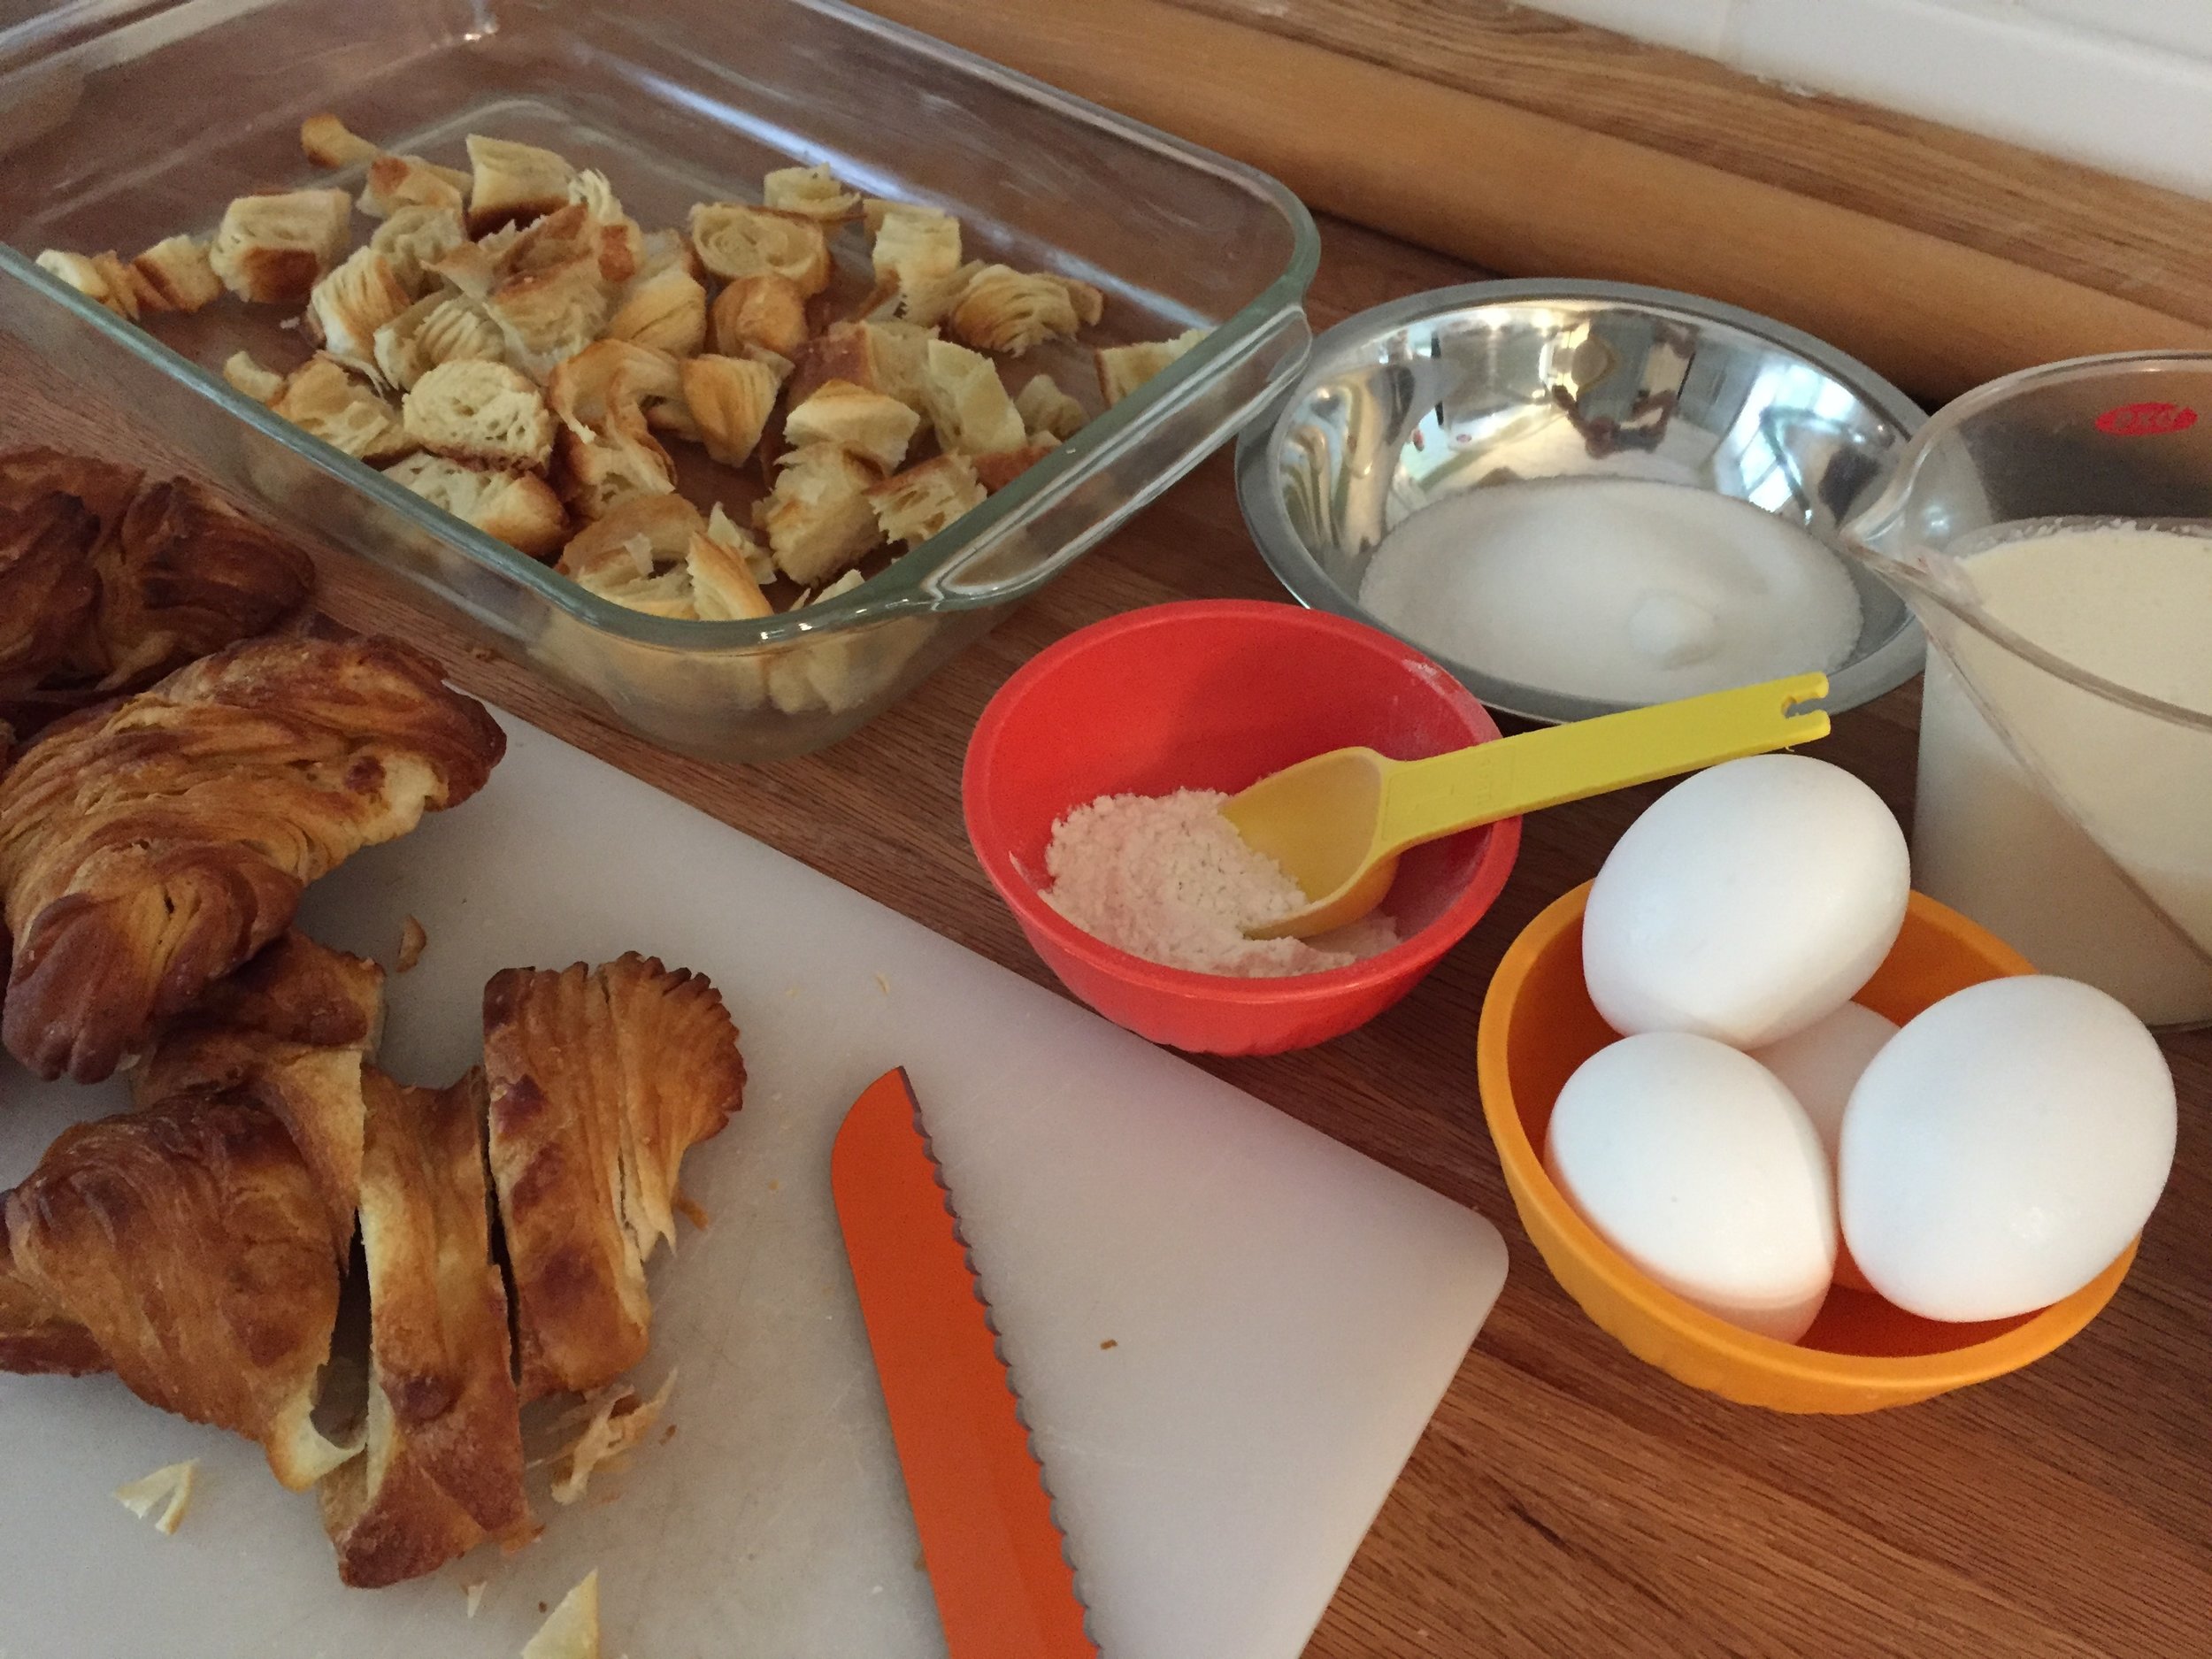
Here I'm using a 3 qt Pyrex casserole dish, lightly buttered, layered with about 400 g/14 ounces of chunked up croissant pieces. It's actually better to use "old" croissants for this purpose, since the dough is able to soak up the custard much more efficiently.

IMG_3107.JPG

The custard is one I love to use for baked fruit tarts too. I wanted a filling quantity about twice the weight of the croissants and doubling my base recipe worked out perfectly. Love it.

I typically plan ahead, giving my croissant/custard mélange a good couple of hours to soak in the fridge before baking. Then I topped this one with about 3 cups of blueberries, tucking them down into the custard a bit, followed by a sprinkling of raw sugar for a little extra crunch.

IMG_3108.JPG

Bake at 350ºF for a good hour to an hour and twenty minutes - you want the custard nicely set and the croissant pieces toasty brown. Just be patient. Trust me.

IMG_3110.JPG

Destined for the dessert table at our Labor Day outing at cousin Jen's, I added a couple of complimentary summer ice creams that I must say were pretty fun to make. BTW - I LOVE making ice cream, in case I haven't told you heretofore. I've been using a classic custard type base from David Lebovitz for many years now and never find it wanting. Just omit the vanilla bean from the base recipe when you're creating your own flavor(s).

First up - roasted plum almond. Dairy infused with toasted almonds (which are then strained out) . . . . .  

IMG_3076.JPG

the finished chilled ice cream base blended with about a cup of roasted plum purée then processed. 

IMG_3082.JPG
IMG_3086.JPG

It just takes some planning, as is true of so many things in the kitchen, right?

The roasting fruit thing has been another of my summer experiments, and since I'm invariably contemplating ways to preserve our wonderful summer fruit bounty here in west Michigan, why not give it a try. The idea behind the roasting is to concentrate the flavor more.

It's quite simple really. Heat your oven to 400ºF (or 375º convection), prepare your fruit depending on size (e.g peaches sliced, plums or apricots halved and pitted and maybe quartered too, cherries pitted, berries left whole - just play with it). Place fruit on a parchment lined sheet pan and roast about 10 minutes. Give them a stir and roast another 5-10 minutes. The fruit should become softened, a bit caramelized and shrunken looking. Since I planned to purée mine, I didn't really care how shrunken they became.

My plums were a red-skinned, yellow-fleshed variety which I placed skin side down on the prepped sheet pan. You can roast your fruit au naturel or drizzle a little honey over it if you'd like.

As a side note, a pound of plums (~6 medium or 9 small), halved, pitted, roasted, puréed and strained should yield about 1.5 cups of purée. Of course, you don't have to do the roasting part - just leave that step out of the above, and the un-roasted purée yield should be a bit higher.

IMG_2927.JPG

Once roasted, the fruit will keep in a closed container in the fridge for a few days or frozen for several weeks. I froze mine and did the puréeing later - just thaw in the fridge overnight, purée, add a tablespoon of lemon juice, a pinch of salt and sweeten to taste. I generally start by adding sugar equal to 10% by weight of the purée and add more if it's still pretty tart. Then use it in whatever way you choose. Maybe swirled into a cake batter, blended into mascarpone cream, warmed and used as a sauce over a nice berry cake. You decide.

The second ice cream - sweet corn! 

IMG_3097.JPG

In this case, using the same base recipe mentioned above, scald the milk with half the sugar and a pinch of salt, temper it into the yolks which have been whisked well with the other half of the sugar, then whisk in 2.5 cups of fresh corn cut off the cobs plus the two cups of cream. Bring this all to a boil (the starch in the corn protects the yolks from curdling, just like making pastry cream with cornstarch!).

Then put it all in a decent blender (I have a Breville brand which is dyn-o-mite), purée and strain then chill thoroughly before processing. YUM.

And there you have it - blueberry & croissant bread pudding with sweet corn and roasted plum ice cream on a polka dot paper party plate. Happy summer!

IMG_3117.JPG

Tartelettes aux myrtilles et tarte aux prunes

Petite blueberry (myrtillestartlelettes
Plum (prunes) tarte
While I'm still on the summer fruits kick, I'd like to introduce you to just two of the many fruit-custard tarts that you can create pretty easily. Pâte brisée on hand in the freezer, summer berries or stone fruits of choice, a straight forward custard filling and off you go!


Michigan blueberries have been in plentiful supply (and wouldn't you know - I now have a number of bags stashed in my freezer).  They're especially tasty when baked into custard, so why not some tartlettes!


First I made my favorite pâte brisée using the by-hand flaking method with a couple of three folds for good measure. The process makes for such a wonderfully buttery, crisp yet flaky crust that is simply fantastic with custard and fruit. Visit this post for ALL the details.

You can make double or triple recipes of the dough, divide, wrap and stash in your freezer so you're ready to create to your heart's content. How great is that?!

For the custard, as is typically the case, one can find many versions of fillings out there in cyber space. Some involve simply whisking the ingredients together, pouring the custard over the fruit in your blind baked shell then baking til set. No stovetop prep there.
I opted for the stovetop method for a classic crème brulée type of custard. Heat the dairy (can be all cream or a cream/milk combo) in a saucepan, whisk egg yolks and sugar in a separate bowl, temper the yolk mixture into the dairy, then strain and set aside until ready to fill your tart. I went a step farther and cooked it to the anglaise stage before straining.

I just had to grate some fresh nutmeg and throw a pinch of coriander into the mix - so good with blueberries.

For my tartelettes I blind baked the pâte brisée in small brioche molds, popped in three berries, poured the custard over and baked them until the custard was set.

Once cooled, a dusting of powdered sugar adds just the right touch. Serve and enjoy.


Local yellow plums

My plum version came about due to the NEED to use up some ripe plums in my fridge. When browsing at the Fulton Farmers Market, I try sooooo hard to buy only the fruit that I'm pretty sure I'll use up quickly. Best laid plans  . . . .

I went with a variety of greenish-yellow, peachy and red fleshed plum varieties for this project . . .


and had just the right amount of dough on hand for my 16 cm square open tart form.

Lining a square form takes just a bit more finesse than a circle, since it's important to get the dough properly tucked into the corners. Dock the dough with a fork . . . .


then place the pan into the freezer while heating the oven to 400ºF.

Line the frozen dough with parchment, fill with dried beans or ceramic weights and bake for 12-15 minutes. Remove the weights and parchment then pop back into the oven for another 5-7 minutes until lightly golden.

Reduce the oven to 325ºF and proceed with final assembly.

Blind baked and ready for final assembly

I sprinkled some almond flour on the crust, placed the multi-colored plum slices just so . . .


and poured the custard over until it reached just below the top edge of the dough.


A final sprinkling of vanilla sugar and into the oven it goes.

Bake about 25 minutes until the custard is set and there's some browning and a hint of bubbling from the plums.

Just out of the oven

After a few minutes, lift off the tart form and finish cooling to room temperature.
Check out that flaky dough

Steve and I had a small sample after our pizza supper. Wonderful buttery, crisp crust, luscious custard filling and tartly sweet plums - yes indeed.

In a nutshell, here's the recap/ custard recipe.
  1. You choose what size and shape you'd like your tart or tartelettes to be.
  2. Have your pâte brisée ready to go (Visit this post).
  3. Roll your dough to about 3 mm thick and line your chosen tart tins or forms. Prick the dough all over with a fork and place in the freezer while you heat your oven. Pâte brisée bakes best at high heat, 400-425ºF.
  4. In general, blind baking requires 12-15 minutes with weights, then another 5-10 without until nicely golden (watch what's happening in that oven of yours!!!).
  5. Decrease the oven to 325ºF.
  6. You'll have to eyeball the fruit quantities you'll need for your given size. The tartelettes are easy - a few berries each. For the 16 cm square I used about 350 g of fruit - choose your favorite berry, stone fruit or combination thereof and have it prepped and ready to go.
  7. For the custard, heat 1 cup heavy cream and 1/2 cup whole milk to barely simmering. 
  8. In the meantime whisk 4 large egg yolks and 1/4 cup granulated sugar in a separate bowl; temper in half of the heated dairy, then return all to the saucepan and cook to the anglaise stage (82ºC or 180ºF). NOTE: I added a skosh of freshly grated nutmeg and good pinch of coriander.
  9. Strain into a 2 cup Pyrex-type pour spout container and set aside.
  10. Sprinkle a shallow layer of almond flour on the bottom crust, arrange the fruit to your liking, then pour the custard over til it reaches just below the top edge of the crust.
  11. Bake about 8-10 minutes for tartelettes and about 25 minutes for larger tarts until the custard is set with a hint of a jiggle in the center.
  12. Let cool.
  13. Enjoy slightly warm or at room temperature.
  14. Best eaten the day it's made but will keep covered in the fridge for a day or twol
Enjoy!!


Kouign-amann pudding

Now here's a good one - essentially a bread pudding made with leftover Kouign-amann.  What?!


Of course some might argue that once Kouign-amann are made they'll be gobbled up and there won't BE any leftovers.

Not so in my case.  A couple of months ago I decided to make a batch of K-a, but, instead of baking them in open tart rings, I baked them in flexi-molds.  I thought it would lend itself to much easier release of the final baked goods from their sticky, caramelized holders.

Nuh-uh.  Because the dough was essentially "shielded" by the silicone molds, the K-a exteriors did not caramelize, the dough layers did not bake through and were pale and floppy.  It was a gooey mess.

Note to self: certain things bake and brown much better surrounded by metal.  Yup.

Some of the edges were actually OK and the flavor was there, so something wouldn't allow me to throw them all away and into the freezer they went.

After the holidays I was visiting Schuler Books here in Grand Rapids, looking of course at baking books, and was excited to find a recipe from Rose Levy Beranbaum's The Baking Bible (with Kouign-amann on the front cover no less) for "souffled French toast".

It uses day-old K-a baked in an egg, milk, cream, vanilla custard.  What's not to like.

I removed 480 grams of K-a from the freezer some hours ahead and let them thaw at room temperature.  Notice the misshapen K-a lumps in the photo below.


notice the doughy interior layers


Cut the K-a into cubes and place them in an 8"x8" glass baking dish.

Mix 6 large eggs, 160 ml heavy cream, 60 ml whole milk and 1 teaspoon vanilla extract.


Pour the custard over the K-a, cover and soak the mélange in the fridge over night.


ready for an overnight soak

Heat the oven to 350º F.  Bake covered with foil for 10 minutes, then remove foil and bake an additional 10 minutes or until the pudding is puffed, set and nicely browned.


We ate this for dessert au naturale, still slightly warm (when it's at its best, by the way).

I can just imagine it topped with a little chantilly cream, a drizzle of maple syrup and some fresh berries, either for dessert or for breakfast or brunch.  YUM.

So now you know what you can do with those leftover or not-so-perfect Kouign-amanns that you just might have lying around.

Thanks Rose.


Time for some tarts!

Tarts are my favorite desserts to make (and eat), going back to the days in the late '80s when I became a huge fan of pastry chef Emily Luchetti (then of Stars restaurant).  I used to pour over her book "Stars Desserts" and made many of the recipes, being particularly fond of the macaroon nut and the blackberry streusel tarts.

So, as I spent a fair amount of time in Grand Rapids, Michigan this past July and August, staying at my mom's, I simply had to take advantage of the summer fruits that the orchards of western Michigan produce.  I paid a visit to the Fulton Street farmers market where I scored some Michigan Red Haven peaches (BIG favorite from my childhood) and fresh local blackberries which soon went into a delicious peach-blackberry custard tart for a small family gathering. Deelicious!  Topped with sliced almonds and served with a scoop of vanilla ice cream, it was just the ticket. 

Above: peach blackberry custard tart

When I had a September request for some petits fours tartlettes, I took a break from my La Pâtisserie des Rêves project to turn out some of my favorites - lemon, chocolate ganache and caramel nut.

It's always such a pleasure to return to tart making, especially when the cool, crisp days of autumn are upon us.  Working with the cool, supple dough, lining the tart rings or petit four molds and thinking about those luscious fillings is such a delight.

The beauty of these tarts is the make ahead fillings.  You can even blind bake your crusts and freeze them ahead of time. Just thaw them briefly at room temp, warm in a 325º oven for 5 minutes to crisp up, then cool and fill.  As usual, it's all about the planning.

I've tried many lemon curd/lemon cream tart fillings over the years, always in search of the perfect one.  All can easily be made a couple of days (or more!) ahead. I normally prefer a classic pucker-y lemon curd, although this time I used a riff on Pierre Herme's (complements of Dorie Greenspan) lemon lemon cream.  It’s oh so smooth and lemony, especially garnished with a dollop of light, whipped lemon mascarpone and a fresh raspberry. 

Above: lemon cream tartlettes

The ganache tart filling (3 parts cream to 2 parts chocolate with a bit of butter added) also keeps extremely well in the fridge.  The day you wish to assemble the tart, gently warm the ganache over a bain marie to liquefy it before you pour it into a blind baked chocolate crust and allow it to set.  I garnish mine with my own chocolate cookie crumbs.

Above: garnishing the chocolate ganache tartlettes

For the caramel nut tart I toast a combination of almonds, pecans, walnuts, pistachios and blanched hazelnuts before coarsely chopping them and folding them into a caramel filling made with butter, honey, brown sugar, sugar and a little cream and vanilla extract.  The mixture is put into a blind baked pâte d'amandes crust and popped back into the oven until the filling is bubbly. Steve describes this one as the best "payday" he's ever had (and it doesn't even have peanuts!)

Above: caramel nut tartlettes

And now - leftovers!!  When making petits fours tartlettes, make plenty of filling so you'll have components on hand to create additional goodies for friends or family.  It's a great way to plan ahead for an upcoming dessert occasion.

Here are just a couple of ideas.

Lemon semifreddo -  freeze the leftover lemon cream in silicone flexi-molds or a plastic wrap lined loaf pan.  At serving time either pop them out of the flexis or turn out of the loaf pan and slice - great with fresh fruit, perhaps a little berry coulis and some lovely shortbread.

Caramel nut truffle tart - blind baked pâte d'amandes, layer of caramel nut filling with chocolate ganache poured over.  A definite keeper!

Above: the components

Above: pouring the ganache over the caramel nut filling

Above: ready to chill with some nuts peeking through

And finally, a summer reminder - the classic fresh fruit tart with crème pâtissière filling.  Ahhhhhh.

Ciao for now!