Hazel-chocolate spirals plus croissant squiggles

Back on our stage once again - it’s time for more fun with croissant dough! Some weeks back I came across an article about the various ways that many baking and pastry folks are shaping their laminated dough - eye opening to say the least. I wanted to give one of those shapes a try in addition to making some spirals for a group event.

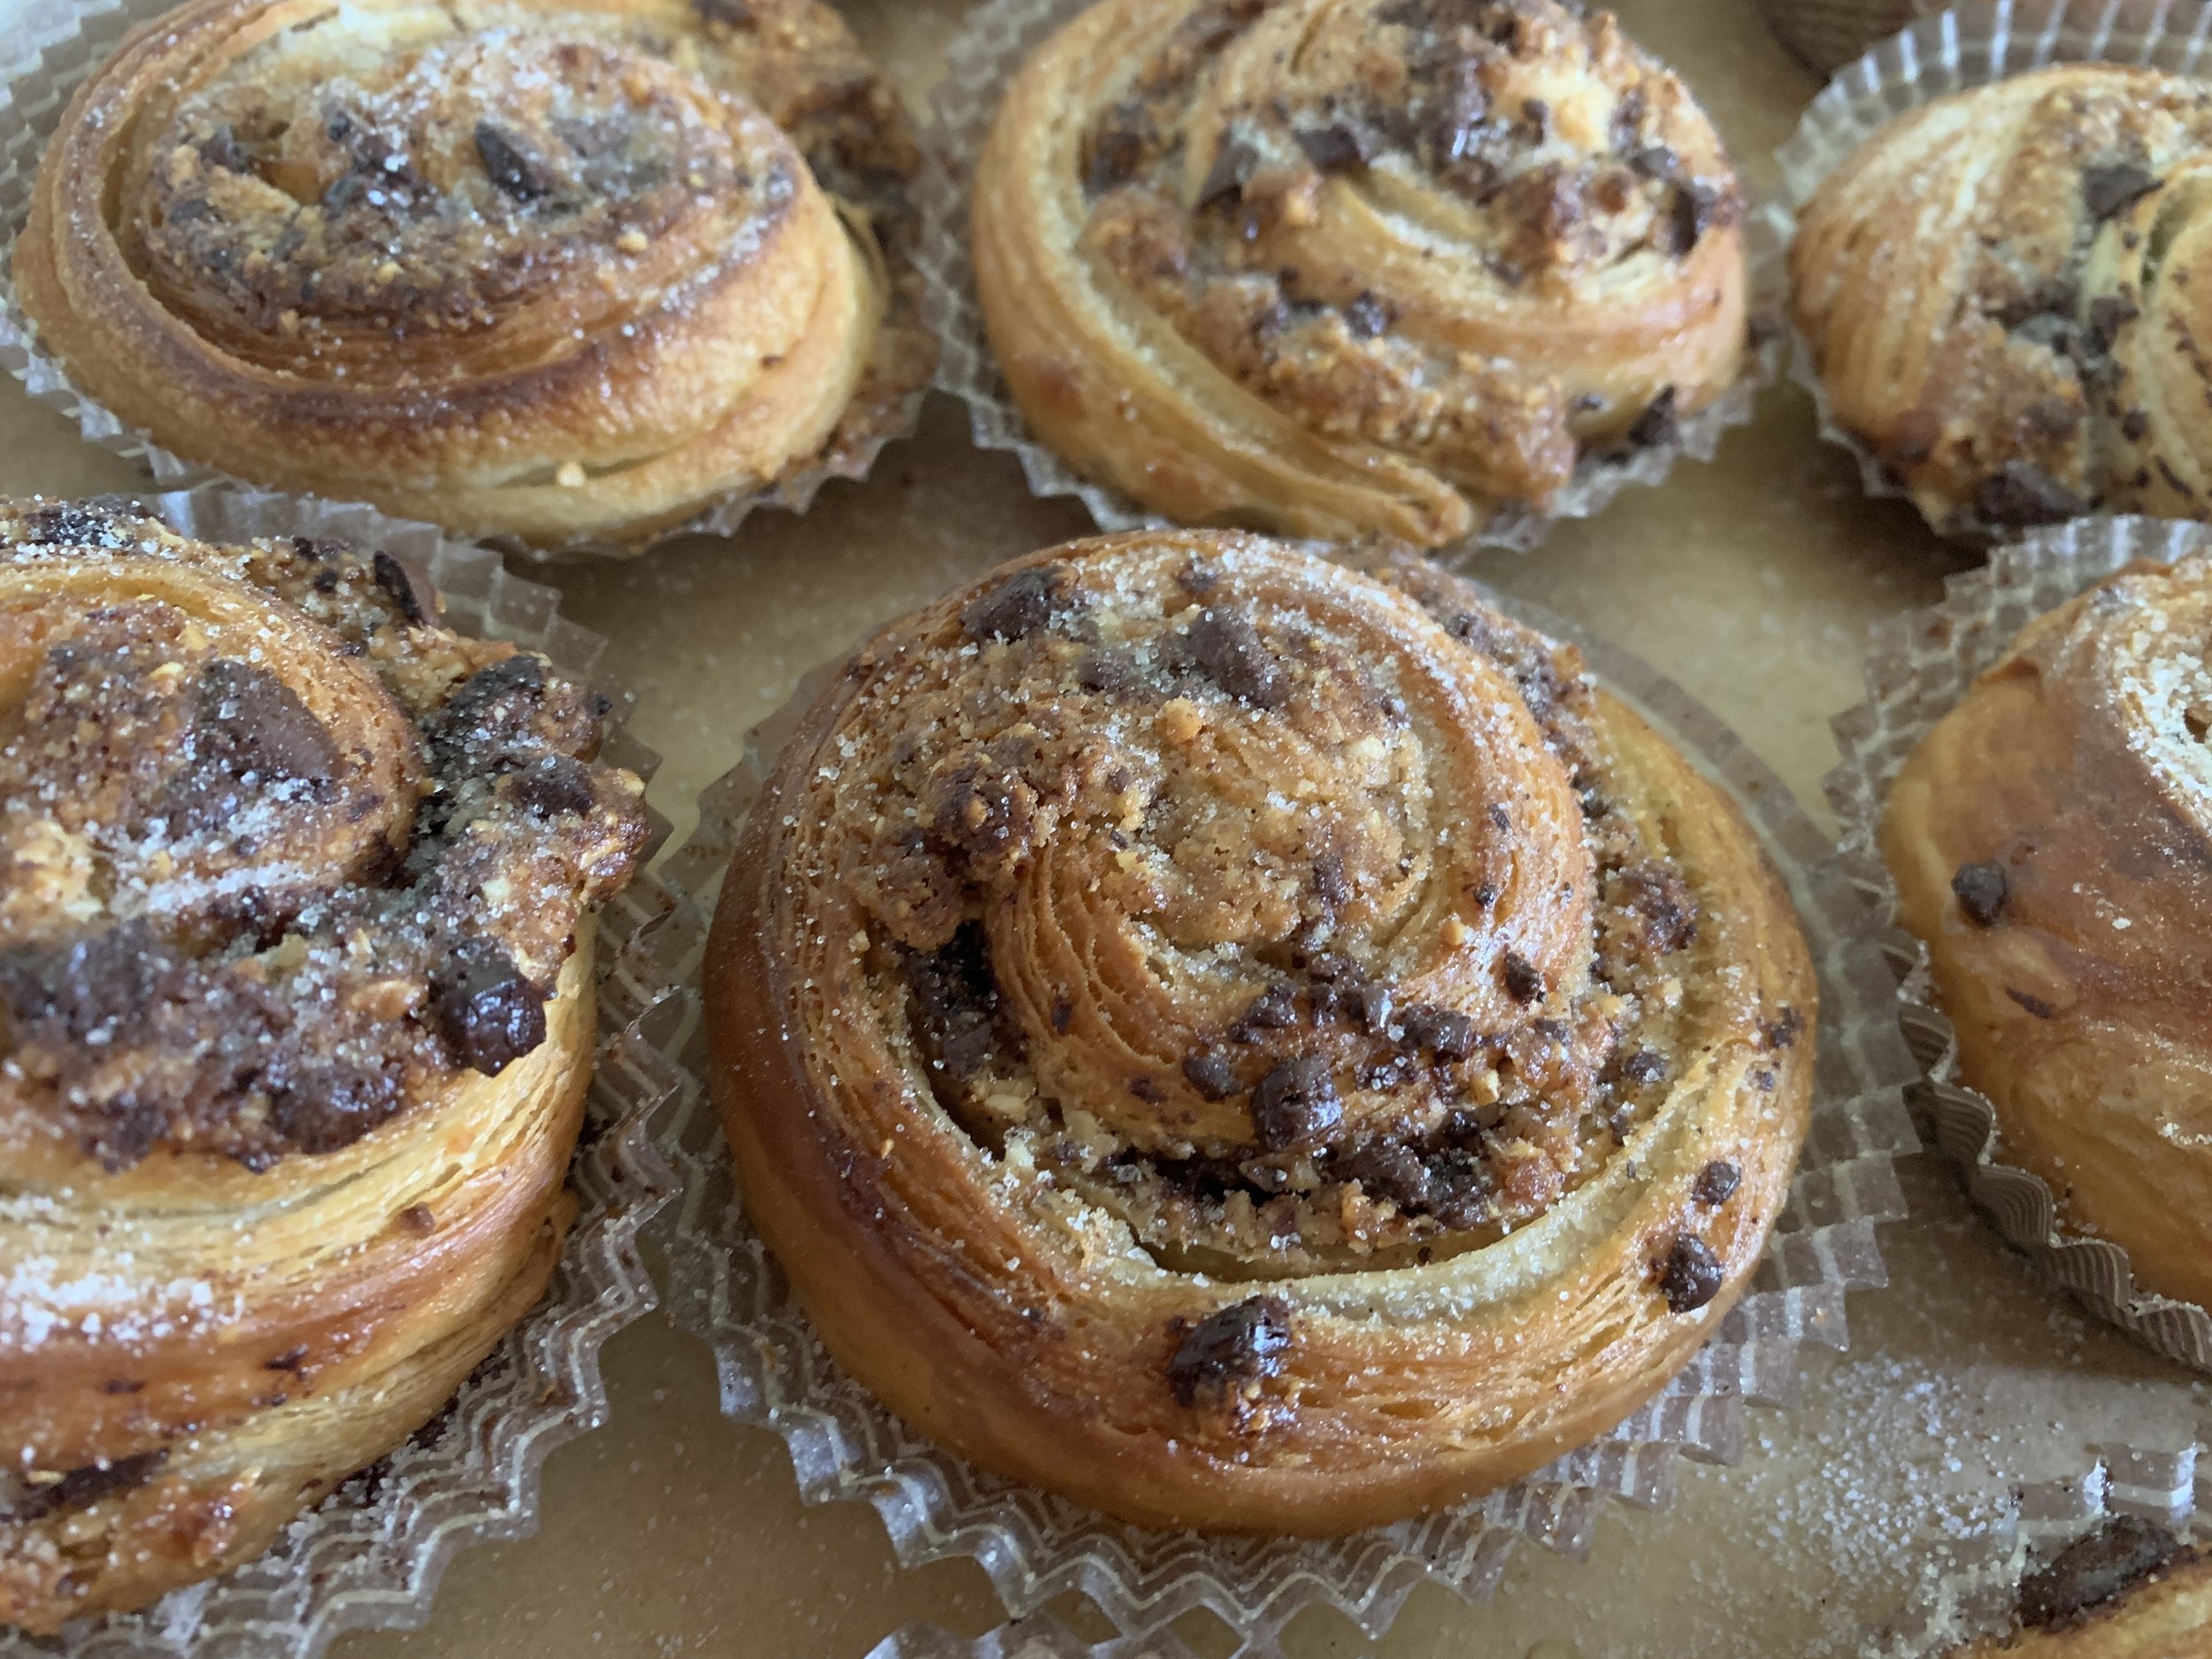
First let’s review the classic spiral process (here’s one version), using one of my favorite fillings - hazelnut remonce topped with chopped chocolate for a match made in heaven.

A quick sidebar: I first made remonce about 3 years ago based on Brontë Aurell’s recipe - 100 g each of almond paste (preferably 50% almond/50% sugar), sugar and butter. As I thought about that mix, I realized it’s essentially 50 g almond, 150 g sugar and 100 g butter. After my lovely class experience in Copenhagen in May of 2022 where we made remonce with 100 g each almond flour, sugar and butter - essentially créme d’amande without any egg or flour - I tweaked the almond paste version to 100 g almond paste, 50 g almond flour, 50 g sugar and 100 g butter for a more almond, less sweet version than Aurell’s. Add 300 g of toasted, ground hazelnuts to the mix for the hazel version. Did you follow that?? It’s all in the details.

As many of you know, the spiral is what we all use for cinnamon rolls - roll out a rectangle of dough, spread or sprinkle your filling on, roll it up into a log, slice, pan up, proof, bake and enjoy! There are tons of filling options, either sweet or savory, so use your imagination and go for it.

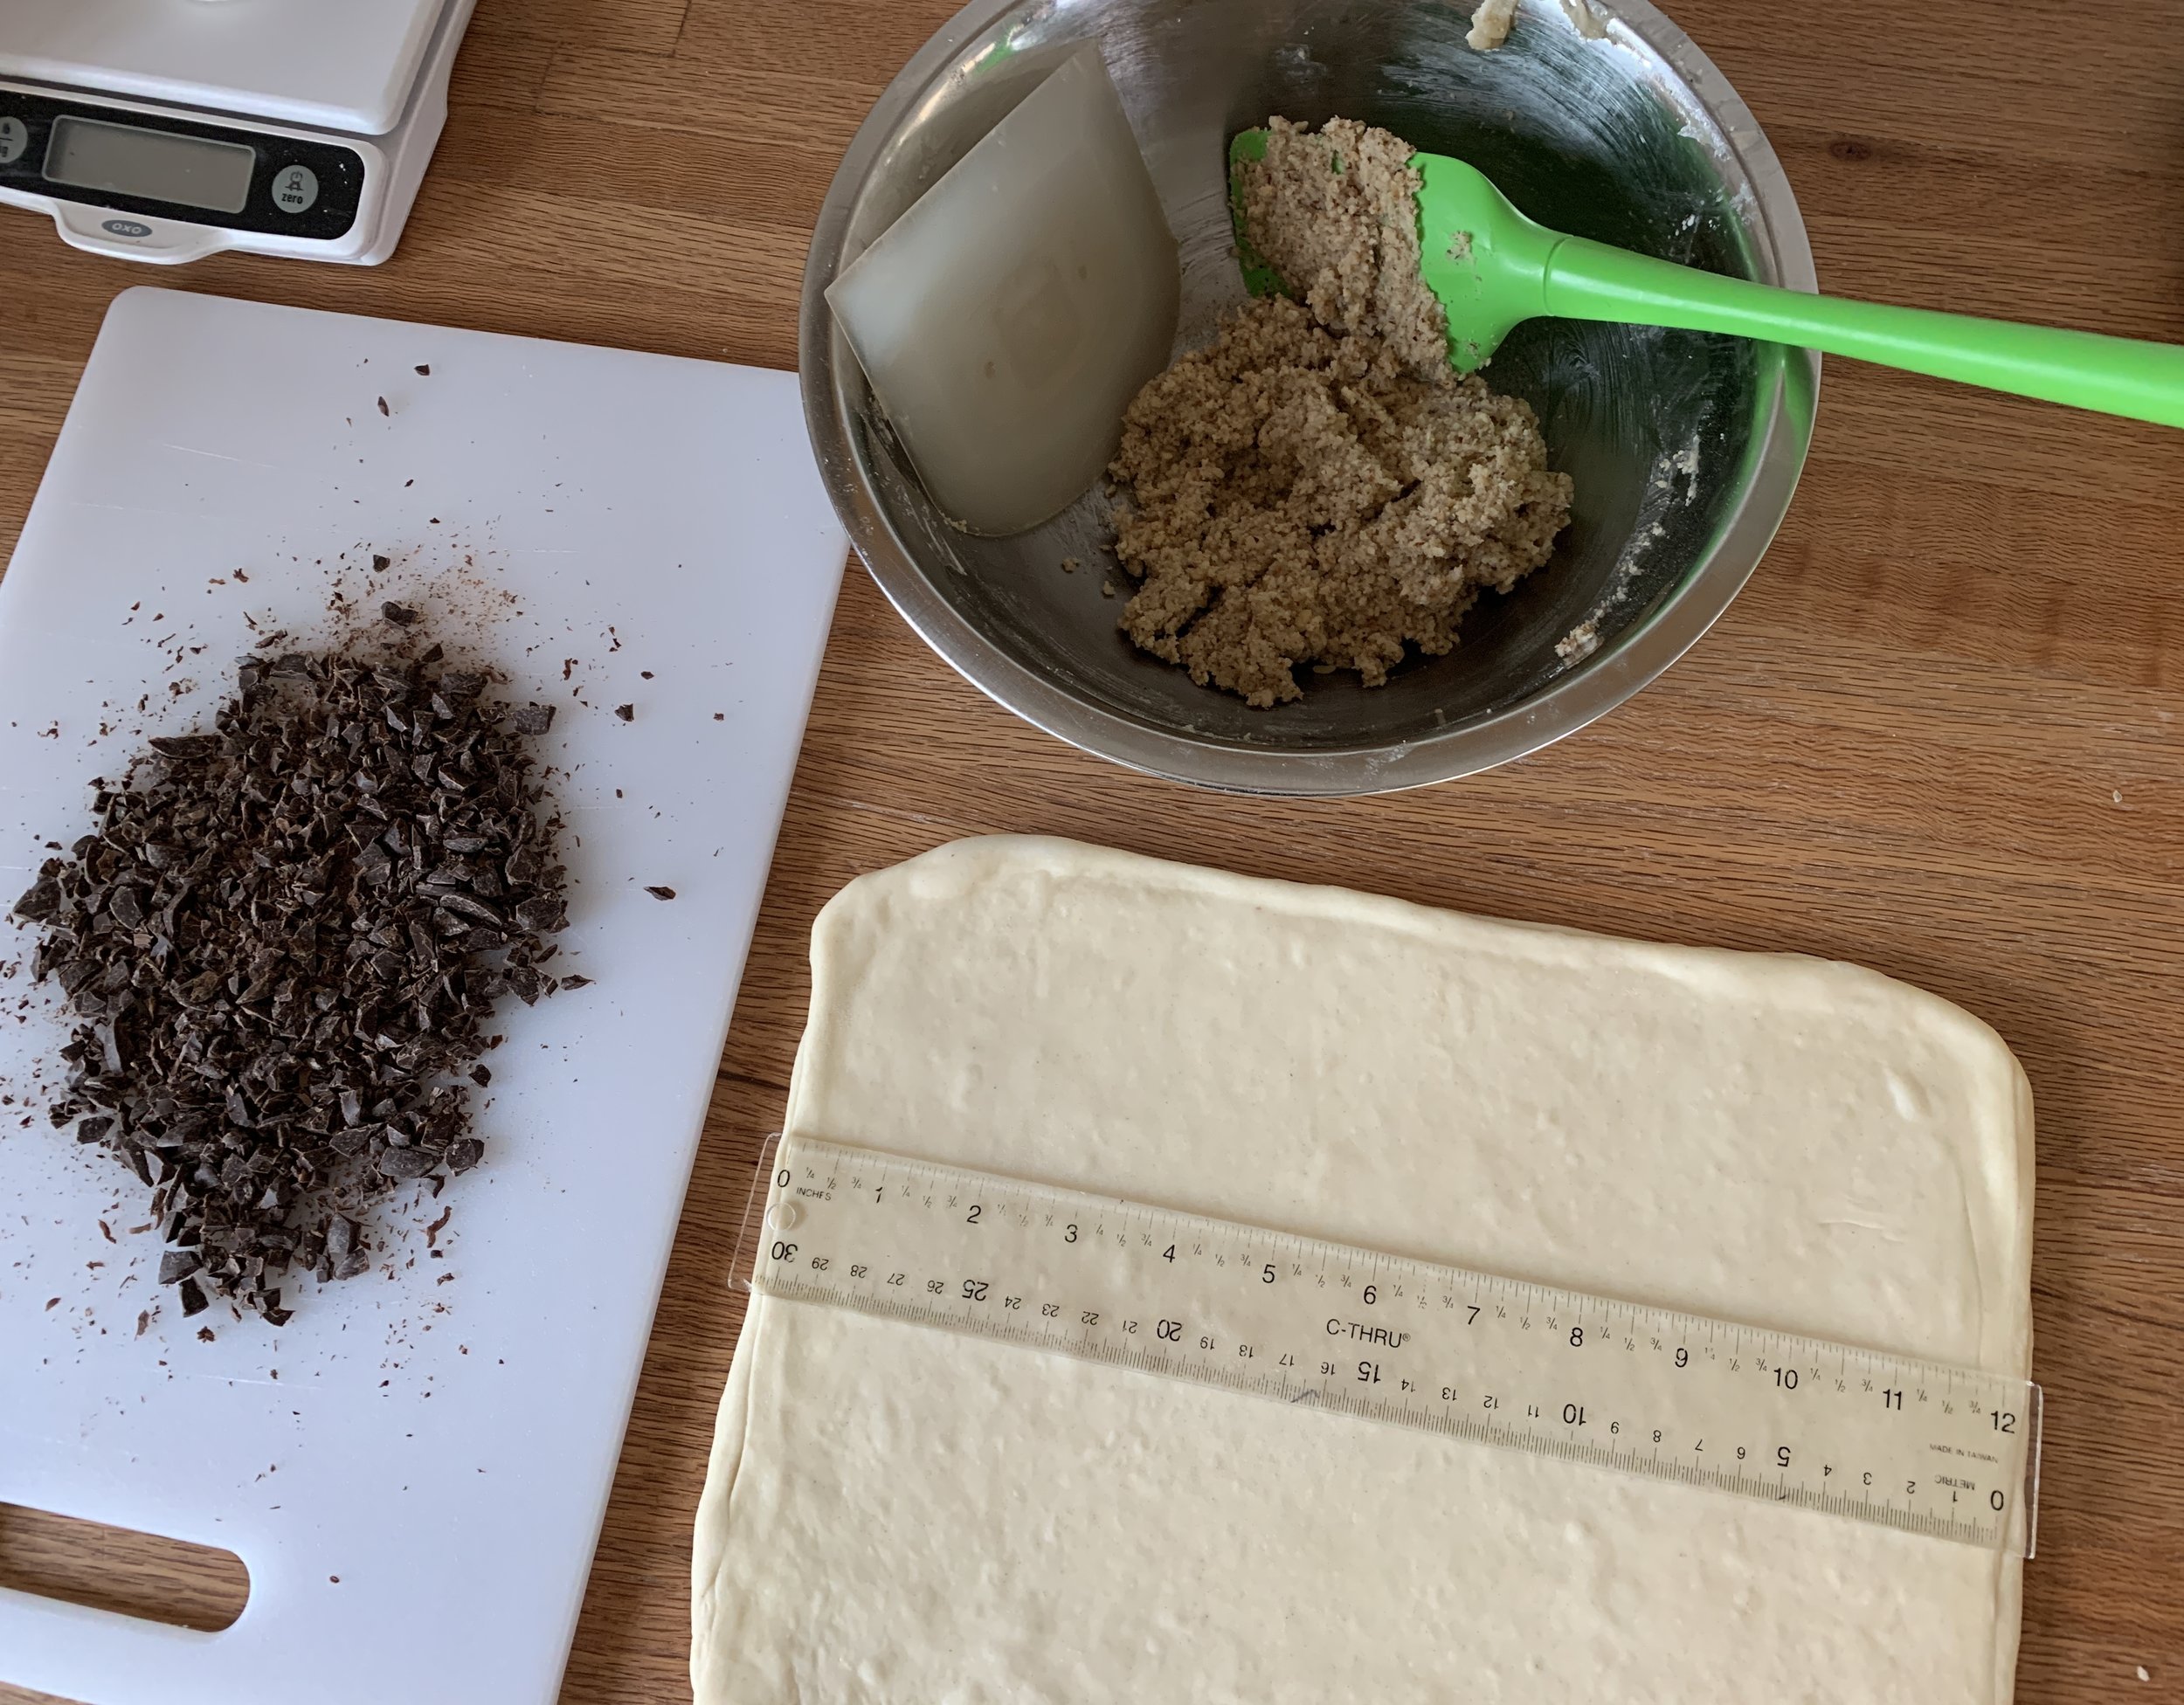
I’m using a half batch of croissant dough here - roll to about an 8” x 12” rectangle (20 cm x 30 cm).

Ready for the filling

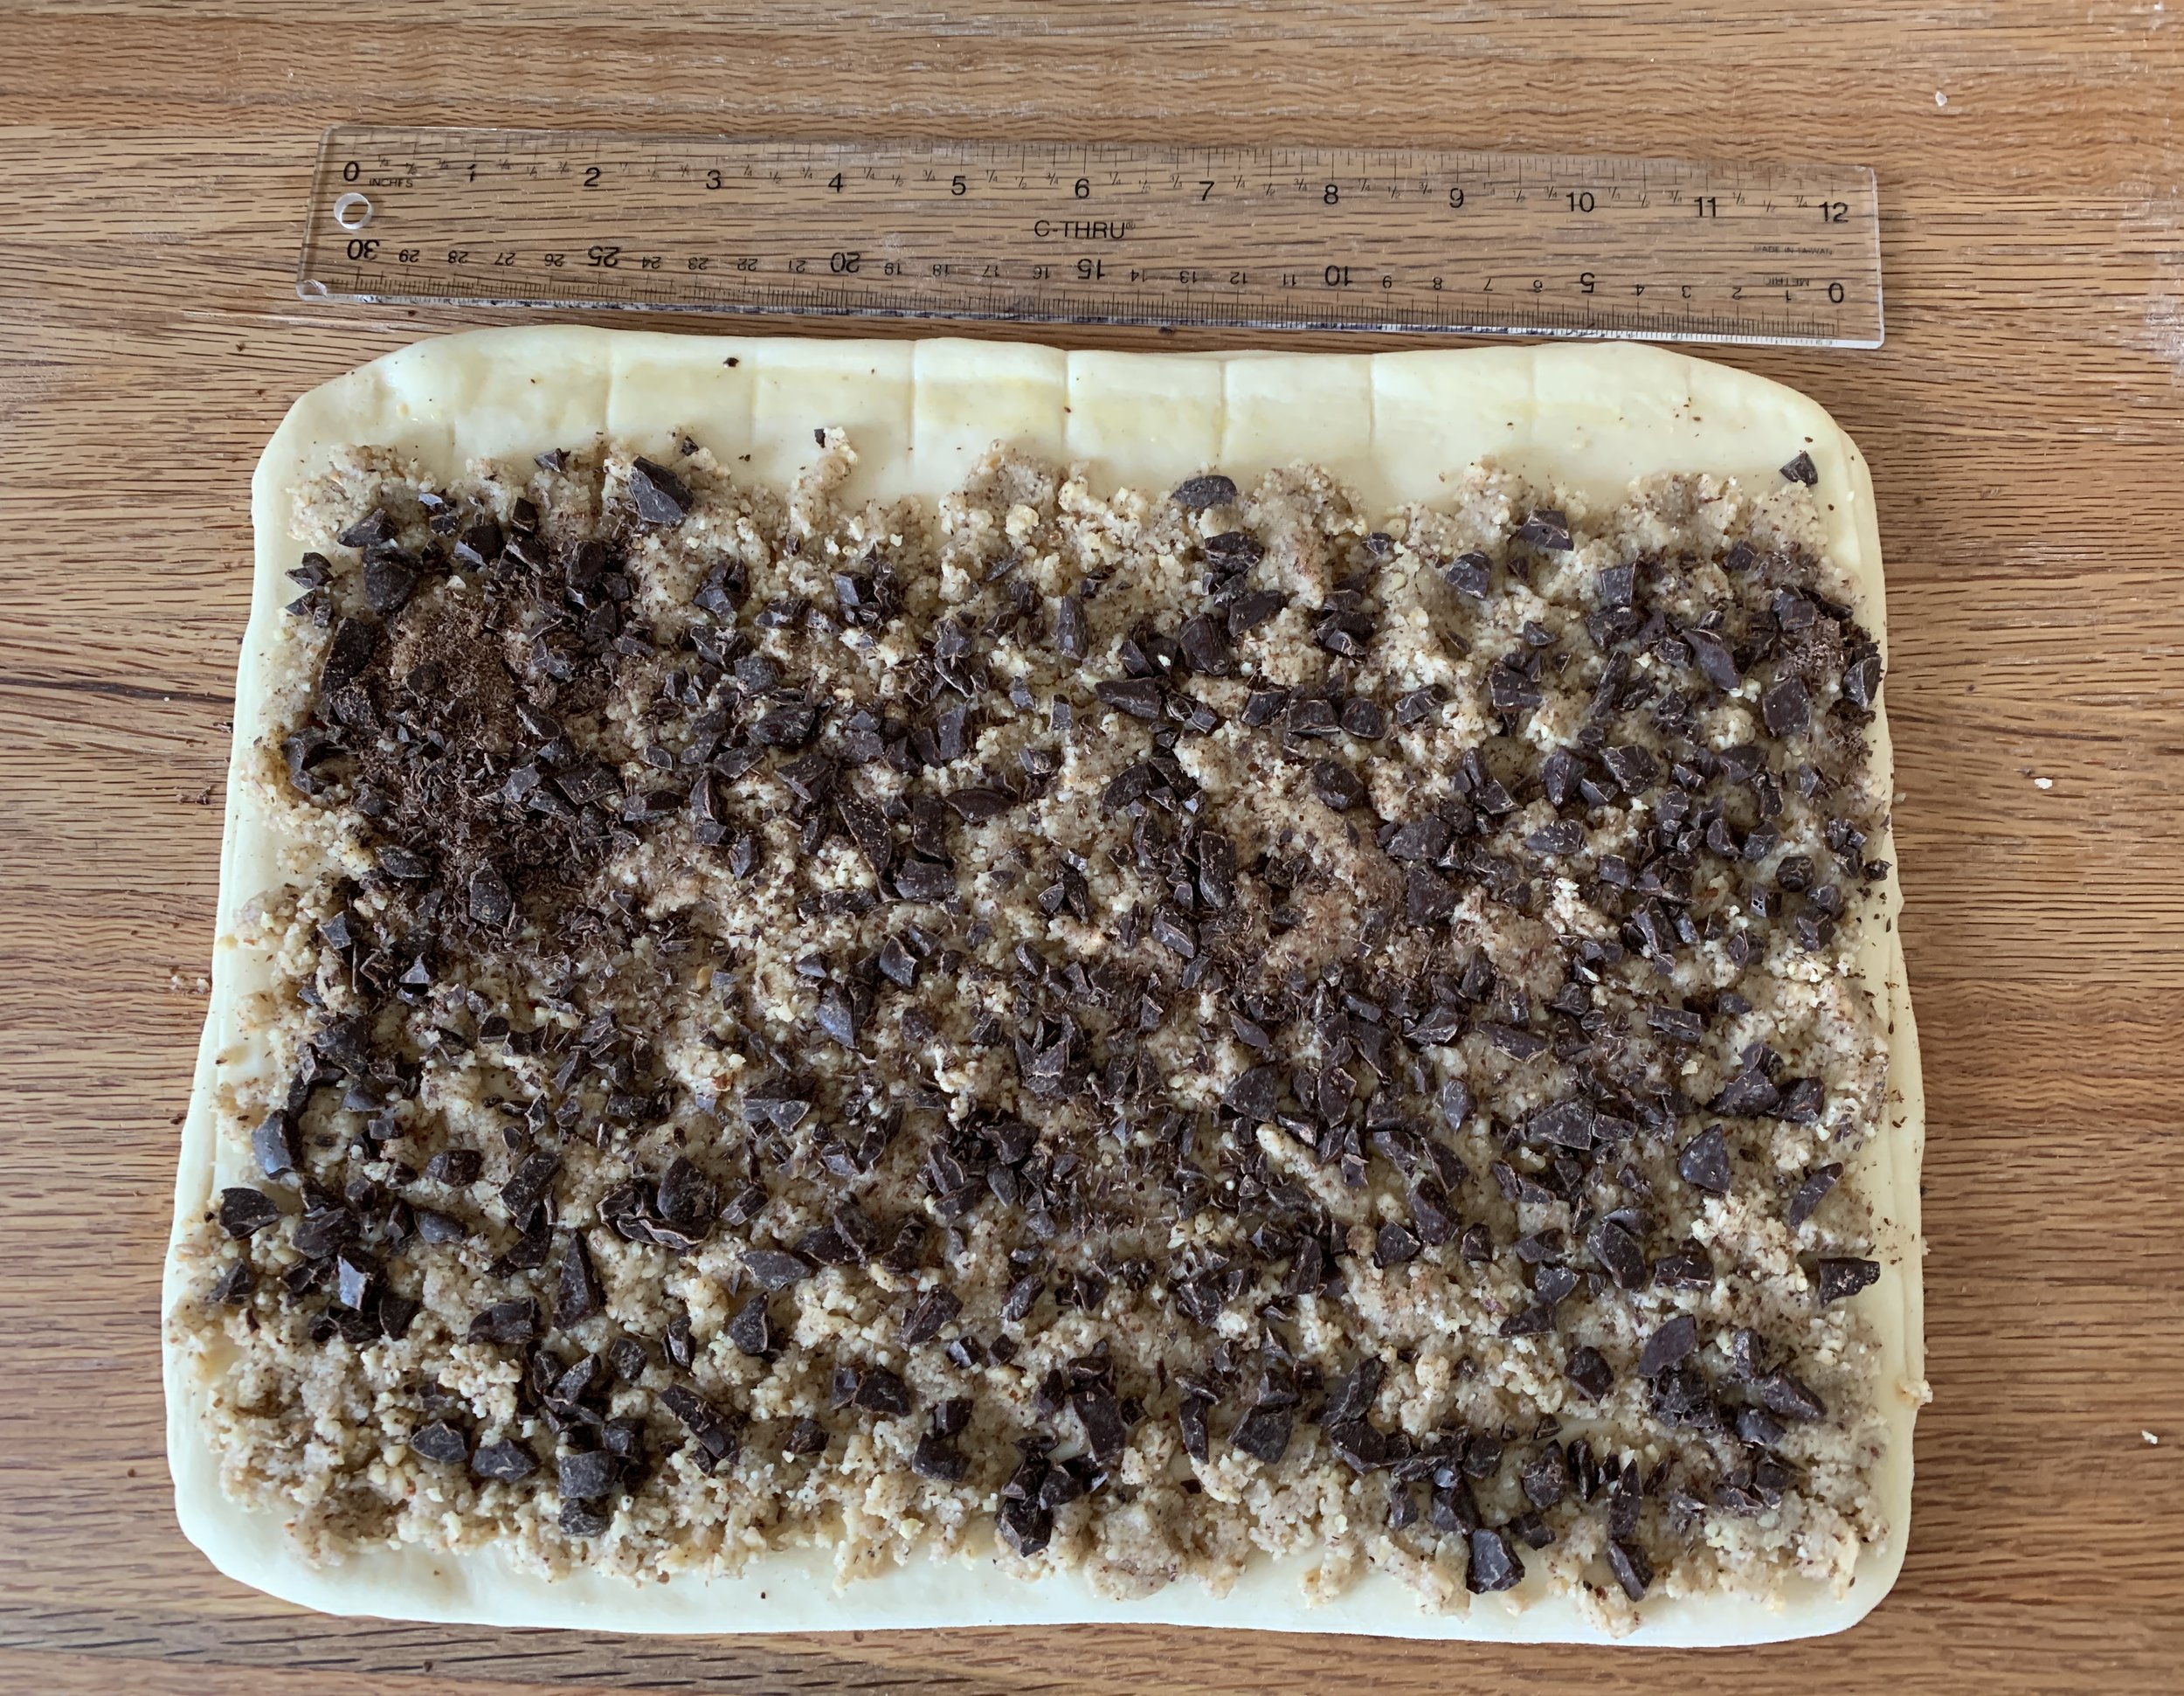
Spread 227 g / 8 ounces hazelnut remonce filling over the dough and sprinkle with 50 g chopped chocolate. I use Guittard 61%.

Ready to cut

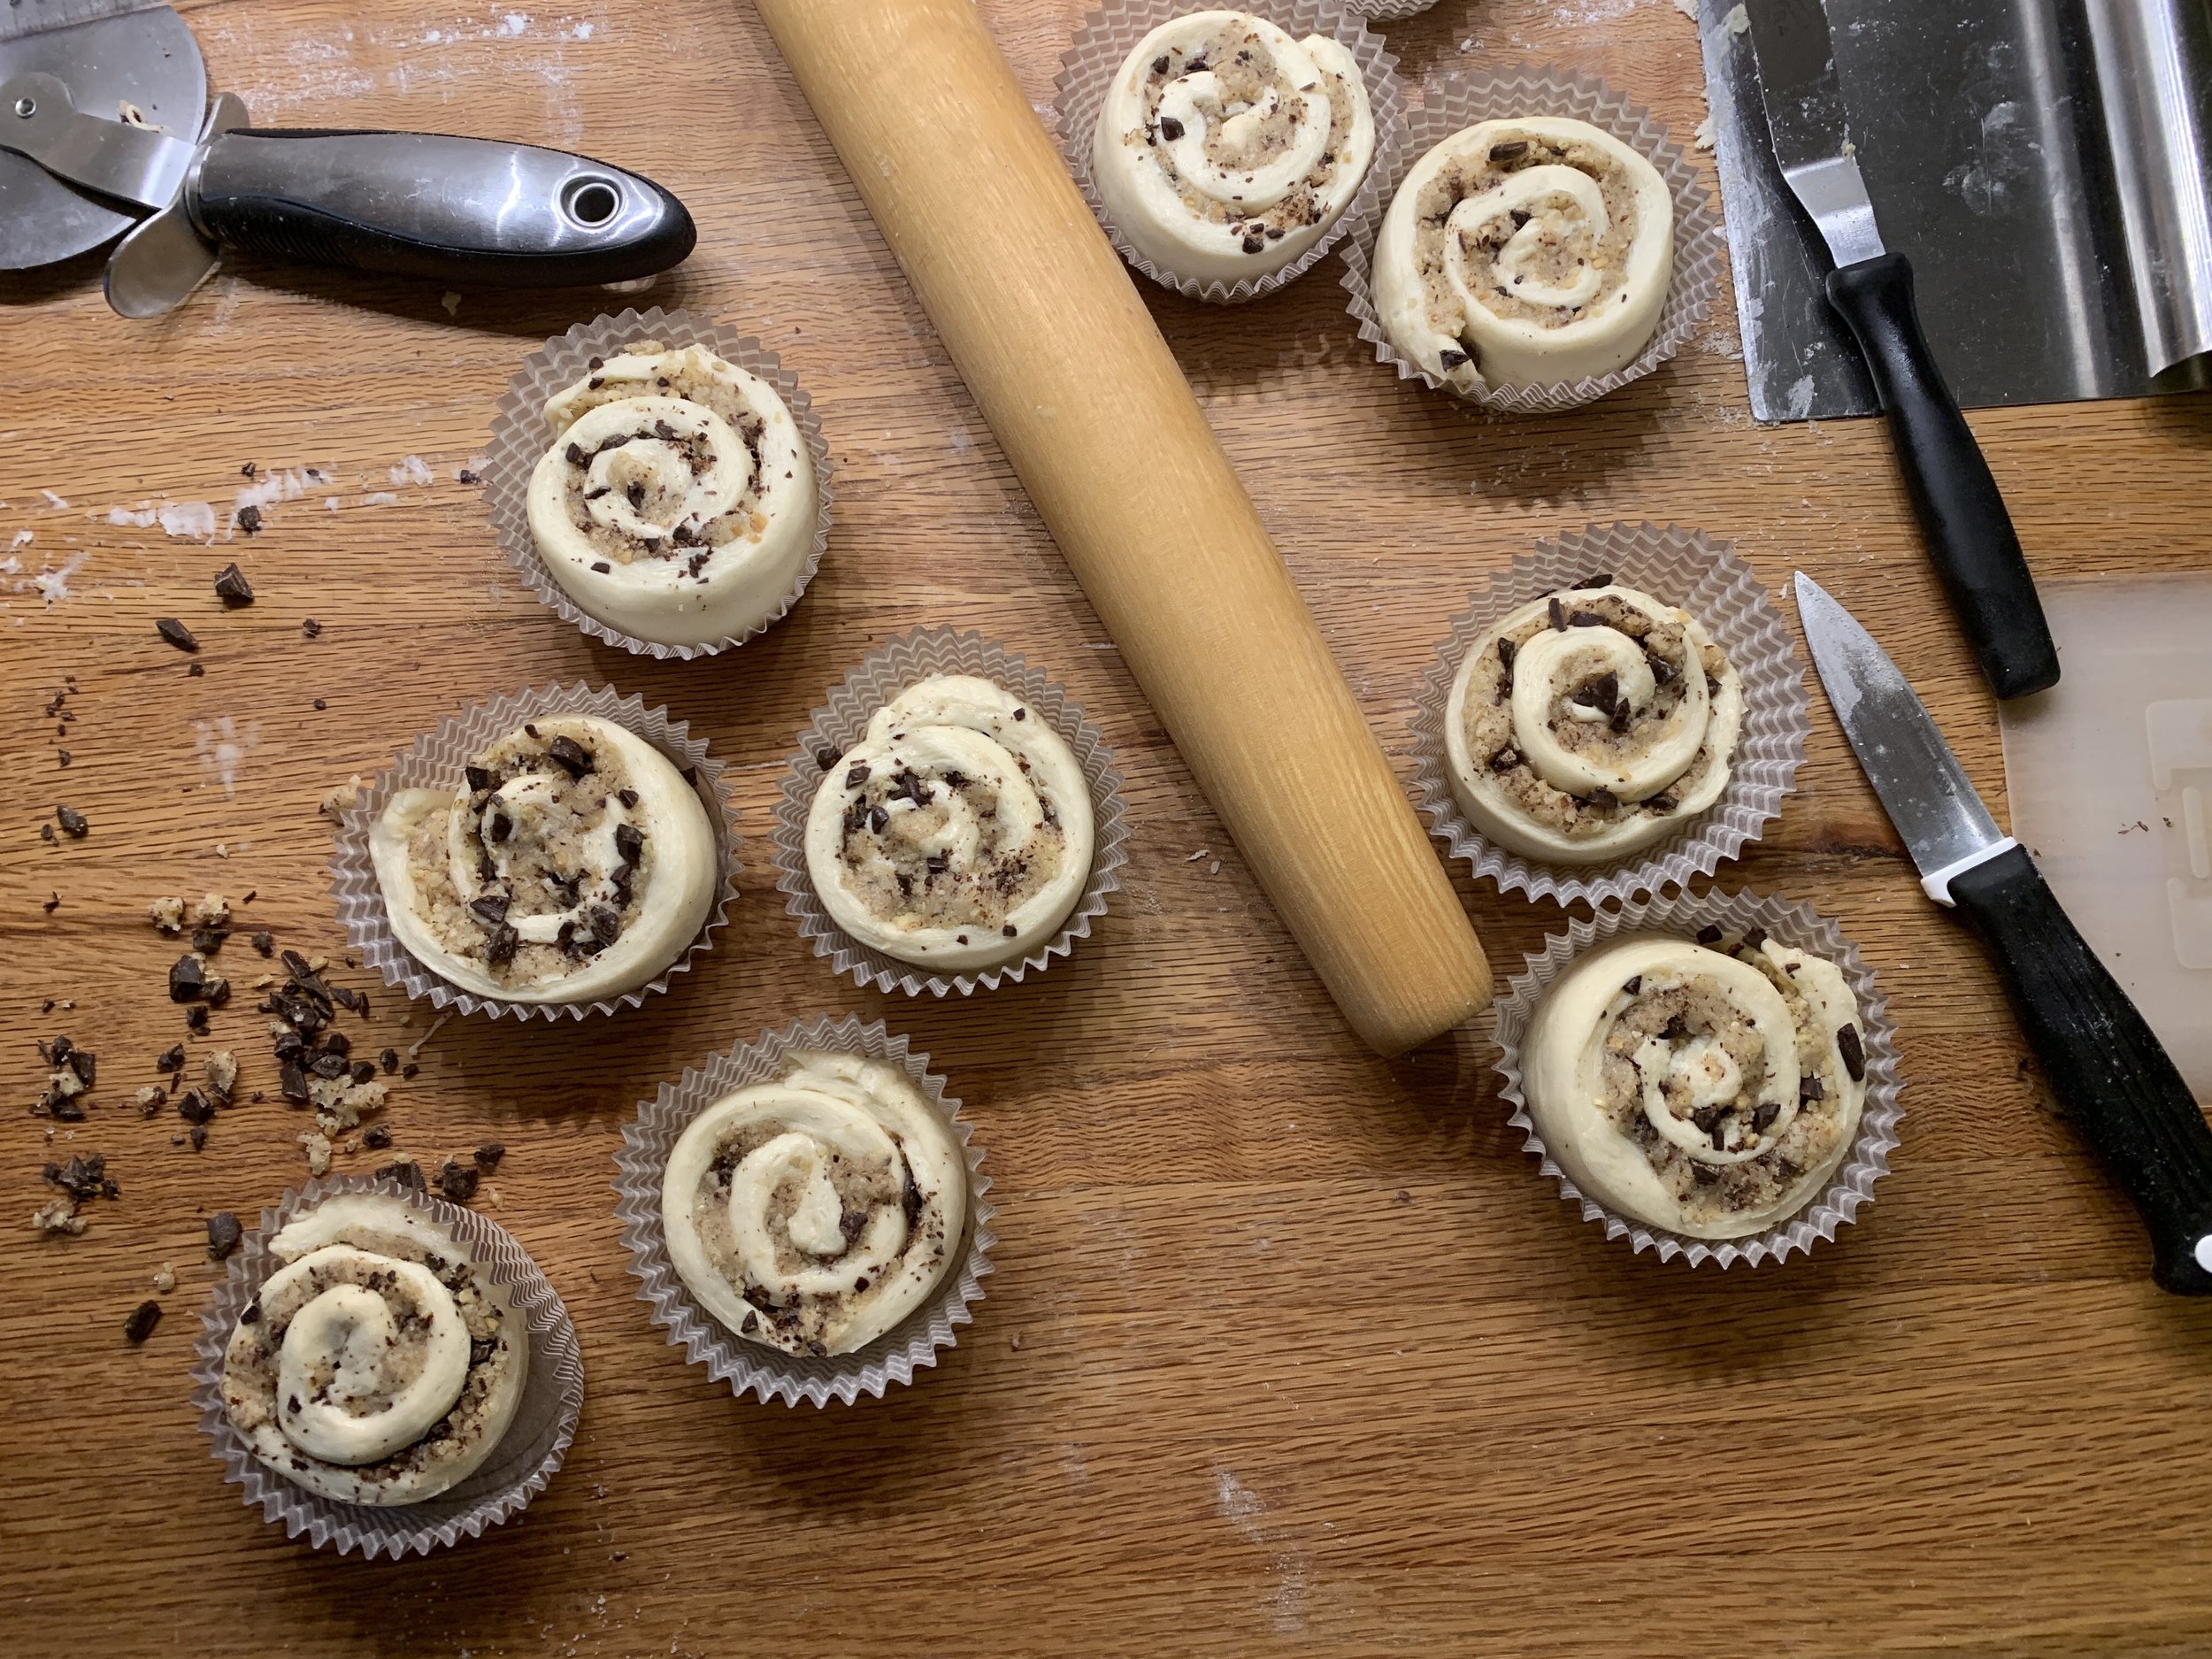
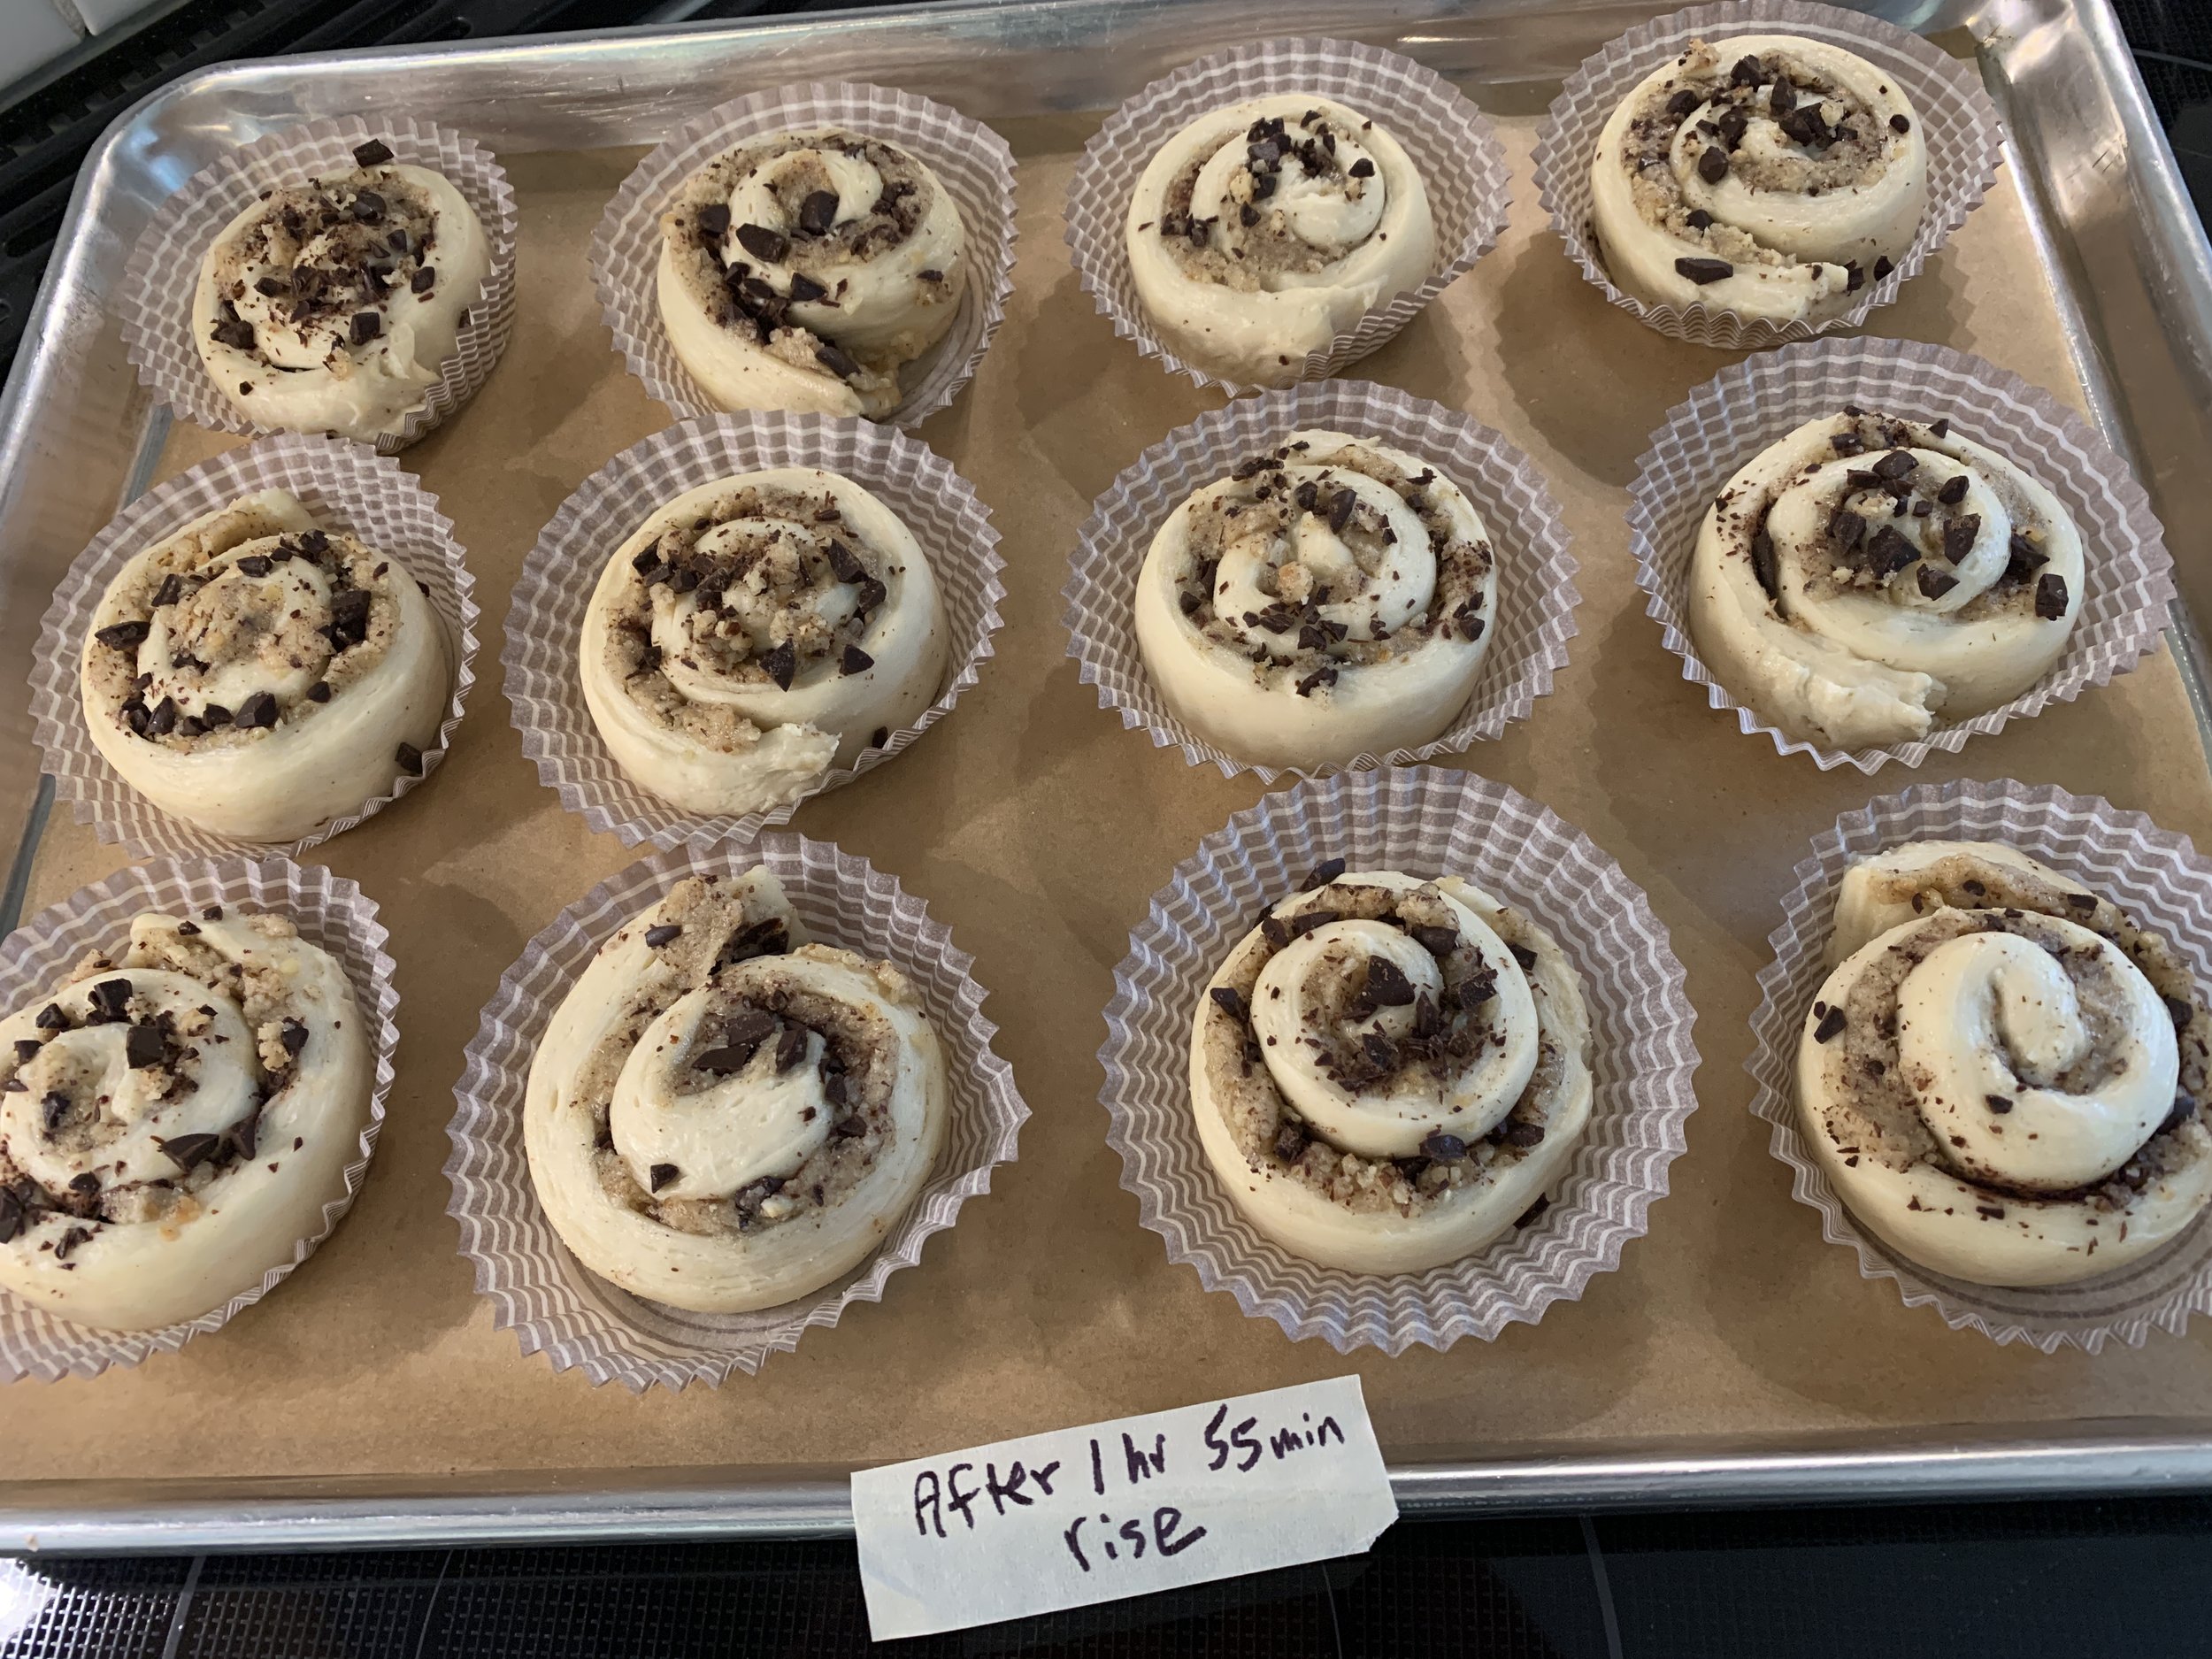
Cut ten 3 cm wide strips, roll ‘em up and place each in a standard sized baking paper. PSST - this is a new approach for me. Rather than tucking them in a pan cheek-by-jowl or setting them openly onto a sheet pan without any ring or form, the papers give them just enough of a boundary to allow for rising/spreading and baking very nicely. Yes!

Rolling, rolling, rolling


Cover lightly with buttered plastic wrap and let rise 1.5 to 2 hours. Not to confuse you, but I cut two additional strips from the half batch of dough I was using for the squiggle test (coming up) to give me an even dozen as you see below.


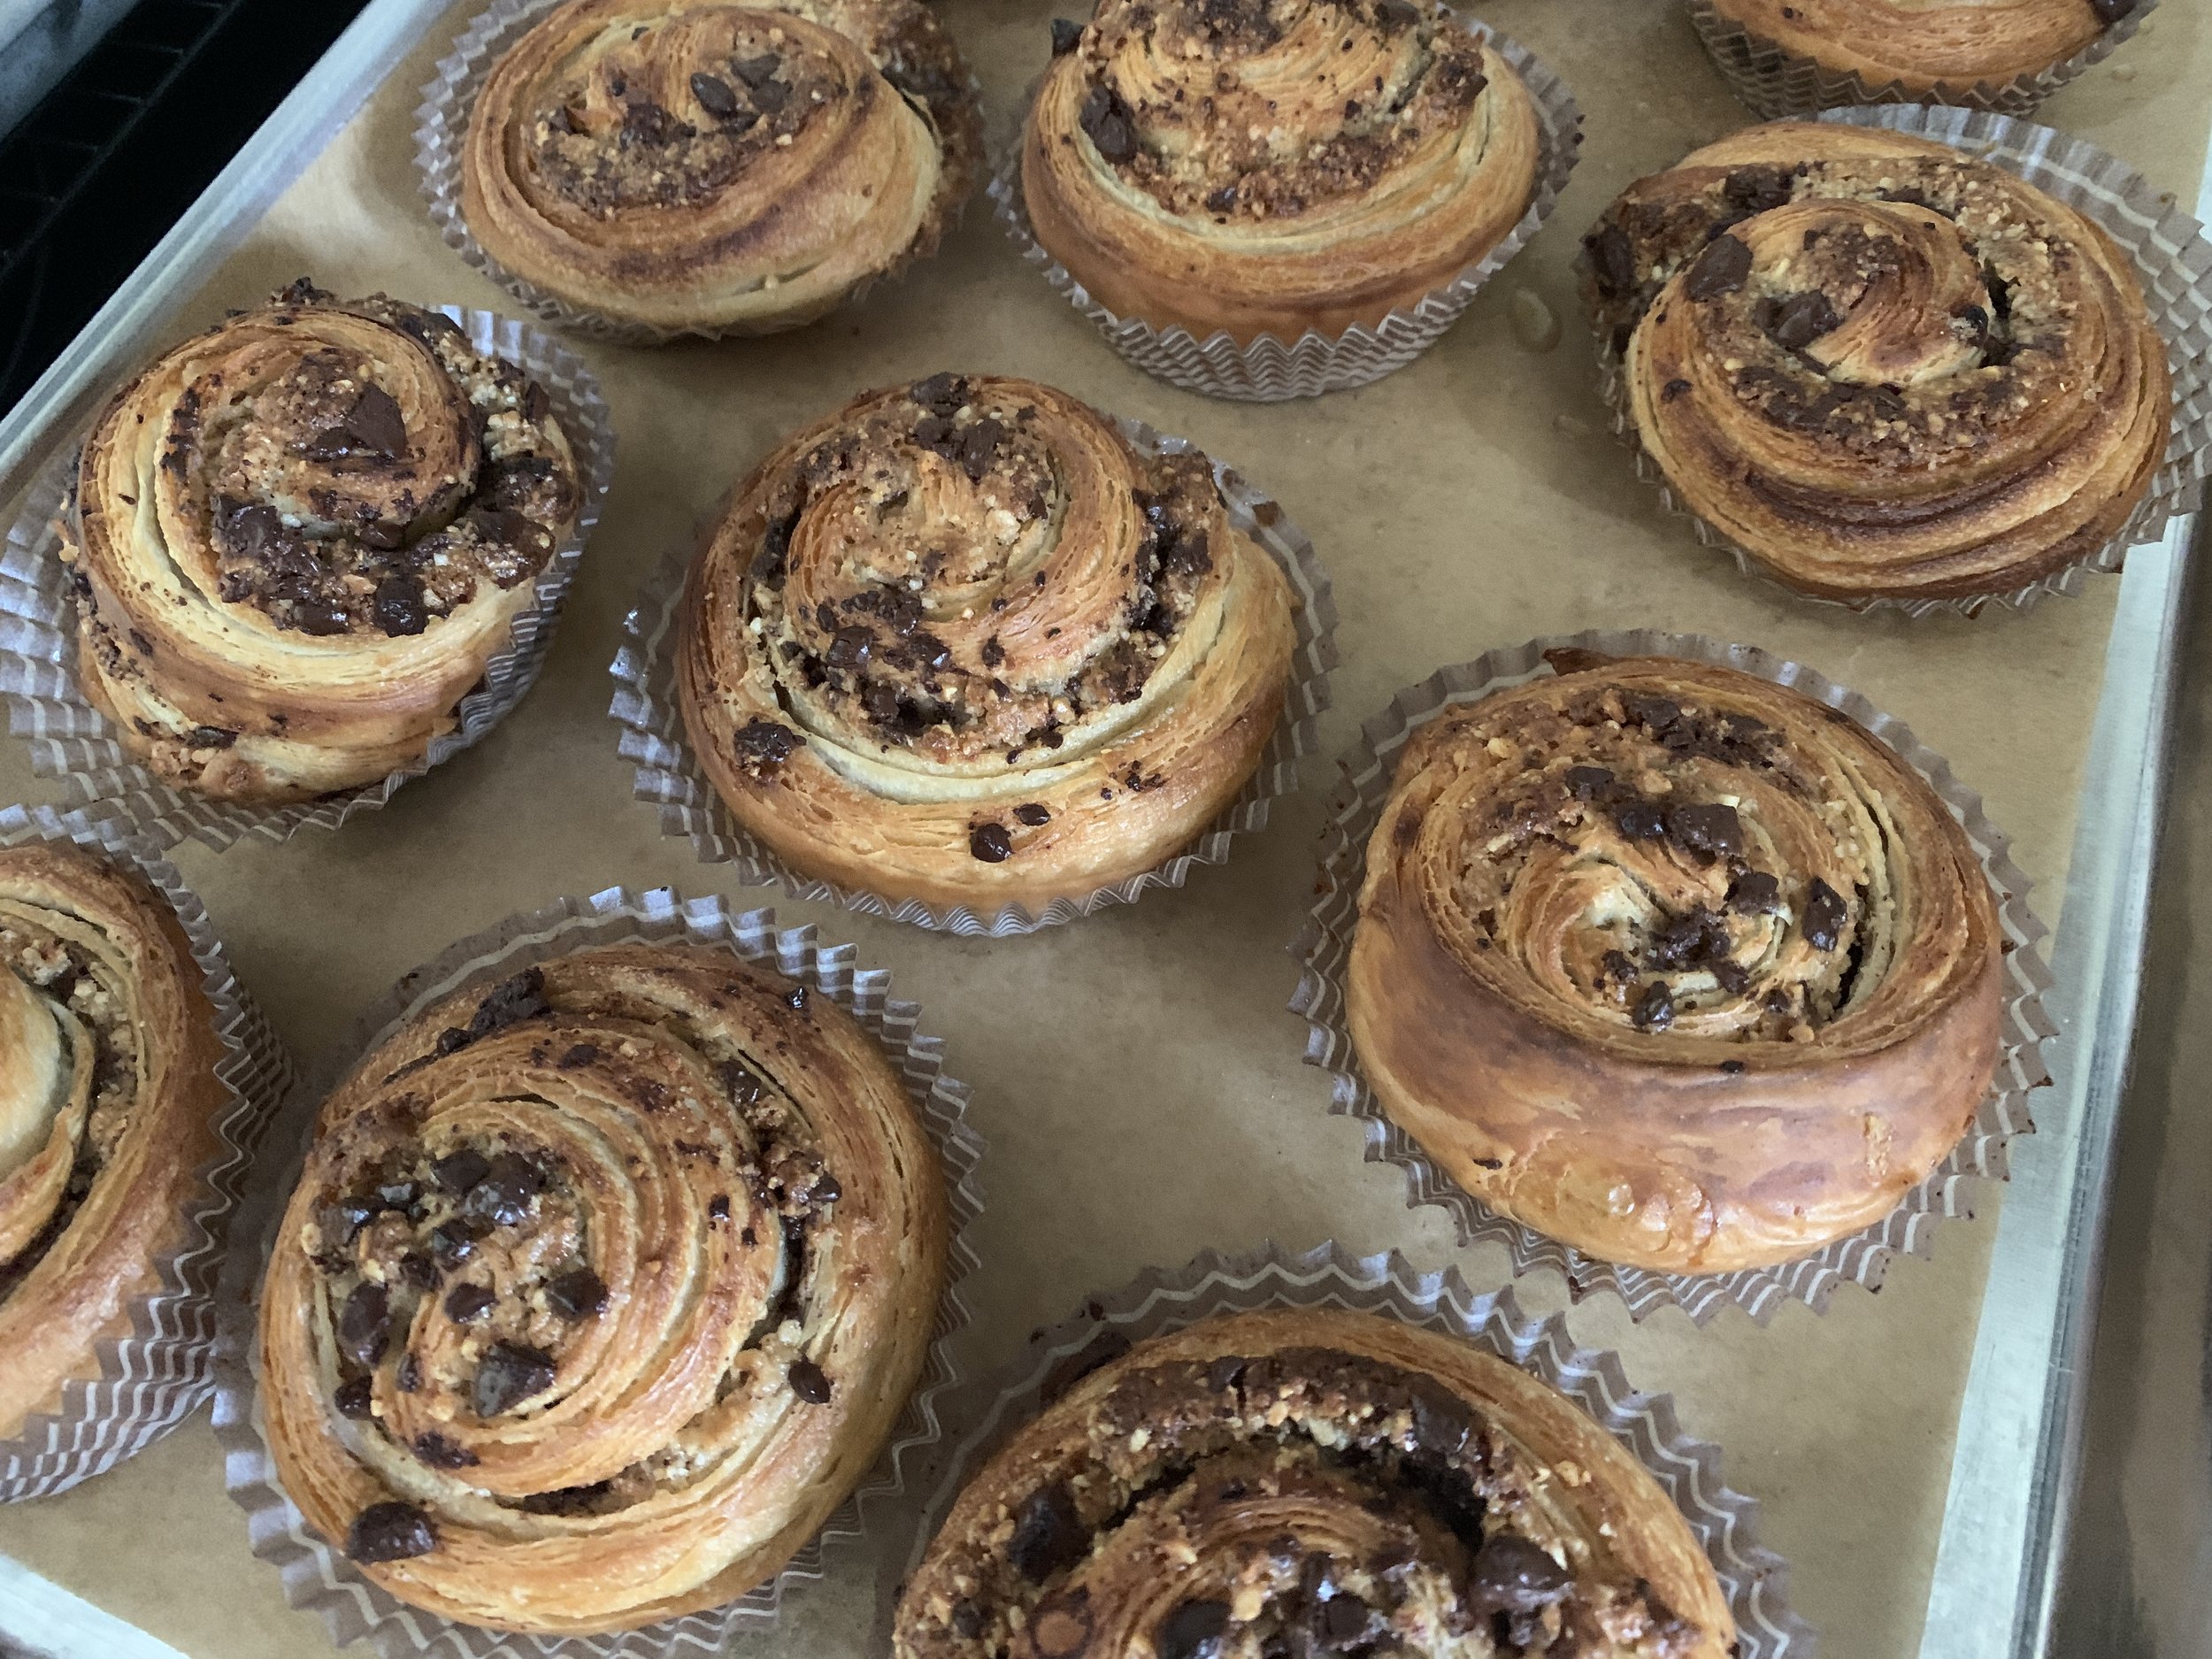
Toward the end of the rise heat the oven to 400ºF. Bake 10 minutes, rotate the pan and check the browning. If browning too quickly, reduce temp to 375ºF and bake an additional 10-15 minutes until nicely browned.


For a little shine I brush them with some simple syrup and then give ‘em a sprinkle of coriander sugar. Yum.


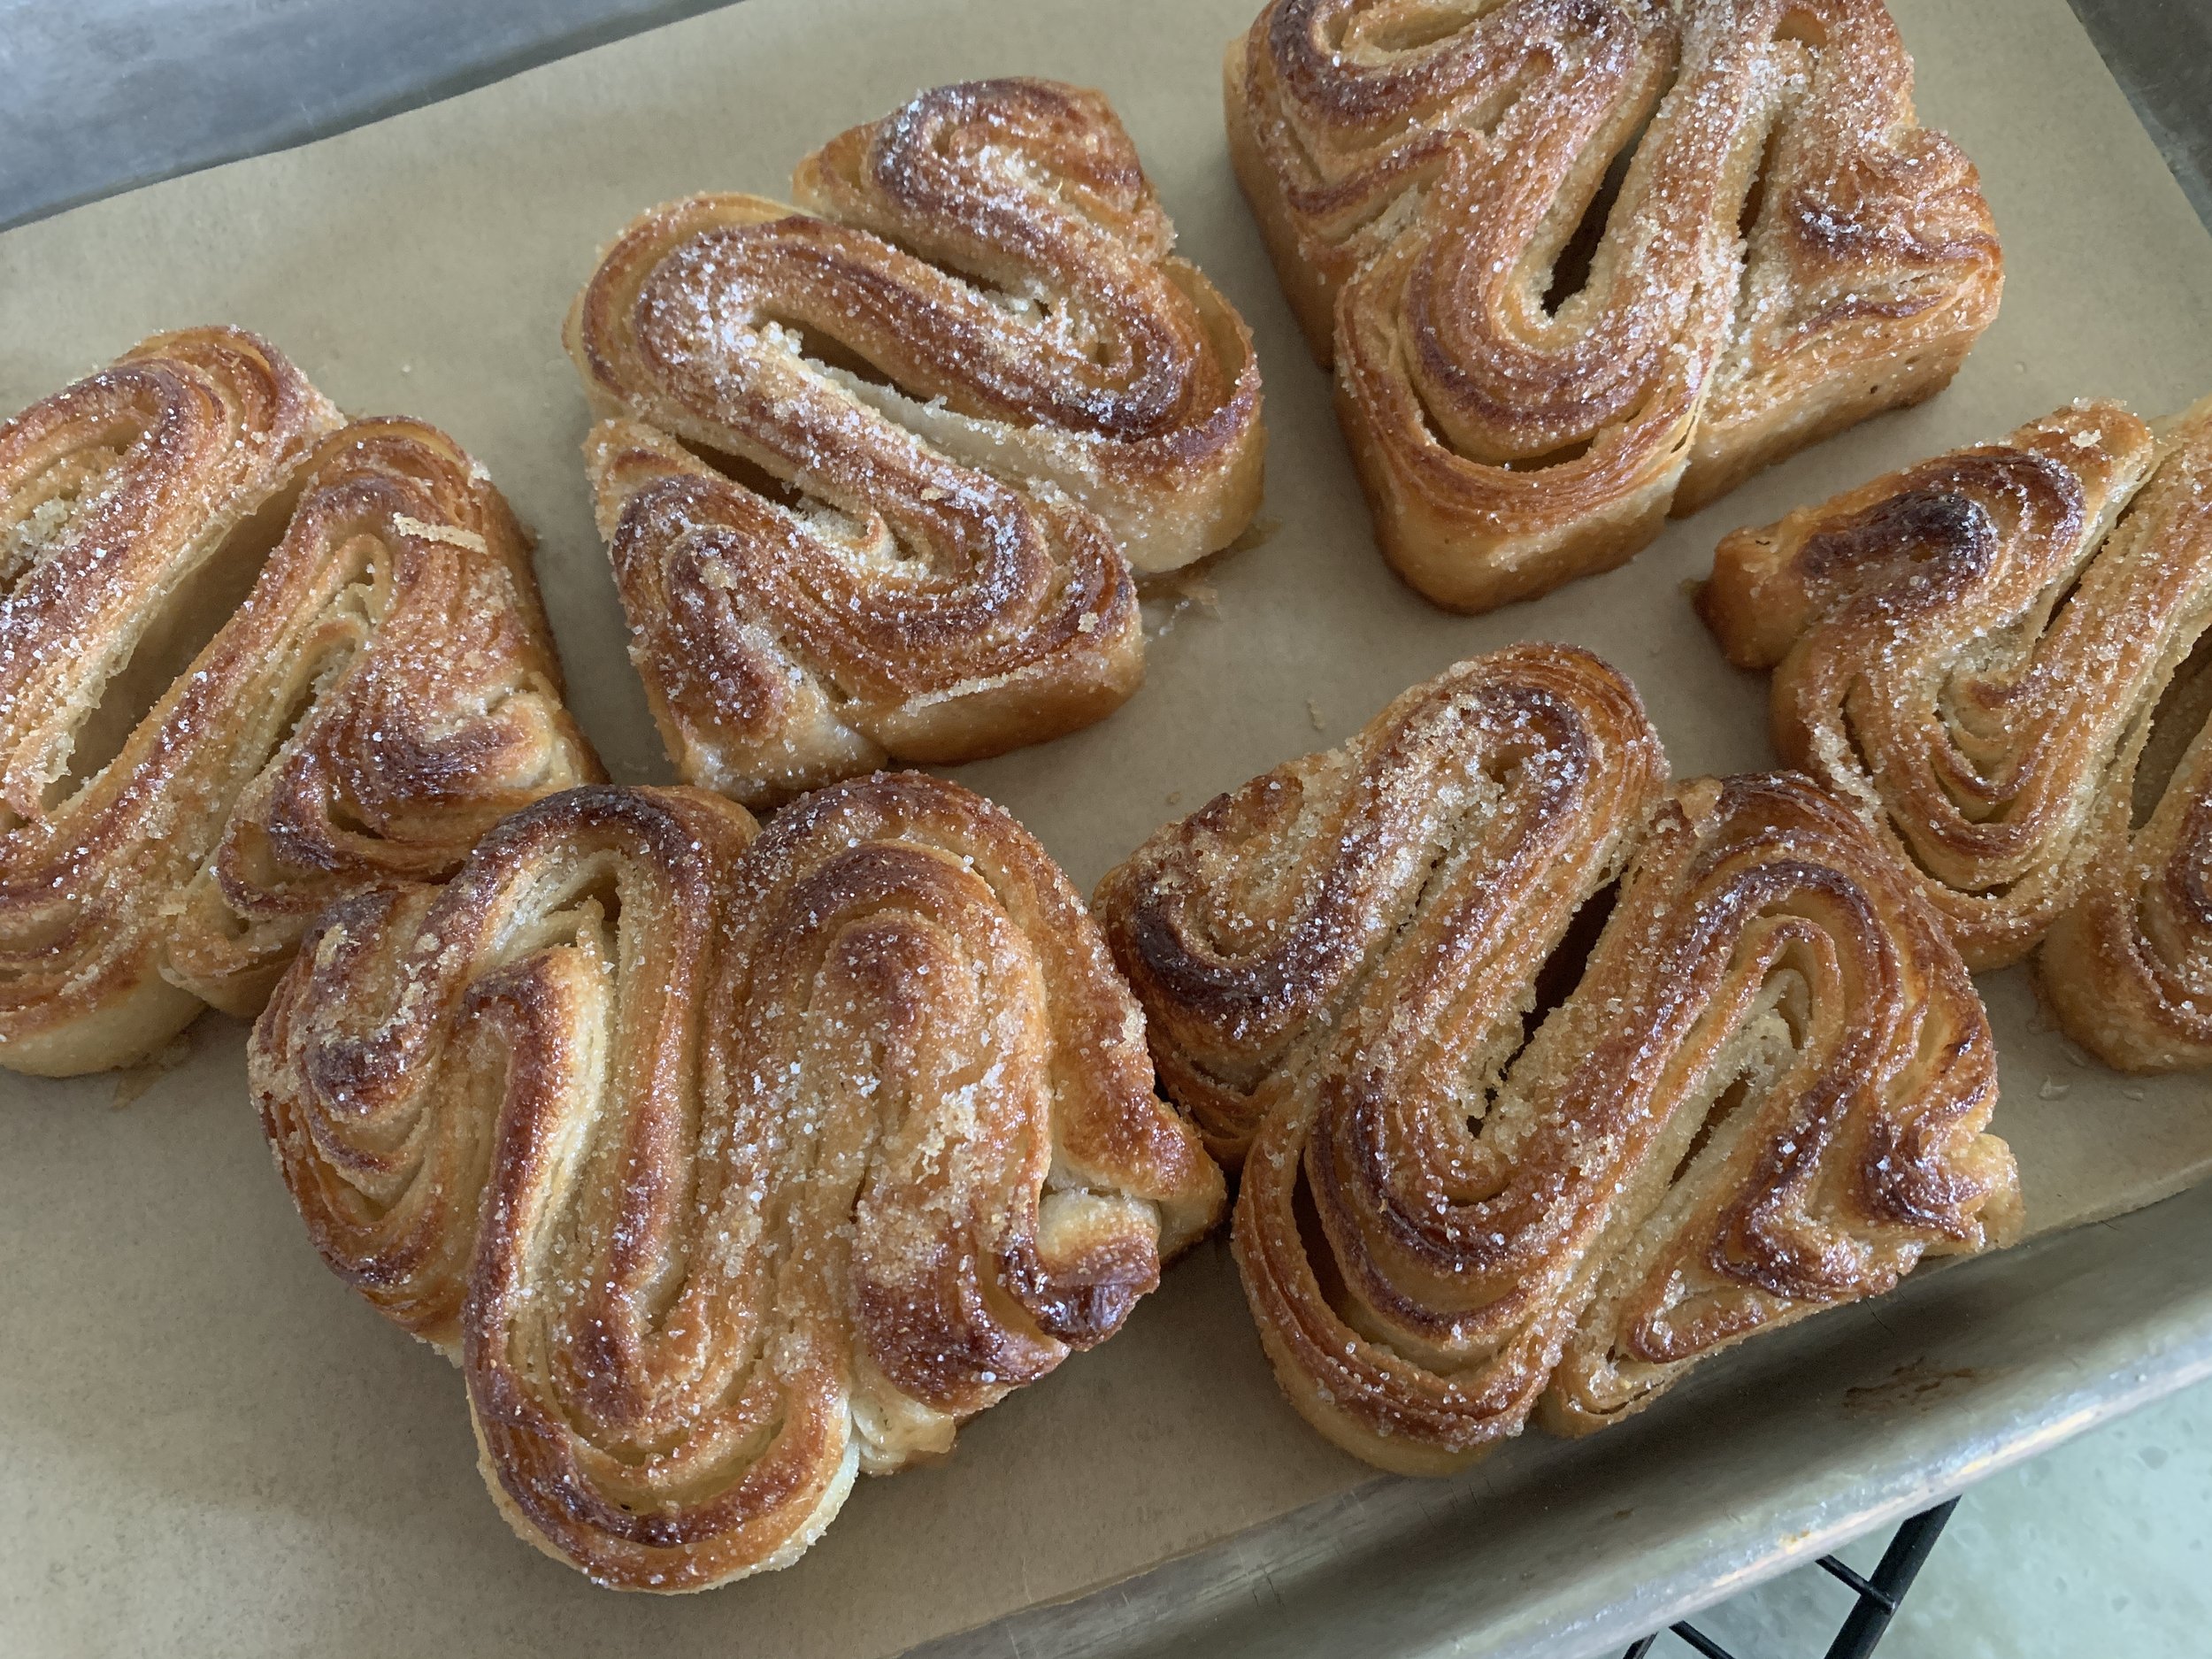
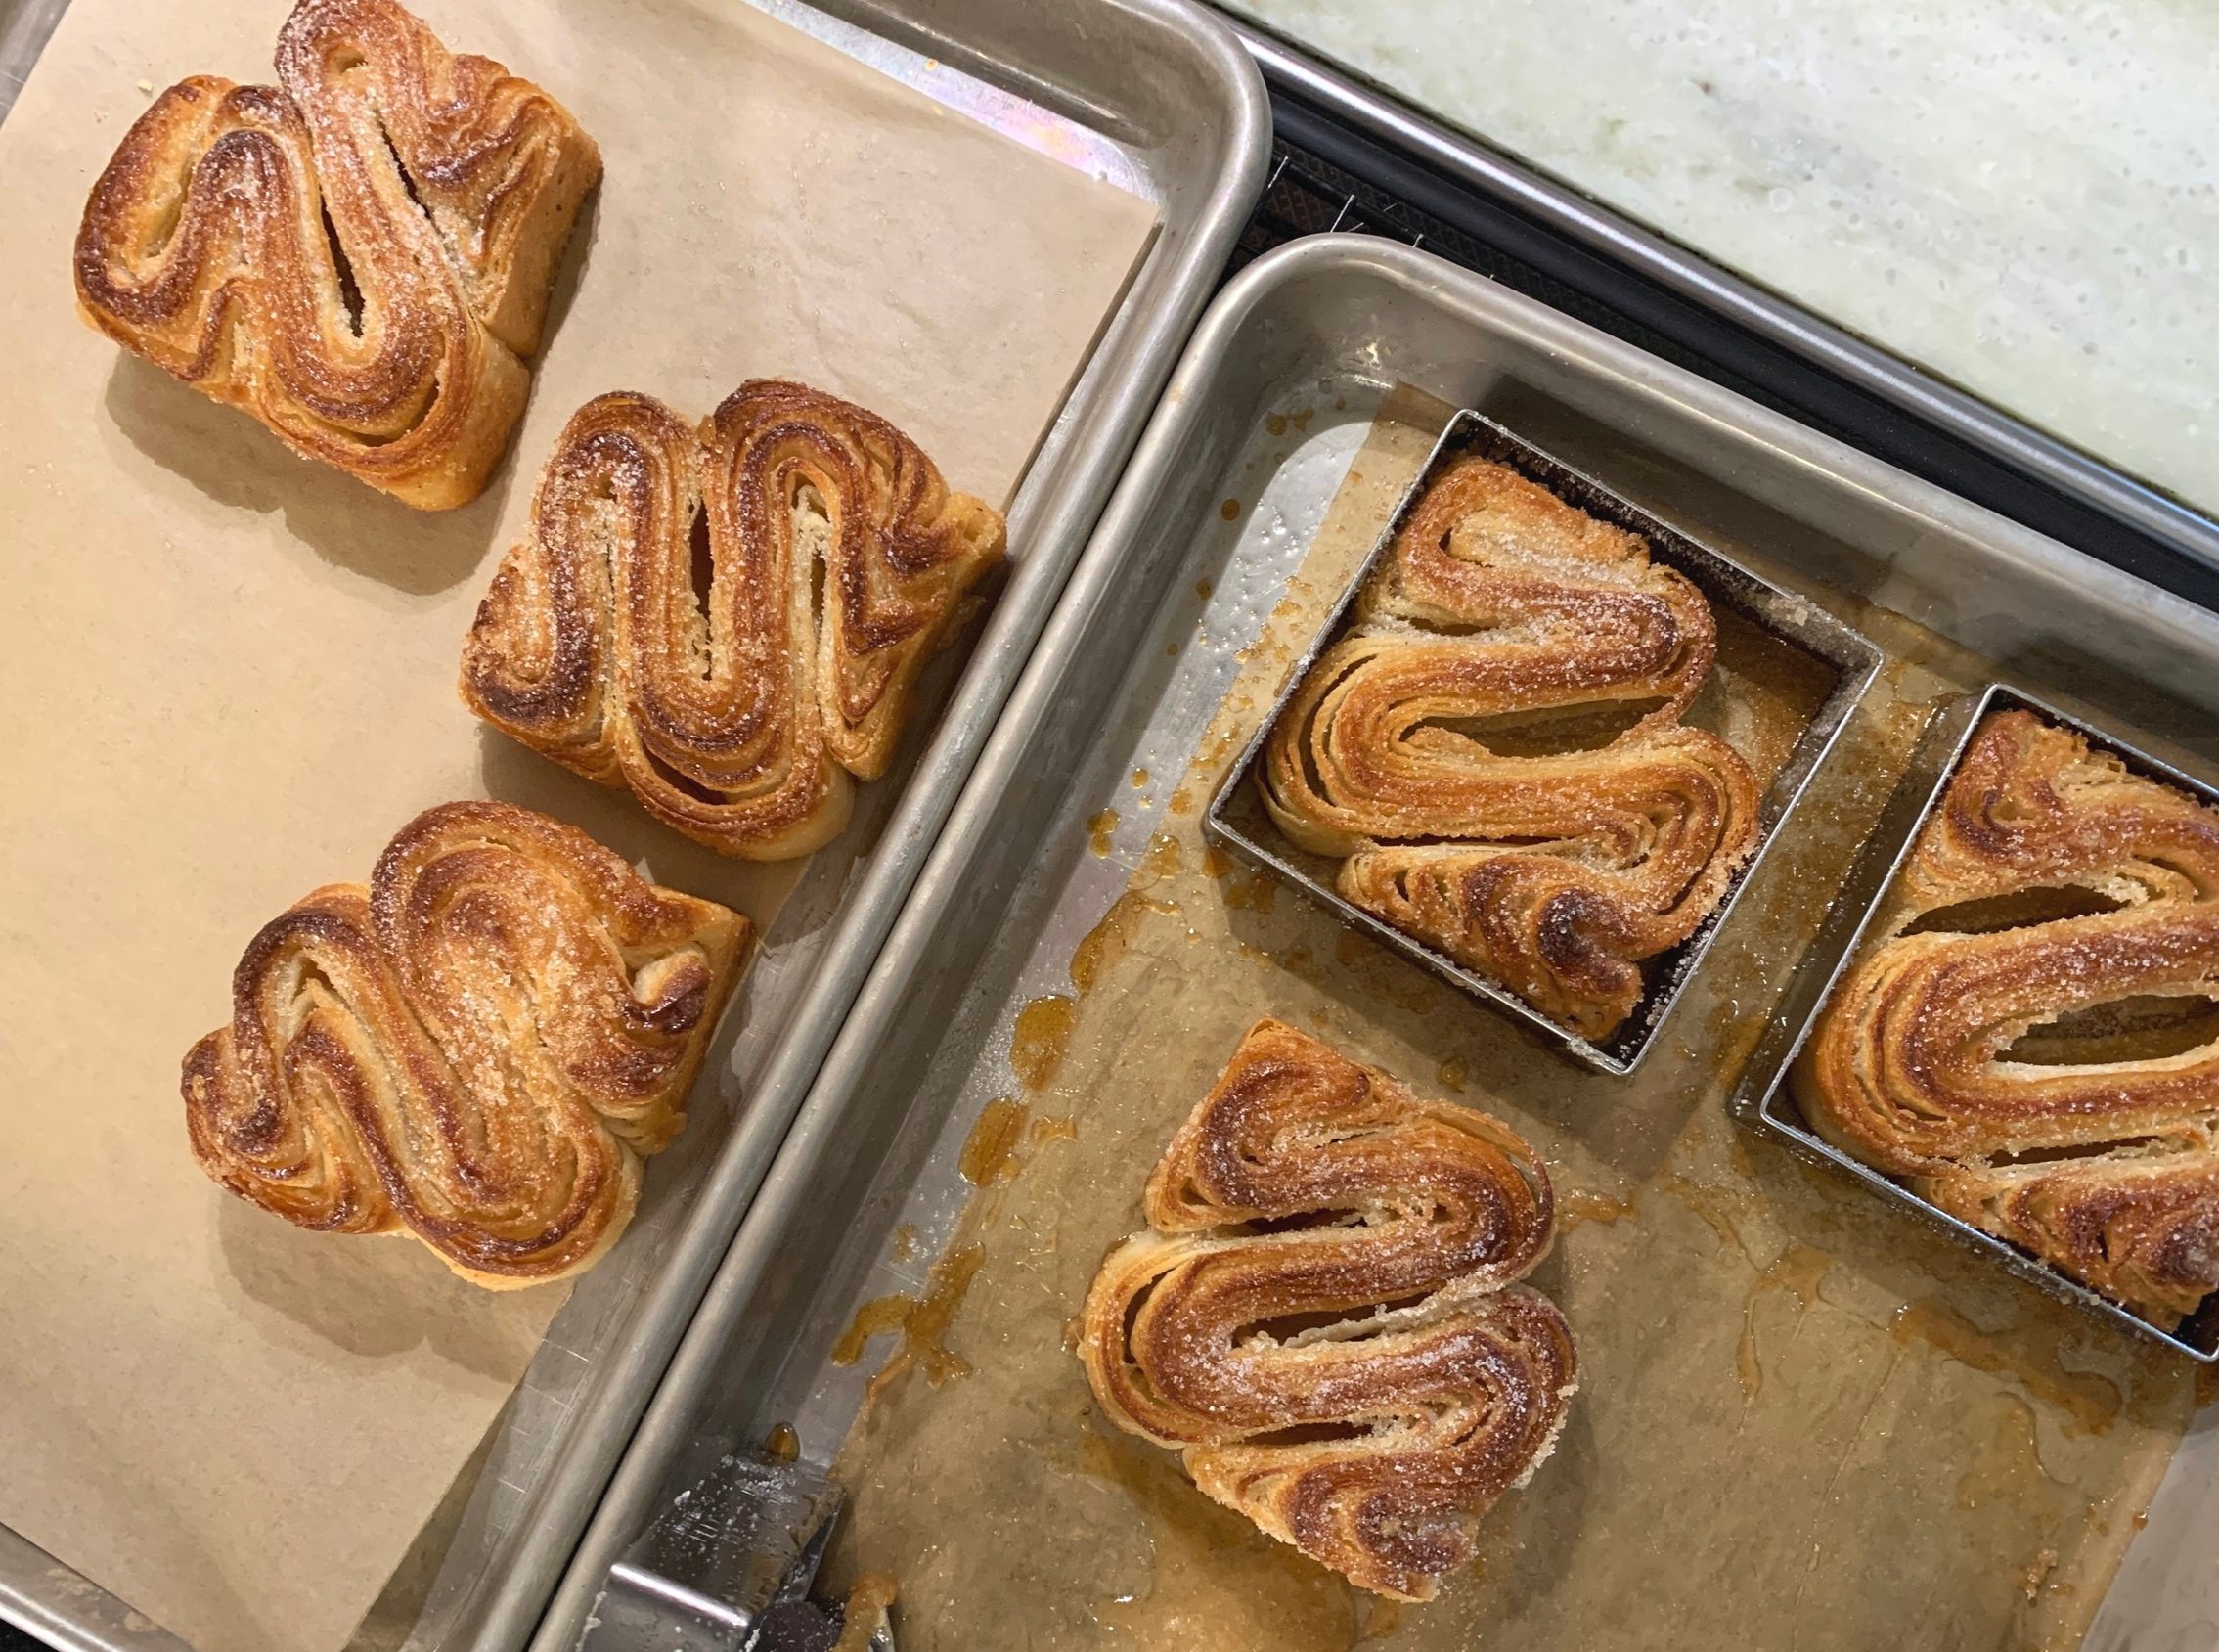
Time for the new shape! Squiggles. They remind me of fleur-de-lis.


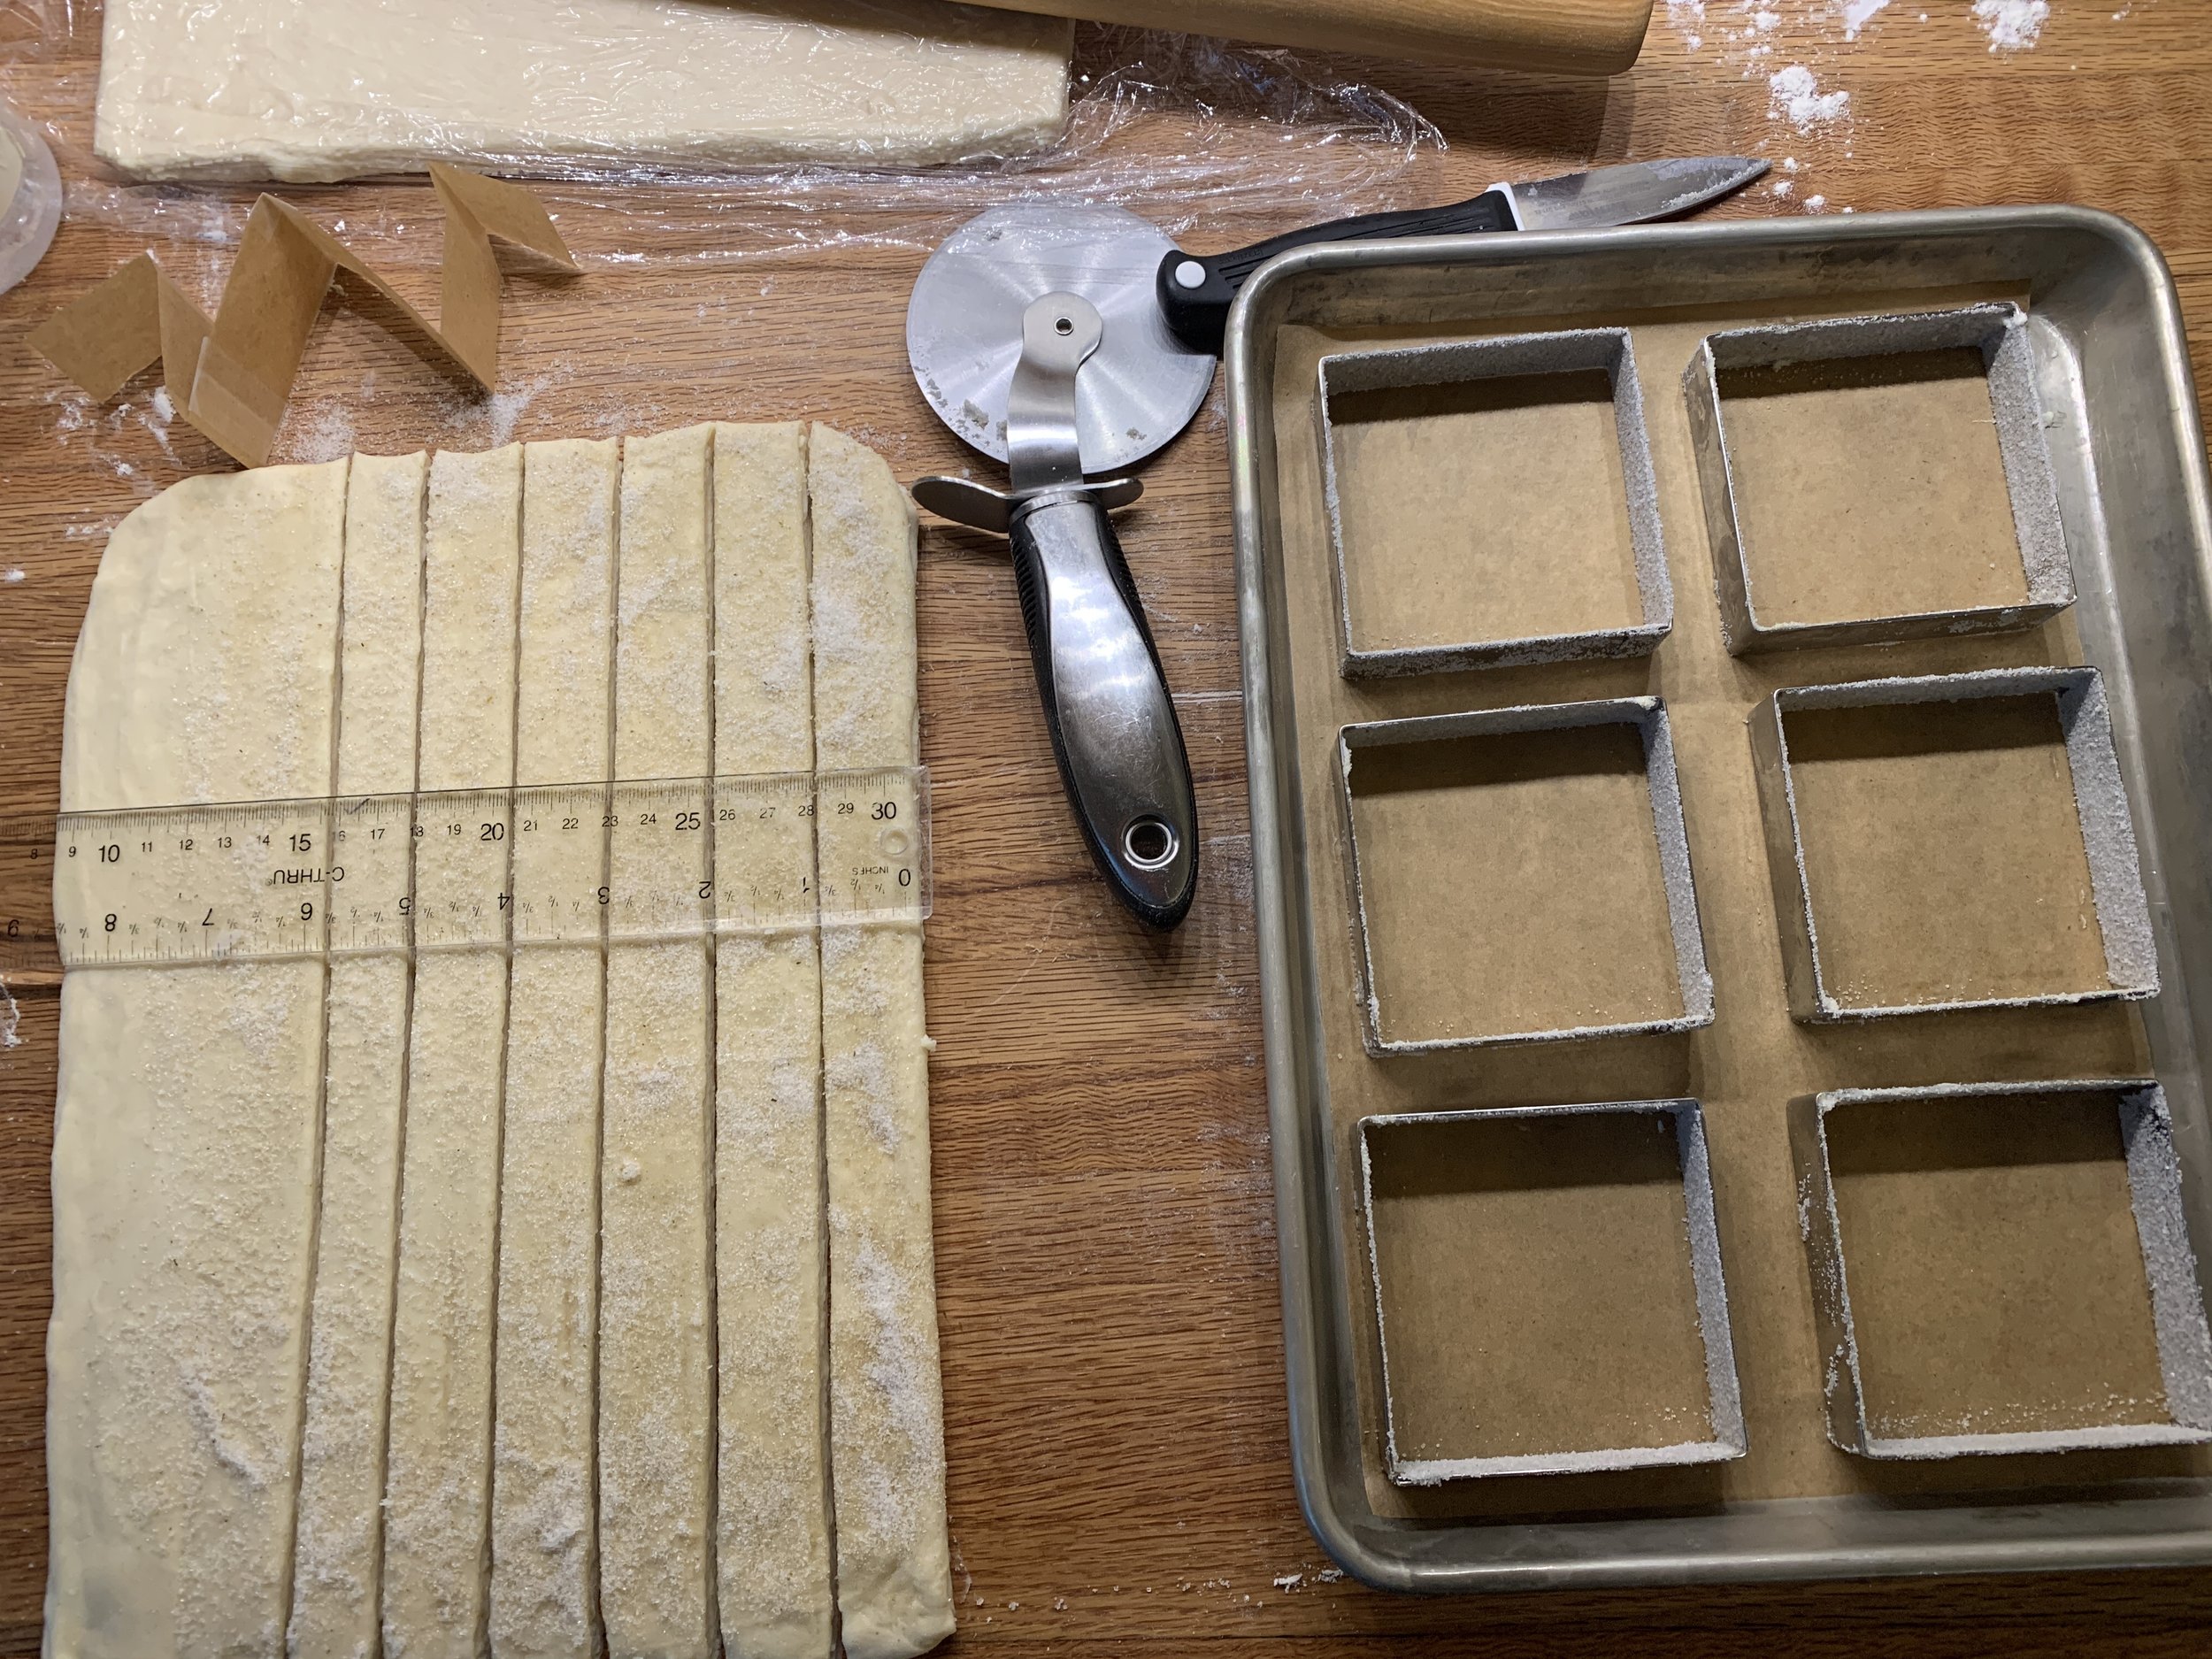
Using a half batch of dough, I rolled it out to an 8” x 12” rectangle, this time with the short side parallel to the edge of the counter. I have only six 80-mm square tart forms so six pastries resulted from this experiment.

Butter and sugar the tart forms which serve as the boundary for the dough to keep it in check, so to speak, as it proofs and bakes. Cut six 30 cm (12”) long and ~ 2.5 cm (1”) wide strips. My cutting eye was a bit off and a couple came out a bit narrower - going forward I’d cut them all a tad wider, ~3 cm each.


Shape each strip into a squiggle (I had practiced with a strip of paper first and figured out the curves I was going for), tuck each into a prepped form at an angle as seen below and sprinkle with some coriander sugar.


Cover lightly with buttered plastic wrap and let rise about 1.5 hours.


Bake at 375ºF about 20 minutes until nicely browned. I also gave these the simple syrup, coriander sugar treatment.


All in all, a fun time in the baking kitchen! I hope you’re having fun too!!

Summer marches on.

More fun with croissant dough - berry flan buns and bourbon glazed pecan spirals

FF561A7A-8D28-41AD-A160-D35006742333.jpeg

I typically have croissant dough in my freezer just waiting to be formed into something delicious. As it turns out, I had a couple of batches that needed to be used for fear that they would soon be over-the-hill soooooo . . . . .

I baked one batch as standard croissants destined for the ever popular twice baked croissant aux amandes.

Freshly baked all butter croissant

Freshly baked all butter croissant

Twice baked croissant aux amandes

Twice baked croissant aux amandes

I divided the other batch in half with two goals in mind - flan buns and pecan spirals. First up - Kouign-amann style berry flan buns. Many of you know about this caramel-y, layered Breton specialty that continues to be very popular in the US. There are specific recipes for K-a dough that differ somewhat from croissant dough, buuuuuuut - you can use croissant dough too! As a matter of fact, it was Chef Xavier Cotte at Le Cordon Bleu Paris who demo’ed Kouign-amann to our class using croissant dough all those years ago. What a treat that was.

Did you realize that Kouign-amann was the subject of the very first post I wrote for this blog back in the fall of 2014! Wow, how time flies.

While I use muffin tins, individual cake pans and ring molds to bake the various twists, spirals and twirls that I make with croissant dough, I love making these in buttered and sugared ring molds. I find they brown much better in the open rings. These are 80 mm (3 inches) in diameter and 2.54 cm (1 inch) high, taller than the usual open tart rings I use for tart making. They’re perfect for this use as well as for other pastries like the aforementioned spirals, twists or twirls.

062F9859-37EA-4ED3-BB29-091018B79E5C.jpeg

For a half batch of dough I go for a yield of 9 pastries, rolling the dough out (on a sugared rather than floured surface) to a 12” x 12” square, then cutting nine 4” x 4” pieces. Do your best to keep the corners square, although a little curve never hurt a thing. As you roll, flip the dough from front to back, sprinkling more sugar on as you go. Don’t be shy.

4E2C31FD-0CC5-494A-8187-4FE24A094B5A.jpg
428A26EA-F78E-44B2-8CA2-AB18C838998B.jpg

Now simply fold the corners of each piece up, kind of pleating the sides, and set the dough into the buttered/sugared rings. Easy-peasy!

48832A33-7C53-4030-92D3-7E24059F3CB5.jpg

Cover lightly with plastic wrap and give them a 45-60 minute rise - you should see more definition of layers and a general pouffy-ness. Meanwhile heat the oven to 375ºF.

You can bake these au naturel, but here I piped a blob of pastry cream into the center (hence the “flan” label), added some blueberries/raspberries and topped with another blob of cream and a sprinkle of raw sugar. I usually have berries in the freezer and add them frozen to avoid the mushiness and wateriness that happens if they’re thawed first (don’t do it!). It’s also helpful that frozen raspberries are easy to break up into smaller pieces for placement in a smallish space.

Sheesh! I forgot to grab a pic after assembly so shot a quick one after going into the oven. Kind of a cool perspective.

6F8D5FC4-F4F9-40D2-822E-ABB033EA9A5F.jpg

Bake about 20-25 minutes until the pastry is golden and the cream set. Once out of the oven I leave them on the sheet pan but gently lift off the rings - they come off much more easily when still warm, before the caramel-y sugar cools.

A4699DAA-6168-491C-98E8-9B680E42D70E.jpeg

They’re deelish still slightly warm, but you can also finish cooling them on a wire rack and enjoy the same day.

You can freeze them too. If you do, plan for a treat with morning coffee by heating your oven to 325ºF, take them right out of the freezer, place on a parchment lined sheet pan and thaw/warm for about 15 minutes. If they’re still a bit cool inside, give them another 5 minutes or so. You be the judge.

B62027F8-23B0-4337-9D5D-1BCFF963DB58.jpg

Next up - crackly glazed pecan spirals.

21872DD6-8FC4-4F6B-9033-1AA771EE47F3.jpg

I’ve previously posted a version similar to this using laminated brioche dough, but here I’m using a slightly different filling and opted for a bourbon butter glaze like the one I used on pound cake a while back. I won’t spend a lot of time on this but just want to share it with you.

For a half batch of croissant dough I’m going for 8 or 9 pastries - just depends on how things roll out.

For the filling blend 28 g/ 2 tablespoons soft unsalted butter with 70 g brown sugar (light or dark, either way). Add a generous teaspoon of spices if you wish - cinnamon or a mixture of your favorites like coriander, cardamom, cinnamon and ginger.

Roll the dough to about a 10”x10” square, spread the filling over it, top it with finely chopped pecans (eyeball it) or your own favorite nut, then roll it up into a log. Cut ~3 cm slices and place them in the center of buttered and sugared rings. You might notice below that I have wrapped two shallower rings together with foil. Since my flan buns were occupying my higher rings, I created my own!

F3180075-E06A-4F70-8A63-246E7946C2B1.jpg

Cover lightly with plastic wrap and let rise about an hour. I hope you can appreciate in the image below the increase in fullness of the dough compared to above.

8D130DE2-1E89-4A52-9903-EA13286C8B88.jpeg

Bake at 375ºF for about 20-25 minutes until golden brown, which gives you time to make your glaze.

Here you go: heat 2 tablespoons bourbon with 28 g / 2 tablespoons unsalted butter to melt, then stir in 50 g / 1/4 cup granulated sugar, stirring to dissolve. Once the sugar is dissolved bring to a boil for one minute. Remove from the heat and blend the mixture with 50 g / 1/2 cup confectioner’s sugar and 2 tablespoons of crème fraiche.

Once out of the oven, remove the rings (sooner than later is always best).

B41B7A9B-D1A4-45D3-82F4-EFF1890CD356.jpg

Brush the glaze generously over the spirals. Now pop the tray back in the oven for about 2-3 minutes. The heat makes the glaze crackle and bubble up, although you can certainly omit this step if you prefer a smooth glazed look.

0E139C82-A5CE-44DA-B5B8-C79F64CB4342.jpeg

Smooth or crackled, they’re tasty either way.

Have fun creating your own treats using croissant dough. You can do it!

F2A51C92-04B4-41F8-AE24-EE72EF47C3CA.jpg

Couronne aux amandes et aux noisettes . . . . and more!

IMG_0629.JPG

During our weeks of staying home and sheltering in place I’ve been doing a variety of baking projects with an eye toward using ingredients I have on hand (hmmmm . . . this is starting to sound old). That also includes croissant dough sitting in my freezer waiting for just the right moment.

Wouldn’t you know I had two batches of said dough that were nearing their “use by” date - I don’t like unbaked yeasted dough to sit for longer than 6 weeks in the freezer since after that the yeast starts dumbing down and the dough doesn’t rise well at all. Trust me - I know.

Time to create! Get ready for it!

I decided to make four different pastries: a bit more than half of one batch for a couronne (can be translated as crown or wreath), the remainder of that batch for petite pain au chocolat, another half batch for apricot twists and the final half batch for what I refer to as cherry cream cheese “flip throughs”. Oh boy!

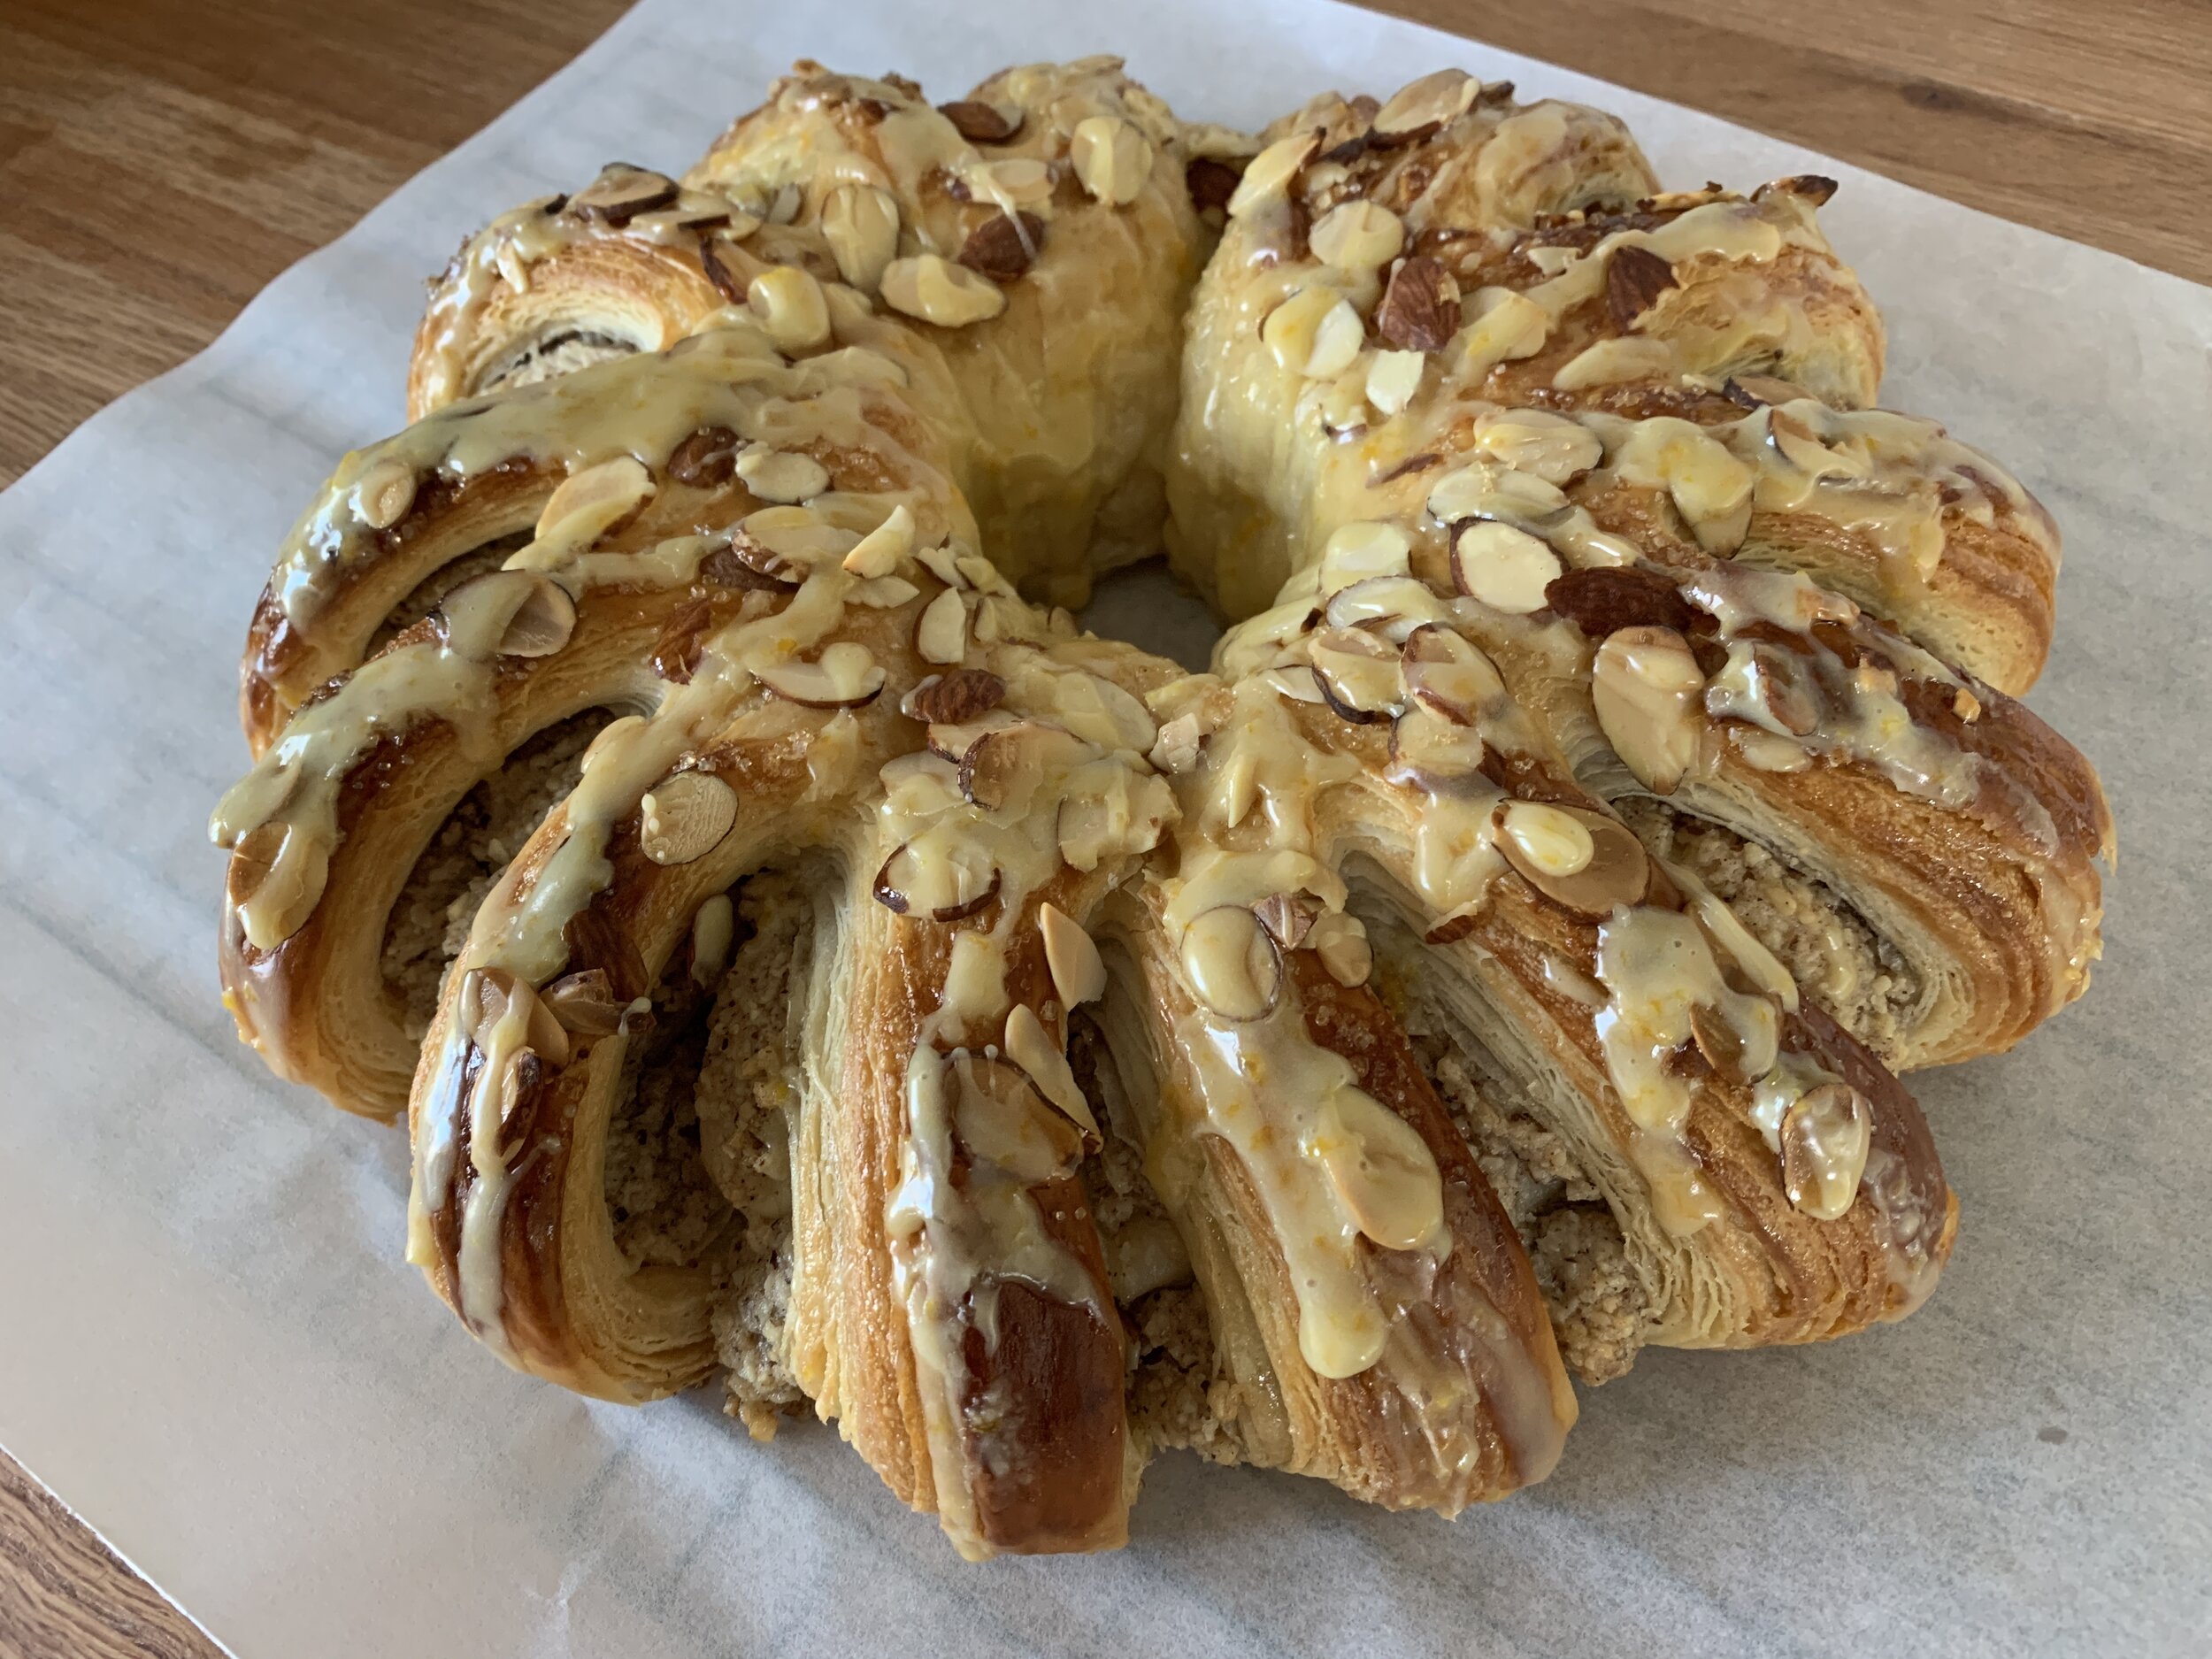
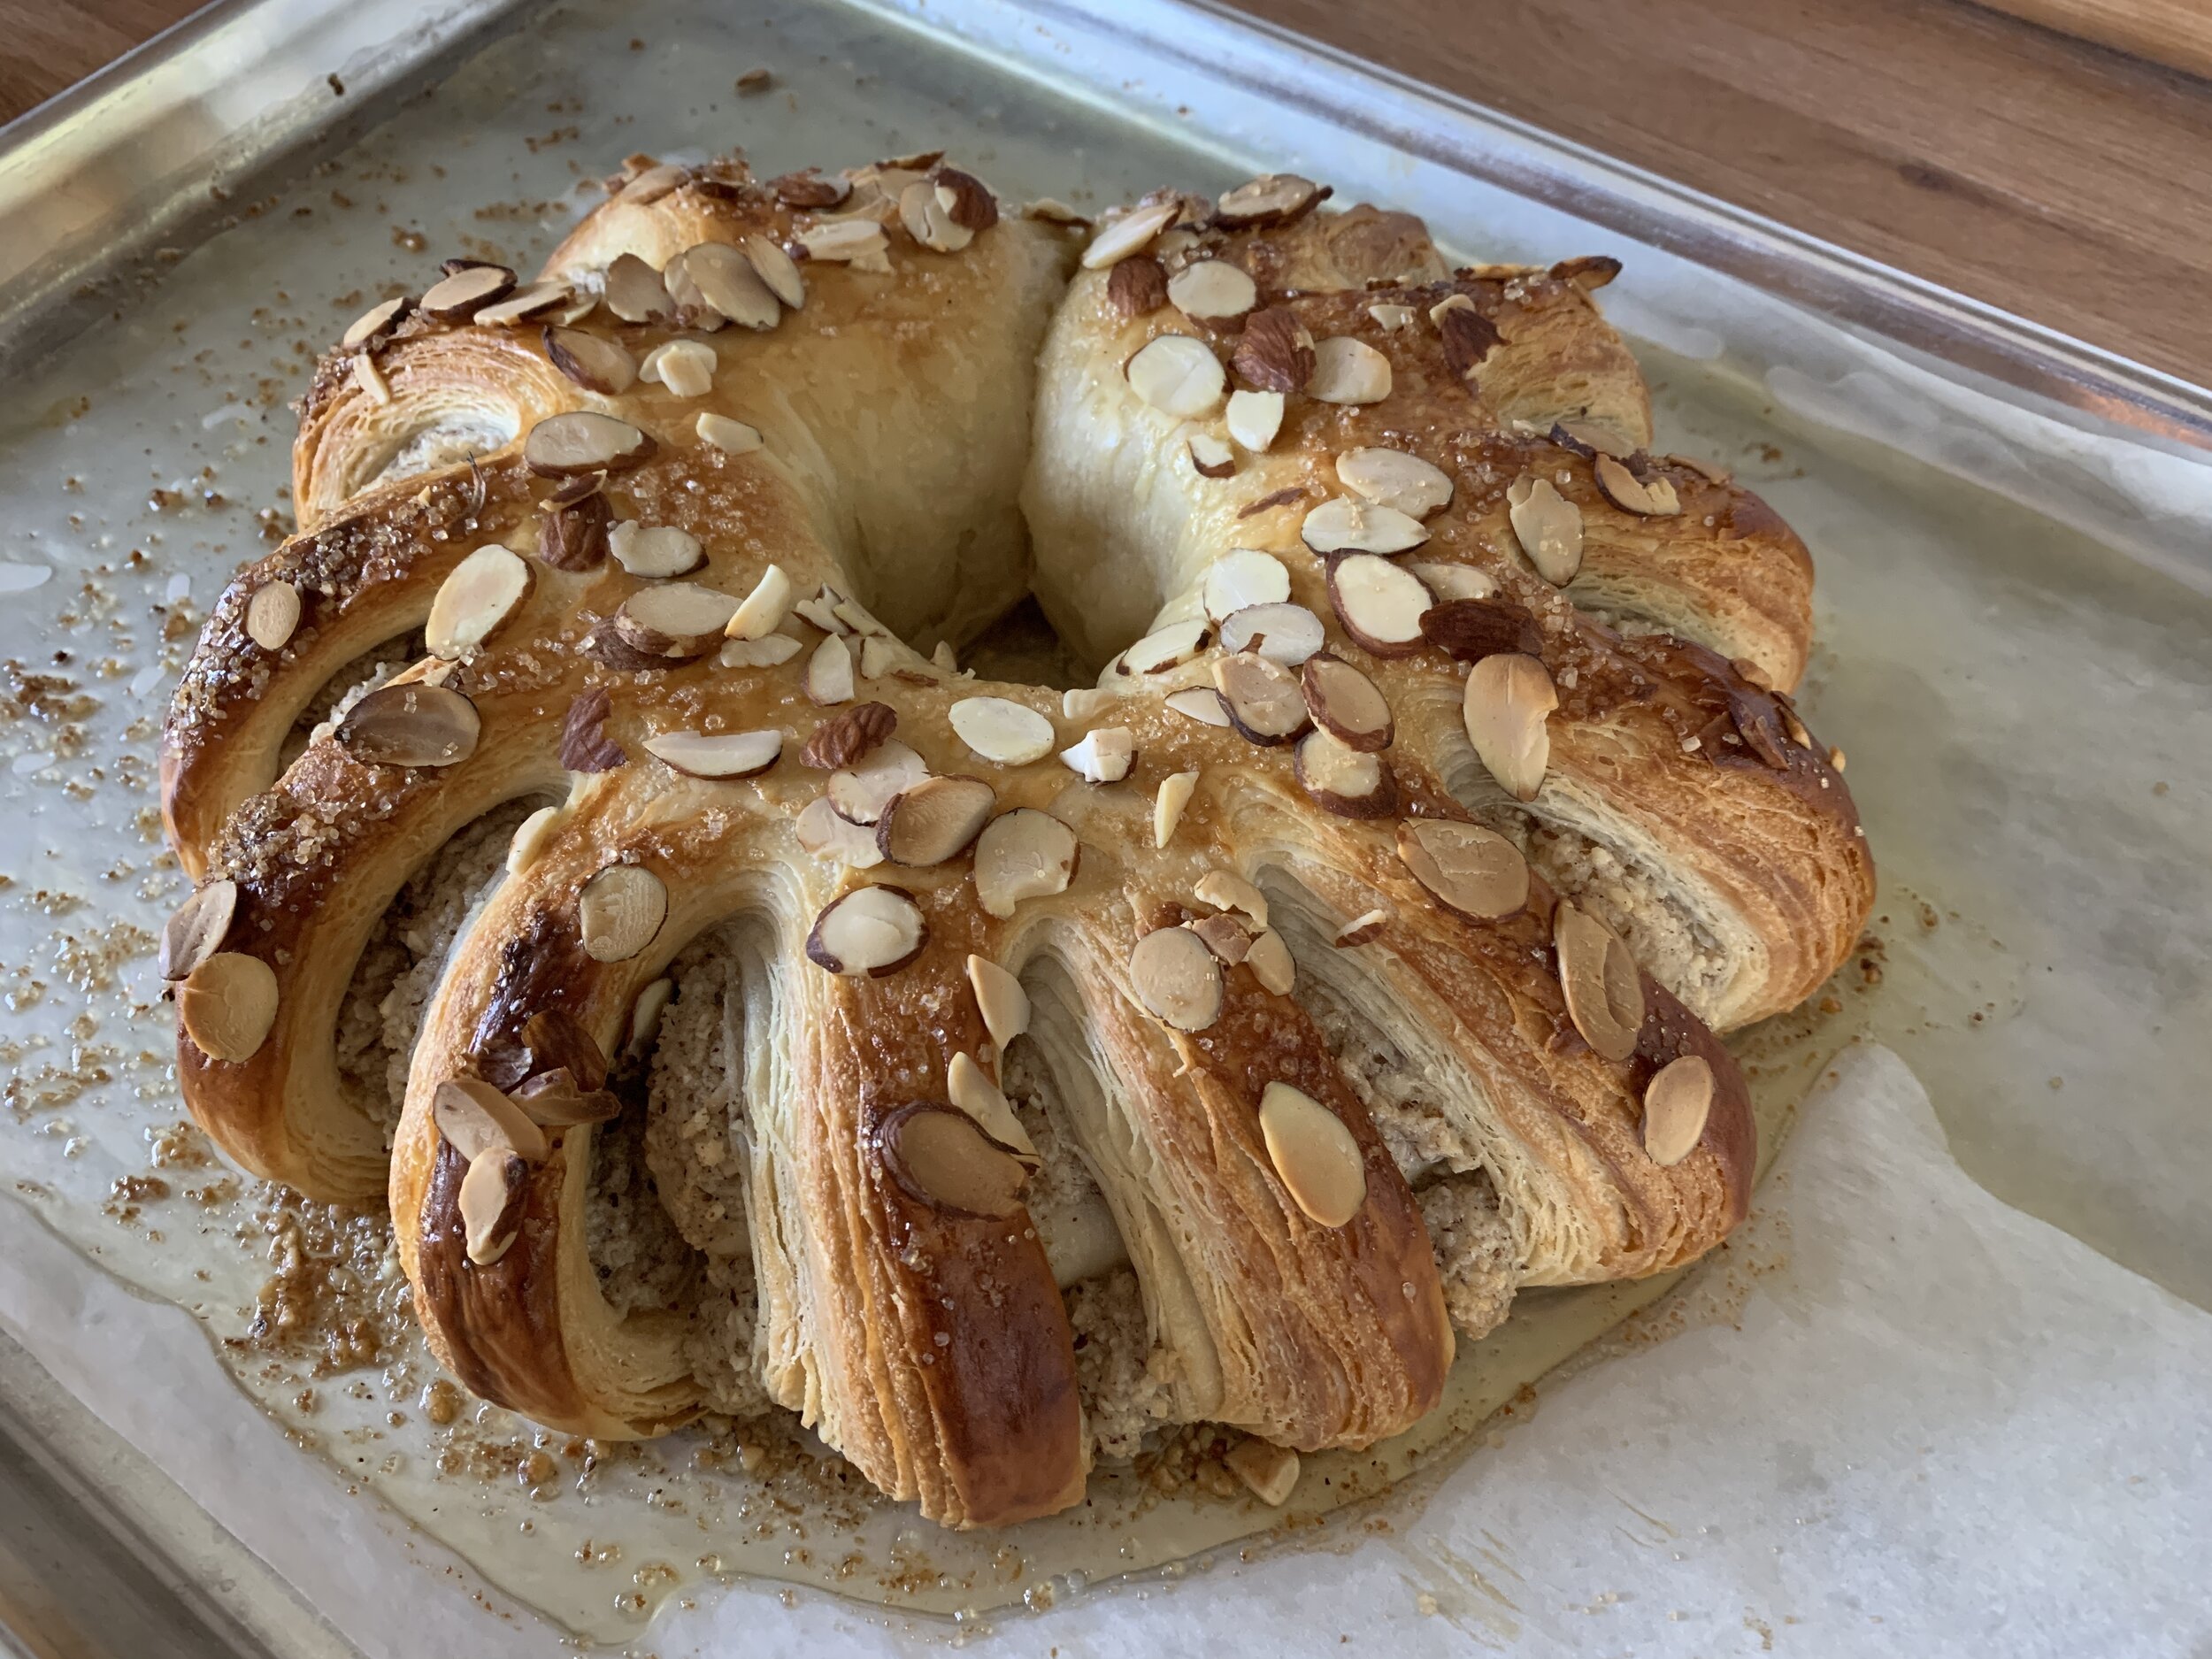
First up is the hazelnut and almond couronne which is shaped in a pretty cool way. A good rule of thumb when rolling this type of dough, no matter what you’re going to shape, is to aim for a finished piece of dough that’s about 1/4” thick. If you start getting much thinner than that, you’ll lose some of the discrimination of your layers and won’t have as lovely of a laminated finish.

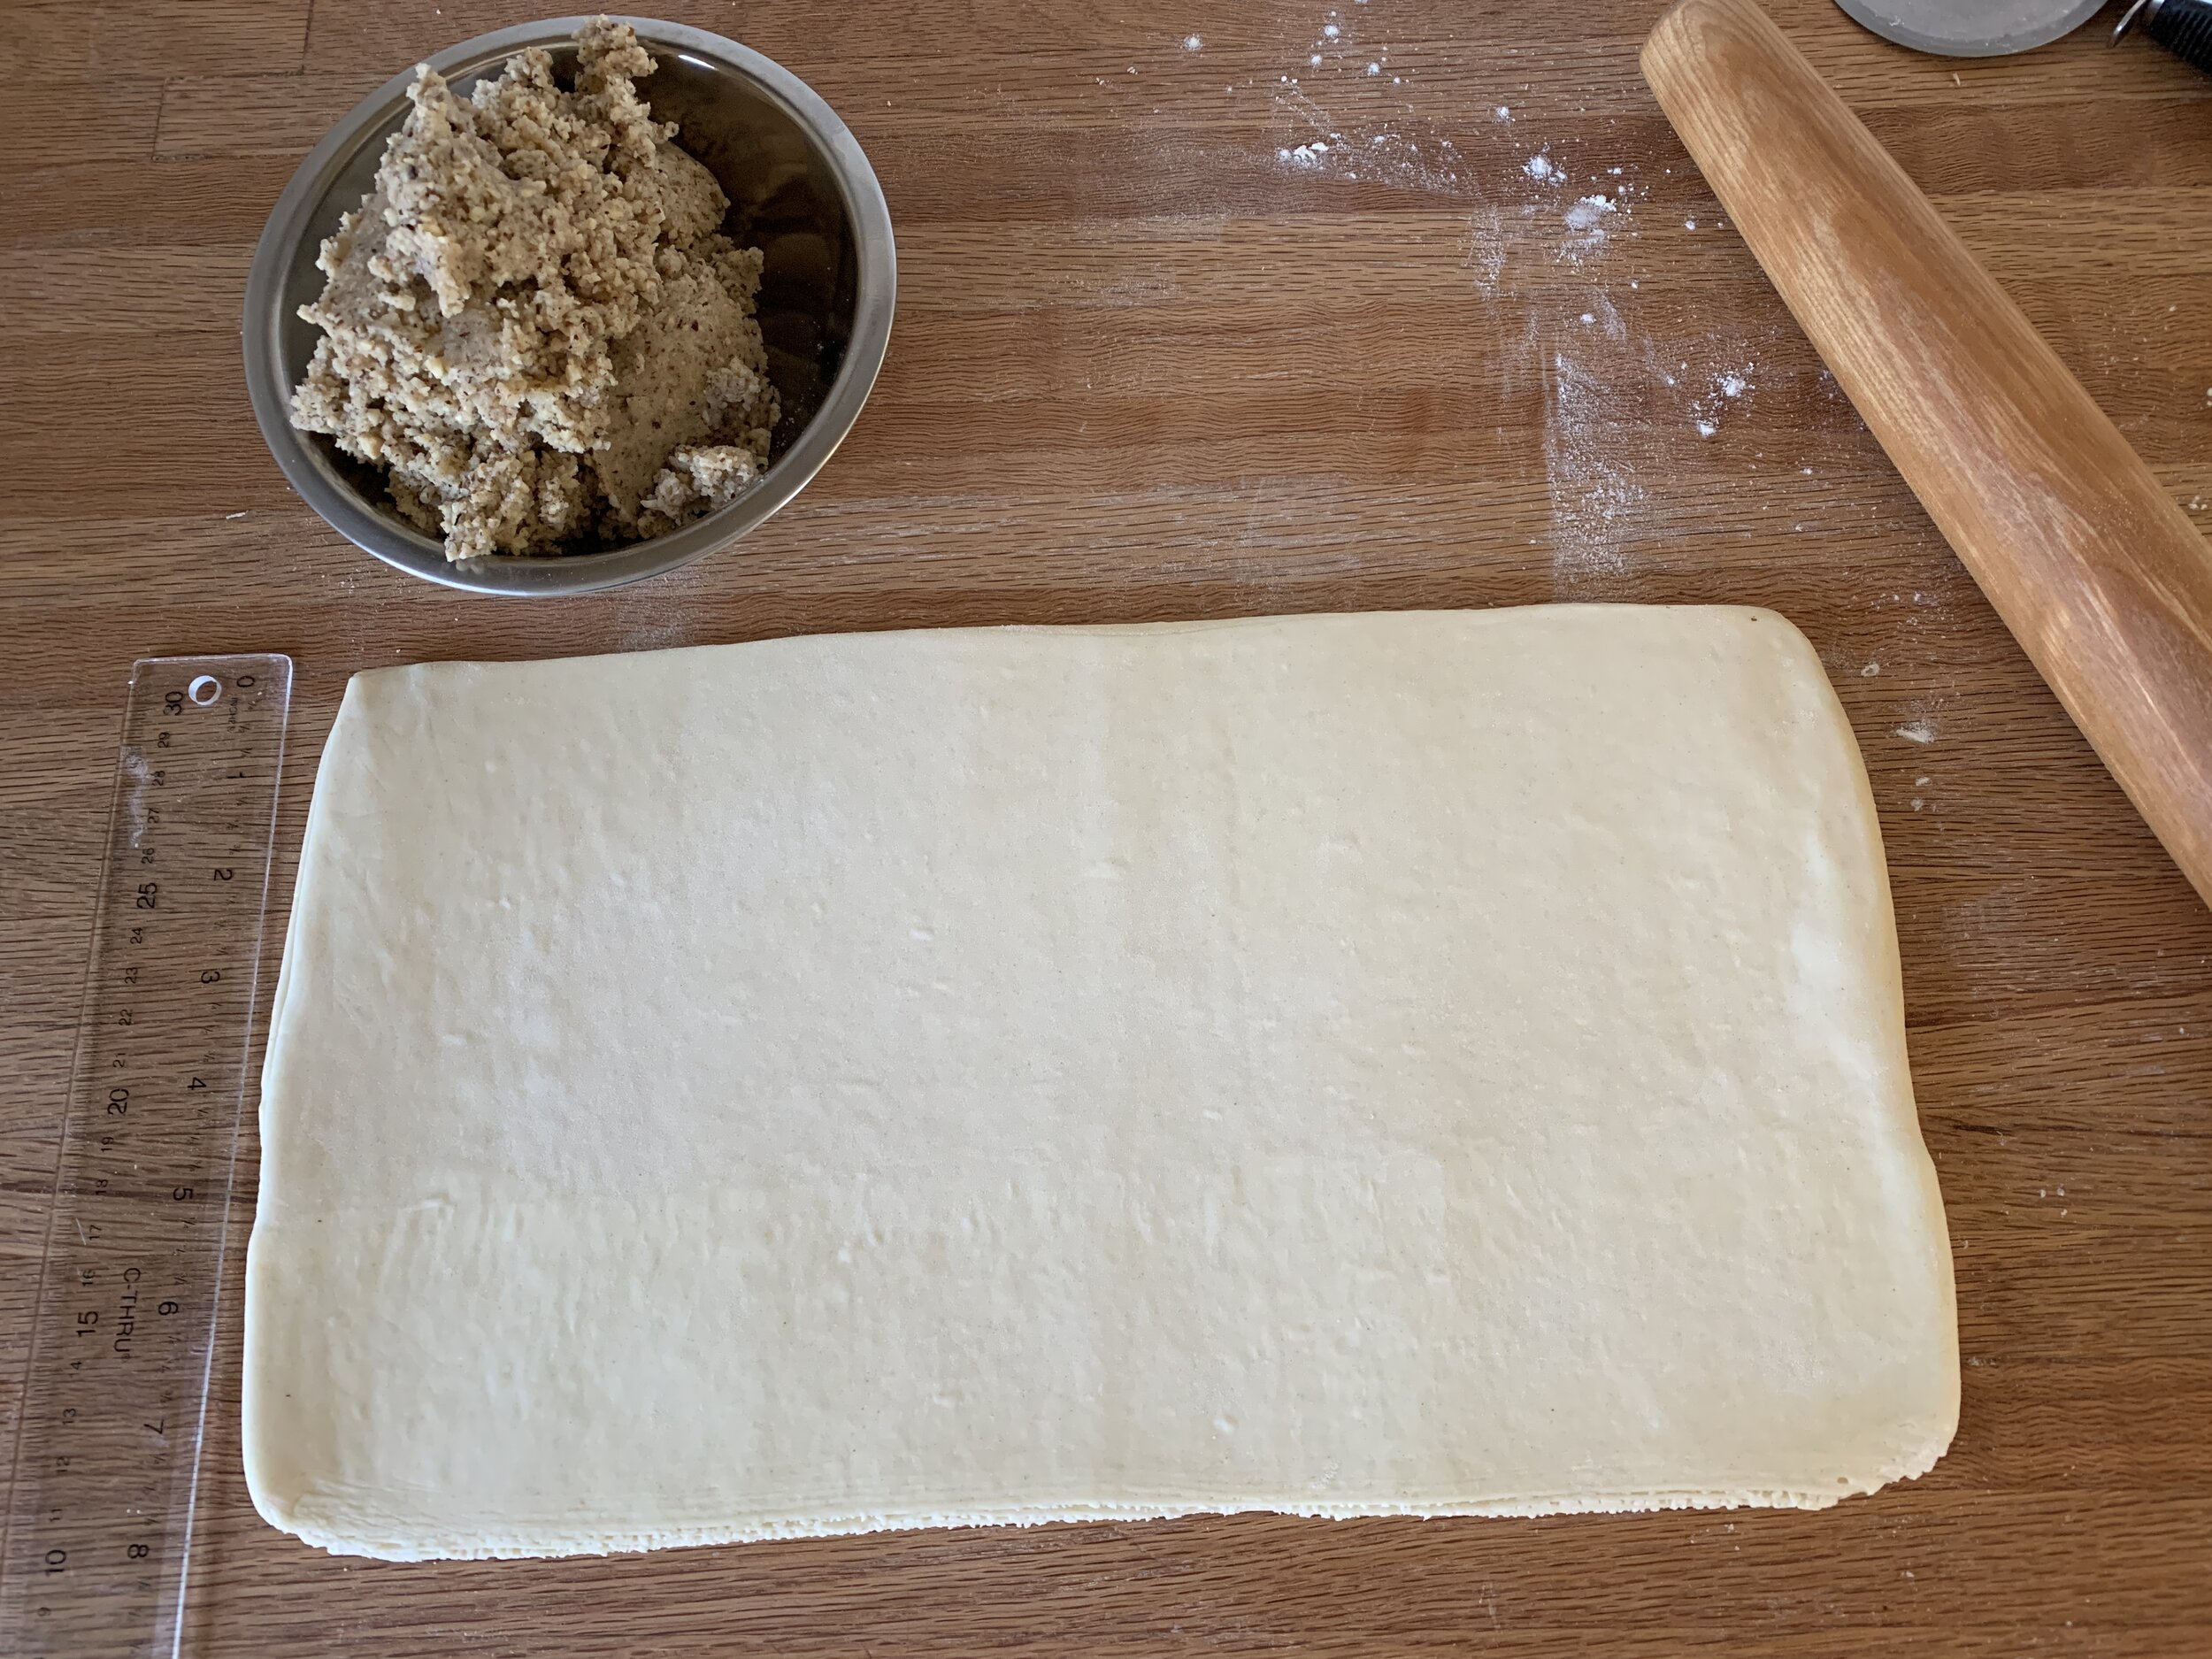
I rolled ~680 g of croissant dough into a 8”x14” rectangle. I had my hazelnut filling ready to go - very much like remonce (which I wrote about in the recent Danish Kringle post), it combines equal weights of almond paste (I’m loving Mandelin premium), sugar and butter followed by the addition of three times that weight in toasted, finely ground hazelnuts - e.g I used 100 g EACH of almond paste, sugar and butter plus 300 g toasted, ground hazelnuts. Cinnamon or other spices can also be added.

My couronne required 340 g of filling so I had leftovers which I wrapped and froze for another day.

IMG_0599.JPG

Spread the filling over the dough and roll it up into a log.

IMG_0602.jpg

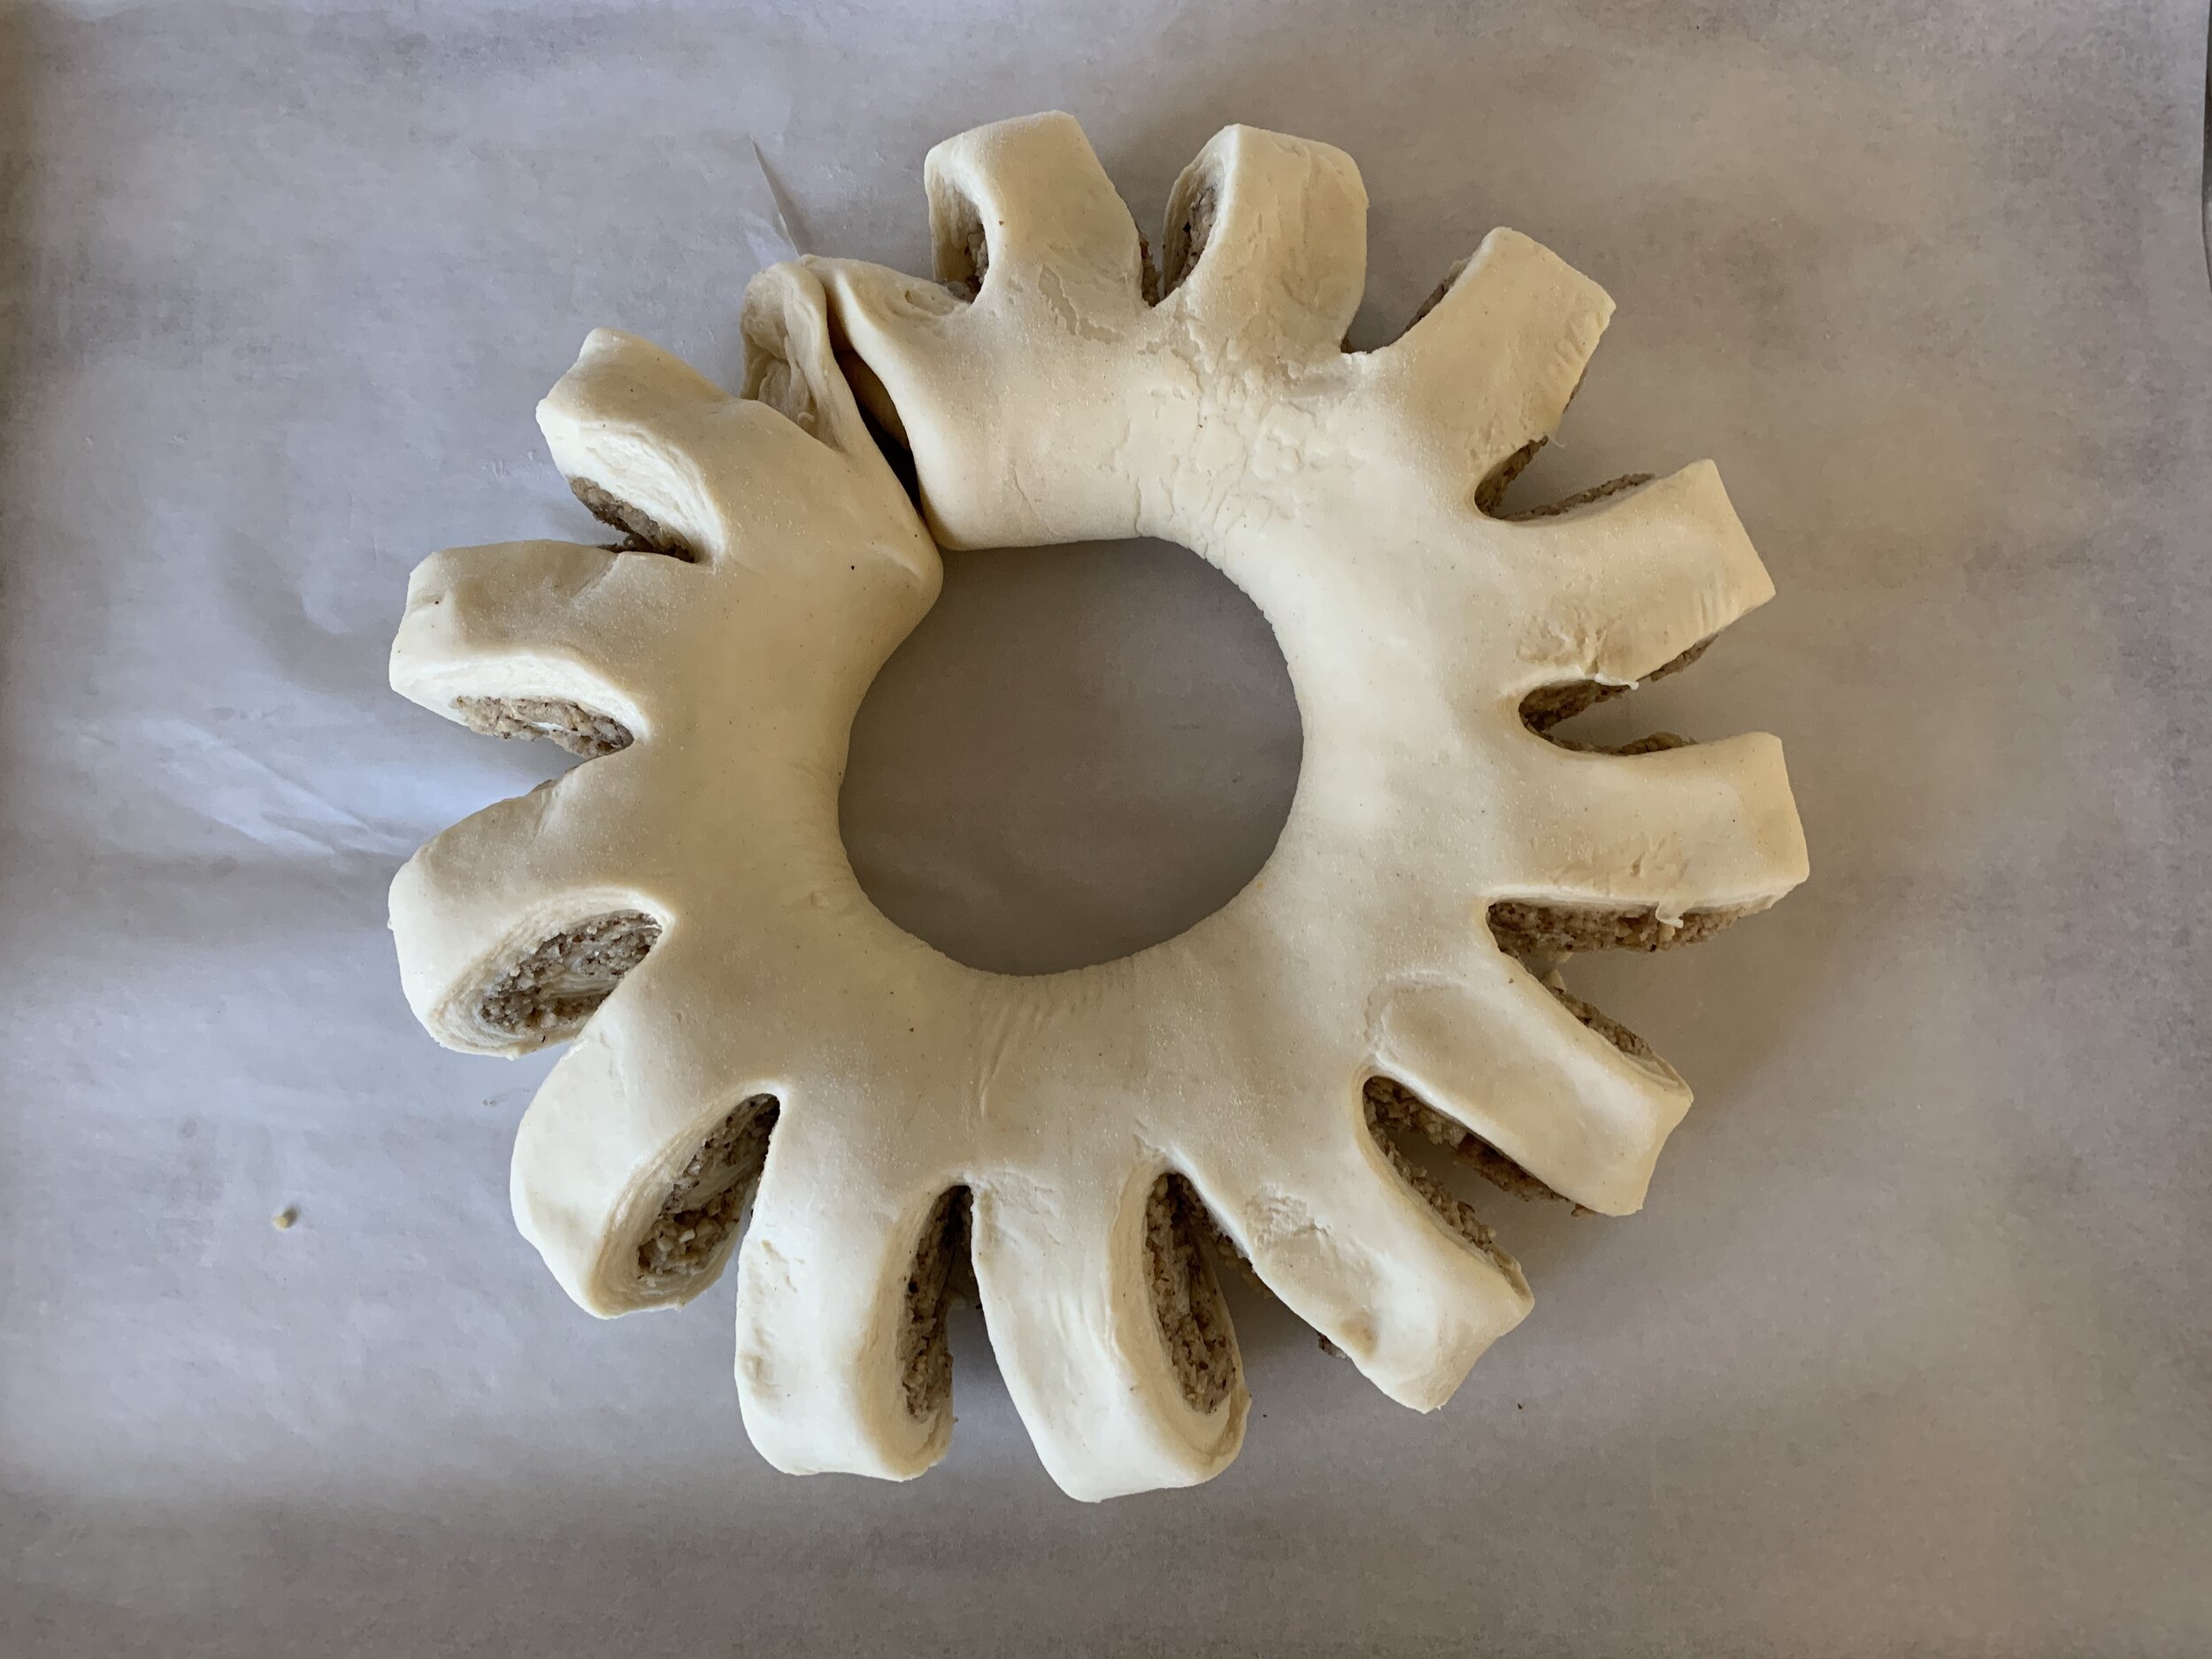
Once rolled, cut slits about 1 inch apart along one side, not quite all the way through.

IMG_0603.JPG

Then form the log into a circle, joining the ends. Twist each sliced portion outward so you see the filling.

IMG_0605.JPG

Brush lightly with egg wash and let rise about 1.5 hours. Toward the end of the rising time heat the oven to 350ºF.

Do a second egg wash and sprinkle with sliced almonds.

IMG_0621.JPG

Bake about 45 minutes until golden brown. I always check about half way through and rotate my tray to promote even baking.

IMG_0624.JPG

I decided to gussy it up a bit by making a simple orange scented glaze with some orange zest, confectioner’s sugar and fresh orange juice and drizzled it all over.

IMG_0627.JPG

Once cooled I sliced a section for testing and loved it! I’m a big fan of hazelnut and orange anyway, so this definitely did the trick. And the almond/hazelnut combo took it up a notch too. A big thumbs up!

IMG_0631.JPG

The petite pain au chocolat portion of the program was straight forward, a process I’ve done many times. A simple image will do this time around. Hmmm . . . . I’m getting low on chocolate batons.

IMG_0609.JPG

Next up - apricot twists. Using a half batch of croissant dough, I rolled it out to 12”x 14” rectangle with the long side facing me, parallel to my work surface. Brush the dough with melted butter then sprinkle on about 1.5 tablespoons of vanilla sugar (cinnamon sugar if you like). Roll lightly with a rolling pin to help the sugar stick.

IMG_0610.jpg

Fold the dough in half from one side so that you end up with a 12”x7” piece. Roll the dough to seal it and slightly stretch it.

Now cut seven strips, each 1” wide.

IMG_0612.jpg

Holding each strip at the ends, stretch it as you twist it several times then coil it up into a spiral.

IMG_0613.jpg
IMG_0614.jpg

Place on a parchment lined sheet pan, brush lightly with egg wash and let rise about an hour.

IMG_0615.jpg

I often use my cold oven as a proof box, placing a pan of warm water on the bottom shelf. However, if my oven is in use, I tuck my tray in a safe spot, place a small glass of warm water on the tray and cover with an overturned clear tote bin to provide moisture and a hint of warmth.

Once risen - they should look more pouf-y and the laminations appear more prominent. Brush again with egg wash, push down at a couple of central spots with your little finger tip or the end of a wooden spoon or chopstick and do your best to direct some apricot jam in there. Don’t fuss over it - just go for it. I added a sprinkle of vanilla sugar too.

IMG_0622.jpg

Bake at 375ºF for about 17-18 minutes until golden.

IMG_0632.JPG

To bring up the rear, last but not least are my “flip-throughs”. Once again using a half batch of croissant dough, I roll it out to ~8” by 13.5” and cut 12 pieces, each 4” by 2.25”. Each rectangle gets a slit down the center leaving the ends intact. I consider these my medium size - you can make them smaller or larger - just cut any size rectangle you’d like!

IMG_0617.jpg

Now take one short end, roll it downward then bring it up through the slit, essentially flipping it through to the top as the sides naturally twist. Looks kinda like a bowtie - just straighten the rectangle a bit and they’re ready to rise. The first time I did this way back when, I found it helpful to cut a piece of paper or felt and practice - you can visualize it immediately.

IMG_0618.jpg

Place on a parchment lined sheet, lightly egg wash and let rise about an hour. Egg wash again and top with your chosen filling - lemon curd, almond cream and jam are just some of the possibilities.

One of my favorite ways to finish these off is with a basic cream cheese filling made by blending 227 g / 8 ounces cream cheese with 57 g / 1/4 cup sugar, 3 tablespoons cornstarch, some lemon and/or orange zest, 1/2 teaspoon vanilla; beat on medium with the paddle until light and smooth; blend in 2 large egg yolks until fully incorporated. This made plenty for my purpose here but you can certainly double the recipe if you’re doing a larger batch of pastries.

NOTE: After the rise the center should fill in but sometimes there’s still a gap between the twisted sides. Just blob your filling/jam more along the edges if need be, otherwise just dollop a blob along the center and top with jam of choice - in this case cherry.. Once they bake it all blends in.

IMG_0637.JPG

Bake at 375ºF about 17-20 minutes until golden and the filling is set.

IMG_0639.JPG

Planning for properly timed rises and taking turns in the oven for each type of pastry made for a busy baking day and resulted in a wonderful assortment of goodies that I ended up divvying up amongst a number of our neighbors. A great way to use croissant dough that would have soon been over-the-hill after too long a stay in the freezer.

The neighbors were most happy!

Have fun, stay safe and keep on keepin’ on folks.

Chocolate pistachio swirls

IMG_0342.jpg

Time for more fun with croissant dough! Thinking along the lines of pain au chocolat , how about using the classic chocolate batons in smaller pieces to create a chocolate pistachio swirl? Sure thing!

IMG_0318.jpg

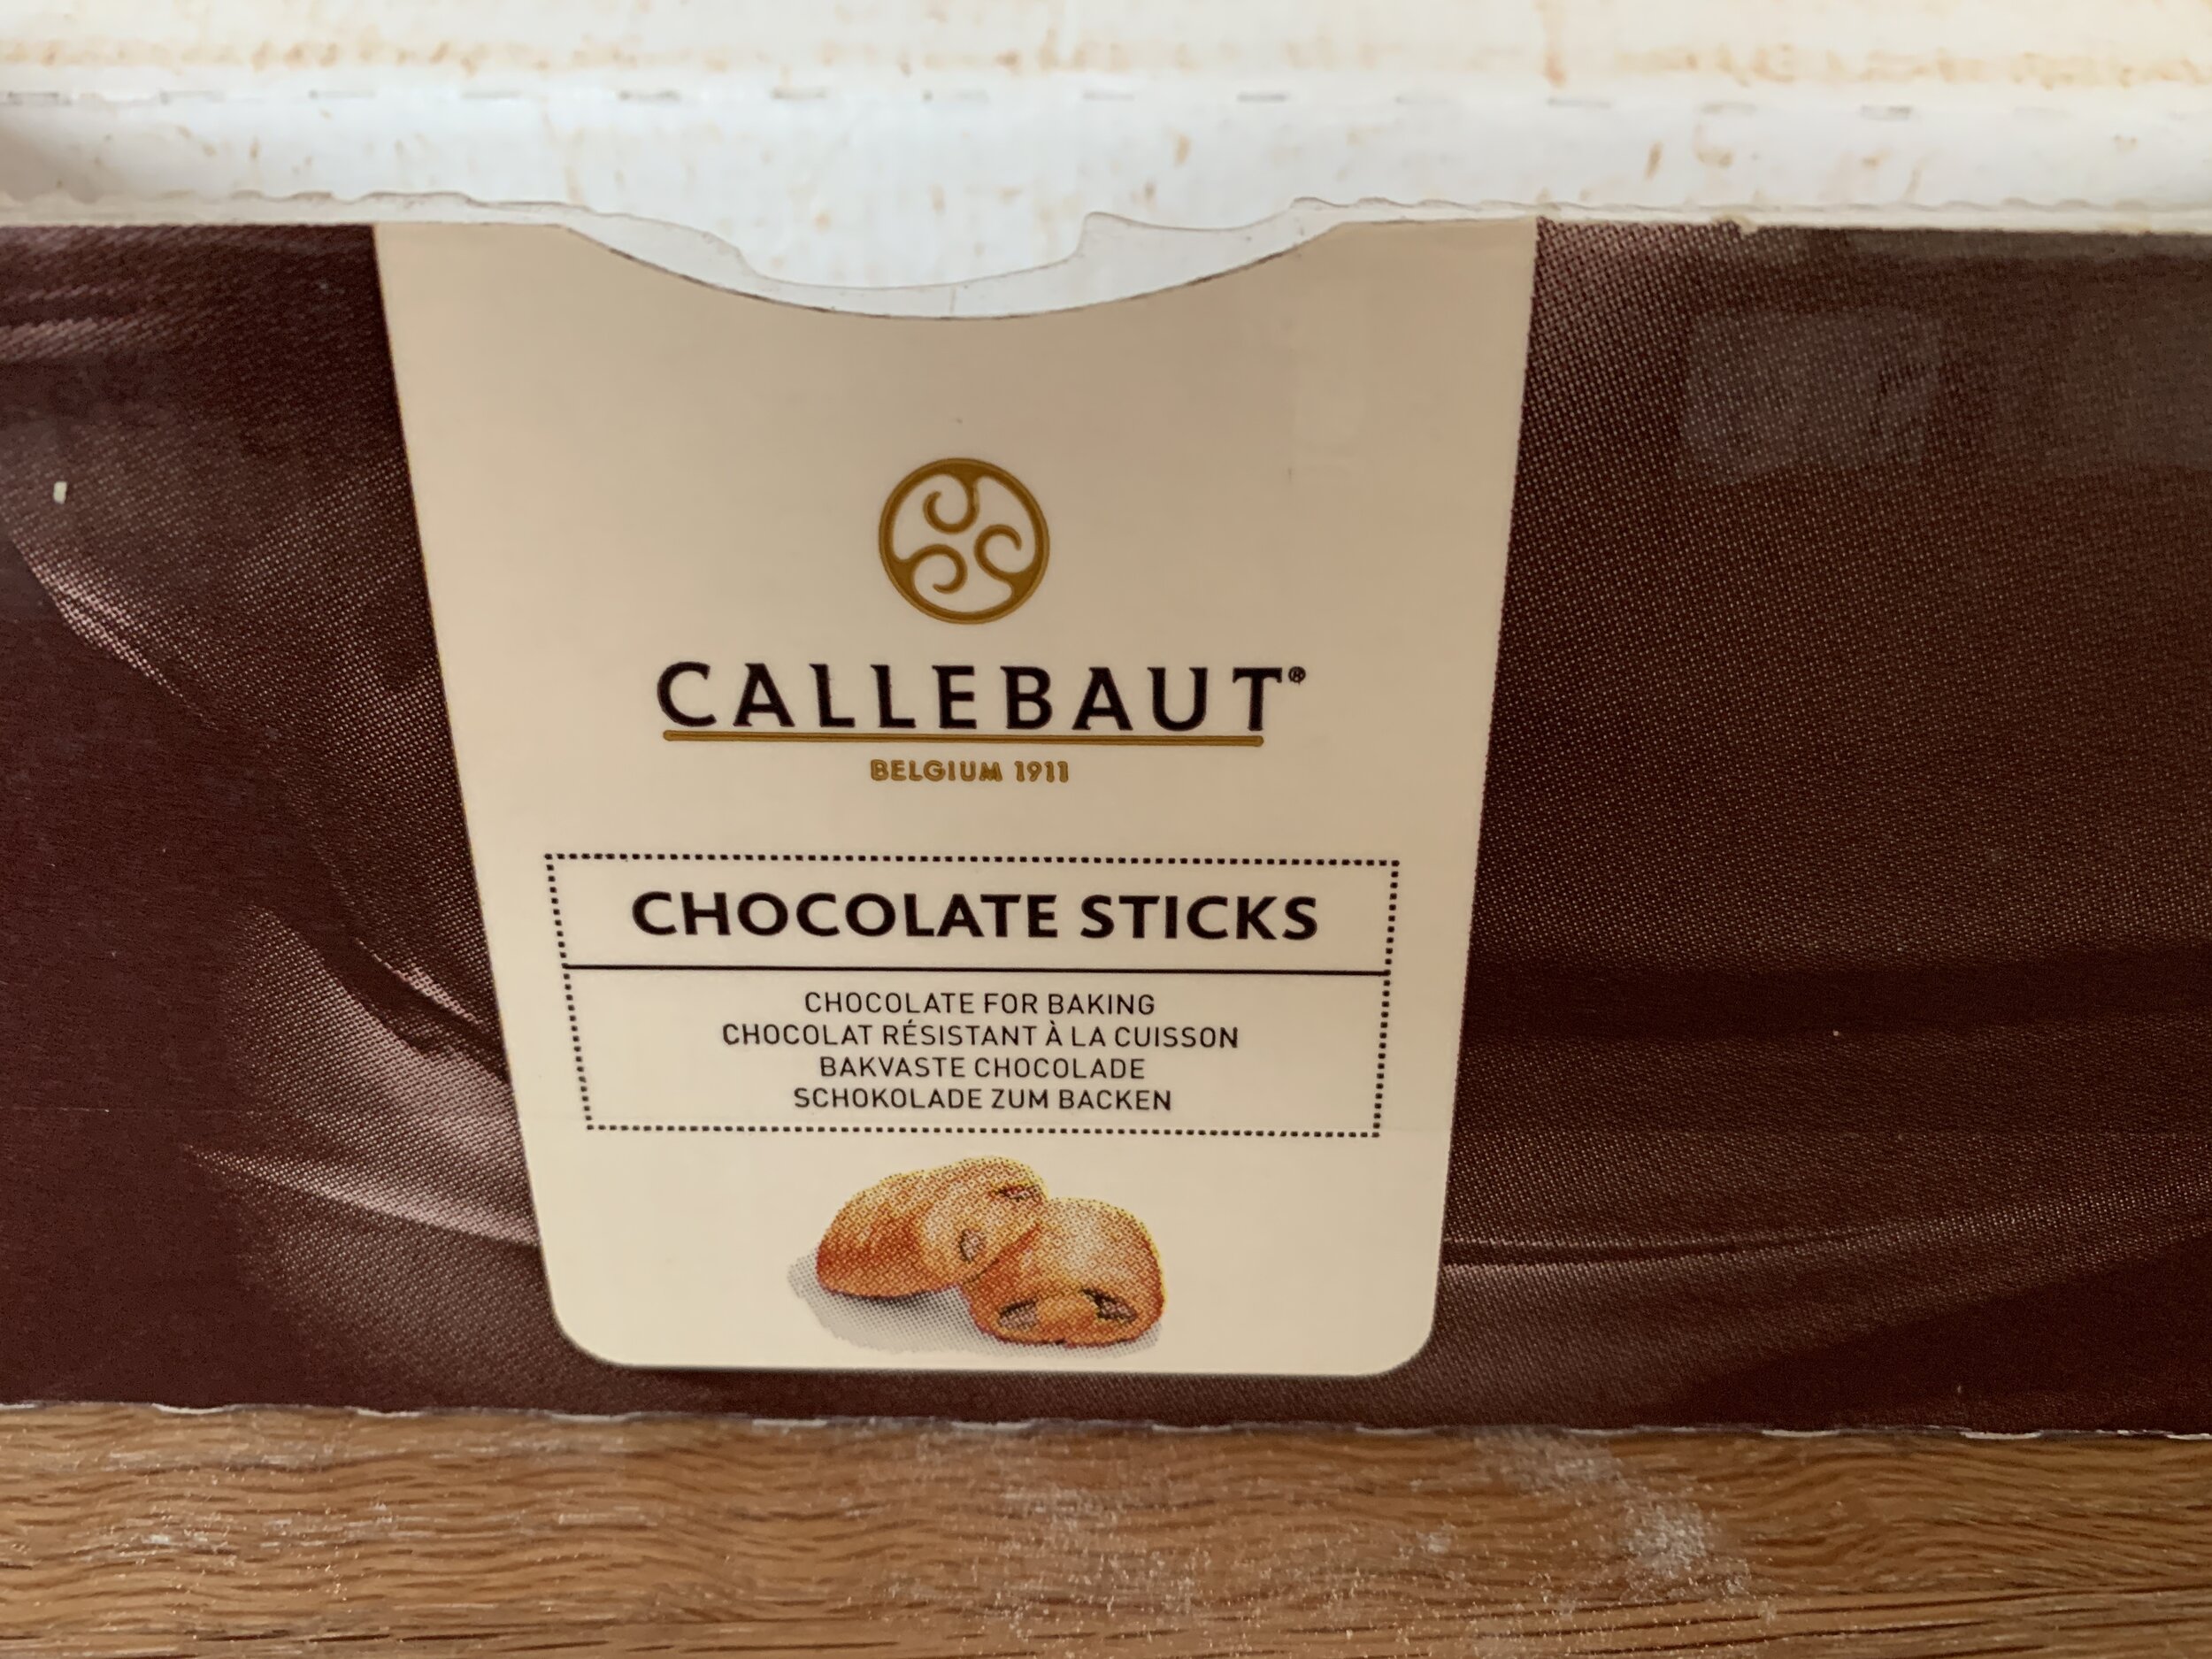
I’ve been using Callebaut’s chocolate baking sticks ever since my Paris internship days at Pascal Pinaud’s pâtisserie on rue Monge in the 5th arr. The box in the shop looked EXACTLY like this and here I am 13 years later still buying the same brand. They’re delicious and hold up well during baking - the only problem is that Steve likes to snitch a couple every day for that oh so needed chocolate fix.

IMG_0319.JPG

I love making petite pain au chocolat with my basic croissant dough. Just the right size for a treat along side one’s morning coffee.

IMG_0132.JPG

For this project I took a slightly different approach. I had a full batch of dough on hand but, since I wanted to bake some straight-up all butter croissants for the freezer (croissant aux amandes here we come!), I used a half batch for those and the other for my choco-pistachio swirls.

I made a pistachio version of crème d’amandes by replacing the almond flour with toasted and ground pistachios. Blend butter and sugar, add in the ground pistachios, blend in egg and a bit of flour and you’re ready.

I prepped my muffin tins by buttering and coating with raw sugar.

IMG_0323.JPG

I spent a few minutes plotting the size to which I wanted to roll the dough out as well as the width of each spiral. Turns out I used 1/3 portions (~1 inch wide pieces) of the chocolate batons to create my spirals.

I planned 9 swirls from a half batch of dough. Roll the dough out to ~ 9 inches wide and ~ 12 inches high. Spread a layer of pistachio cream over the dough and place 4 rows of the 1” baton pieces across the dough, spacing the rows about 3 inches apart as seen below.

IMG_0324.JPG

Cut one inch strips, roll them up and tuck them cut side up in the prepared muffin tins.

IMG_0325.jpg
IMG_0327.jpg
IMG_0328.JPG

Cover the pan lightly with plastic wrap and let the spirals rise about 45 minutes. You should appreciate some poof and greater prominence of the laminations.

About 20-30 minutes before baking heat the oven to 375ºF.

IMG_0330.jpg

Bake approximately 20-25 minutes until golden brown and the pistachio cream is set. I typically bake 10 minutes, rotate my pan and, depending on the degree of browning, I may reduce my oven temp to 350ºF to finish the process.

I find that when baking these in a muffin tin, even when the visible portions of the swirls look nicely browned, once I pop them out of the pan there can still be paleness to the sides and bottoms. If so, I transfer the swirls (OUT of the tin) onto a parchment lined sheet pan and put them back in the oven at 325ºF for another 5-10 minutes to finish off the baking and have a nicely golden end result. It’s a bit more fuss but it does the trick.

Another way to approach this is to use buttered 80 mm open rings instead of a muffin tin or simply space the pastries an inch and a half or so apart on a parchment lined sheet pan and bake them unfettered by any type of form. They’ll probably unfurl a bit as they expand but will be “held” by their neighbors.

IMG_0333.JPG

Once cooled (or even when still a bit warm!) enjoy with a fresh cup of coffee or your favorite tea. No fancy plated shot here - just go for it!

Flaky, buttery, pistachio-y with just the right balance of chocolate. Good and good for ya as Steve loves to say!

Stay home and happy baking! We’ll get through this yet folks.

IMG_0339.JPG

Sweet and savory croissant twirls

IMG_4165.jpg

Time for more croissant dough fun! Love it!!

Sweet and savory coming your way. Some months back I posted on this very topic using my whole wheat version of croissant dough. Classic croissant and spirals were the forms I went for then and now its time for - twirls!

There are so many shapes to be made from croissant dough, and, once you’ve mastered the base recipe and the nuances of lamination, there’s (almost) no limit to what you can create using different twists and turns. Twists + swirls = twirls!

First up - a savory version using my whole wheat croissant dough only this time I chopped fresh herbs (basil, thyme, rosemary) and added them right to the butter block before proceeding with the beurrage et tourage. Hence an herbed whole wheat dough was born.

I buttered standard muffin tins and coated the wells with finely grated cheddar.

IMG_4144.JPG

After rolling the dough out to 12” x 18” I spread the top half of the dough with a mixture of 60 g (2 large) egg whites, 50 g toasted bread crumbs, 1 teaspoon dry mustard and pinches of black and cayenne peppers. Then a good sprinkle of 5 ounces grated cheddar cheese (Barber’s vintage reserve and Prairie Breeze are two of my faves).

IMG_4145.jpg

Then the bottom half gets folded up over the top.

IMG_4146.jpg

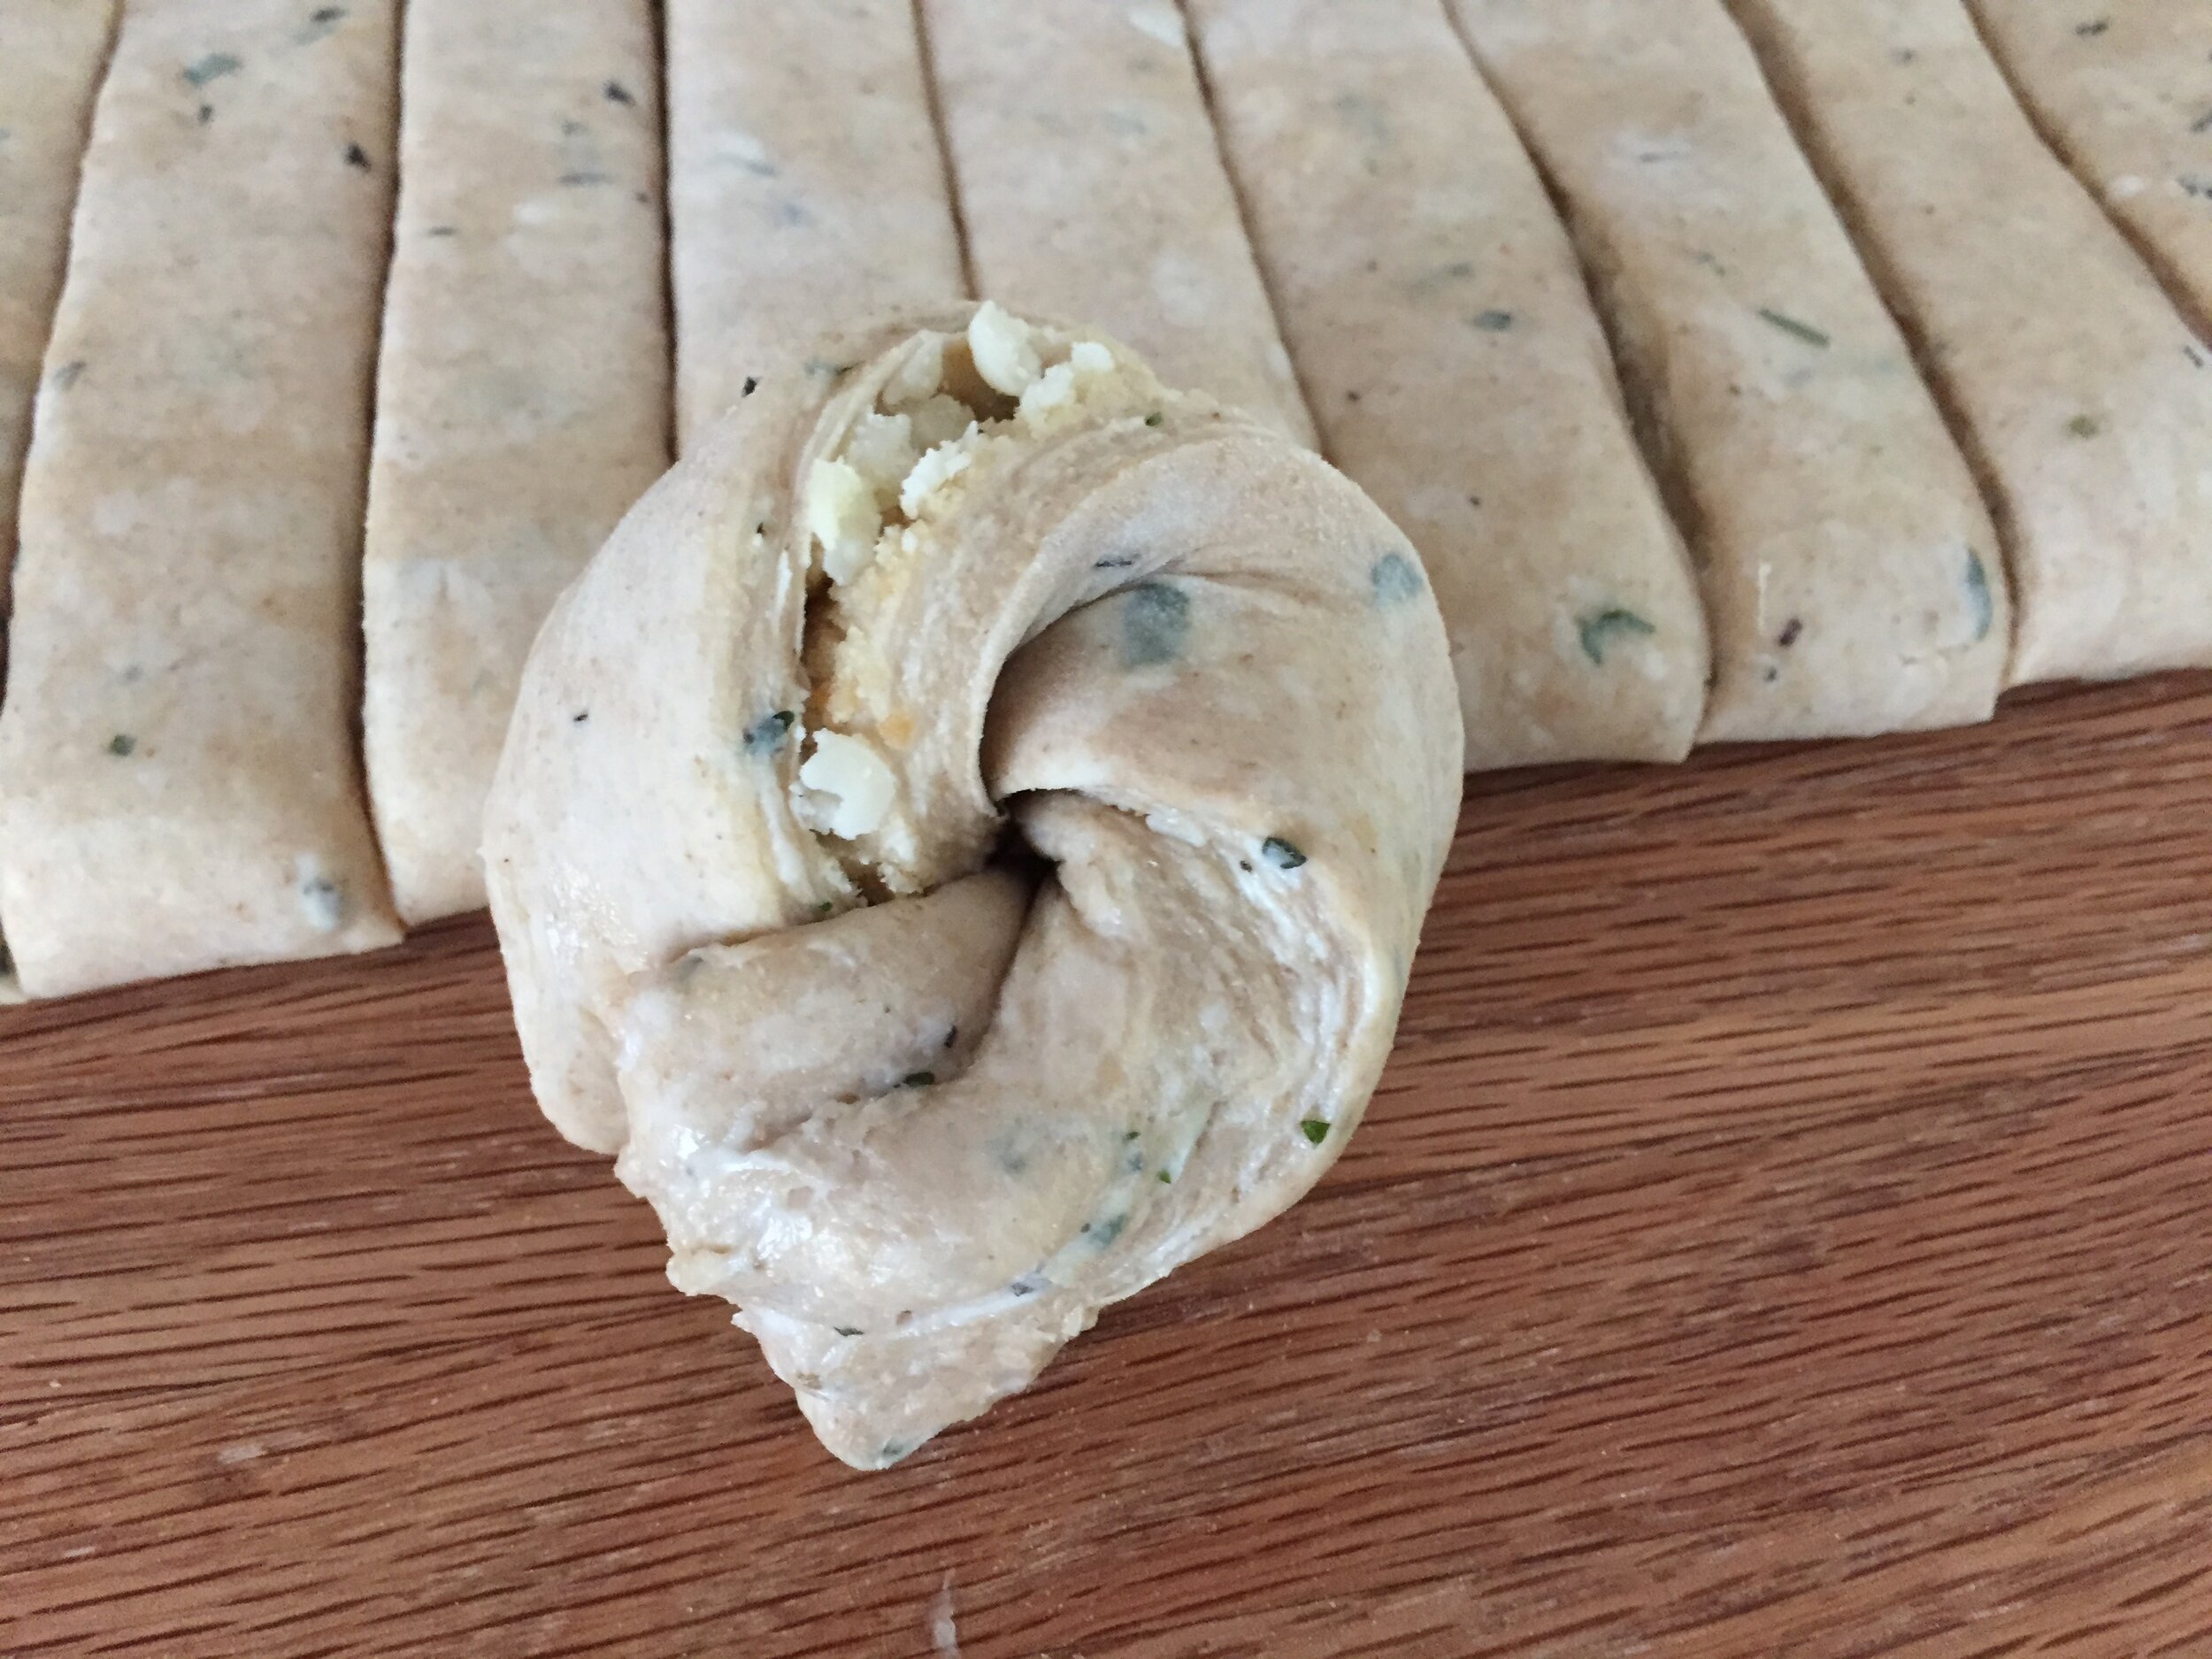
Cut into one inch strips, twist and coil into twirls.

IMG_4148.JPG

Tuck into the prepared muffin tins, sprinkle a little extra cheese on top, cover loosely with plastic wrap and let rise in a warm space about 45 minutes. Meanwhile heat your oven to 375ºF.

IMG_4149.jpg

These bake about 20-25 minutes until golden.

IMG_4159.jpg

Pop ‘em out of the pan and let cool on a wire rack.

Taste time was a delightful treat of cheesy herby layers with just a hint of sweetness.

IMG_4163.jpg

For the sweet version I went for a coffee walnut theme. Using my basic non-herbed croissant dough, the steps are the same as outlined for the savory version. This time my filling is made with 3 large egg whites, 100 grams dark brown sugar, 80 g ground walnuts and 100 g coarsely chopped toasted walnuts, a tablespoon almond flour (for a bit more binding of the mixture) plus orange zest from one medium orange.
I prepped my individual cake pans with butter and espresso sugar (grind 1 tablespoon espresso powder with 200 g raw sugar).

IMG_4152.JPG

Roll out the dough, spread the top half with the coffee walnut filling and a light brush of egg white plus chopped nuts on the bottom half . . .

IMG_4153.jpg

. . . fold it up, cut strips, twist and swirl. While shaping keep a bit of a stretch on the dough as you go. The filling here is more gooey than the savory version - just forge ahead even though it seems as though stuff is oozing out. It’s OK!

IMG_4154.jpg

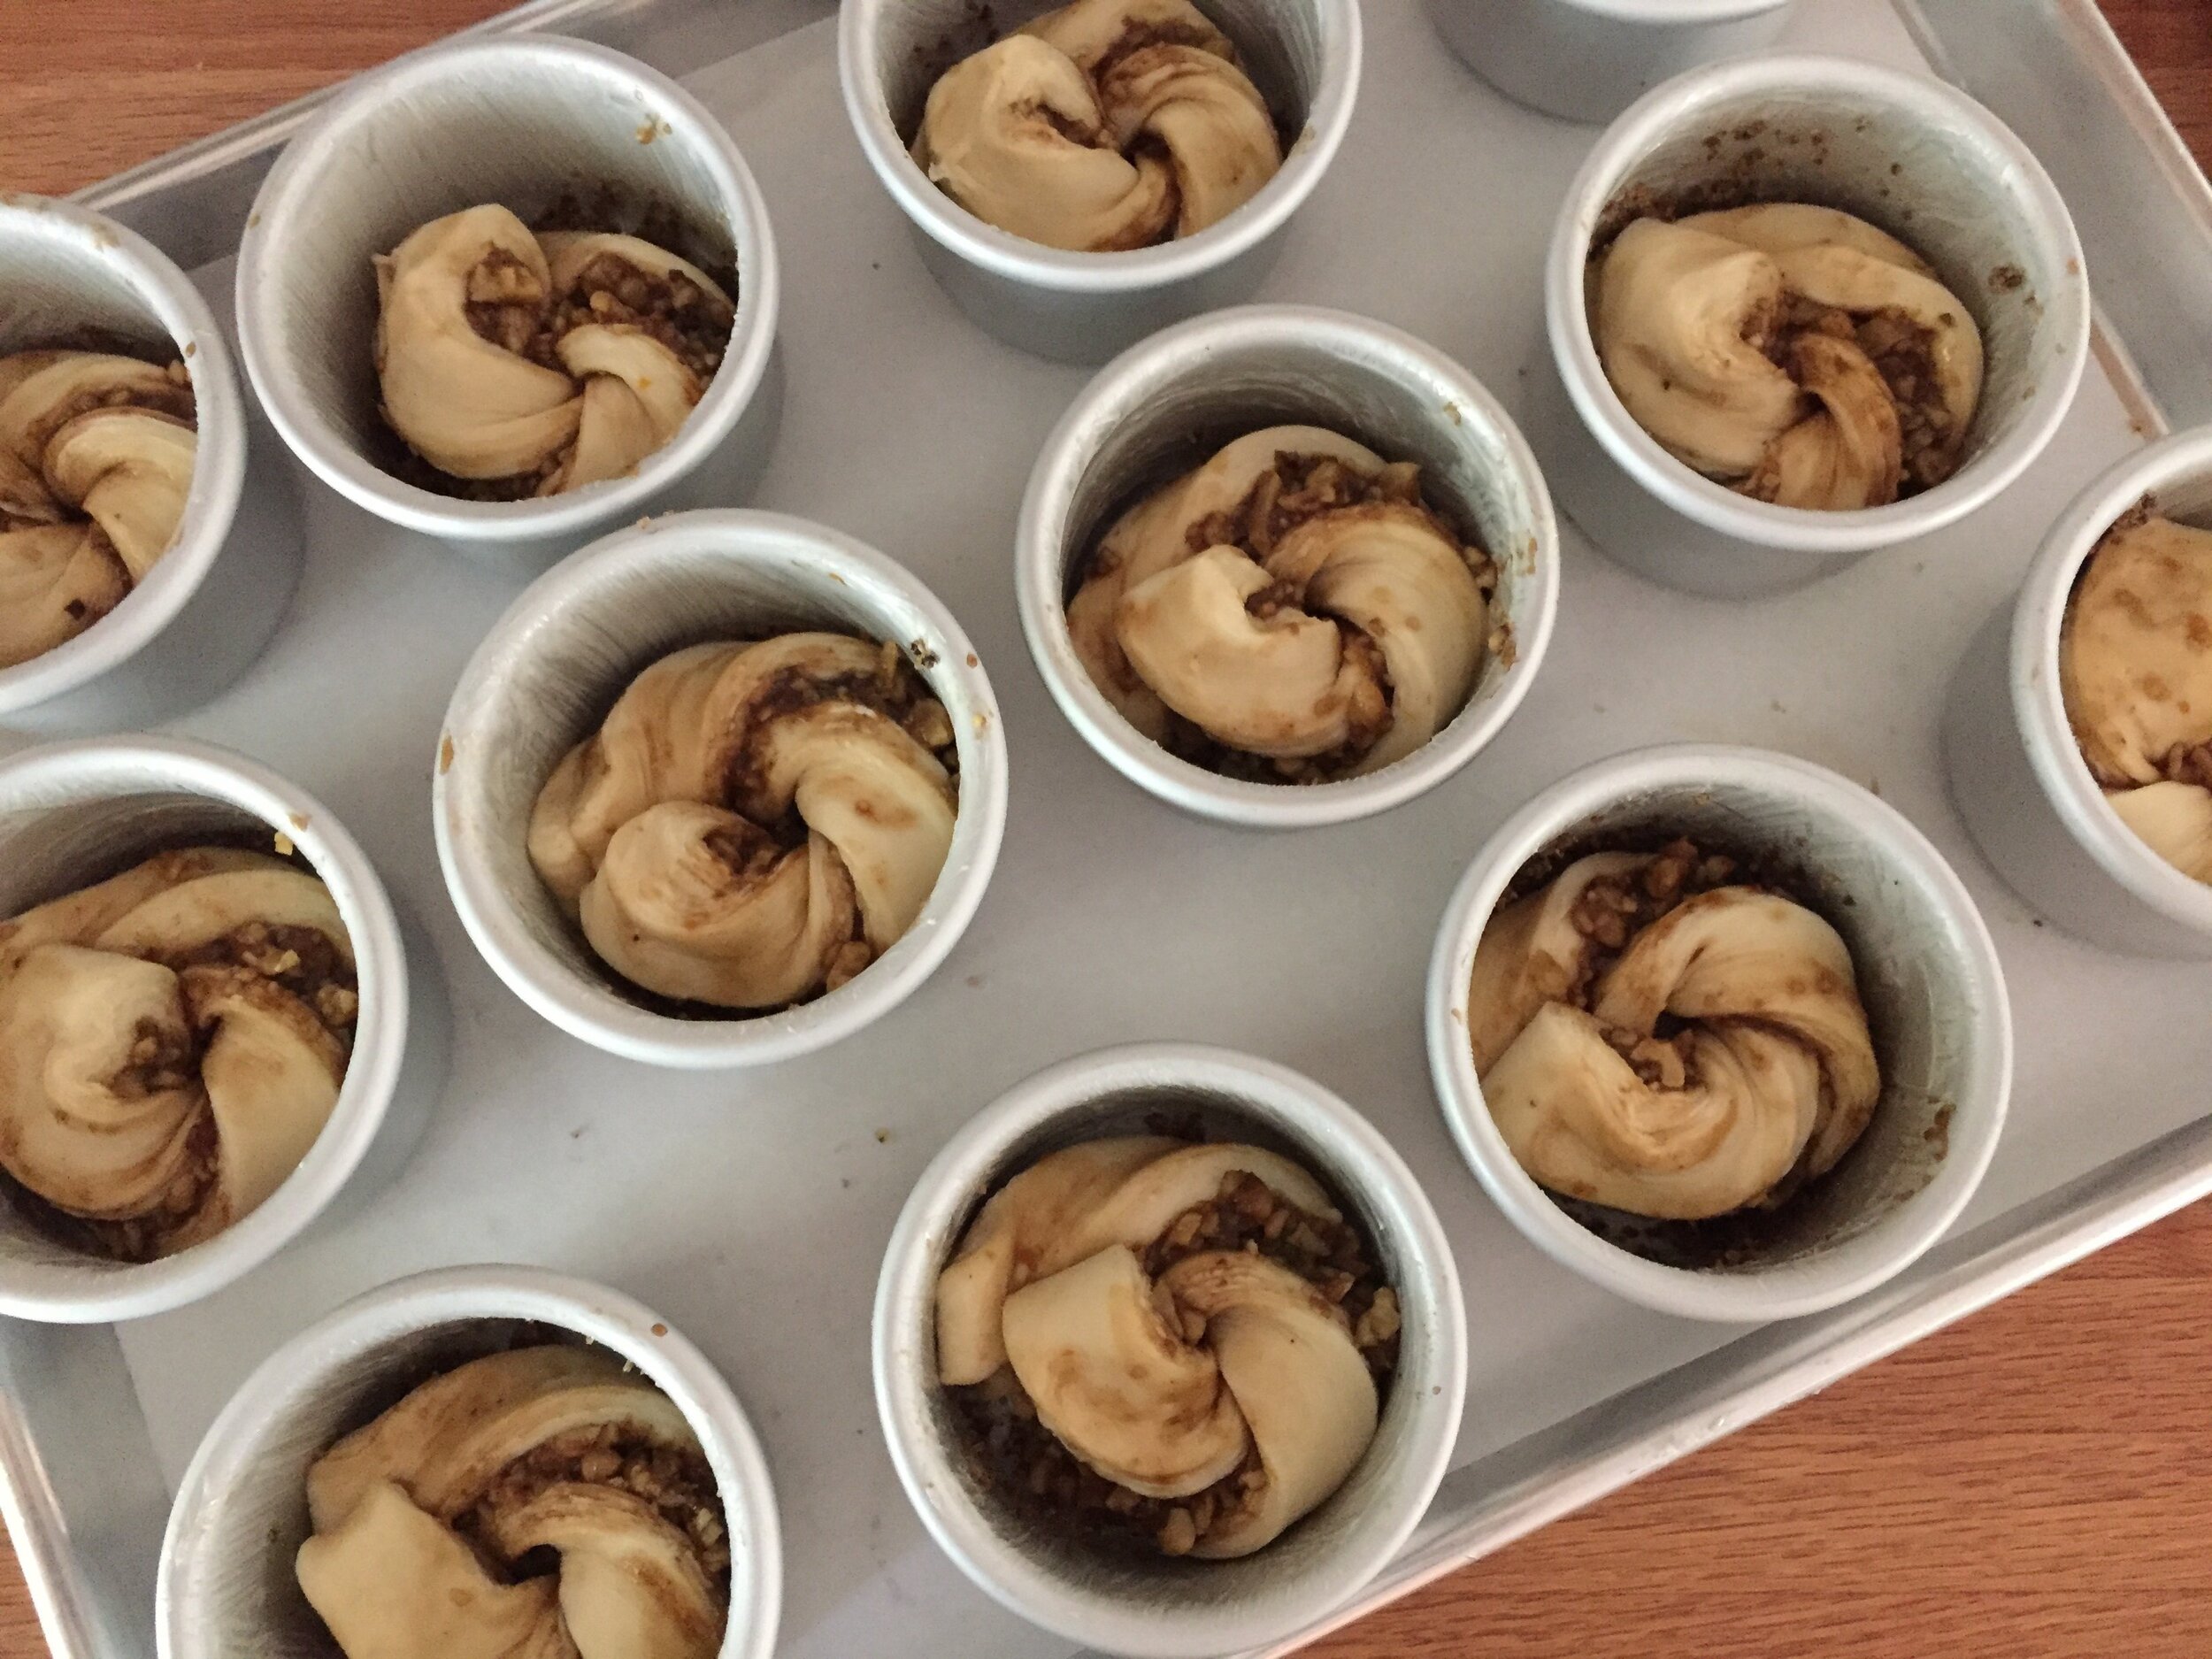
Tuck ‘em in the prepped pans, cover and let rise about 45 minutes. Heat that oven of yours to 375ºF and bake away!

IMG_4155.jpg

Once out of the oven, gently lift them from the pans and place on a cooling rack. I brushed them with some simple syrup for a nice sheen. Alternatively roll them in espresso sugar while still warm, let cool and enjoy.

IMG_4168.jpg

Coffee and walnut go so well together, and the coffee essence here was just right. The orange didn’t come through very strongly so I’d add more zest next time (you can never have too much zest!).

It’s great fun to dream up other ways to use croissant dough. I’m keeping my thinking cap on and so should you. Happy baking and happy autumn!

IMG_2049.JPG

Oranais aux pêches

IMG_4229.JPG

Kinda looks like a double yolked fried egg, eh?

As we step ever so eagerly into prime baking season and autumn flavors like apples, pears, nuts, caramel, coffee, chocolate and pumpkin, here’s a farewell nod to the delicious summer fruits of west Michigan. Desirous of doing something a bit different, I opted for my own peach version of oranais.

So what is oranais you might ask? A traditional pastry made with either puff pastry or croissant dough, it’s created with a combination of pastry cream and apricot halves. It may go by a different name in various parts of France, e.g. lunette aux abricots, croissant aux abricots (en Bretagne) or abricotine (sud de la France).

My research revealed that it reportedly originated in Algeria in and around the port city of Oran - hence the name oranais. Did you know that Algeria is fourth in apricot production in the world? And let’s not forget that Algeria was once governed by France so there’s still a huge French influence there, both culturally and culinarily (is that even a word?). By the way, here’s a little historical tidbit for you - Algeria gained it’s independence from France on July 5, 1962.

During our various trips-to and stays-in Paris over the years, oranais is always on Steve’s radar - he loves those sunny beauties!! Frankly they’re not often found in the many pastry shops around town so one has to keep an eye out for a good one. At Le Cordon Bleu Paris we made them with croissant dough, and those that we’ve found in Parisian pâtisseries have been made that way as well. However my online research found that many recipes call for puff pastry.

I decided to give it a go with both. Oh boy!

Since puff is not yeasted it’s more straight forward in its handling - no worries about the dough bubbling and puffing up during the rolling, cutting and shaping. I rolled my puff to about 6-7 mm (~1/4”) thick and cut 80 mm (3 inch) squares.

IMG_4203.jpg

The rolling out, cutting and assembly process is the same for both puff and croissant dough. Using a classic pastry cream, pipe a line diagonally across the square, place two rounds of fresh peach near opposite corners and bring the other two opposite corners up and over, sealing with egg wash. Sort of like a chubby bowtie.

IMG_4220.jpg
IMG_4221.jpg

Remember - puff doesn’t have to rise before baking, whereas with the croissant dough version, give it a 45-50 minute (give or take) rise. I topped the shaped/risen croissant version of oranais with an additional blob of pastry cream and some peach jam in the hopes of keeping the corners together during their time in the oven.

IMG_4225.JPG

Bake at 400ºF for about 20-25 minutes until the pastry is golden brown.

Puff result

Puff result

Croissant dough version result

Croissant dough version result

Once out of the oven brush with a vanilla simple syrup or some apricot glaze and let cool.

During the bake there was definitely more slipping and sliding of the pastry cream and peach in the croissant dough version. I had to keep pushing the peach rounds back onto the dough in my attempts at keeping things together.

As for the taste test (the best part, especially for Mr. Steve), we actually preferred the puff version. The flaky pastry and creamy, peachy combo was oh so delicious.

Of course, the croissant version was pretty good as well. After all, anything made with croissant dough is usually a winner.

Bottom line - going forward I’ll be making my oranais with puff. Yes indeed!

Dried apricot purée and something new with croissant dough


Always on the path of using up ingredients I have on hand, I decided to make apricot purée with a bunch of dried apricots standing by in the fridge.  Of course, what I might do with said purée was also on my mind.  Ahhh - something with croissant dough might be nice!

First the purée. After some recipe research I came up with a pretty straight forward approach involving poaching the dried apricots in a light sugar syrup with added orange zest.  Apricots go soooo nicely with orange, n'est pas?

Place 300 ml (1 1/4 cup) water, 50 g (1/4 cup) sugar, 84 g (1/4 cup) honey and the zest of two oranges in a saucepan, bring to a simmer and cook on medium low until the sugar is dissolved. Add 250 g (1 1/4 cup) dried apricots, cover and cook about 30 minutes until the fruit is soft and supple.


Purée in a blender until smooth then strain.  This stuff looks like baby food!


I decided to freeze the end result by portioning it out into an ice cube tray. That allowed me to remove small amounts on an as needed basis. Interestingly the purée didn't freeze solid due to the sugar content but it was a good way to store it nonetheless.


The day before I wanted to create my little croissant bites, I pulled some croissant dough from the freezer, thawed it overnight and then rolled it out and cut small squares that would fit nicely into buttered and sugar-dusted mini-muffin tins.


I decided on a cream cheese type filling, making my own version based on a recipe in my CIA Baking and Pastry book.


Mix 270 g cream cheese with 33 g sugar (I reduced the amount of sugar in the original recipe since I would be adding my sweetened apricot purée), 33 g corn starch, pinches of lemon and orange zest and a splash of vanilla. Blend in 45 g egg and a couple of tablespoons of apricot purée (or more to taste).

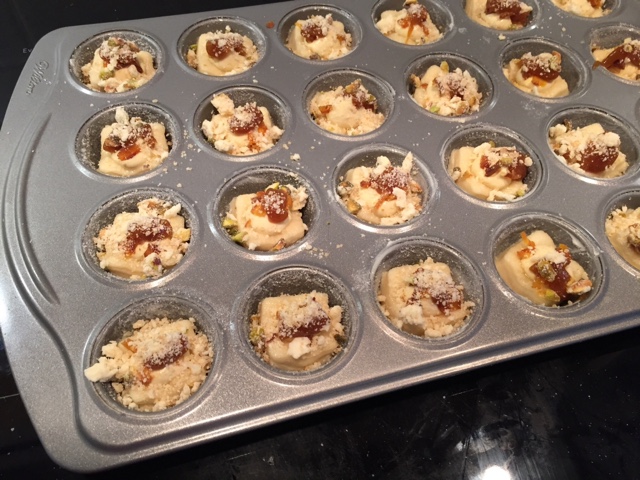
I let the croissant squares rise for about 1.5 hours then topped them with a dollop of apricot cream cheese filling, followed by a smaller dollop of purée and a few pieces of diced dried apricot.


Then I topped 'em all off with some pistachio crumble . . . . 


and popped them into a preheated 400ºF oven to bake.  After about 8 minutes I reduced the temp to 375ºF and continued to bake until nicely browned, another 15- 20 minutes or so.  REMEMBER - watch what's going on in that oven of yours!

.  
After a few minutes I gently lifted them out onto a wire rack to cool, and then, of course, it was time for a taste test.  Yeah baby.


Lovely layered, delectable, buttery goodness with the creamy apricot filling and crunchy pistachio crumble adding the always hoped for differences in textures and tastes.


And Steve liked them too. Yippee!