French Tarte Faves (FTF) No. 2: pots de crème


OK! My first FT FAVE post was on financiers in early June. Next up - pots de crème!

Custards have been one of my favorite things since as far back as I can remember. Back in the 50s and 60s, as more and more foods became available in “convenient” form, Mom glommed onto Jello brand pudding mixes, making the stovetop-cooked versions which were WAY better than the instant variety that came later. Vanilla still warm, topped with chocolate chips so they got all melty; butterscotch with chopped walnuts; chocolate with mini marshmallows. Oh those were the days. I would always snag one of my sibs portions (thanks Joybell for not liking pudding!) for an extra treat.

As I contemplate which FTFs I’d like to post about, I realize that I’ve covered many of them over the years in some way, shape or form. I see it as my chance to review and share a bit more about them as I update recipes and links (which believe me is no small task!).

This particular topic begs to include a discussion of custards in general but that becomes a bit overwhelming. I did write up a mini primer on custards that will give you a sense of the range that ingredient portions can take and how you can adjust them.

The custards I make most commonly are crème anglaise for ice cream bases; crème pâtissière as filling for profiteroles and tartes (or blending with crème d’amandes for frangipane - think galette des rois) and this post’s (and my!) particular fave, pots de crème. Think Jello pudding a thousand times better.

Briefly: the first two custards mentioned above are stove topped cooked versions, the primary difference being that crème pat (as the Brits call it) contains a thickener like flour or cornstarch (or a blend of both) and is brought to a boil to thicken/cook it. Crème anglaise on the other hand contains only egg yolk, dairy and sugar and is cooked to the nappe stage (thick enough to coat the back of a spoon), not boiled ‘cuz the eggs will cook and curdle. My standard ice cream base is a version of crème anglaise - flavor variations are endless as you can see here.

Even on hot summer days, working in the cooler morning hours, one can whip up pots de crème in a low oven and have them ready for a dessert treat that evening. Even better - they keep for several days in the fridge!

My favorite pots de crème are chocolate, maple, butterscotch, cappuccino and lemon (links are to each recipe).

The header image is the maple version (recipe compliments of Sur La Table) which I adorned with maple walnut shortbread, Chantilly and toasted, chopped walnuts. Love it! Truth be told, the garnishing is half the fun. It doesn’t have to be fancy, no sirree. Fresh berries and a favorite crumble will do the trick.

Petite lemon pots

The steps of preparation are essentially the same for all recipes but I’ll talk a bit about a couple of variations that add that certain something to the end result. I don’t want to bore you with too much detail, but I’ll also provide a few process pictures.

Below is prep for the butterscotch version which starts by making an easy “caramel”: melt 56 g / 2 ounces unsalted butter in a medium saucepan then blend in 200 g / 1 cup brown sugar, one cup of heavy cream and a tablespoon of vanilla extract or vanilla bean paste until smooth. That step can be done a bit ahead and the mixture set aside. You’ll blend three more cups of heavy cream and 1/2 teaspoon salt into it and bring it to a simmer on medium heat.

Once I have my dairy/sugar mixture heating up, I separate my eggs as close to the tempering step as possible - that way they don’t sit too long and get shriveled. In this case the yolks are kept separate but note that some recipes have you whisk half of the sugar with the dairy and half with the egg yolks before the tempering step. In that case, whisk the yolk/sugar mixture thoroughly and aggressively until it becomes pale and thicker. If you let yolks and sugar just sit, the sugar can “burn” the yolks and they’ll get all grainy.

Preparing butterscotch pots de crème

When I first made butterscotch pots, I used a mix of 660 ml / 2.75 cups heavy cream and 300 ml / 1.25 cups milk. The end result wasn’t as thick as I like but the flavor was superb. And I saved some of the base, chilled it for a day or two in the fridge then processed into a most delicious ice cream. Yum! NOTE: the recipe link gives you an ALL cream version for pots de crème. If you want to make it into ice cream, use the cream/milk mix.

Butterscotch pots - too loosey goosey for me!

Here’s a lemon version so creamy and tart. The twist here is, rather than replacing a portion of dairy with freshly squeezed lemon juice and adding lemon zest, this one involves reducing a lemon zested simple syrup that is ultimately added to the custard at the end. A nice punch of flavor.

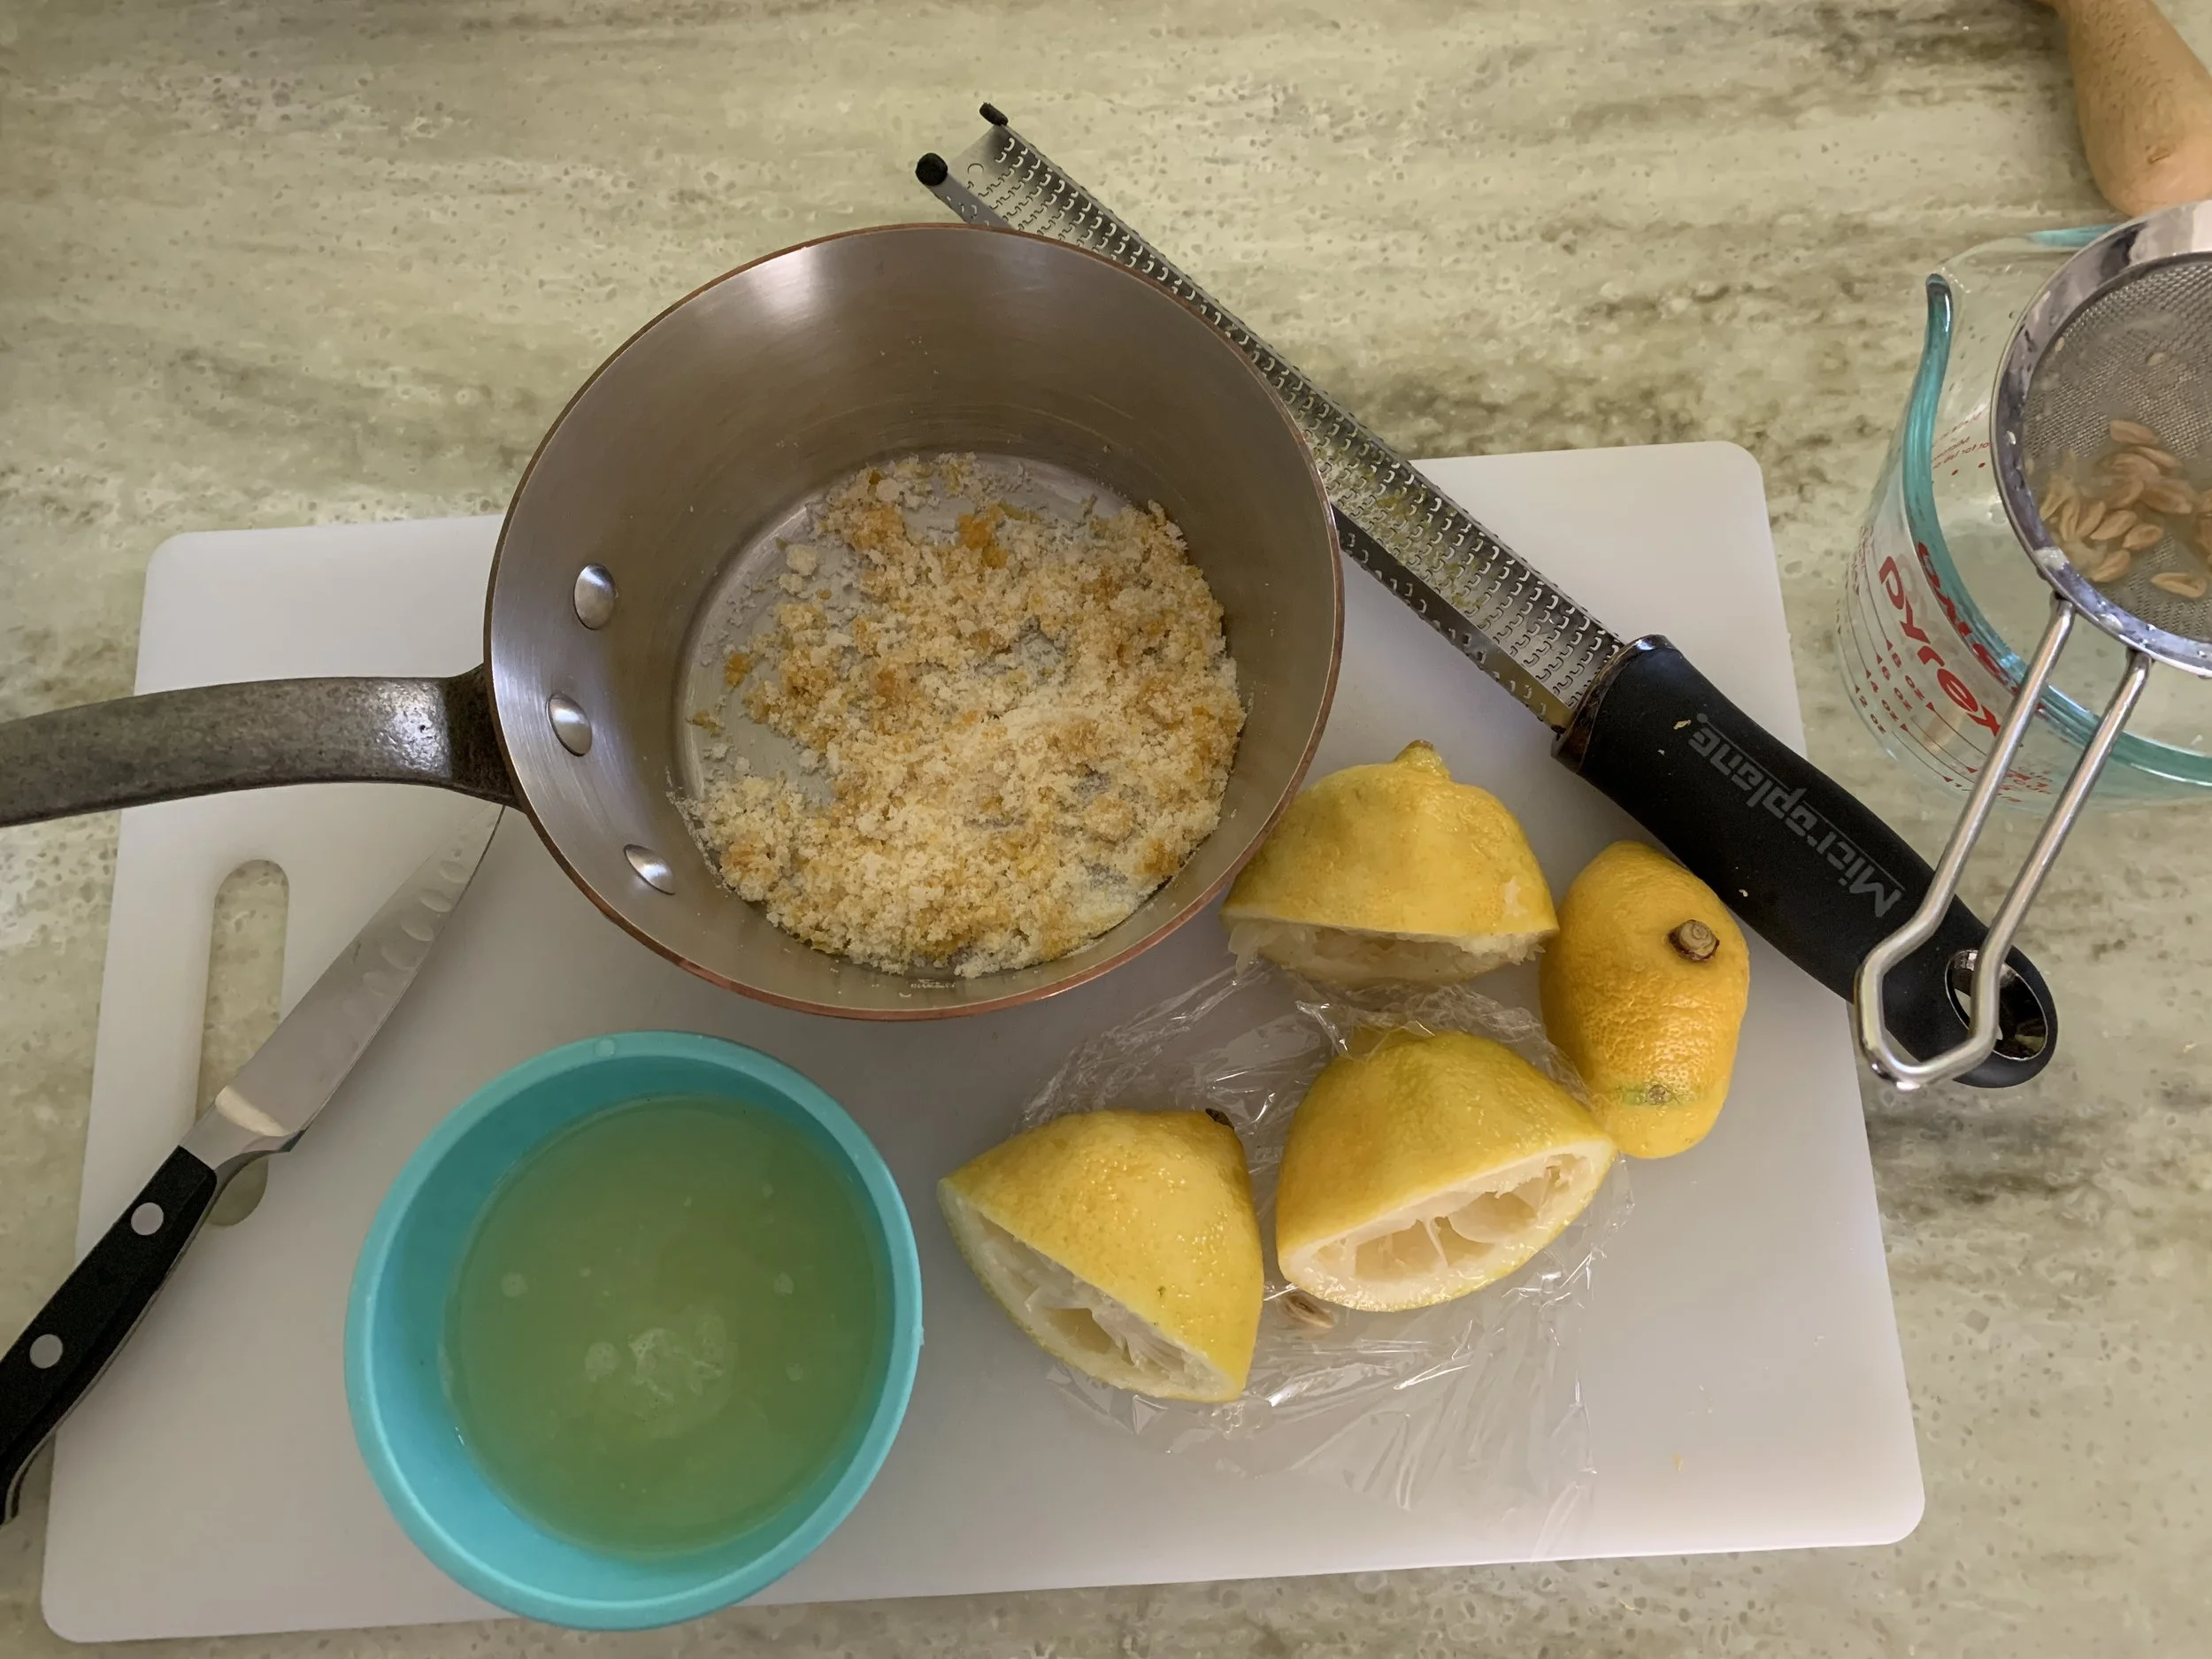
For the syrup you zest a couple of medium to large lemons and rub the zest into 50 g / 1/4 cup sugar; then squeeze yourself 180 ml / 3/4 cup fresh lemon juice and blend it all together.

Mise for lemon simple syrup

Bring to a boil then reduce the heat and continue on a low boil to reduce down to 1/2 cup, stirring periodically.

Coming along nicely

Then you’ll follow along with the base recipe, blending in the reduced simple syrup at the end.

I typically bake my pots at 325º F conventional OR 300ºF convection. Both work although total baking times vary.

Carefully fill the ramekins to about 1/4” below the rim.

Ramekins just filled and ready for the oven

Pour hot water into the baking dish until it reaches half way up the ramekins. No splashing!!

Cover loosely with foil and bake 35-45 minutes. Some pots take longer - I usually check things at about 25 minutes then continue checking until the edges are set and there’s a quarter size jiggly circle in the center. Remember - every oven is different!

Carefully lift the ramekins out of the water bath and place on a wire grid.

Just out of the oven, cooling

Once the custards have cooled to room temperature, chill them in the fridge for several hours. If not serving that day, cover with plastic wrap, keep refrigerated and enjoy over the next several days. So delicious!

I haven’t made the cappuccino version for awhile but looking back over my recipes, I found a note from way back in May of 2010 when I made a batch for a dinner gathering. I wasn’t taking photos of my stuff back then (Steve was my official pastry photographer). I garnished that one with almond nougatine and Chantilly cream. Basically you could add instant espresso powder to any base - hmmmm, should be good in butterscotch or chocolate or maybe even maple.

Chocolate is the flavor I make most often. Check out this post from early pandemic days (6/22/20) where I describe the steps and also create a frozen treat from the same base. Cool!

Enough of all that! I hope I’ve given you an understandable summary and some good recipe variations for you to try. Be creative with your garnishing and have fun with it.

Lemon/chantilly/raspberries with financier on the side

It’s September and baking season is comin’ at ya!

Wild grapes

Blueberry hazelnut tarte Bretonne

Petite version

Petite version

I’ve extolled the virtues of sablé Breton on a number of occasions over the years and simply must return to it now and again. The dough is versatile and one that I can make ahead and keep handy in the freezer for a couple of months. As we ease into the late spring and summer seasons, a Breton dough base is perfect either baked with fruit or jam or baked au naturel and topped with fresh fruits and luscious creams. Mmmmm . . . I can just taste them now. Fulton Farmers Market here I come!

Just one of the beauties of this dough is it’s made with egg yolks so . . . . . . When I need to amass egg whites for some of my faves like financier, dacquoise or Swiss meringue buttercream, Breton dough comes to the rescue. Separate the eggs, yolks go into the dough and whites (which can sit in the fridge for a week or so and can also be frozen) are on hand for whatever. I love that.

As an aside, a few other basics that offer me the same egg white saving opportunities are the classic custard sauce/ice cream base crème anglaise or the familiar crème pâtissiére, crème brulée and pots de crème. Of course it’s generally best to make these egg and dairy based goodies within a couple of days of enjoying them, so some planning ahead is important. But they’ll all give you plenty of whites to add to your stash.

I do digress. On to la tarte Bretonne!

The dough comes together easily - one plan ahead note is the butter should be soft. Let it sit out an hour or so, mise out the rest of the ingredients and you’re ready to go. Once mixed you can either wrap in plastic and chill for later or you can shape a rough circle and simply press it into a buttered ring or mold. NOTE: I love baking this dough in silicone flexi-molds which don’t have to be buttered. Yay - one less step!

Here I sub in hazelnut flour for the almond but you can do the same with pretty much any ground nut. Using a buttered 220 mm / 9” tart ring, I guestimated about 360 g of dough to press in the bottom and build up the sides. It’s up to you to experiment a bit, depending on how thin or thick you want your finished dough to be. Thicker than a typical tarte crust is my preference here. You can use even more dough (up it to 400 or 425 g) for a base that’s a delicious, buttery cross between tarte and cake. Yum.

Just for comparison sake, if I’m making a standard tarte with let’s say pâte sucrée, a good rule of thumb is to take the diameter of your ring (e.g. 220 mm), add 30 g to that number and that gives you a decent estimate for the amount of dough for that size ring - 250 g. It works pretty well with inches/ounces too - 9” tart uses about 9 ounces of dough.

998021B8-862D-4609-A6A0-E076FDB324CD.jpeg

Once the dough is pressed into the ring, you can cover and refrigerate it for a few hours or overnight if you’re not quite ready to proceed.

I made a quick hazelnut crumble with 50 g sugar and 75 g whole wheat pastry flour (all purpose is fine too) mixed in a medium bowl; sand in 60 g of cool, cubed butter to coarse crumbs and add 30 g of toasted and chopped hazelnuts. It yields plenty for this type of project and you can freeze any leftover for next time.

My store bought blueberry jam is Bonne Maman, but I also like St. Dalfour, both of which have some great flavor options.

Heat the oven to 350ºF.

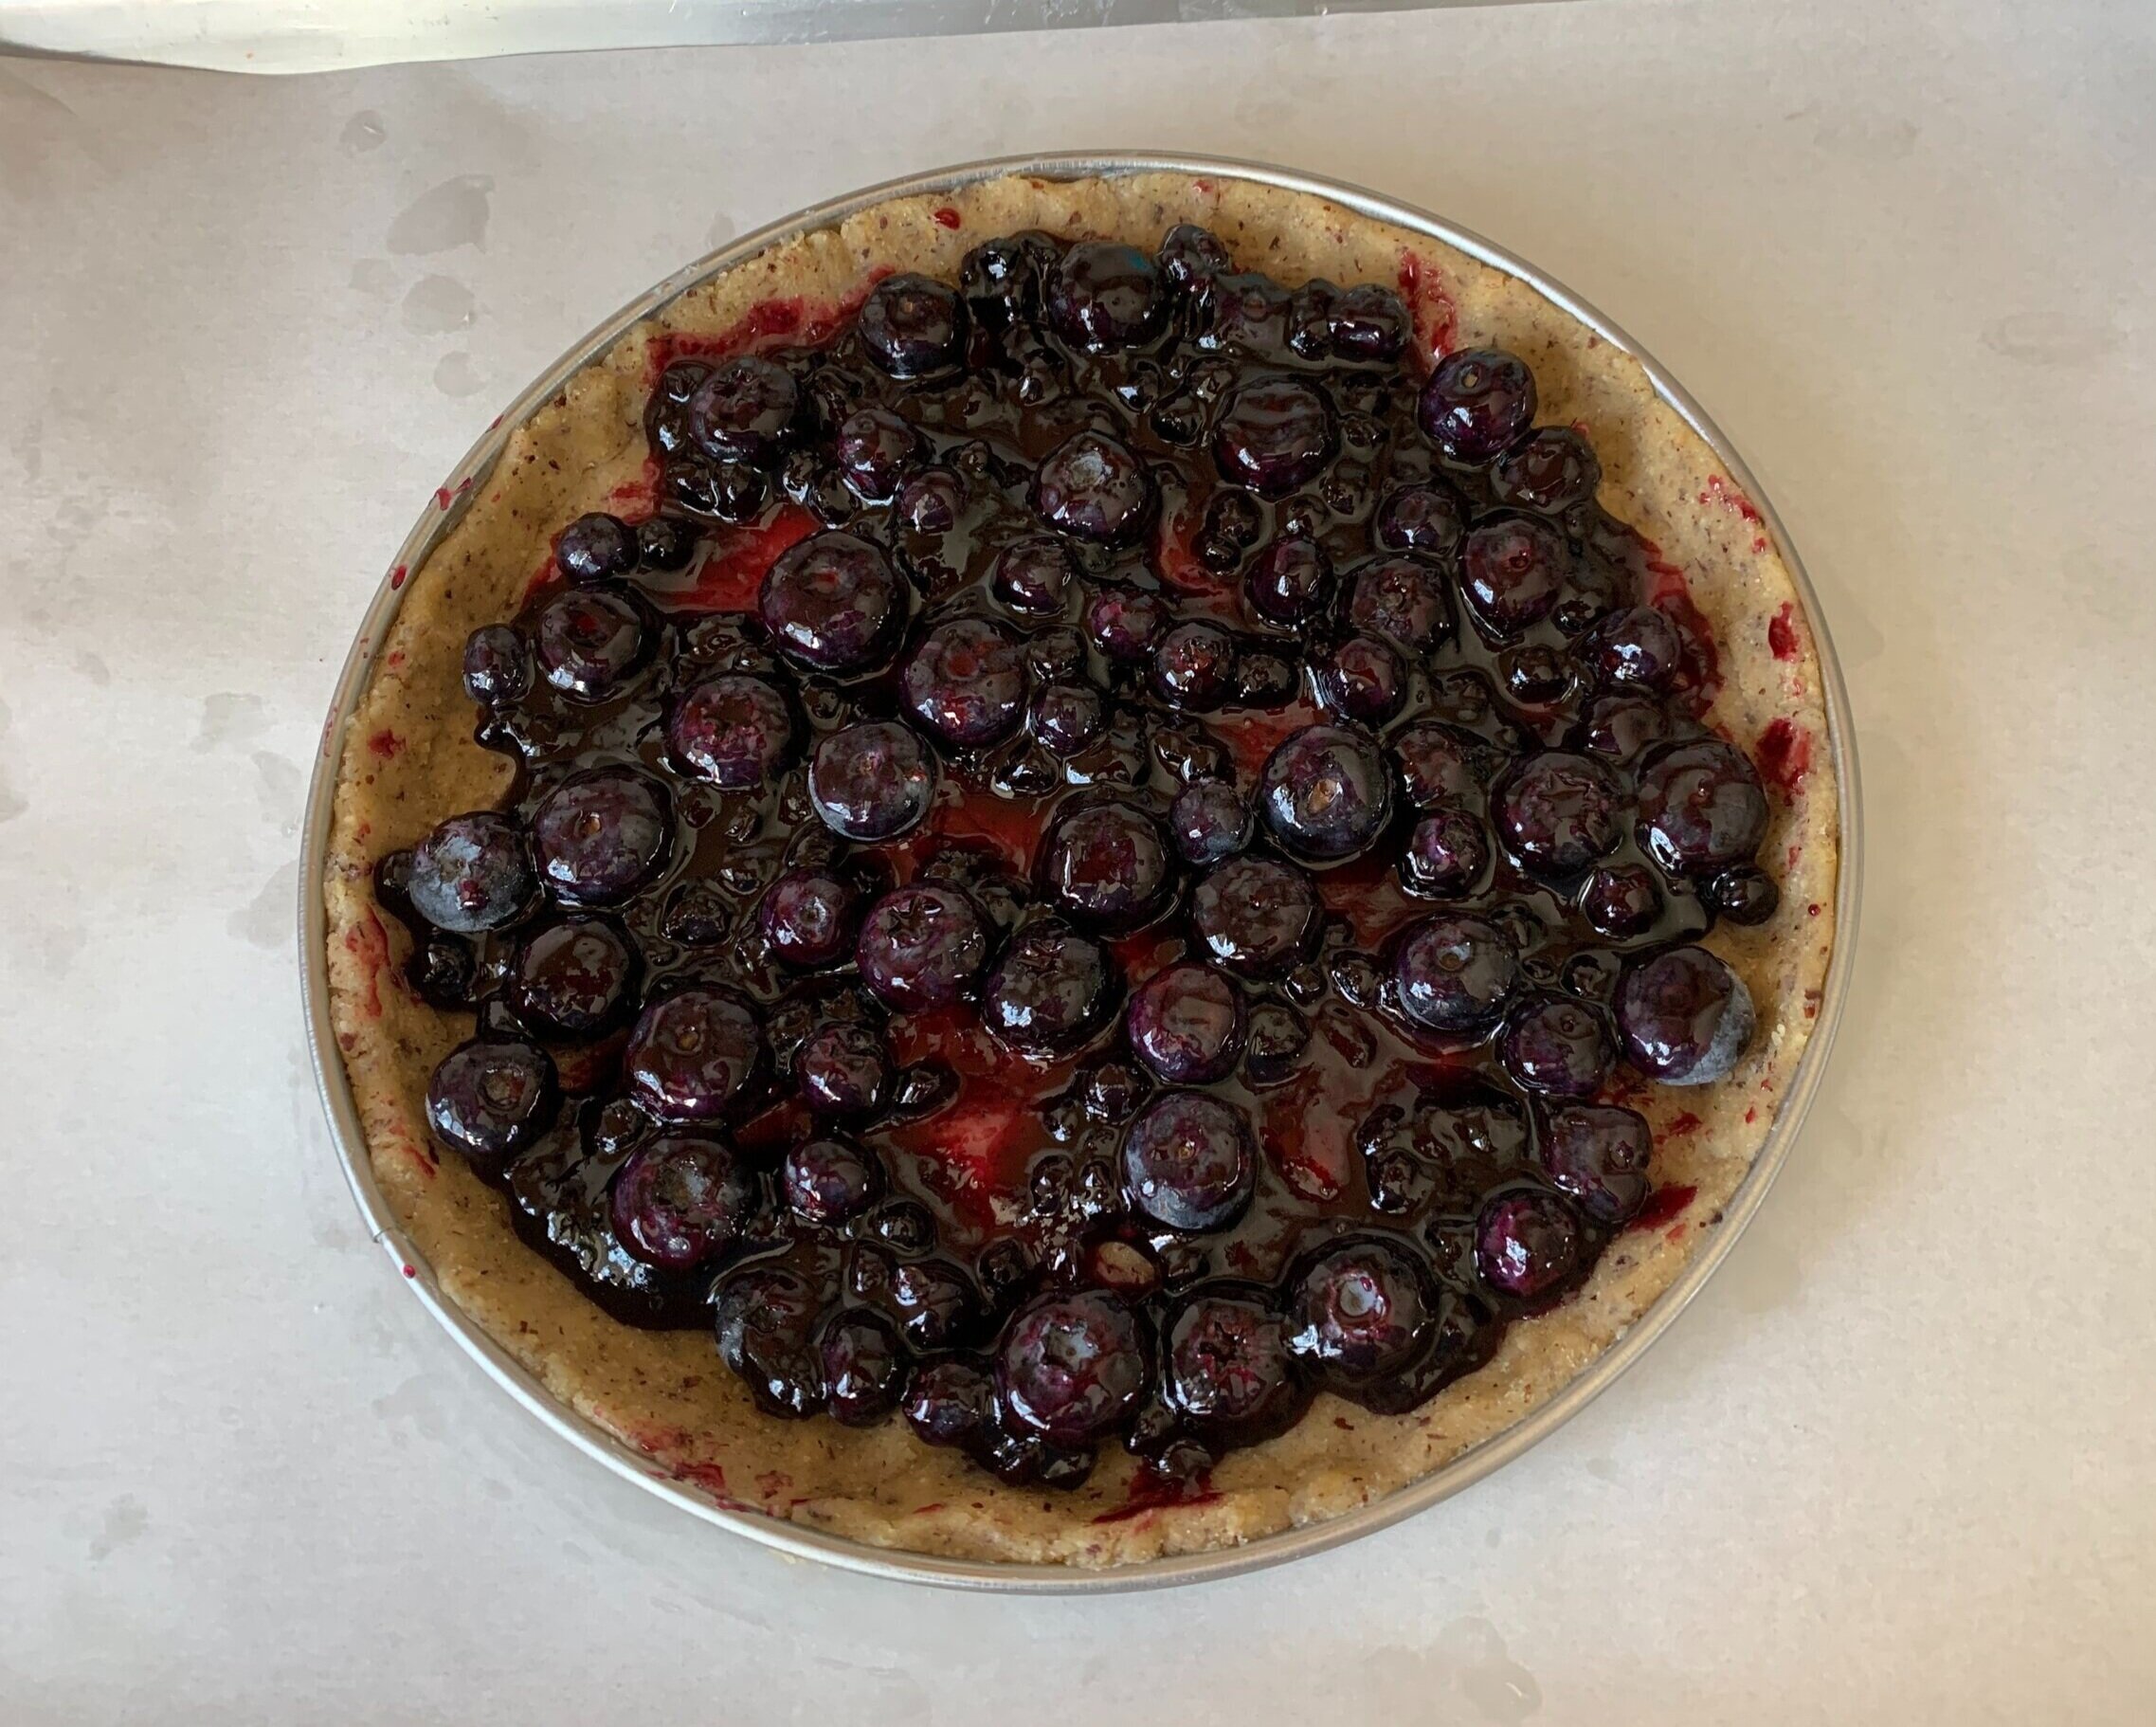
Create a layer of fresh blueberries mixed with a few spoonfuls of jam (eyeball it) over the dough. No fancy fillings here folks!

AD5ACA4A-199B-4E0B-A84D-7EC84214C368.jpg

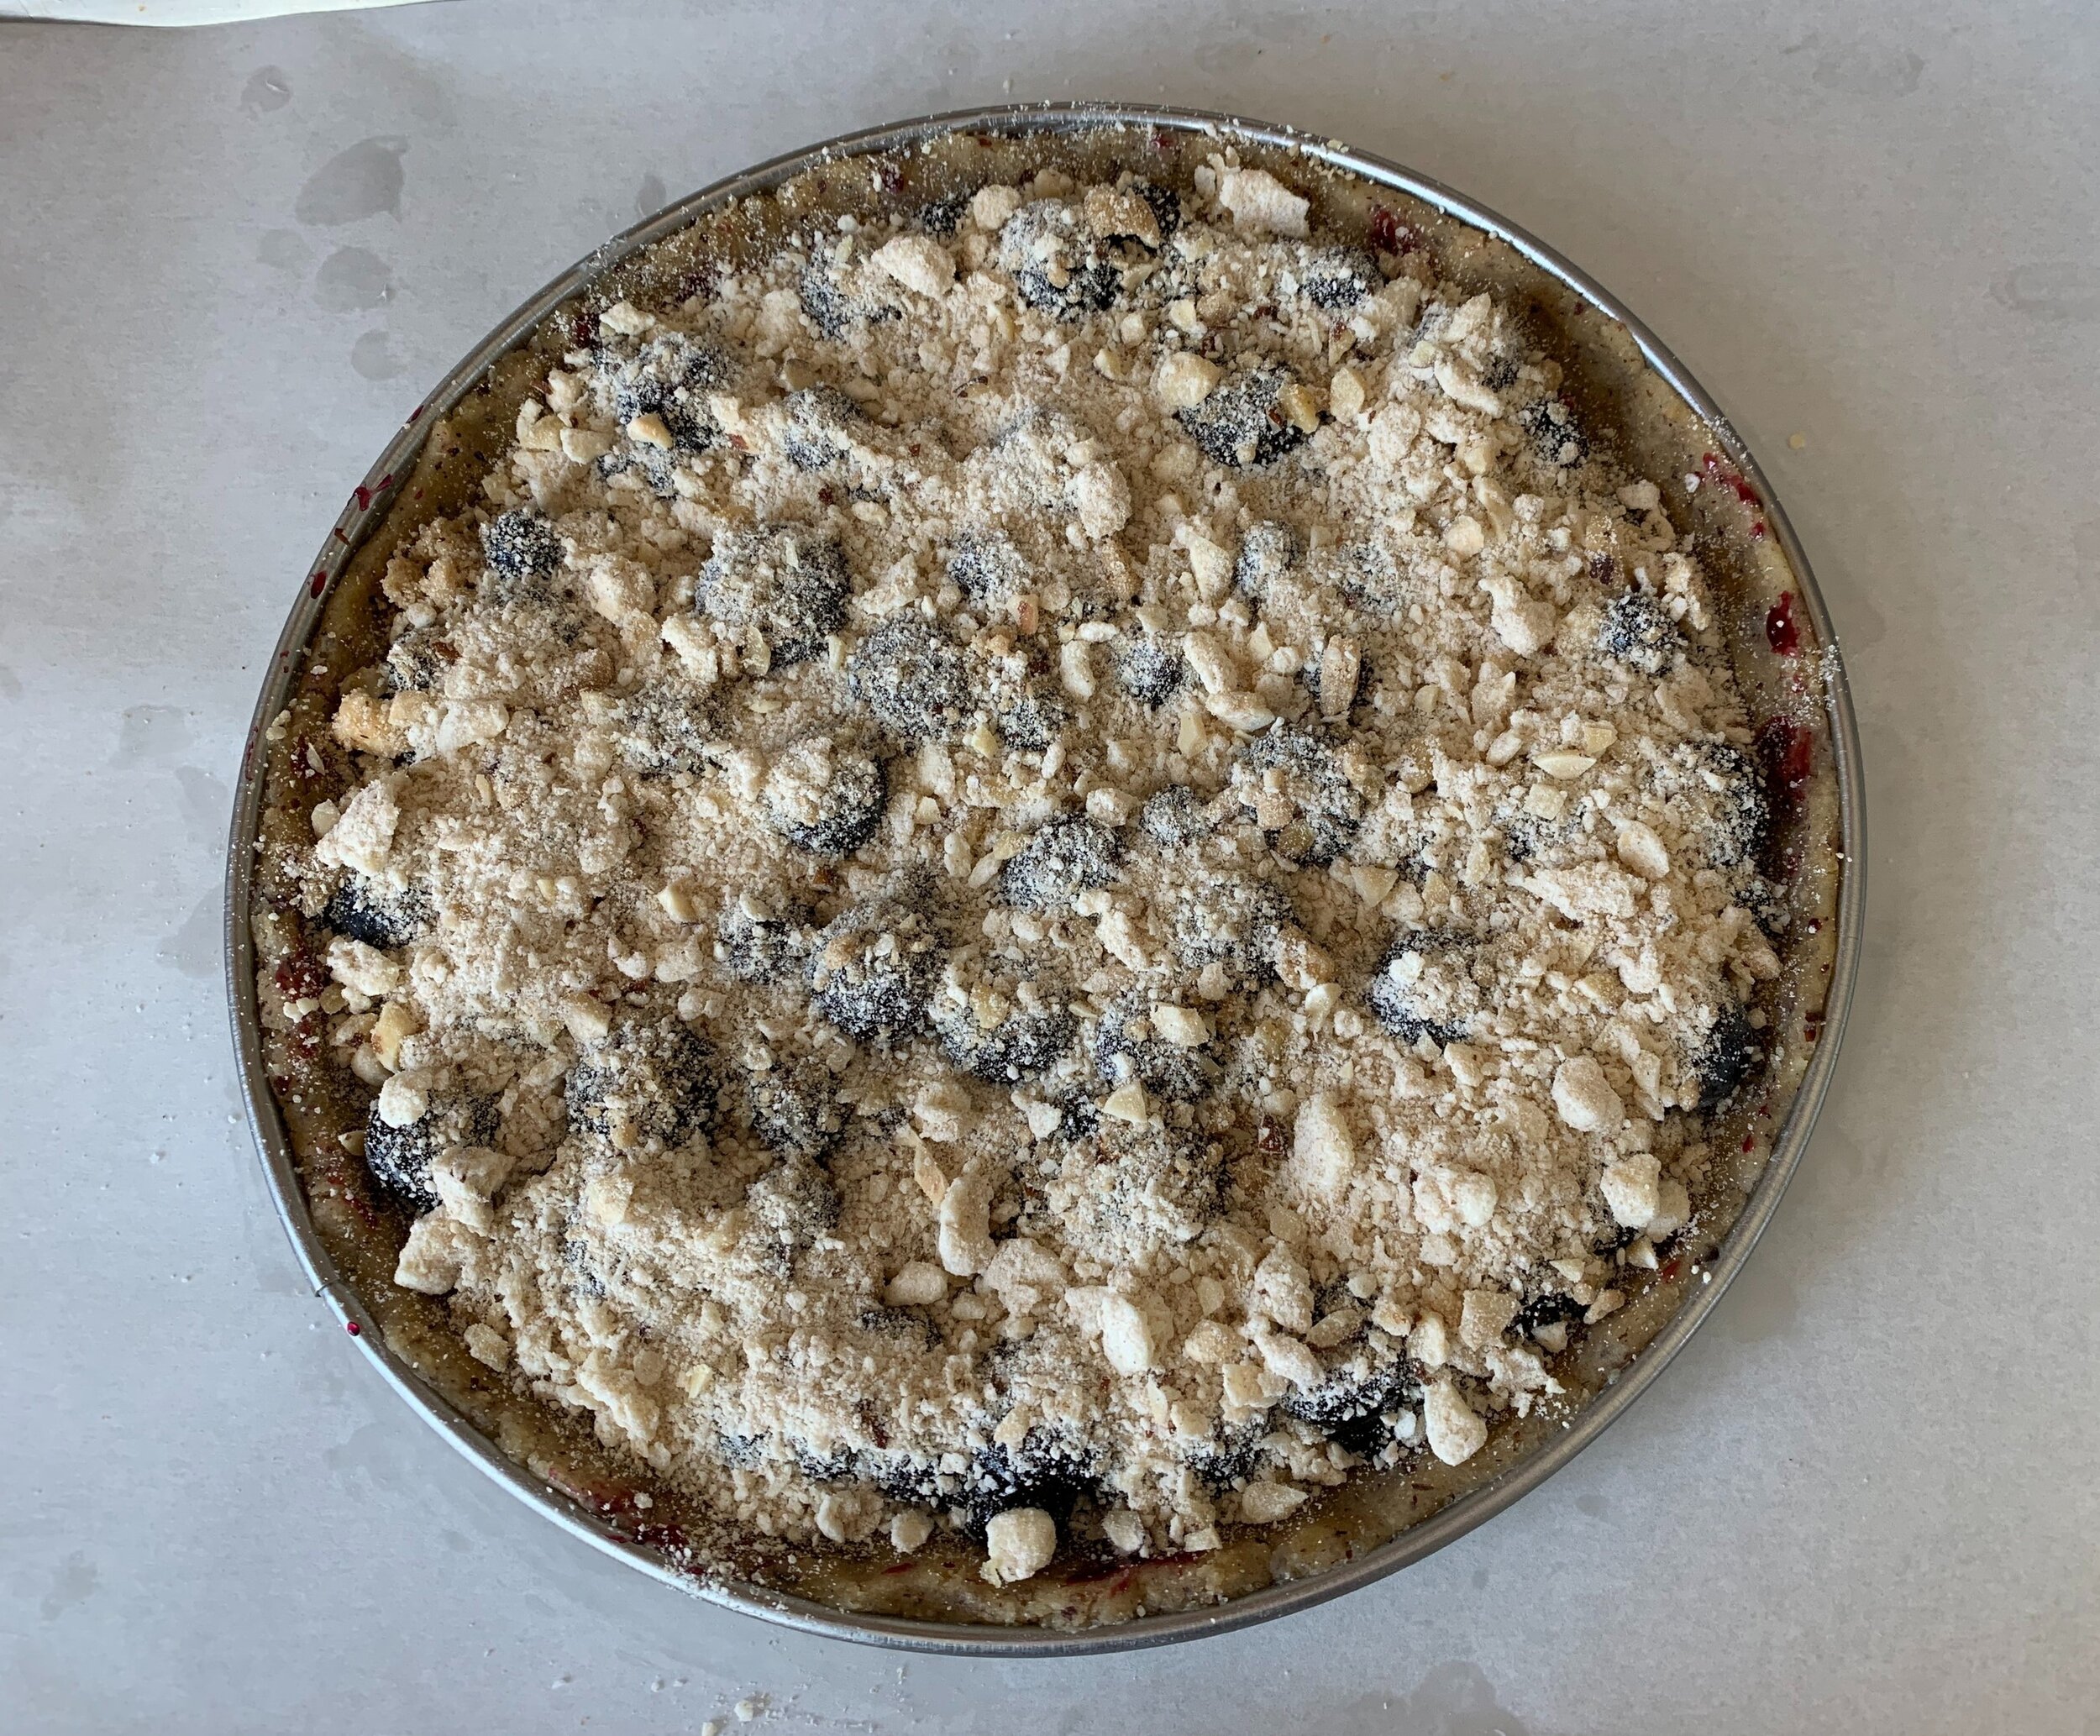
Top it with a decent layer of crumble.

68D8D8D9-ACD6-491E-917F-F435171D62D9.jpg

Bake about 25-30 minutes until the edges and crumble are nicely browned and the jam/berries look bubbly and set. Reduce oven to 325ºF if you feel your edges are browning too quickly. It’s up to you to keep on eye on things!

478CDEBC-5EE7-49F1-8120-45C11B67F05F.jpg

I made this baby for Easter dessert, served with homemade raspberry ice cream. The end result was a nutty, chewy, buttery, jammy, fruity and delicious treat which paired so beautifully with the creamy raspberry.

Truth be told, I prefer small individual desserts to larger, sliceable versions. I made a petite version ahead of time as a test, and it worked so well with a rustic scoop of ice cream right on top. Steve and I enjoyed our taste test while the tartelette was fresh and still a tad warm. Oh my.

E02D9501-C815-468A-97EB-DD1CBA277249.jpg
E5E79400-8188-4574-82DC-AB4326796713.jpeg

There are so many ways to create your own tarte Bretonne. Trust me, you won’t regret it!

Meanwhile spring keeps springing with flowers popping, sightings of turtles on logs, herons flying overhead, red wing blackbirds with their shrill call, garter snakes on the path and spring peepers singing to us all.

Enjoy the season and stay safe.

80881E5D-722B-4B7A-AD7B-25E567586C19.jpeg
7A8FA5C7-2D42-457A-8EBE-FFFF9C231D14.jpeg


A couple of autumn tarts

IMG_3305.JPG

Apples! Pears! Berries! What better way to celebrate autumn, eh?

On the prowl for a couple of Sunday desserts, as well as a way to use some of the local Michigan pears and apples I had on hand, tarts were definitely on my mind. Natch! This project involved two versions of tart, one apple/pear/blackberry with classic brown sugar crumble topping and one apple/pear/raspberry with crunchy almond topping. Ooooohhh how delicious.

IMG_3297.JPG
IMG_3291.JPG

I’ve been a fan of Bosc pears for some years now, and, on the apple side of things, this season I’ve taken quite a shine to Jonagolds too.

I typically poach my pears soon after purchase as a way to avoid the ripening wait as well as to hold them in the fridge for use when needed. But after reviewing some of my numerous pastry books I opted for the slice/dice/sauté in a little butter and sugar approach. Works like a charm!

For a couple of full sized tarts I peeled, halved, cored and thinly sliced about 4 pounds of apples. That would normally be a decent quantity for one tart, but, since I was mixing in pears and berries, it worked very nicely for two.

Then on medium heat melt 2 ounces/56 g unsalted butter in a sauté pan or Dutch oven large enough to hold all of the apples, then stir in the slices until coated. Add 100 g dark brown sugar, a large pinch of salt, the zest of one lemon and a large squeeze (a tablespoon or so) of lemon juice, increase heat to medium high and stir about a minute.

Now here’s where I took Elisabeth Prueitt’s advice from her “Tartine all Day” book - cover the pan, reduce the heat to low and let the apples cook for about 10 minutes until softening and juice-releasing has happened. Then scoop the apple slices out with a slotted spoon (I placed them in a large strainer over a bowl to allow dripping then transferred them to a clean bowl) and cook down the juices for a few minutes until very thick - apple caramel! Mix the thickened juices in with the apples and you’re good to go. You can add a little cinnamon and nutmeg here if you’d like - I kept mine au naturel. Set aside to cool until you’re ready to fill your tart shell.

For the pears, again using about 4 pounds, I peeled, halved, cored and diced them into 1/2 inch cubes then followed a similar sauté approach in butter and sugar. For these, simply cook them over medium high heat until they start to soften and become lightly caramelized (maybe 5-8 minutes) then set them aside to cool until ready to fill the tarts. No juice reduction here.

I used two of my favorite tart doughs - pâte brisée for the blackberry version and pâte sucrée for the raspberry - blind baking them before filling. Once baked I brushed the bottom with egg white and popped ‘em back in the oven for a couple of minutes to “dry”. That provides a seal to the dough and reduces the chance for a soggy crust.

Pear apple blackberry waiting for assembly

Pear apple blackberry waiting for assembly

I mounded the apple/pear mix in first then tucked my blackberries into the various nooks and crannies. These were plump frozen berries that I broke up into pieces for more efficient cranny-ing.

IMG_3294.JPG
 

The brown sugar crumble is equal weights flour, brown sugar (you can use light or dark, whichever you prefer) and diced cold butter sanded into the dry ingredients. I usually make a bunch and store it in a zip-top bag in the freezer to use at a moment’s notice.

Loaded with crumble!

Loaded with crumble!

Since the crust is already baked and the fruit “cooked”, the primary task here is to brown the crumble and get the fruit to juicy-up. Bake at 350ºF for 20-25 minutes until the crumble is golden and some juicy bubbling is visible.

IMG_3296.JPG
 

The approach to the raspberry version is pretty much the same. Fill the blind baked crust with the pear/apple/raspberry mix.

IMG_3288.JPG
 

But this time the topping is made with 2 large egg whites, 100 g/1 cup confectioner’s sugar and 125 g/1.25 cups sliced almonds all mixed together and spread over the fruit.

Ready for the oven

Ready for the oven

This one also bakes at 350ºF for about 25-30 minutes until the nuts are browned and have taken on a certain luster and there’s some fruit juiciness visible around the edges.

IMG_3290.JPG
 

Talk about a treat! Whether it’s crunchy toasty almonds or a more classic crumble that melts in your mouth, both of these tarts delivered with the lovely fall flavor of pears, apples and berries. And a side of vanilla ice cream doesn’t hurt either!

Now don’t hesitate to make your own version of a delicious autumn tart.

Happy baking!

IMG_3302.JPG

Cherry-berry feuilleté and peach buttermilk ice cream


The summer annuals are showing off their colors here in Grand Rapids MI . . . .

lovely coleus in our little garden courtyard

and the summer peaches are out in full force!


Fresh Michigan peaches are one of my favorite fruits.  So of course I've been thinking of the many wonderful ways to use them.  This time I was inspired by a peach buttermilk ice cream recipe from "Food and Wine" magazine.


I followed the recipe for my usual ice cream base (2 cups heavy cream, 1 cup whole milk, 3/4 cup sugar, 5 large egg yolks, pinch of salt) replacing the cup of whole milk with buttermilk.  I blanched 1.5 pounds of peaches, then peeled, pitted, sliced and blender-ized them with a squeeze of lemon juice, folding the purée into the cooled base.

peach purée at the ready

ice cream base finishing its chill down

I usually chill my base in the fridge for a day or two, then process in my ice cream maker and transfer to a freezer container several hours before serving.

I also wanted to use some cherries and blueberries I had on hand to complement the peach ice cream in a dessert I was planning for a family meal.  And, to top it off, there was some reverse puff pastry in my freezer just waiting to be made into something oh-so-delicious.

The beauty of the feuilleté preparation is that I can roll, shape and bake them ahead of time and hold them either at room temperature if using the same day, or in the freezer for a number of days if planning a bit farther ahead.


When ready to fill them, I simply push down the center layers of puff to make room for the fruit mixture that will be mounded in the feuilleté.

I mixed 4 cups of fruit (cherry/blueberry combo) with a teaspoon of fresh lemon juice, 3-4 tablespoons granulated sugar (I like my fruit on the tart side) and 1 tablespoon cornstarch. I then cooked this concoction on med-low heat until bubbly and thickened.

Note:  this quantity of fruit filling was enough for 7-8 feuilletés about 3.5 inches square.

Then I scooped a mound of filling in the center of each feuilleté and baked at 350ºF for about 10-15 minutes.  Since the puff pastry is already baked and the filling already cooked, it's really just a matter of heating everything up.

Once cooled, I topped each one with previously baked matcha crumble (really more for color contrast than taste) and gave them a light powdered sugar dust.

the end result!

I know I've mentioned crumble before in this blog.  It's a great thing to have on hand and is so easy to make.  Make as much or as little as you'd like.  

Simply mix equal weights flour and sugar in a medium bowl, sand in the same weight of cool, diced butter to form coarse crumbs.  In this case I added some matcha powder with the flour and sugar (you don't need much).

Spread the crumbs out on a parchment lined sheet pan and bake at 325ºF, stirring and breaking up clumps every 5 minutes or so until lightly browned and crisp, 10-15 minutes total.  Let cool.

Store in a zip-top bag in the freezer and use at will!

For serving I simply placed a scoop of peach buttermilk ice cream atop each feuilleté (no muss, no fuss) and handed 'em out.

Mmmmmm!

While the ice cream was a bit more icy in texture than I had hoped (I suspect due to using low fat buttermilk rather than whole milk, plus the water content of the fruit purée), the contrast of the tangy peachy coolness with the tart cherry-berry filling and buttery, flakey puff was oh-so-good indeed.

Three cheers for summer fruits!  Hip hip hooray . . . .


Semifreddo and a one dish composed dessert

On the prowl once again for a weekend supper dessert idea I decided to make a semifreddo to pair with something warm and fruity.

cherry berry pistacho crumble with vanilla almond semifreddo

Semifreddo is Italian for "half-cold" and is a molded, creamy dessert that's in the "still frozen" category, meaning it isn't churned like ice creams and sorbets before freezing.  There are numerous flavor possibilities with coffee, chocolate, citrus or a fruit purée of one's choosing among the many.

Its base is similar to an Italian zabaglione or French sabayon in which egg yolks, sugar and a liquid like Marsala (the classic in Italy), Champagne, Prosecco, red or white wine, citrus (or other fruit) juice or a liqueur are whisked over a bain marie until lightened, foamy and thickened.

In this case I whisked 80 ml (1/3 cup) vanilla simple syrup (essentially combining my sugar and liquid before hand) with 3 egg yolks until thickened and lighter.


at the start of cooking

thicker and more pale

zabaglione or sabayon in its pristine form is often served warm just after preparation, perhaps with fresh fruit, but in this case I cooled it over an ice bath in preparation for the next step.

When you take a zabaglione/sabayon to the next level and fold either whipped cream or a meringue into the chilled base, it becomes a semifreddo (or a French parfait - confused yet?).
  

whip cream to nice soft peaks

all blended together


The mixture can be placed in one large plastic-wrap-lined mold such as a simple loaf pan or a fluted bowl, or can be portioned into small silicone molds, available in an appealing assortment of shapes and sizes.


cover with the plastic wrap and pop into the freezer

Freeze for a number of hours until firm.  Well wrapped it can sit in the freezer for several days, allowing at least that portion of the dessert to be made ahead (it's all about the planning, folks!).

A quick side note:  there are many terms in the cream/custard lexicon, and the word mousse is one that I've always found it a bit confusing.  The word literally means "froth" or "foam" and refers to a dish in which an aerator like whipped cream or meringue is folded into a base.  That base can be a fruit purée, a crème anglaise or crème pâtissiére, pudding or custard, curd, sabayon, or pâte à bombe (yet another French base made with just yolks and sugar).  However a mousse isn't necessarily frozen, so I guess that's one distinction from a semifreddo.

Just had to throw that in there!

As I was mentally concocting my composed dessert I knew I wanted some crunch.  The words crisp and crumble always speak to me of American desserts, yet, truth be told, the French are all over the crumble thing.  They're sold in many pâtisseries, and one can find books devoted solely to the subject of the crumble in librairies like Gibert Jeune et Librairie Gourmande in Paris.

I turned to my recipe binder from Pascal Pinaud's shop on rue Monge and resurrected a crumble recipe which calls for both almond and hazelnut flours (I was on a nut roll with this dessert).

A basic crumble is equal weights sugar, butter and flour.  You can add the same weight of a nut flour or even just chopped nuts.  The idea is to mix the dry ingredients, then sand in cold diced butter to create coarse crumbs.  For this batch I used 120 gm each sugar, butter and flour, plus a total of 120 gm of almond and hazelnut flours (I used 30 gm almond and 90 gm hazel - you can decide your own ratio).


les ingredients

bake it now or freeze it for later

Now you have a choice.  Your crumble can be baked ahead and used later as a crisp, buttery topping for whatever - a tart, a custard, some ice cream or fruit, or even your morning oatmeal.  Keeping the crumble separate and adding it as a topping just before serving keeps it from getting soggy.

Or you can bag up the raw mixture, freeze it and have it at the ready to simply throw on top of fruit, cake batter or anything else you can think of and bake it - it melts in a bit yet still provides a crispy baked topping to your dessert.

When I bake my crumble ahead, I do it at 350º for about 20 minutes, stirring it up every 5 minutes or so until lightly browned and set.

use a bench scraper to toss and separate the crumbs

all baked up

Mmmmm!

There is another option for a crumble which allows you to create coarser crumbs or even larger chunks to use as a garnish on a larger entremet type of dessert.  This one involves blending softened butter with sugar, then blending in the all purpose and nut flours, pretty much like a cookie dough.  Then shape the dough into a 1/2" (or so) thick square or round, cover and chill.  Then you can cut it or break it up into chunks and bake it as described above.  And they're not a bad pop-in-your-mouth snack either!

Now onto the fruit part.  So it's still winter, after all, but I was going for cherries and berries for this dessert.  That's the beauty of IQF (individually quick frozen) fruit that's available in the grocery stores all year round.

I have these great little square ramekins that I bought at Crate and Barrel some years back.  They hold just the right amount for a not too generous dessert portion.  To fill six of them I used 340 gm (12 oz) frozen pitted sweet cherries and about a cup and a half of mixed blueberries and raspberries.  I tossed them in a mixture of 85 gm (generous 1/3 cup) sugar, 10 gm (~ 1TBSP) cornstarch, the zest of half a lemon, a pinch of freshly grated nutmeg and 1/8 teaspoon coriander.  Topped with some pistachio crumble that I had in my freezer (told you I was on a nut kick), they're ready for the oven.


Bake at 325º for about 40-45 minutes until the crumble is lightly browned and the fruit is bubbly.

When it came time for dessert, I scooped some semifreddo onto the still warm fruit, sprinkled some hazelnut-almond crumble on top and drizzled a bit of caramel over it all.

Delicious!


So use your imagination and create your own composed dessert.  Having the contrast in textures (creamy, fruity, crunchy) and temperatures (warm and cool) is oh so wonderful.  And remember -  it doesn't have to be fussy, difficult or fancy - just tasty!