Chocolate ganache tarte

The holidays are here and, as each day brings its own tasks to be tackled or projects to delight us, I want to send all of you my wishes for a very peaceful season.

And what better time to talk about chocolate!!

This ganache tarte is one of my all time faves. The more I consider all of the goodies I’ve created and written about over the years and the things I so enjoy making, the more I realize that the simplest things are usually the best. This delicious treat has been often requested and frequently made, but, believe it or not, even though I’ve perhaps referred to it in various iterations over the years, I’ve never given it top billing. So here goes.

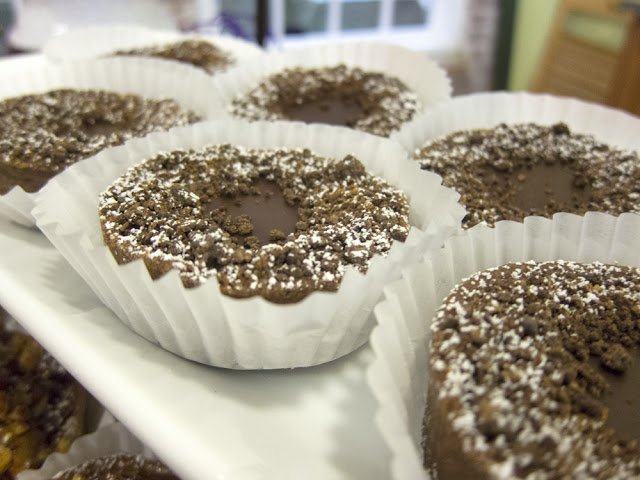
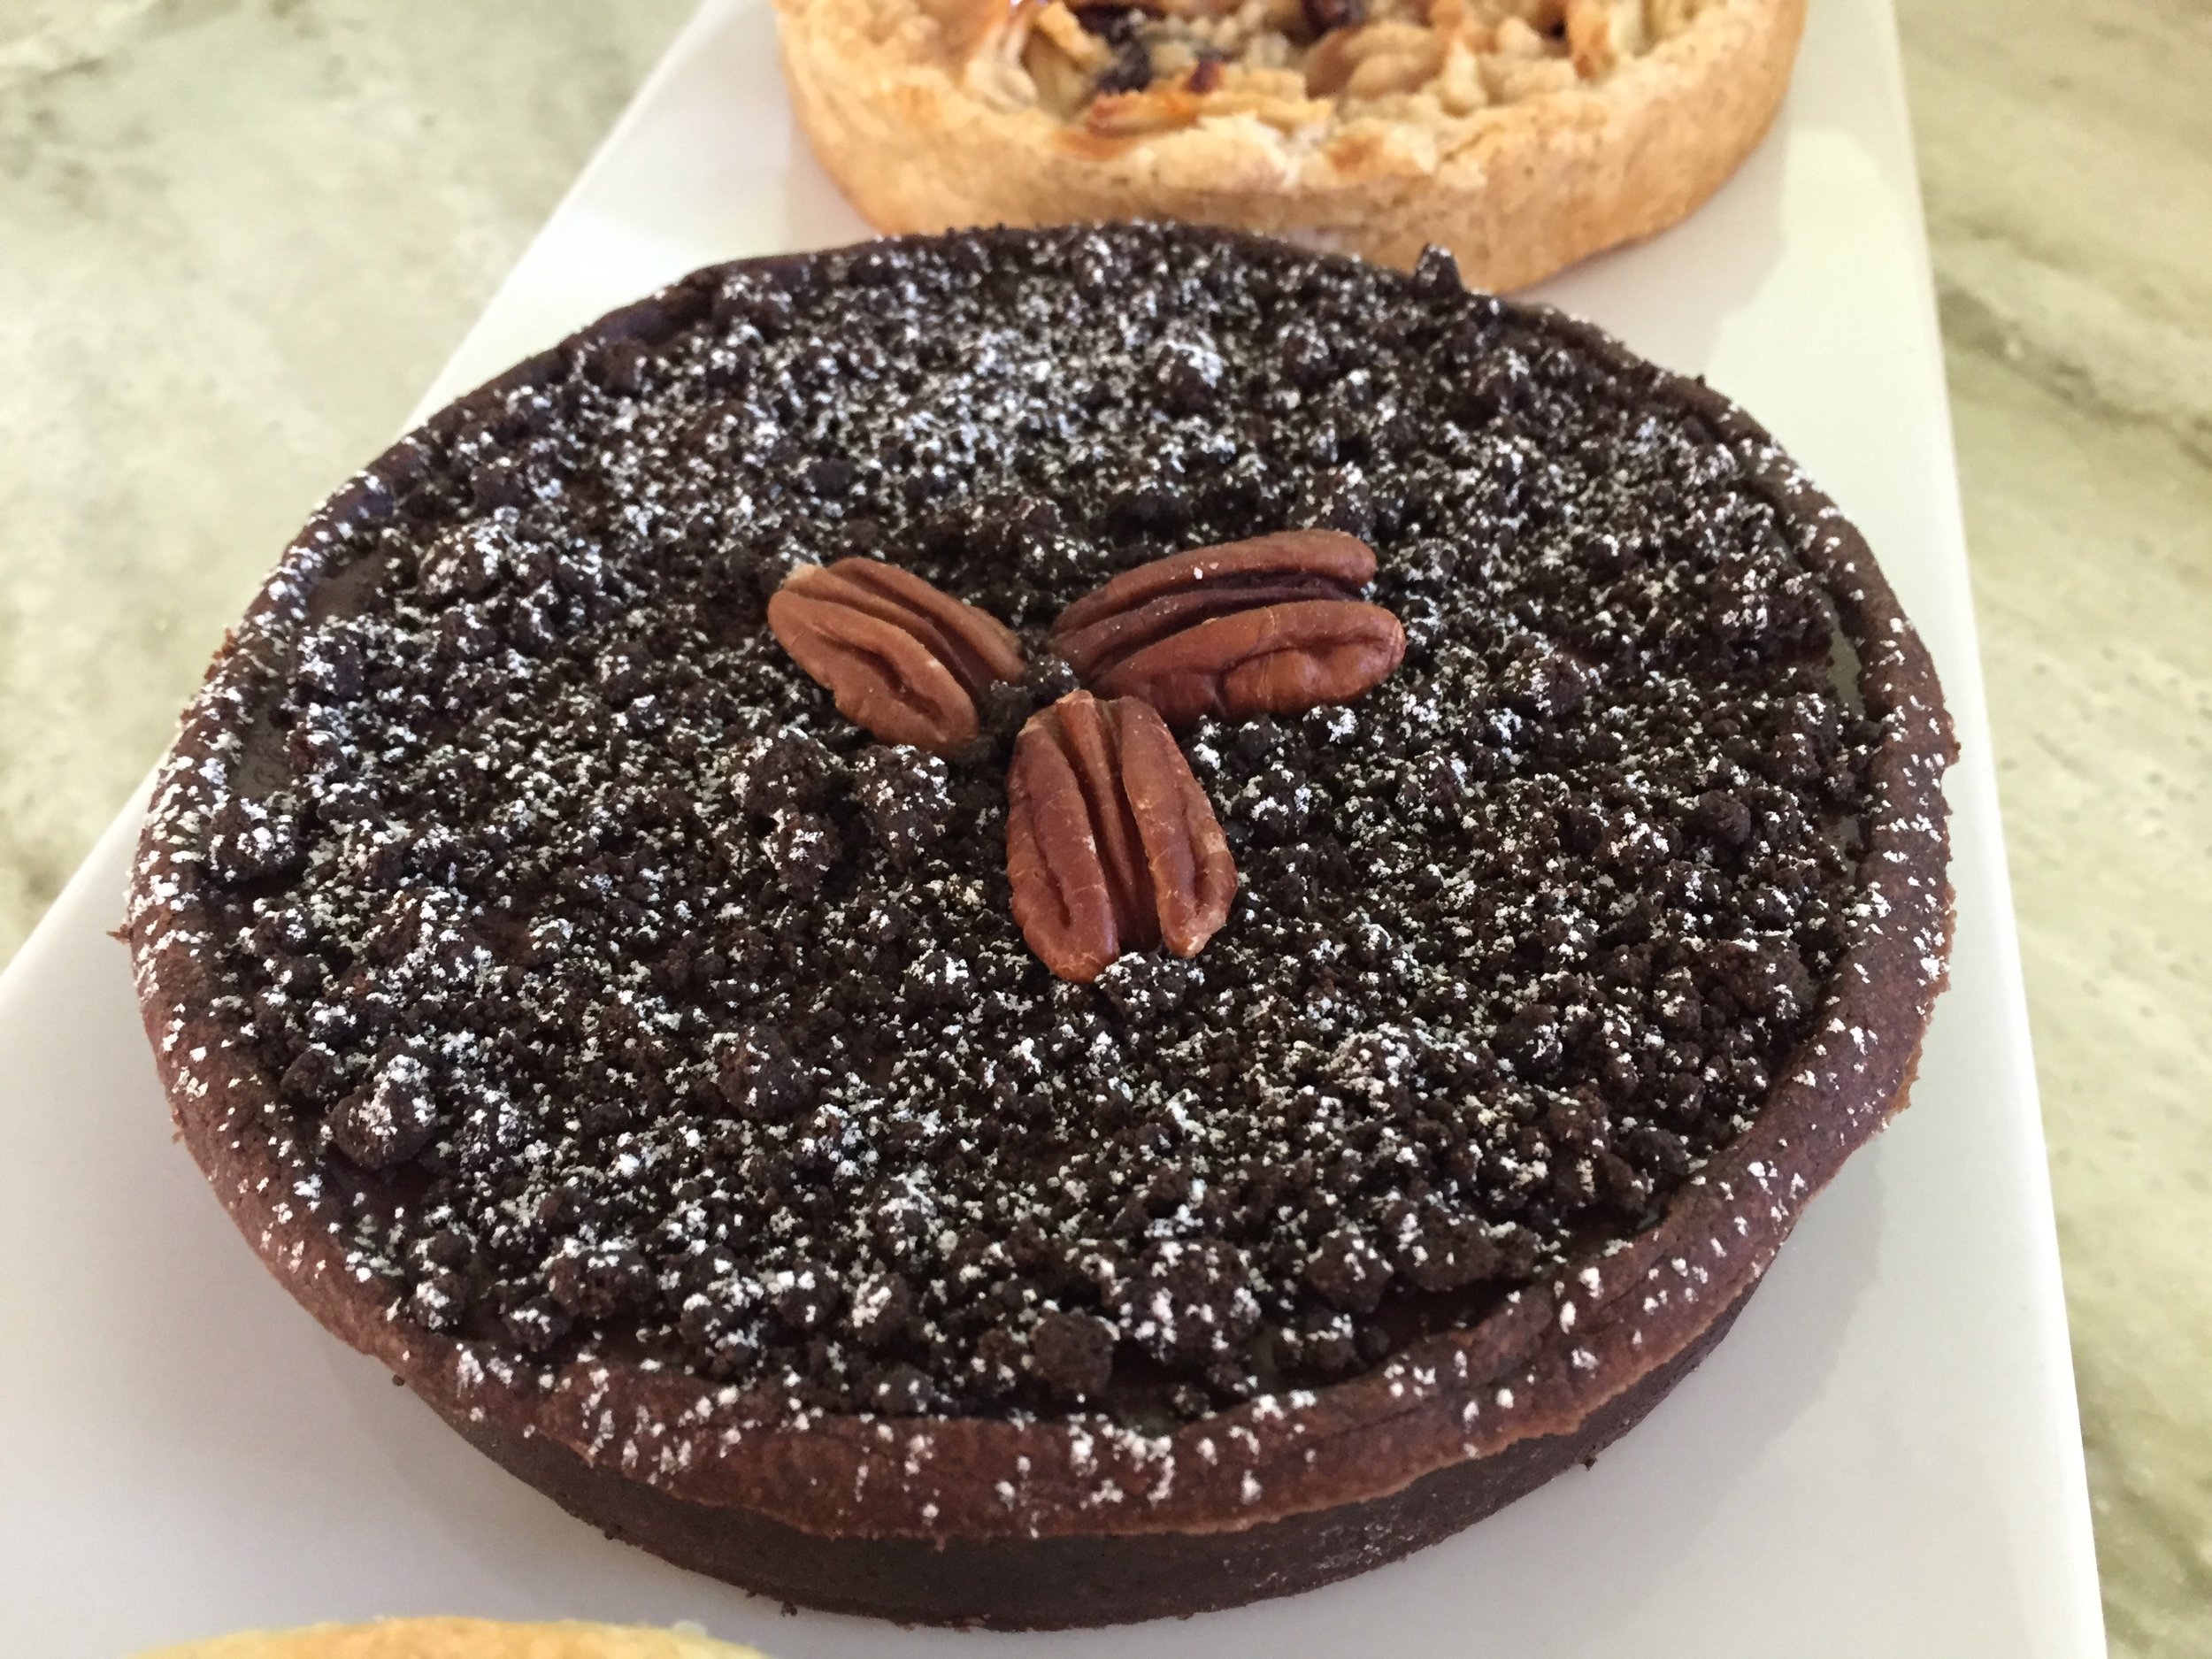
During my Providence/Pawtucket days I made 80 mm individual versions for my retail space, keeping ‘em clean with a sprinkle of chocolate crunchy crumbs and a dusting of confectioner’s sugar. Plain and delicious. Then it’s up to the buyer to leave it au naturel and eat it out of hand or dress it up for serving - dollop on some whipped cream and a few fresh raspberries (for you fruit and chocolate lovers) or top with crunchy candied nuts or some sesame brittle.

Individual ganache tartes

The process utilizes some of the basics in tarte making - cooled blind baked shell; ganache filling poured in and cooled; garnish as you wish; serve and enjoy. Pretty straight forward. You can use either a pâte sucrée au chocolat or a standard pâte sucrée.

As an aside, I’m not intending to overwhelm but to explore options with you for creating your own version of a delicious ganache tarte!

As for planning ahead, be sure you make your chosen dough either the day before or early enough to allow an hour or two for the dough to chill in the fridge before rolling it out. An even better plan-ahead step is to make a double or triple batch of dough a week or two ahead, divide it into approximately 260-280 gram / 9-10 ounce portions and hold them in the freezer well wrapped. The dough keeps for months. Just thaw it in the fridge overnight before using.

You’ll fully blind bake the tarte shell first. When you’re ready, roll out the dough (generally about 260-280 grams / 9-10 ounces for a 9”) and line a 9” tart ring or fluted pan. Place it on a parchment lined sheet pan, prick the bottom all over with a fork and pop it into the freezer for 15-20 minutes to firm it up.

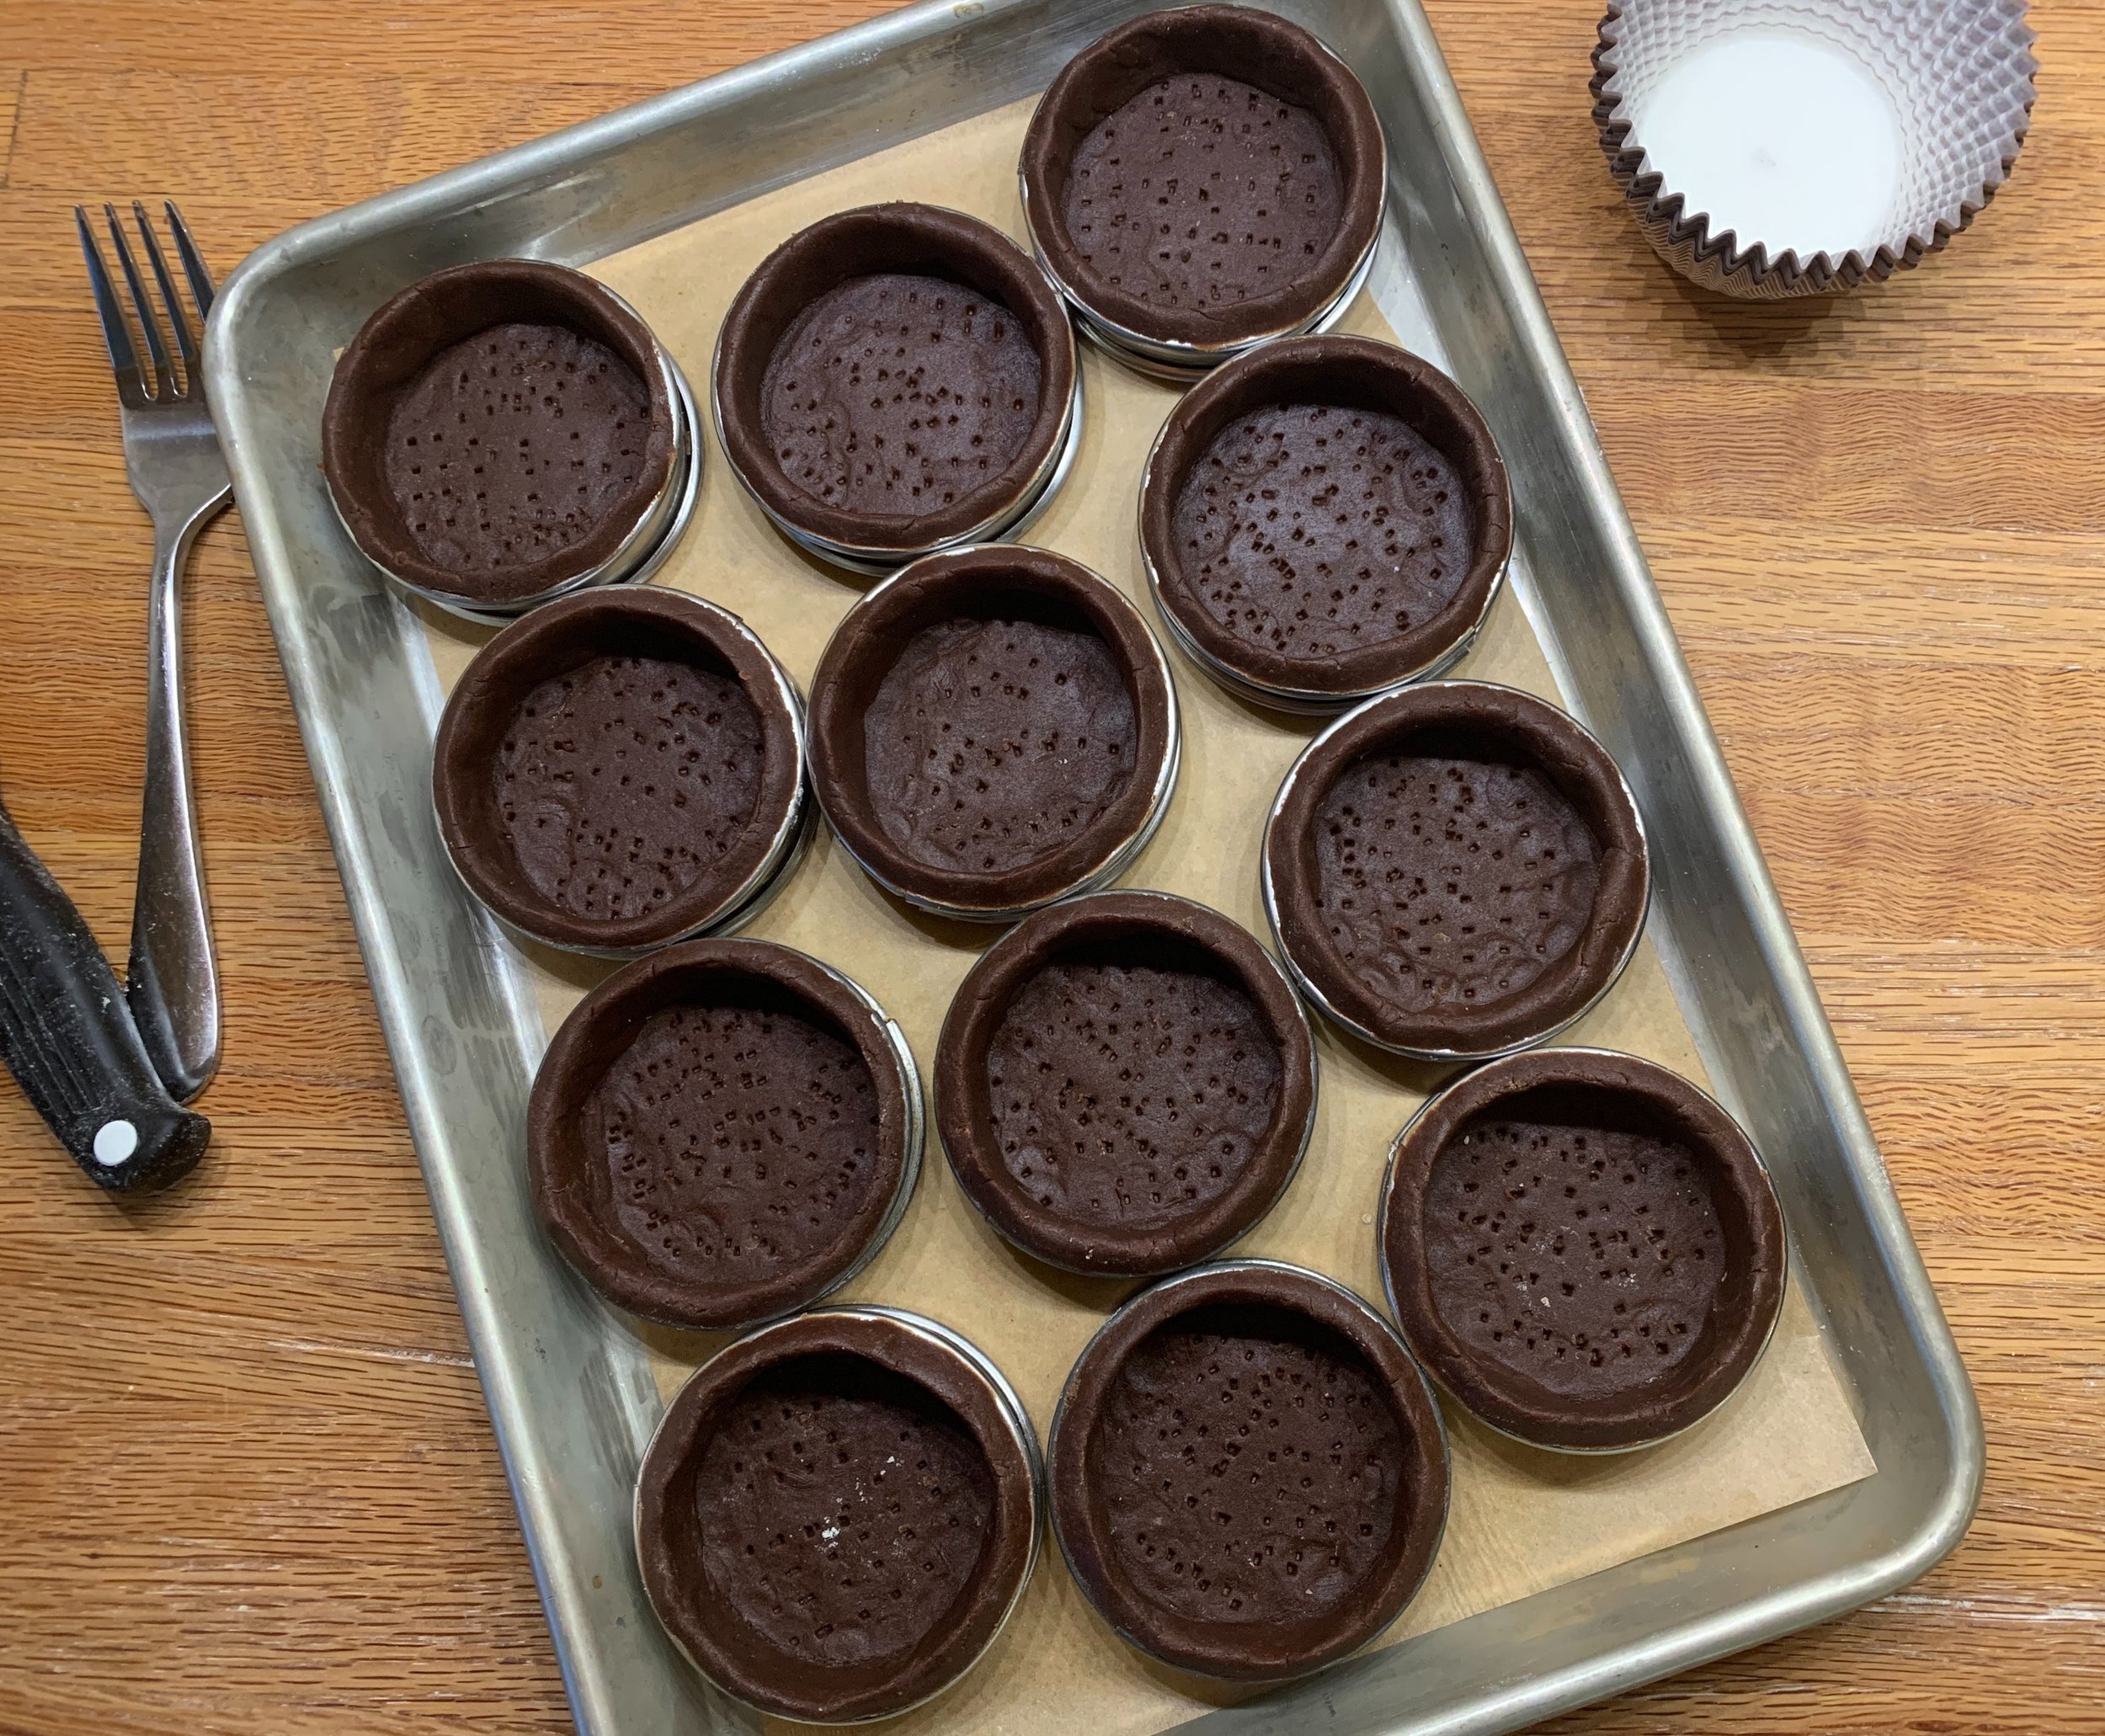
I often do various sizes for different venues. Roll with it (hah! - get it?). You’ll learn to figure out how much filling will work for certain sized tartes. I gauge a double batch of filling should fill the rings below (not including the little brioche tins).

So many choices!

My favorite 65 mm rings - perfect!

7 inch and 5.5 inch rings

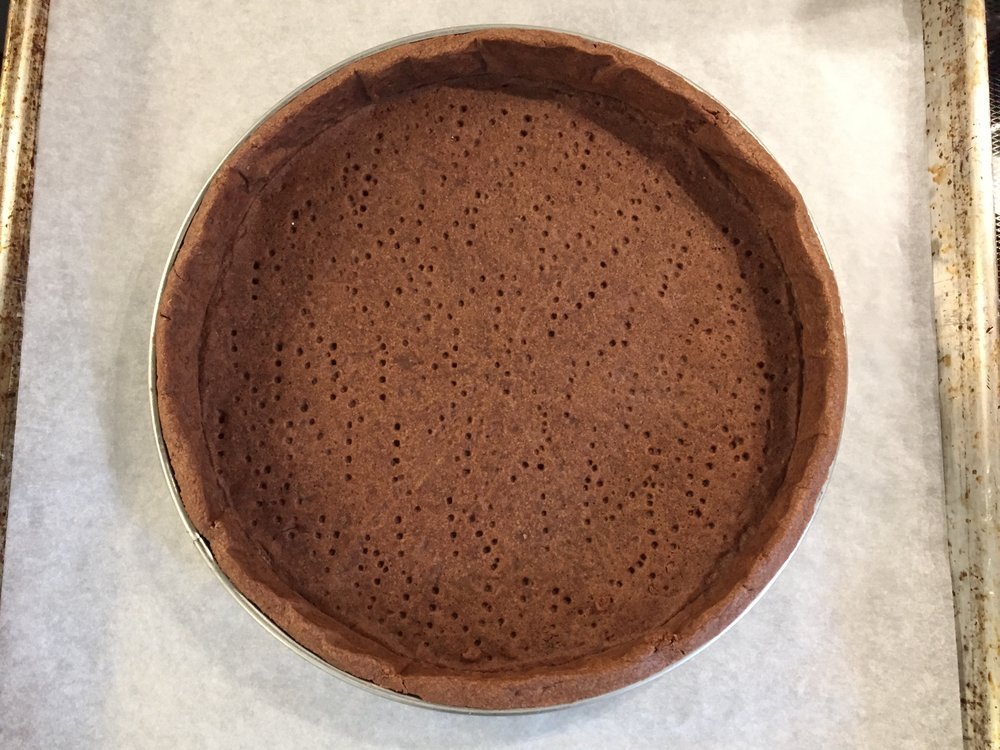
You can actually do the lining step a day or two ahead and hold it in the freezer until baking day. No need to thaw it - just line with a round of parchment, fill with weights or dried beans. Bake at 350ºF for 12-15 minutes, then lift out the weights and parchment and bake an additional 5-8 minutes to fully bake/dry the bottom. Cool completely before filling.

Fully blind baked shell

As if there weren’t enough options for this tarte shell, here’s one more way to help with the plan-ahead process. You can freeze the fully baked shell too! There have been times that I’ve had a baked shell in my freezer for several weeks before I decided it was time to fill and enjoy it. So many possibilities!

The ganache filling is as simple as ganache can be. Place 227 g / 8 ounces of chopped dark chocolate or discs/feves in a medium heat proof bowl along with 28 g / 2 tablespoons unsalted butter. Heat 360 g / 1.5 cups heavy cream to boiling then pour the hot cream over the chocolate/butter. Let it sit a minute then gently blend with a whisk or spatula until smooth. Don’t be aggressive with the mixing - you don’t want to aerate it. Blend in 30 ml / 2 tablespoons brewed espresso - I often make a mix of 1/4 cup hot water with a half tablespoon espresso powder as a substitute for the brewed and use 30 ml of that.

Once the ganache is made, pour it directly into the blind baked shell.

Let it sit out at room temperature uncovered for an hour or so to let the heat dissipate before placing it into the fridge (again uncovered) to fully set. If you put it in the fridge right away, you’ll get condensation on the surface - not attractive, believe you me. Plus chocolate doesn’t like that.

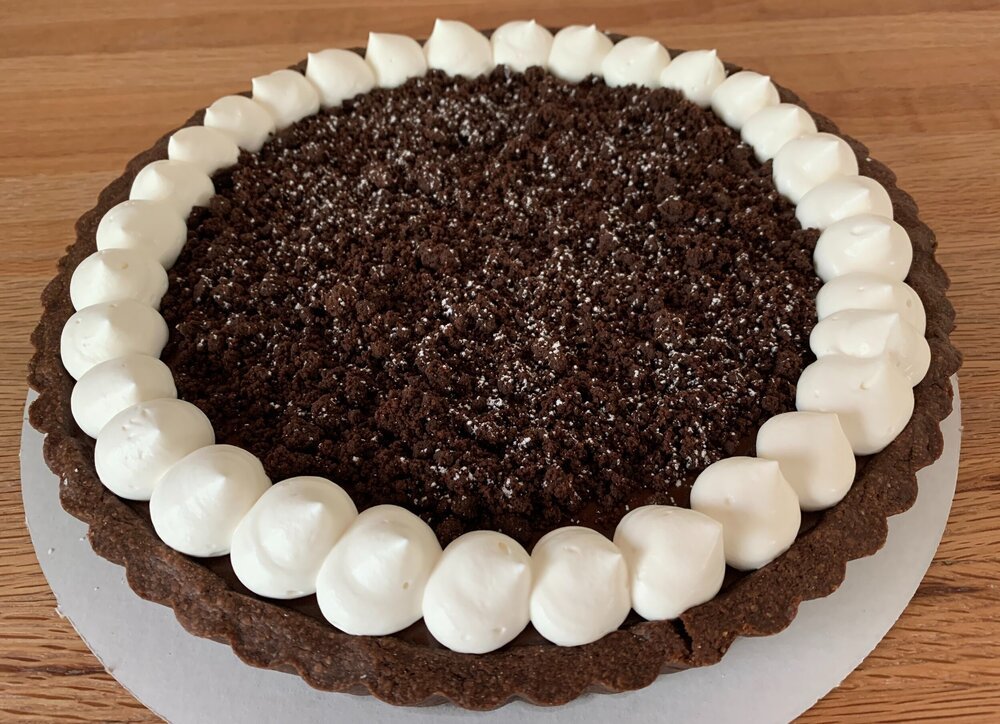
Once chilled, garnish away! Crunchy chocolate crumbs, a light confectioner’s sugar dust, whipped cream and voila! It keeps covered in the fridge over several days so don’t feel like you have to eat it all right away!

An option for you nut lovers out there is to spread some toasted chopped nuts of choice coated in caramel on the bottom and pour the ganache over them. You can do fewer nuts and more ganache or more nuts and less ganache. Below are images of a few different sizes I experimented with for Thanksgiving a few years ago.

Pecans and caramel nestled in

Ganache poured over, ready to set

As for how you’d like to garnish your tarte, keep it simple by dolloping some Chantilly cream on each slice and adding some fresh raspberries. The pecan/caramel version below received a layer of chocolate crunchy crumbs, a dusting of confectioner’s sugar and a simple trio of toasted pecans. Yum.

For petite tartelettes, top the already set ganache with a lighter whipped version of chilled 2.5 parts cream to 1 part chocolate ganache and add a simple chocolate disc as decor.

Check out my ganache tips for more fun with ganache.

Petit fours tartelettes

Nothing like a day late and a dollar short. These images are from late October but I had to share a bit of seasonal beauty with you. They say snow’s a comin’!

Bejeweled burning bush

Late season color after a first snowfall - October 31, 2023

Here’s to comforting and grateful days, keeping our spirits and hearts bright, staying active and healthy and hoping for calm around the world. Cheers and, as always, happy baking!

Late summer veggie focaccia

74D48926-F6CE-4A7D-8929-BBADB6ED70CA_1_201_a.jpeg

This is what I’m talking about - sweet corn, tomatoes and a delectable focaccia for summer perfection on a sheet pan. Yes!

Even though it’s officially autumn on the calendar, there’s still time to reap summer’s bounty. As a matter of fact, Steve and I have amassed a wonderful stash of sweet corn in the freezer for fall and winter soups, chowders, frittatas, baked corn pudding, cheesy corn muffins and more.

I simply had to give this one a go. Based on the recipe from Melissa Weller’s “A Good Bake”, it’s focaccia with an interesting twist. Whipped cream! Can you believe it??

I’ll go through the steps with you so as to share my experience with the process. If you’re a fan of very detail oriented recipes/instructions, you should put Melissa’s book on your list.

You’ve got the basics of bread making here - flour, water, yeast, salt - put together using my favorite poolish approach.

Make the poolish (blend 120 g bread flour, 1/2 cup room temp water, 1/16 teaspoon instant yeast in a bowl and cover) the evening before so it sits at room temperature overnight for about 12 hours as it “pre”-ferments. You see it below in its bubbly goodness. Let’s hear it for planning ahead, eh?

To make the final dough place 313 g room temperature (70-75ºF) water in the bowl of a stand mixer and add the poolish and 450 g all purpose flour. Mix with the dough hook on low speed for 2-3 minutes. Remove the bowl from the mixer, place a teaspoon/3 g instant yeast and 12 g fine sea salt separately on top of the dough and let sit uncovered for 30 minutes. This allows the dough to autolyse (flour and water have a chance to start developing gluten before introducing the salt and yeast to the mix).

Autolyse step

Autolyse step

Return to the stand mixer with the dough hook, mix on low speed for a couple of minutes then increase to medium speed for three minutes. Remove the dough hook and bowl from the stand, cover the bowl with plastic wrap and let ferment for 2 hours. Turn once half way through.

The following images give you a sense of what’s happening.

Dough at the end of mixing

Dough at the end of mixing

The one hour mark

The one hour mark

End of bulk fermentation

End of bulk fermentation

Focaccia tends to be what I call a rough and tumble sort of dough - I think you can appreciate that in the photos above.

Now it’s time to pan it up! Have a half sheet pan on hand, pour 75 g (5-6 tablespoons) extra-virgin olive oil into it and spread it around evenly with your hands. Another thing about focaccia - LOTS of olive oil!!

Using a bowl scraper, scrape the dough onto the sheet pan in a pile and coat it with oil. Let it rest 20 minutes then proceed with stretching and dimpling it with your fingertips to work it into the corners and edges. It’s fun!

It will start to spring back so give it another 20 minute rest.

First stretch and dimple

First stretch and dimple

Finish stretching and dimpling to get the dough into the corners of the pan. Now set it aside to proof about 45 minutes.

Ready to top!

Ready to top!

Heat the oven to 425ºF. Meanwhile whip 3/4 cup heavy cream to stiff peaks, dollop it onto the dough and gently spread it with an offset spatula.

Cream dolloped

Cream dolloped

Cream spread - oh boy!!

Cream spread - oh boy!!

Let’s assume that any health benefits from the olive oil are pretty much erased by the whipped cream. You gotta live, right?

To top - a pint of small, sweet variety tomatoes, halved and placed over the cream . . . . . .

55261DC8-59F6-43BB-9BE7-8F32837339A4_1_201_a.jpeg

then sprinkle on the kernels cut off of one ear of corn . . . . . .

9550A64A-5B70-4A5A-8EDD-82157FF8AEE2_1_201_a.jpeg

then sprinkle with 1 1/2 teaspoons flaky sea salt, chopped fresh or dried herbs of choice (we use a salt free pizza seasoning mix) and 1/3 cup grated Pecorino Romano.

68FF46AC-26D6-48DF-970F-3058B72E58AF_1_201_a.jpeg

Bake 30-35 minutes until golden brown, rotating the sheet pan 1/2 way through. Remove the focaccia with a large spatula onto a cooling rack.

I’m here to tell you that even with all of that olive oil, there can be some sticking so use some elbow grease and determination if needed to do the deed. I ended up cutting it in the pan and getting the pieces out without too much trouble with the help of my trusty spatula.

We were so eager to try it that I forgot to snap a picture just out of the oven. Oh well.

74D48926-F6CE-4A7D-8929-BBADB6ED70CA_1_201_a.jpeg

This is good stuff! Just the right thickness, chewy and superb with the fresh veggies. We enjoyed it with a simple green salad and cut the rest (save for two pieces) to freeze for later.

The next day for lunch we warmed those two pieces up with an egg on top - about 20-25 minutes in a 350 oven to set the egg then a short broil to lend just the right crunch. Delicious!

F22E4103-9EEE-4560-9EEA-A7802D180A4A_1_201_a.jpeg

Enjoy autumn everyone. It’s my favorite time of year, and I hope you love it too!

Roadside asters

Roadside asters

Vanilla/chocolate dacquoise

vanilla chocolate dacquoise

Here’s a perfect example of taking oft made and familiar components from your repertoire and putting them together for a delicious dessert. It’s a wonderful way to create a layered entremet either from new beginnings or as a means of using a leftover cream or ganache that’s begging to be saved. BTW - the freezer is your friend here.

As a reminder, don’t forget to check out my recipe page where you’ll find some of my favorite base recipes that can be combined as you see fit to make your own version of tastiness.

This one came together after making the mille-feuille aux fraises that I wrote about here. I had enough vanilla crème légère left that I simply couldn’t throw away, so I went with my favorite dacquoise as the base for my creation.

The full dacquoise recipe is intended to be good for a half sheet pan but I wanted only two 16 cm (just a tad over 6 inches) squares so I used 3/4 of a recipe. I’ve shared this trick with you before - place your intended mold/shape on the Silpat and dust confectioner’s sugar over it to give you the outline.

EC9E47B6-6DAA-44E6-973E-662E7D635161.jpeg

Pipe your meringue mixture evenly within the outlines and sprinkle with additional confectioner’s sugar. It’s OK if you’re a little outside the lines - you’ll trim the edges before assembly anyway.

Ready for the oven

Ready for the oven

Bake at 325ºF for about 20-25 minutes until lightly browned.

All baked up!

All baked up!

Let cool. Once cooled, I like to pop the sheet pan into the freezer for 10-15 minutes which allows for easier release from the Silpat.

When ready to assemble, I first neatened up the edges using my 16 cm form as a faux cutter. BTW - never cut with anything sharp on a Silpat. You’ll regret it.

BD70B852-FA40-4F6B-B4EB-82E6C1F992C0_1_201_a.jpeg

Place the 16 cm form on a cake board (I used a cardboard square covered with foil), have your intended cream and any other garnishes at the ready, then set in the first layer of dacquoise.

90C856F6-7568-4E28-A635-A704384C9ACD_1_201_a.jpeg

I proceeded with caramel drizzle topped with chocolate shortbread crumbs . . . . . .

BA0FB448-217D-4791-B678-6539D0DFC666_1_201_a.jpeg

followed by a layer of vanilla crème légère spread evenly. Eyeball the amount of cream you use depending on the height of your form and the other layers you’re planning to add.

My form is 4.5 cm (1.75 inches) high and, since I wanted to leave room for my second dacquoise layer and some whipped ganache, I took my cream about 1/2 way up.

5FAFFA95-D98F-462D-B2ED-34CABEA6AB46_1_201_a.jpeg

Top with the second dacquoise layer and hold in the freezer to firm up a bit before the finale.

45C9A53D-DD16-418F-B42E-86F747AA4ABD_1_201_a.jpeg

For the ganache I used 50 g of Guittard’s 61% Lever du Soleil . . . . .

3748CB81-7E5B-47A8-89EF-1FB7072FB2AB_1_201_a.jpeg

and three times that weight in heavy cream. I knew I didn’t need much and this turned out to be the perfect amount. Of course, if you make more, you can always use the extra for something else, eh?

C1E8FB08-C2F3-4238-B33B-E22B2013675F_1_201_a.jpeg

Make as you would any ganache by boiling the cream, pouring it over the chocolate (chopped if you don’t have it already in discs), and gently blending until smooth. I suggest making this early in the day - it has to chill completely before you whip it. When you’re ready to add it to your entremet, just whip to soft peaks and spread it on top.

Whipped ganache - the best stuff ever

Whipped ganache - the best stuff ever

4D6DDDE4-8FCE-4788-9F40-9DD0AC3DB5B5_1_201_a.jpeg

Place the whole thing in the freezer. Once firm, cover the top with a piece of parchment or waxed paper, pressing down gently to exclude air. Wrap it all in foil or plastic wrap. It can remain in the freezer for some weeks. Mine was frozen for about a month before Steve, my mom, and I enjoyed it for his recent birthday supper.

The day you wish to serve, take it out of the freezer, put it in the fridge for an hour or so, then use a knife warmed in hot water and wiped dry to cut around the edges to loosen the form. Lift off the form then cut into slices of desired size, again using the warmed knife technique. It’s much easier to slice when still semi-frozen and firm.

Hold the portions in the fridge in a covered container where it will continue to thaw and be ready to eat several hours later.

65928896-DE23-4972-8BE9-4ABCF97813A5.jpeg
BC9AEFEE-E90D-4D71-9719-AB8CF684AB7B.jpeg

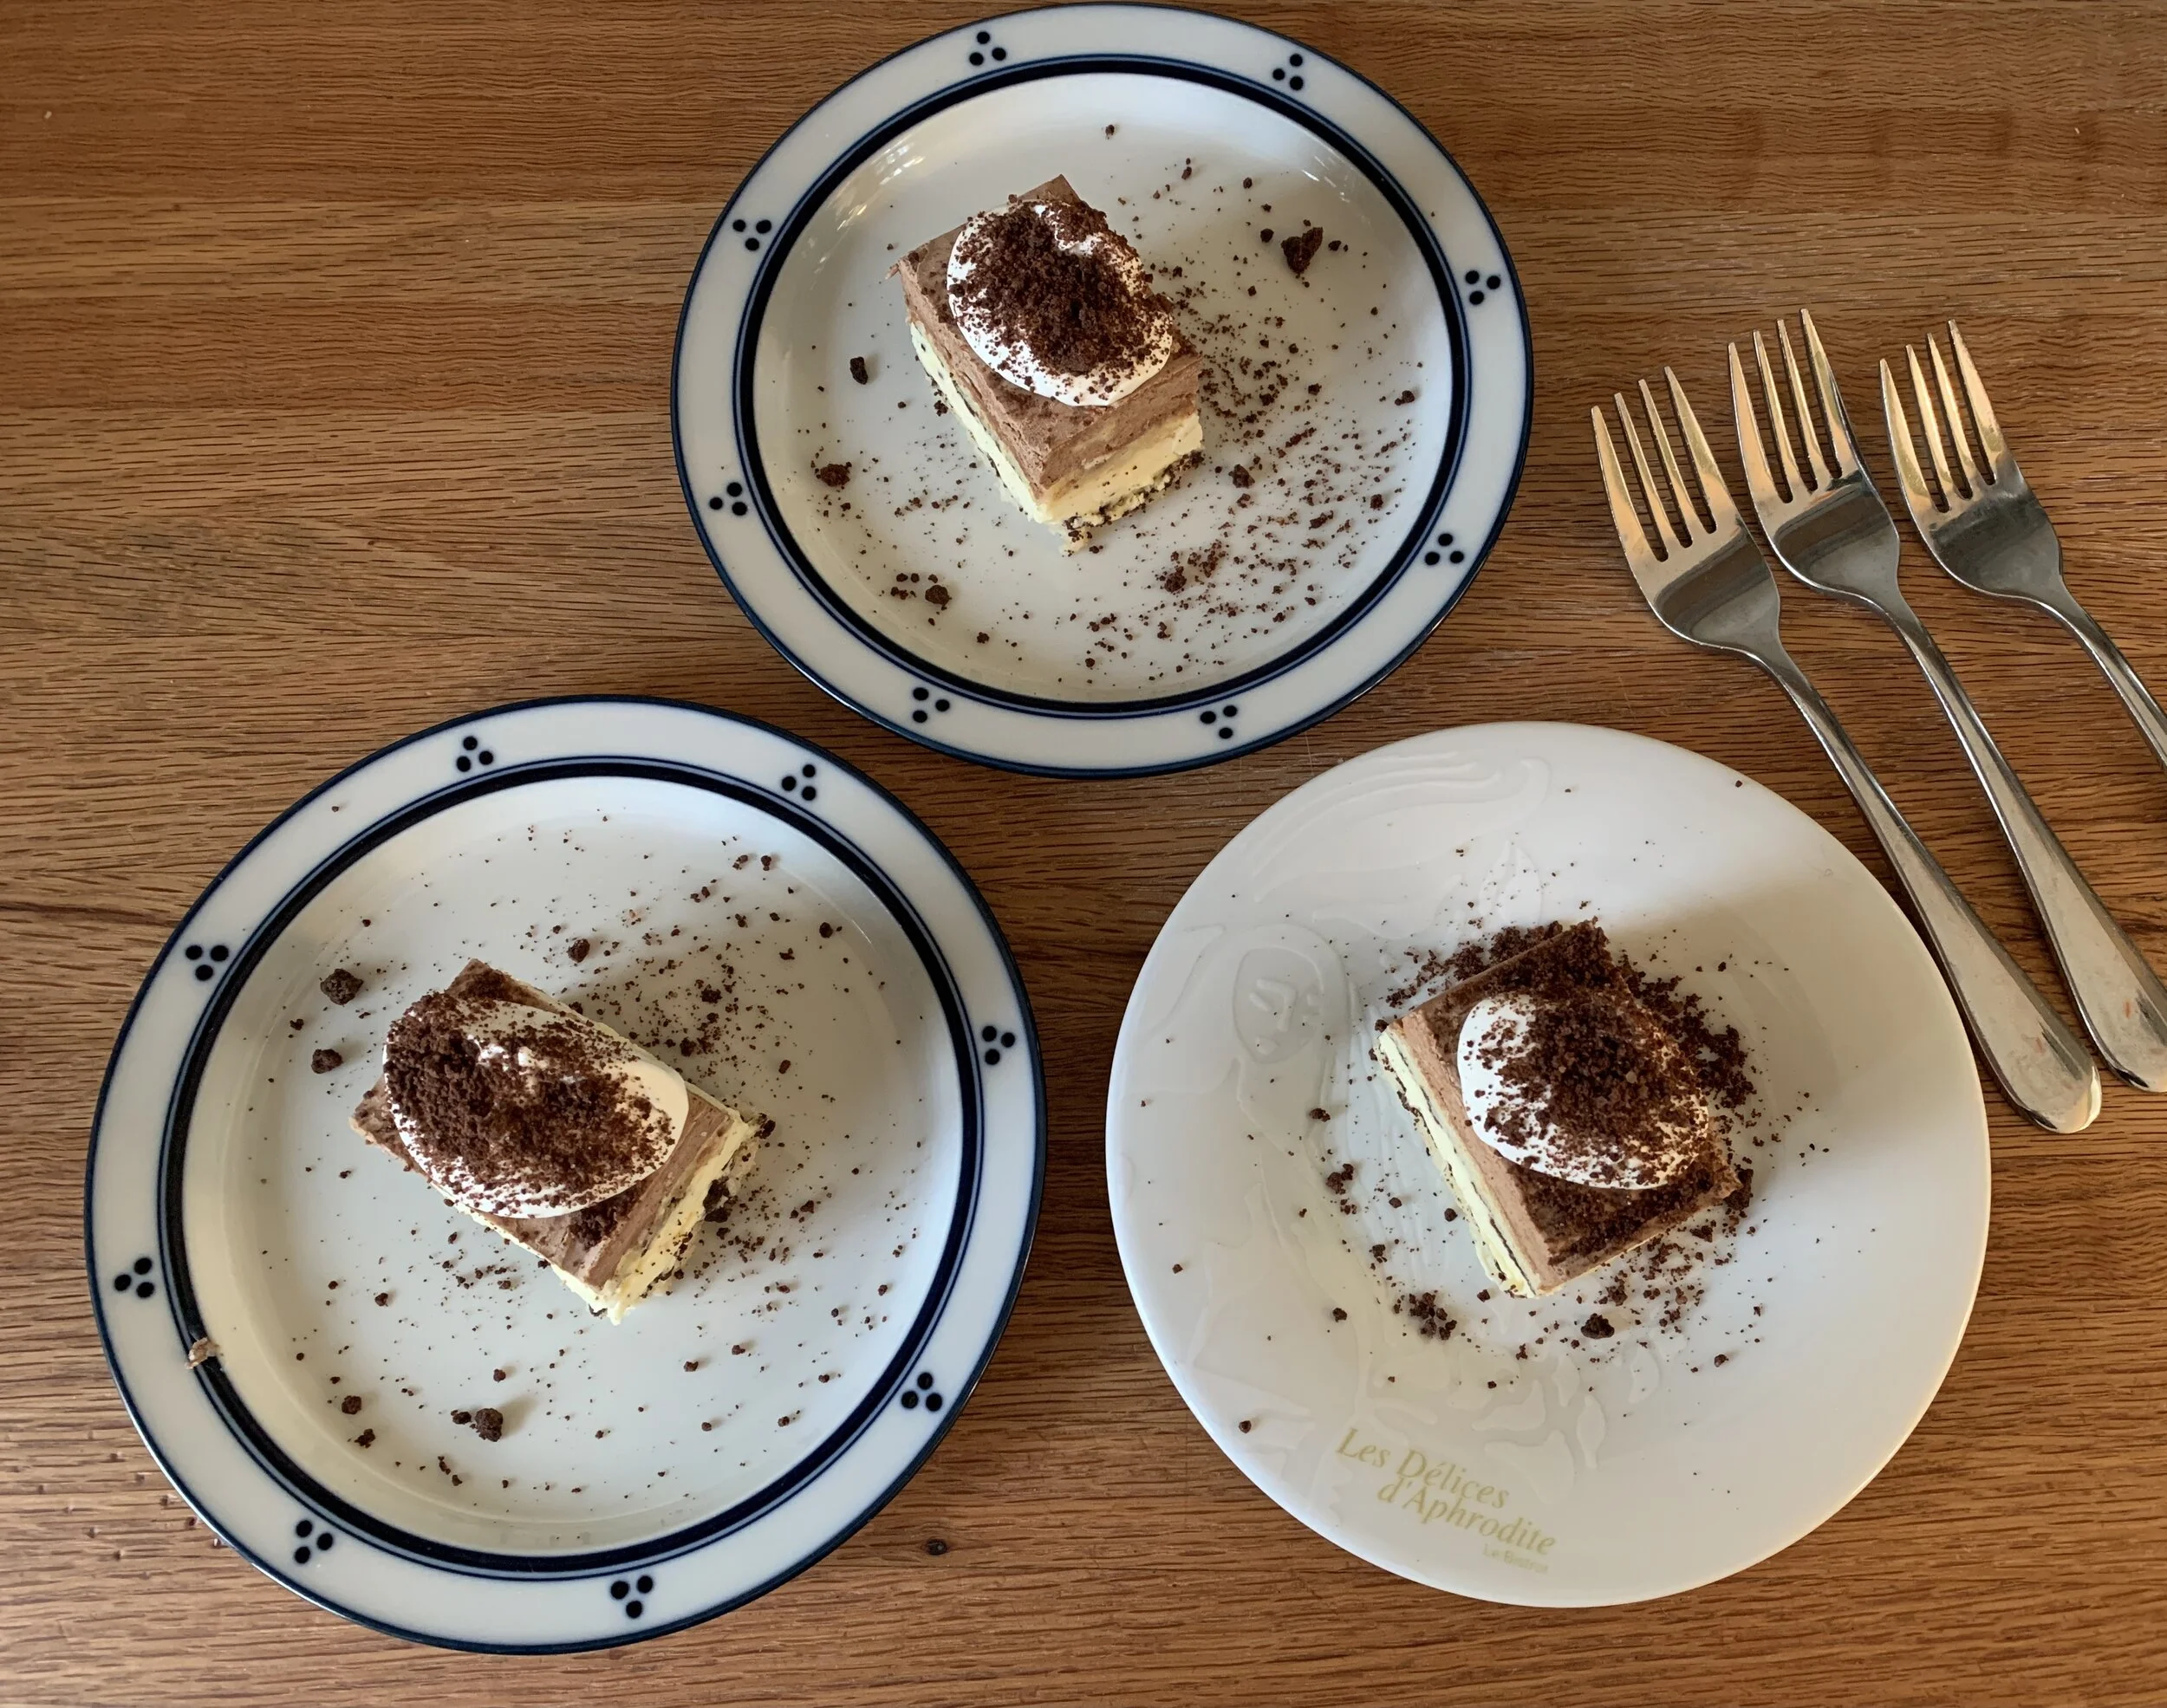
I garnished with a simple dollop of whipped cream and a sprinkle of chocolate crumbs for serving and enjoying.

377BE83C-8210-43B0-B62E-5EE6253FFED3_1_201_a.jpeg
8F6E2689-5CE6-44D2-8167-B9370C20C68E.jpeg

Steve the birthday boy’s conclusion - yum, yum, yum. Oh so light, creamy and smooth, a hint of crunch and the soft slightly chewiness of the meringue layers all made for a memorable dessert (and the leftovers kept for 2-3 days in the fridge!)

Now think about creating your own version of deliciousness. You can do it!

May you have a song in your heart and a spring in your step.

34CC6476-F824-4998-96DE-6BF48B8F2E34.jpeg
Whatever it is, the way you tell your story online can make all the difference.

Victoria sponge

IMG_4556.jpg

Sur La Table is currently offering a “Great British Baking” class on the winter/early spring calendar and I’m on the docket to teach these British specialties.

In addition to sticky toffee pudding and sausage rolls, the classic Victoria sponge cake is on the menu, so why not trial SLT’s recipe along side another one by British chef Will Torrent - just for fun of course!

Chef Torrent has written a number of books, one of which I purchased a year or so ago. It’s chock full of goodies for one of my most enjoyable past times - afternoon tea. His recipe for Victoria sponge is a tad different due to the replacement of about a quarter of the all purpose flour with cornstarch, the result being a lighter texture.

IMG_4534.jpg

I also reviewed a number of other Victoria sponge recipes and found that some call for self-rising flour (or self-raising as the Brits say) which is a softer flour with baking powder and salt already in the mix. Some call for cake flour, another softer flour without any leavening additions. Many simply use all purpose flour. As always, there’s more than one way to skin a cat!

I’m sure many of you know the substitution if you don’t happen to have cake flour in your pantry - place 2 tablespoons cornstarch in a one cup measure, top it off with all purpose flour to yield one cup. Sift it together and voilà! Cake flour.

The base recipe for Vic-sponge is similar to pound cake: equal weights butter, sugar, and flour, plus eggs (usually a bit less by weight), baking powder, salt and vanilla. Many also have a small amount of milk blended in at the end - some give a specific amount, some a range of anywhere from 1-4 tablespoons (depending on the amount of batter/size of the cake). The milk is intended to “slacken” the mixture making it less stiff for spreading evenly in the pan.

This recipe is for a six inch double layer cake. The batter can be baked in ONE buttered/parchment lined/buttered again/floured pan and then sliced into two layers once cooled OR in TWO prepared six inch-ers which takes out the layer slicing step. Just remember the two shallower layers won’t need quite as long to bake.

Note: double the recipe for an 8” cake, either baked in one pan sliced into two layers or two pans with shallower layers ready to assemble.

IMG_4531.JPG

All ingredients should be at room temperature. The differences between the SLT and Torrent recipes are a tad more baking powder in SLT’s and the replacement of about a quarter of the flour with cornstarch in Torrent’s.

Here you go:

Heat your oven to 350ºF. Butter the bottom of your cake pan(s), place a round of parchment down, butter parchment and sides of pan(s) and dust with flour.

Break 2 large (~ 100 g) eggs into a small bowl and lightly beat them. In the bowl of a stand mixer fitted with the paddle attachment, cream 113 g softened unsalted butter with 113 g granulated sugar on medium high for 3-5 minutes until light and fluffy. Scrape down the bowl. Reduce speed to medium low and add 1 teaspoon vanilla extract (or vanilla bean paste) and the lightly beaten egg in three additions, blending fully and scraping down after each addition. On low speed add 113 g all purpose flour (88 g ap + 25 g cornstarch in Torrent’s version), 1.5 teaspoons baking powder (1 tsp in Torrent’s) and 1/4 teaspoon fine sea salt and mix just until combined.

I like to take my bowl right off the mixer and finish things up by hand with a spatula - it helps to get down into the bottom to be sure everything is blended in. Then fold in 1-2 tablespoons whole milk as needed to slacken the mixture. I went with the smaller quantity and both batters came out with a bit of heft, yet nice and smooth and easy to work with.

IMG_4532.JPG

Transfer batter to the prepared pan and smooth the top . Below is SLT’s - they both looked pretty much the same going into the oven.

IMG_4533.jpg

Bake about 25 minutes until springy to touch in the center and a cake tester comes out clean.

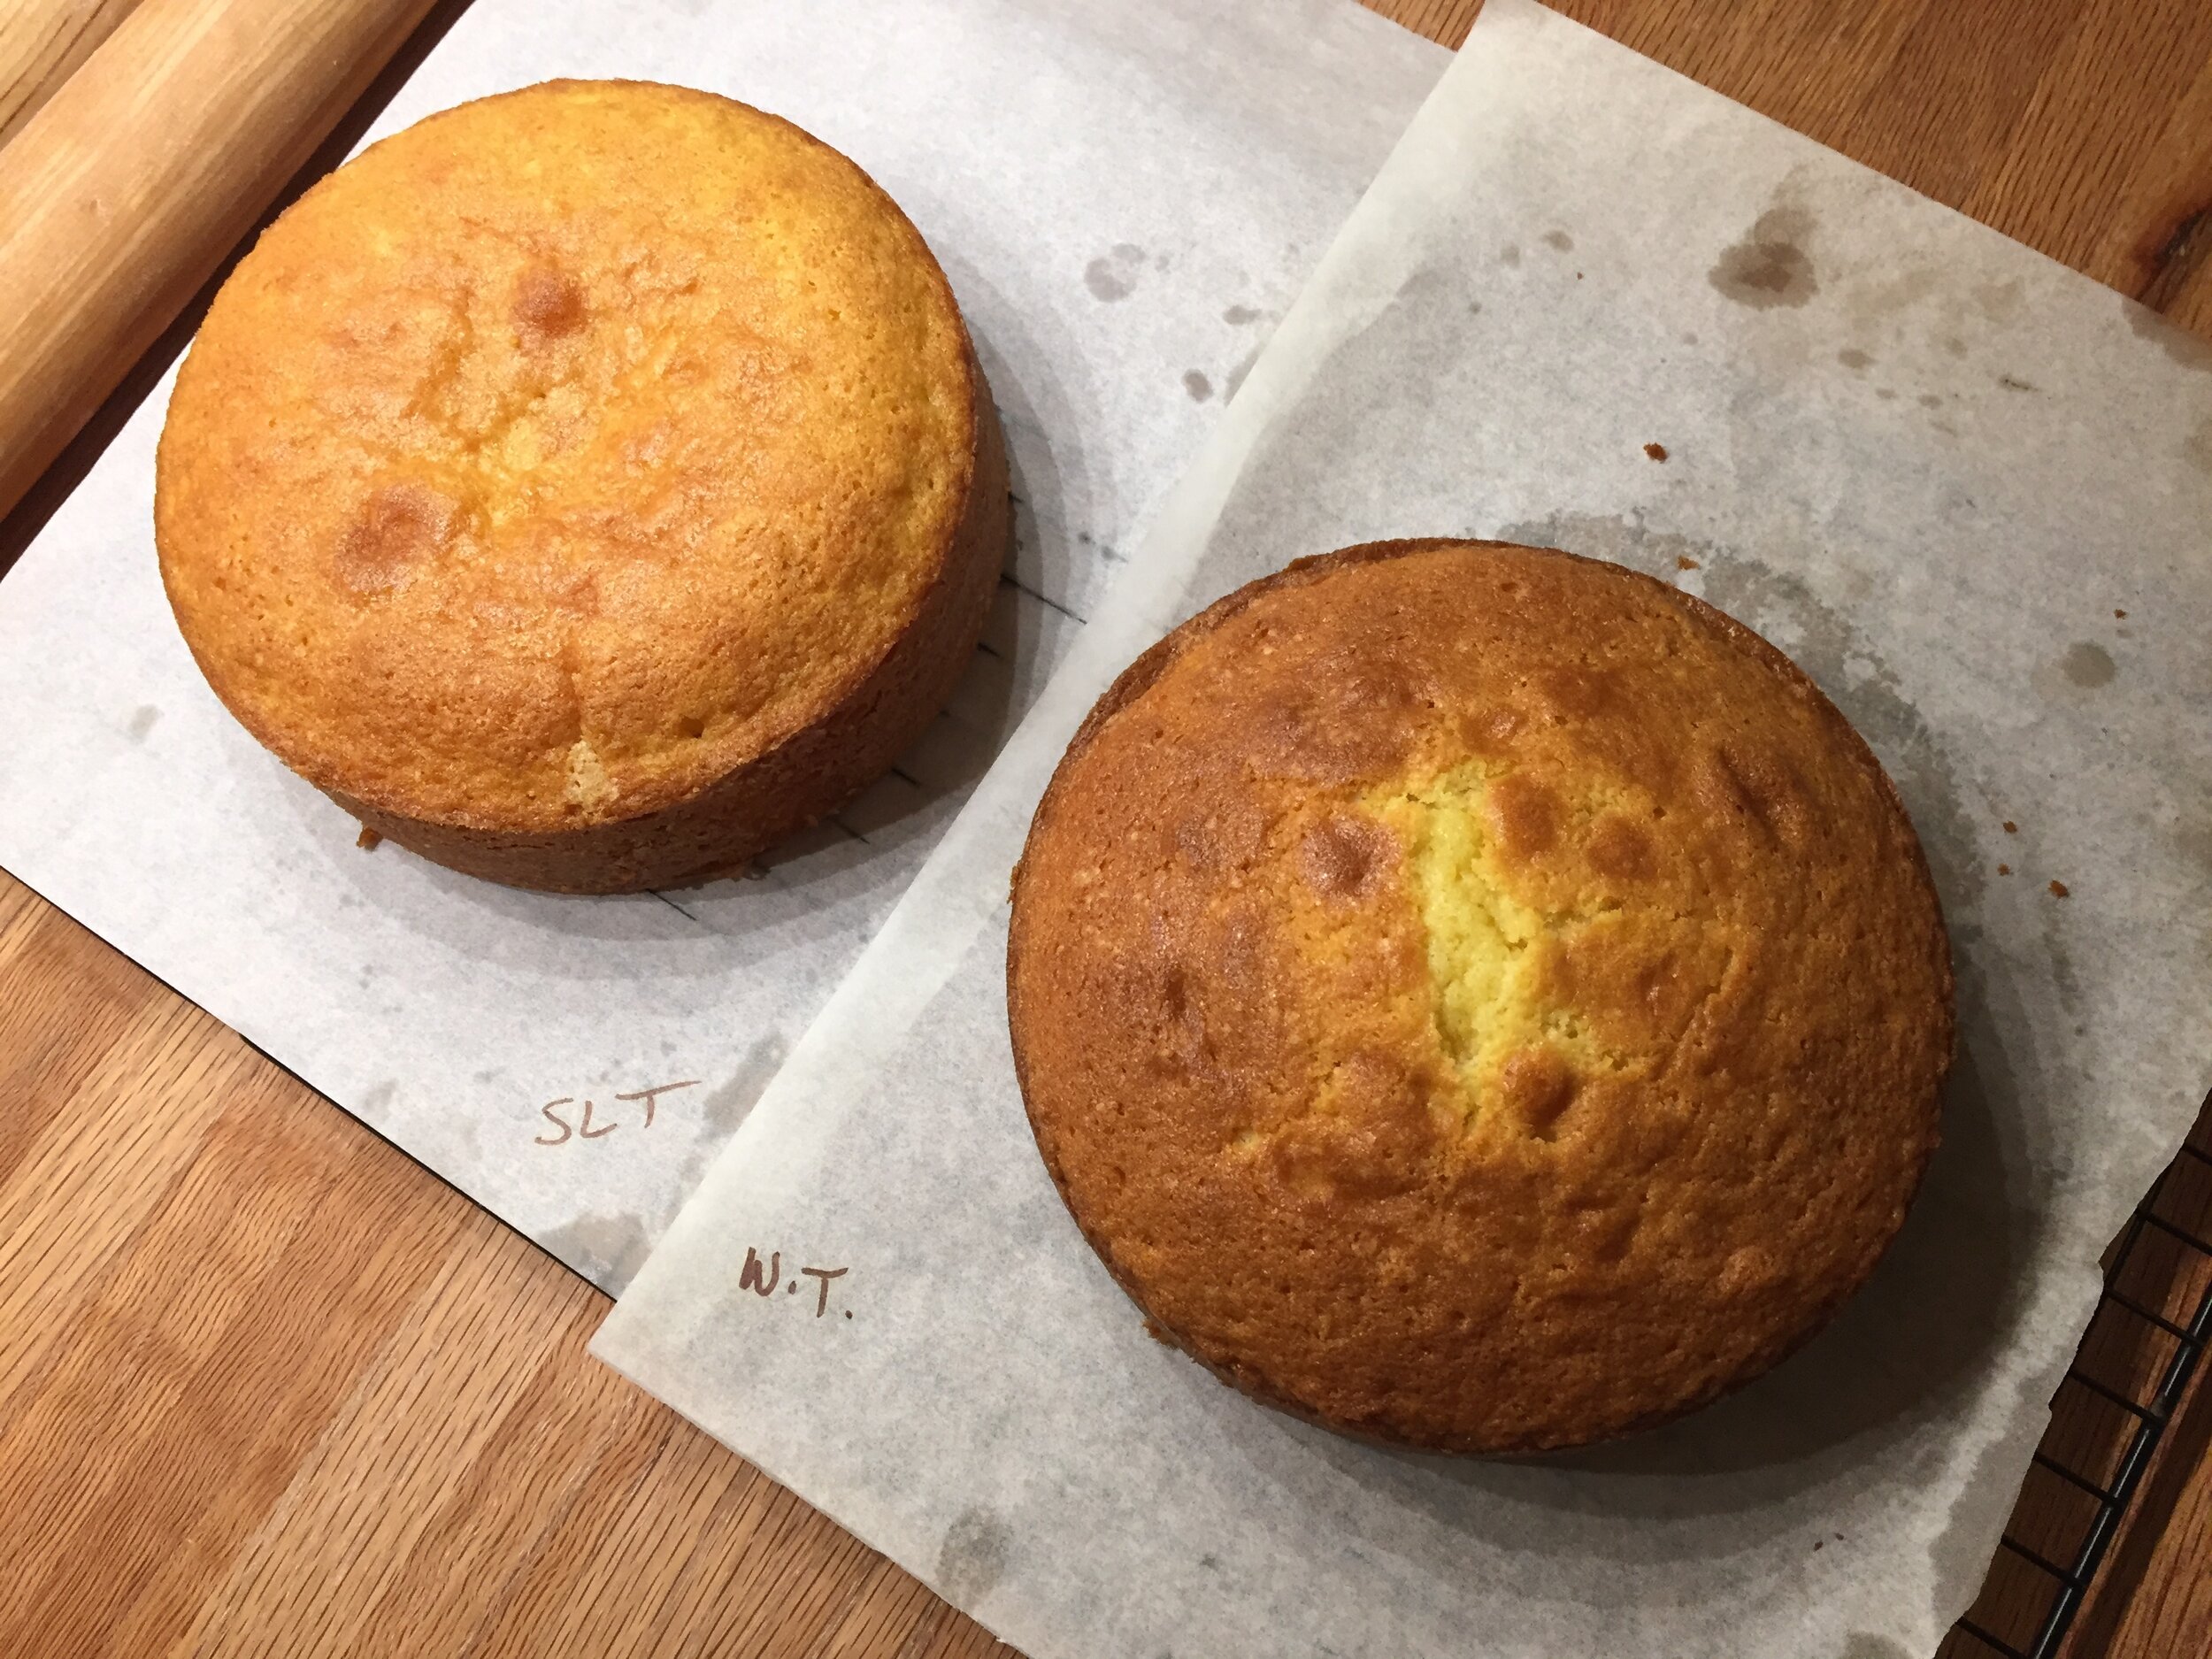
Torrent’s rose into a dome while SLT’s stayed flat with just a bit of a dent in the center. Not to worry.

IMG_4542.JPG

Once cooled, slice into two layers. A little tighter crumb on Torrent’s perhaps.

IMG_4547.jpg

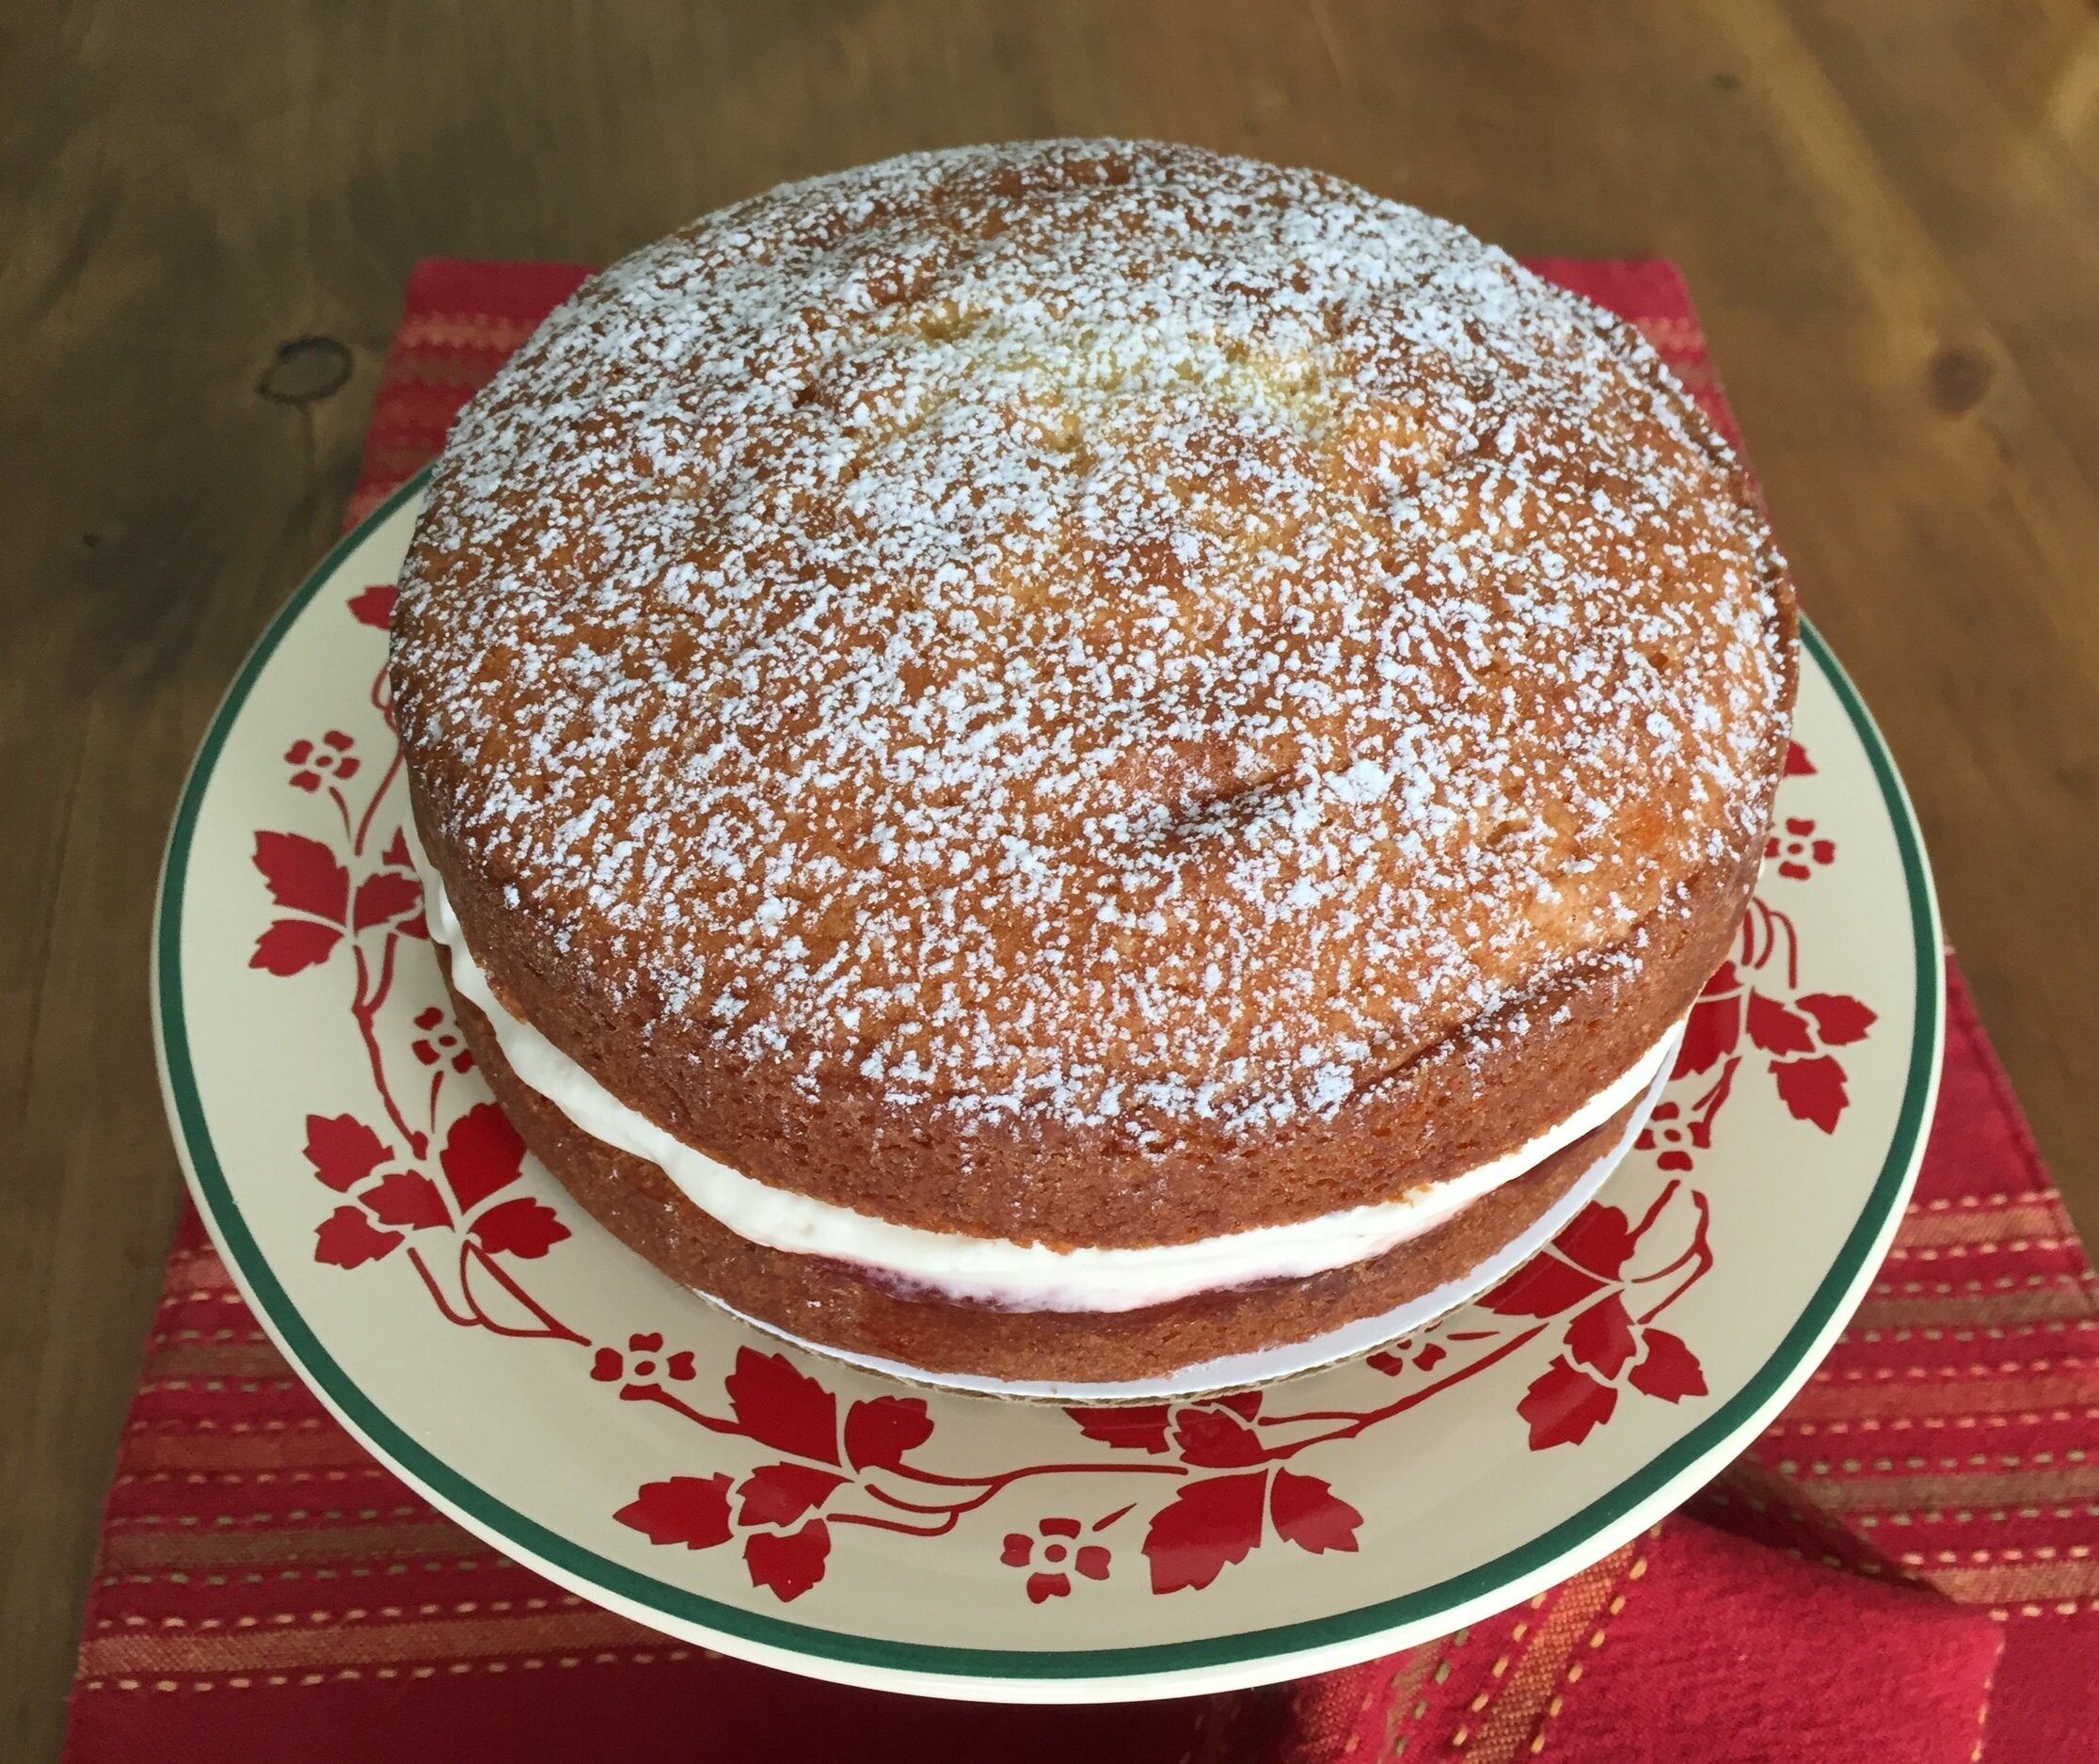
Spread a layer of strawberry (or jam of your choice) on the bottom and then spread a layer of lightly sweetened whipped cream over the jam. Sandwich ‘em up!

IMG_4548.jpg
IMG_4549.JPG

Dust with powdered sugar and you’re good to go!

When slicing you’ll invariably get some cream and jam ooze but it certainly doesn’t affect the flavor. On the right below is Torrent’s more domed version. They both have a nice crumb and golden color.

IMG_4561.jpg

And guess what! They both taste great. What a lovely combo of jam, cream and vanilla cake. Steve and I noted that Torrent’s texture was a bit lighter but not really a huge difference at all.

Store covered in the fridge and enjoy a slice for several days to come. Not bad.

IMG_4562.JPG

Until next time. Stay warm and think spring!

IMG_4555.JPG

Strawberry shortcake

IMG_4051.jpg

Recognizing the fleeting yet delicious strawberry season here in west Michigan I just had to share a little something with you on June’s quintessential summer dessert - strawberry shortcake.

IMG_4045.JPG

What a difference between the often gargantuan looking engineered strawberries that we get from California and the smaller, succulent and so tasty berries from our local growers. Oh my.

California vs. Michigan

California vs. Michigan

Whether you like yours assembled with a crumbly scone/shortcake/biscuit or a wedge of angel food or sponge cake, with lightly sweetened whipped cream or a scoop of chilly ice cream (think vanilla, strawberry or pistachio!), it’s definitely a seasonal favorite.

The spring board for this off-the-cuff post was a shortcake made recently during a teen’s summer culinary camp session at Sur La Table where I teach baking and pastry classes. The recipe is very similar to my usual scone recipe with a couple of tweaks: more cream and no egg. The result, especially warm from the oven, has just the right crispness on the surface and a dense yet light melt-in-your-mouth texture inside. Yum. Yum.

And ya wanna know the cool part? The dough is made in the food processor! I’m here to tell you that I’ve been a staunch “by-hand” scone and flaky pie dough maker for a long time without the need (or desire) for gadgets. Give me a simple dinner fork, bowl scraper, bench scraper, small offset spatula, paring knife, silicone spatula for many dough mixing and bench top projects and I’m in heaven.

Ahhh . . . . but wait. I am now on the best of terms with the food processor for those flaky doughs made with cold cubed butter - quick pulses and voilà! Think your best pâte brisée, quick puff pastry, buttery scones and biscuits - all of ‘em!

IMG_4050.jpg

Here’s the shortcake recipe:
1. Heat the oven to 425ºF. Have a parchment lined sheet pan ready.
2. Cube 113 g (1 stick/4 ounces) cold unsalted butter and hold it in the freezer until ready to mix.
3. Have one cup of cold heavy cream standing by in the fridge.
4. Place 260 g (2 cups) all purpose flour (or 60 g whole wheat pastry flour + 200 g a.p. flour), 50 g (1/4 cup) sugar, 8 g (2.5 teaspoons) baking powder and 1/4 teaspoon fine sea salt in the bowl of a food processor. Pulse it a couple of times to mix.
5. Add the cold cubed butter and pulse briefly several times to break it up - you WANT pea to pecan-half size pieces of butter left!
6. Add the cream and pulse again briefly several times just until the dough comes together.
Turn the mixture out onto a lightly floured surface and lightly squeeze any clumps together. Don’t overwork. Form a 4”x8” rectangle and cut 8 squares.
7. Place the squares on the prepared sheet pan, brush tops with cream and sprinkle with coarse sugar. Place the sheet in the freezer for 10-15 minutes then bake about 15 minutes until the tops are golden brown.
8. Cool or serve still slightly warm with fresh strawberries and whipped cream or ice cream of choice.

Either split your shortcake/fill it/cap it and top with berries and cream or simply leave it whole and pile on the goods, it’s up to you. You can even chunk it up in a bowl and crown it with creamy, fruity goodness. Any way you do it, it’s superb!

IMG_4052.jpg
IMG_4058.jpg

Here’s to lots more summer berries. Enjoy!