Baking with rye flour: cookies two ways

Hi! The days continue to fly by! It’s been awhile since I’ve posted but I have a few drafts in the hopper on projects I accomplished during the cooler weeks of late spring/summer. I’ve worked on them helter-skelter without giving myself enough time to finish and publish them.

In the coming weeks I hope to share a citrus yogurt olive oil loaf cake, maple blueberry almond butter cakes, a classic plum torte and the second topic in my recently launched FAVE series - pots de crème. Leaning more toward simple and delicious cakes seems more appropriate for warm summer days, especially when fresh local fruits are teeming at the farmers markets. It’s best to leave the laminated dough and flaky pâte brisée for the cooler months.

Summer plum torte

My days are peppered with regular exercising, admiring late summer flowers along the paths, recipe writing and organization, planning for autumn classes through our local school district’s adult enrichment program, looking into a couple of small home improvement projects, hosting family, celebrating birthdays (including Mom’s 97th!) and anniversaries, along with a grand cousins’ reunion to boot. That’s summer for ya!

Classic summer - black eyed susans!

Enough of all that. Let’s talk rye!

On a late spring trip up to Traverse City to met up with friends Patty and Paul, we enjoyed a variety of food and wine adventures. One was a visit to Farm Club, a calming and beautiful spot in the countryside outside TC. A blend of restaurant, brewery, farm gardens and market, it’s an enjoyable way to spend a couple of hours on a beautiful afternoon no matter the season. We happened to be there over the Memorial Day weekend, enjoying a delicious lunch and taking advantage of a bit of shopping in their eclectic market.

Bags of recently milled rye flour on the shelf caught my eye and so it was that I came home with one of said bags. Although the staff there that day couldn’t give me the particulars as to whether it was dark, medium or light rye, I wanted to see what I might do with it once back in Grand Rapids.

I compared it with the stone ground dark rye from Bob’s Red Mill that I’ve been using for awhile and found it to be a whole grain, coarser grind with bran, germ and endosperm clearly visible.

For some time now I’ve been incorporating rye flour into some of my breads, rolls, tart doughs, puff pastry and cake batters, seeing how it marries with all purpose, whole wheat, spelt and nut flours. So far I enjoy the deeper, nutty taste it imparts. Rye is lower in gluten than wheat flours so the two are often combined to give that just right texture and somewhat earthy flavor that one might be looking for in their baked goods. Plus rye has some nutritional benefits - better control of blood sugar, high dietary fiber, some help with cholesterol reduction and it contains important B-vitamins and certain minerals like magnesium, iron and potassium.

My goal this time around is to share a couple of rye chocolate chunk cookie recipes. The steps are familiar to many since both of these are made very much like a standard chocolate chip cookie.

If you prefer not to scroll through the post (I know I do go on and on sometimes), here’s the link to recipe one using both rye and all purpose flour, chopped chocolate and dried tart cherries; the cookies are toasty blond (header photo) like many chocolate chip cookies. Recipe two uses all rye flour and contains cocoa powder to give the cookies a through and through chocolate look.

First up - this one is based on a recipe from Mokonuts, a cafe/bakery in Paris’ 11th arr. which I learned about from Dorie Greenspan, the prolific cookbook author and Paris guru that I’ve admired for many years. I made these once a while back and have been wanting to revisit them. How about now?!

Mokonuts makes them with dried cranberries but I went with Michigan dried cherries, typically a staple in my baking cupboard. Chocolate chunks and poppy seeds add to the interesting mix. Here’s the recipe with the mise below. A picture says a thousand words.

All mised up

The plan ahead prep includes cubing 140 g / 5 ounces unsalted butter which should be at cool room temp and chopping 113 g / 4 ounces of chocolate. My cherries needed a little pick me up so I soaked them in hot water for a bit then drained them and paper toweled dry. I like my cookies on the small side so I snipped the cherries into smaller bits.

I used a combo of the Bob’s Red Mill dark rye and the Farm Club whole grain rye along with all purpose. Here’s the familiar cookie drill: dry ingredients whisked together in a separate bowl; butter and sugars creamed in the mixer; egg blended in; dry ingredients blended in then add cherries, chocolate and poppy seeds.

For awhile now there’s been a much greater emphasis in the cookie world on refrigerating cookie dough overnight for a more chewy yet crispy end result. That’s the case here. Scoop out your chosen portions and store them in the fridge overnight in a covered container or on a parchment lined sheet pan covered with plastic wrap. You can store them close together then spread them out for baking. I used a 25 g volume scoop for a not too huge end result and my yield was 34 cookies.

The dough should remain cold until ready to bake so get your oven heating to 425ºF and when it’s ready, space your cold dough balls about 2 inches apart and pop ‘em in the oven!


Bake one sheet at a time. If you only have one sheet pan, make sure it’s completely cool and the dough cold before baking the second round. Bake about 10 minutes, remove from the oven and tap the tops lightly with a small spatula. Let them rest a few minutes then transfer to a cooling rack.

Et voilà

Yum! Nicely crisp with a center chew and the chocolate/cherry combo is divine. Yes.


As if you haven’t had enough yet, the second recipe is from Brontë Aurell’s book “Brontë at Home”, this one using cocoa powder blended in with the dry ingredients to yield an obviously chocolate end result.

All mised up

For the prep, coarsely chop 100 g / 2/3 cup chocolate - I used my Guittard 61% discs - OR use either milk or dark chocolate chips. Melt 150 g / 11 tablespoons unsalted butter and set aside to cool. Blend dry ingredients (rye flour, cocoa powder, baking soda, salt) in a separate bowl. I used solely the Farm Club whole grain rye flour for this one. Mise out both brown and granulated sugars in a small bowl. One egg plus one yolk, 2 tablespoons of milk and 1 teaspoon vanilla extract round out the roster. If you prefer, scrape the seeds of one vanilla bean into your dry ingredients. Don’t forget to save that pod!! Let it dry and pop it into a container of granulated sugar.

This dough is wetter than the first and also needs a chill. In this case, wrap it as one in plastic wrap and refrigerate a few hours or overnight. The chilled dough is much easier to scoop out the next day.


I opted for two different sizes, one using my smallest one tablespoon scoop, each weighing in at 15 g. My next size up scoop is slightly less than 2 tablespoons and those weighed in ~ 25 g. I simply wanted to see how each baked up.


Answer - pretty much the same, apart from size. They bake about 8-10 minutes at 375ºF/190ºC. My yield: 18 of the 25 g; 24 of the 15 g. If making all the 25 g size, the yield should be around 33 cookies.


I like these! An interesting whole grain chew with a nutty hint, just the right cocoa-ness and not too sweet. Steve liked ‘em too!


I admit I’d give the cherry chocolate chunk version higher marks but both of these cookies have qualities many will enjoy. While cookies are always best freshly baked, both versions keep in a covered container over 2-3 days. But my go to method is freezing them in ziptop bags and popping a few out when the craving hits. They’re delicious cold!

Enjoy the remaining summer everyone and have fun! Autumn is just around the corner.

Brioche feuilletée revisited - chocolate hazelnut braid

IMG_0825.jpg

I would never have imagined that the most viewed post on this blog would be Brioche feuilletée, written back in November, 2016. I launched that project by tweaking the brioche recipe from a Le Notre Paris class I attended in September of that year. Reducing the butter in the base dough, adding a butter block and putting it through three 3-folds yielded a lovely laminated result.

Since then, as is my wont, I’ve reviewed a number of additional brioche recipes and techniques from the likes of Dorie Greenspan and Jeffrey Hamelman (of King Arthur Flour fame) and developed a new version of the base dough in November, 2018. The dough can be used for any brioche option you wish - Nanterre, brioche à tête, coffee cake, cinnamon buns or brioche rolls topped with pastry cream/jam/fruit. Lots of choices.

In this recipe PDF I go into more details about brioche, adjusting the recipe to yield either a leaner or an even richer dough plus some options for laminating the dough. So many possibilities.

It helps me to assess a brioche recipe by looking at the butter to flour ratio. A medium brioche dough typically contains butter that is about 50% the weight of the flour. Brioche can run from lean (where the butter may be as low as 25% of the flour) or rich where the butter can be all the way up to 100% of the flour.

The full batch of the base brioche dough (before adding any butter block/laminations) yields about 1300 g (2.8 lbs) of dough. So you can make the full batch and then separate out the 600 g for this braided two loaf project. Wrap and freeze the remaining dough for later or use it for other projects you might have up your sleeve.

Using Hamelman’s guidelines for these braided delights, I laminated 600 g of the base dough with an additional 120 g/4.25 ounces of butter which, by my calculations gave the final result a butter to flour ratio of 1:1. Now THAT’S a rich brioche! Remember - this makes TWO braids.

IMG_0829.jpg

Let’s do a quick review on laminating the dough - it never hurts, since the more you do it, the more it becomes second nature.

Roll the dough out to a 6”x12” rectangle. Have a 6” butter block ready - it should be cool and malleable.

IMG_0796.jpg

Place the butter on half of the dough . . . . . .

IMG_0797.jpg

then fold the dough over the butter, pinching the edges closed to fully envelope the dough. This is the beurrage.

IMG_0798.jpg

If your kitchen is pretty warm or your dough and butter seem warm and starting to squish, wrap it up and refrigerate for 30 minutes before proceeding. Now roll the dough out to about 18” long and 6” wide, always with the short side parallel to the work surface and rolling to and from yourself (not sideways) to achieve the length. Do a 4-fold (book fold) by bringing each short end into the middle with edges meeting . . . . . .

IMG_0799.jpg

then fold it on itself.

IMG_0800.jpg

Wrap and chill the dough for 30 minutes to allow it to relax then proceed with a 3-fold (business letter fold). Before rolling remember to turn the dough 90 degrees so the “spine” or fold is on your left then roll out to approximately 18”x6” again, rolling to/from yourself. Don’t get hung up on exact measurements - you’re going for about three times length to width.

IMG_0807.jpg

Visualizing the dough in thirds, fold one end up . . . . . .

IMG_0808.jpg

and the other down over it. Congrats! Your laminated dough is complete.

IMG_0809.jpg

Now wrap it snugly and refrigerate for a good 1-2 hours to let it relax and firm up before rolling it out for your intended purpose.

For this braid project I divided the dough in half - look at those buttery layers!

IMG_0814.JPG

Each half of the laminated version weighs about 360 g (before filling) and is good for a medium loaf pan size braid.

I created a chocolate hazelnut filling by taking 200 g of a hazelnut remonce mixture I had left from this hazelnut/almond couronne project and adding 50 g / ~2 ounces of Nocciola crema and a bit of egg white and simple syrup to loosen it a bit for piping.

IMG_0803.JPG
IMG_0802.JPG

Butter two medium (8”x4”) loaf pans and have the filling ready in a piping bag.

On a lightly floured surface roll one half of the dough into a 10”x10” square and divide it in three strips.

IMG_0815.jpg

Egg wash (I used egg white since I had some on hand) along one long edge of each strip then pipe a line of filling along the opposite edge.

IMG_0816.jpg

Roll each strip up into a log and press the edge to seal.

IMG_0817.jpg

With seam sides down do a classic three strand braid.

IMG_0818.jpg

As you come to the end of the braid, just tuck the ends under then pop it into a buttered loaf pan.

IMG_0819.jpg

Repeat the steps with the second half of the dough.

Cover the pans with buttered plastic wrap and let rise for a good 1.5 hours. Toward the end of that proofing time heat the oven to 375ºF.

IMG_0821.JPG

Brush the loaves with egg wash and bake about 35 minutes until nicely golden.

IMG_0823.jpg

Remove them from the pans and, if you’d like to gussy them up a bit, brush with either some simple syrup or apricot glaze for a bit of shine and even go another step and drizzle on a confectioner’s sugar/milk/vanilla glaze. I left mine au naturel.

IMG_0825.jpg

Once cooled, I sliced into one of these babies. Oooooh - buttery with just the right swirl of choco-hazelnut and pretty darn delicious to boot. Nothing like a good brioche, eh?

IMG_0831.JPG

I love the feel of dough, the shaping, the proofing, the baking, the aromas and, of course, the tasting! Dough reigns!!

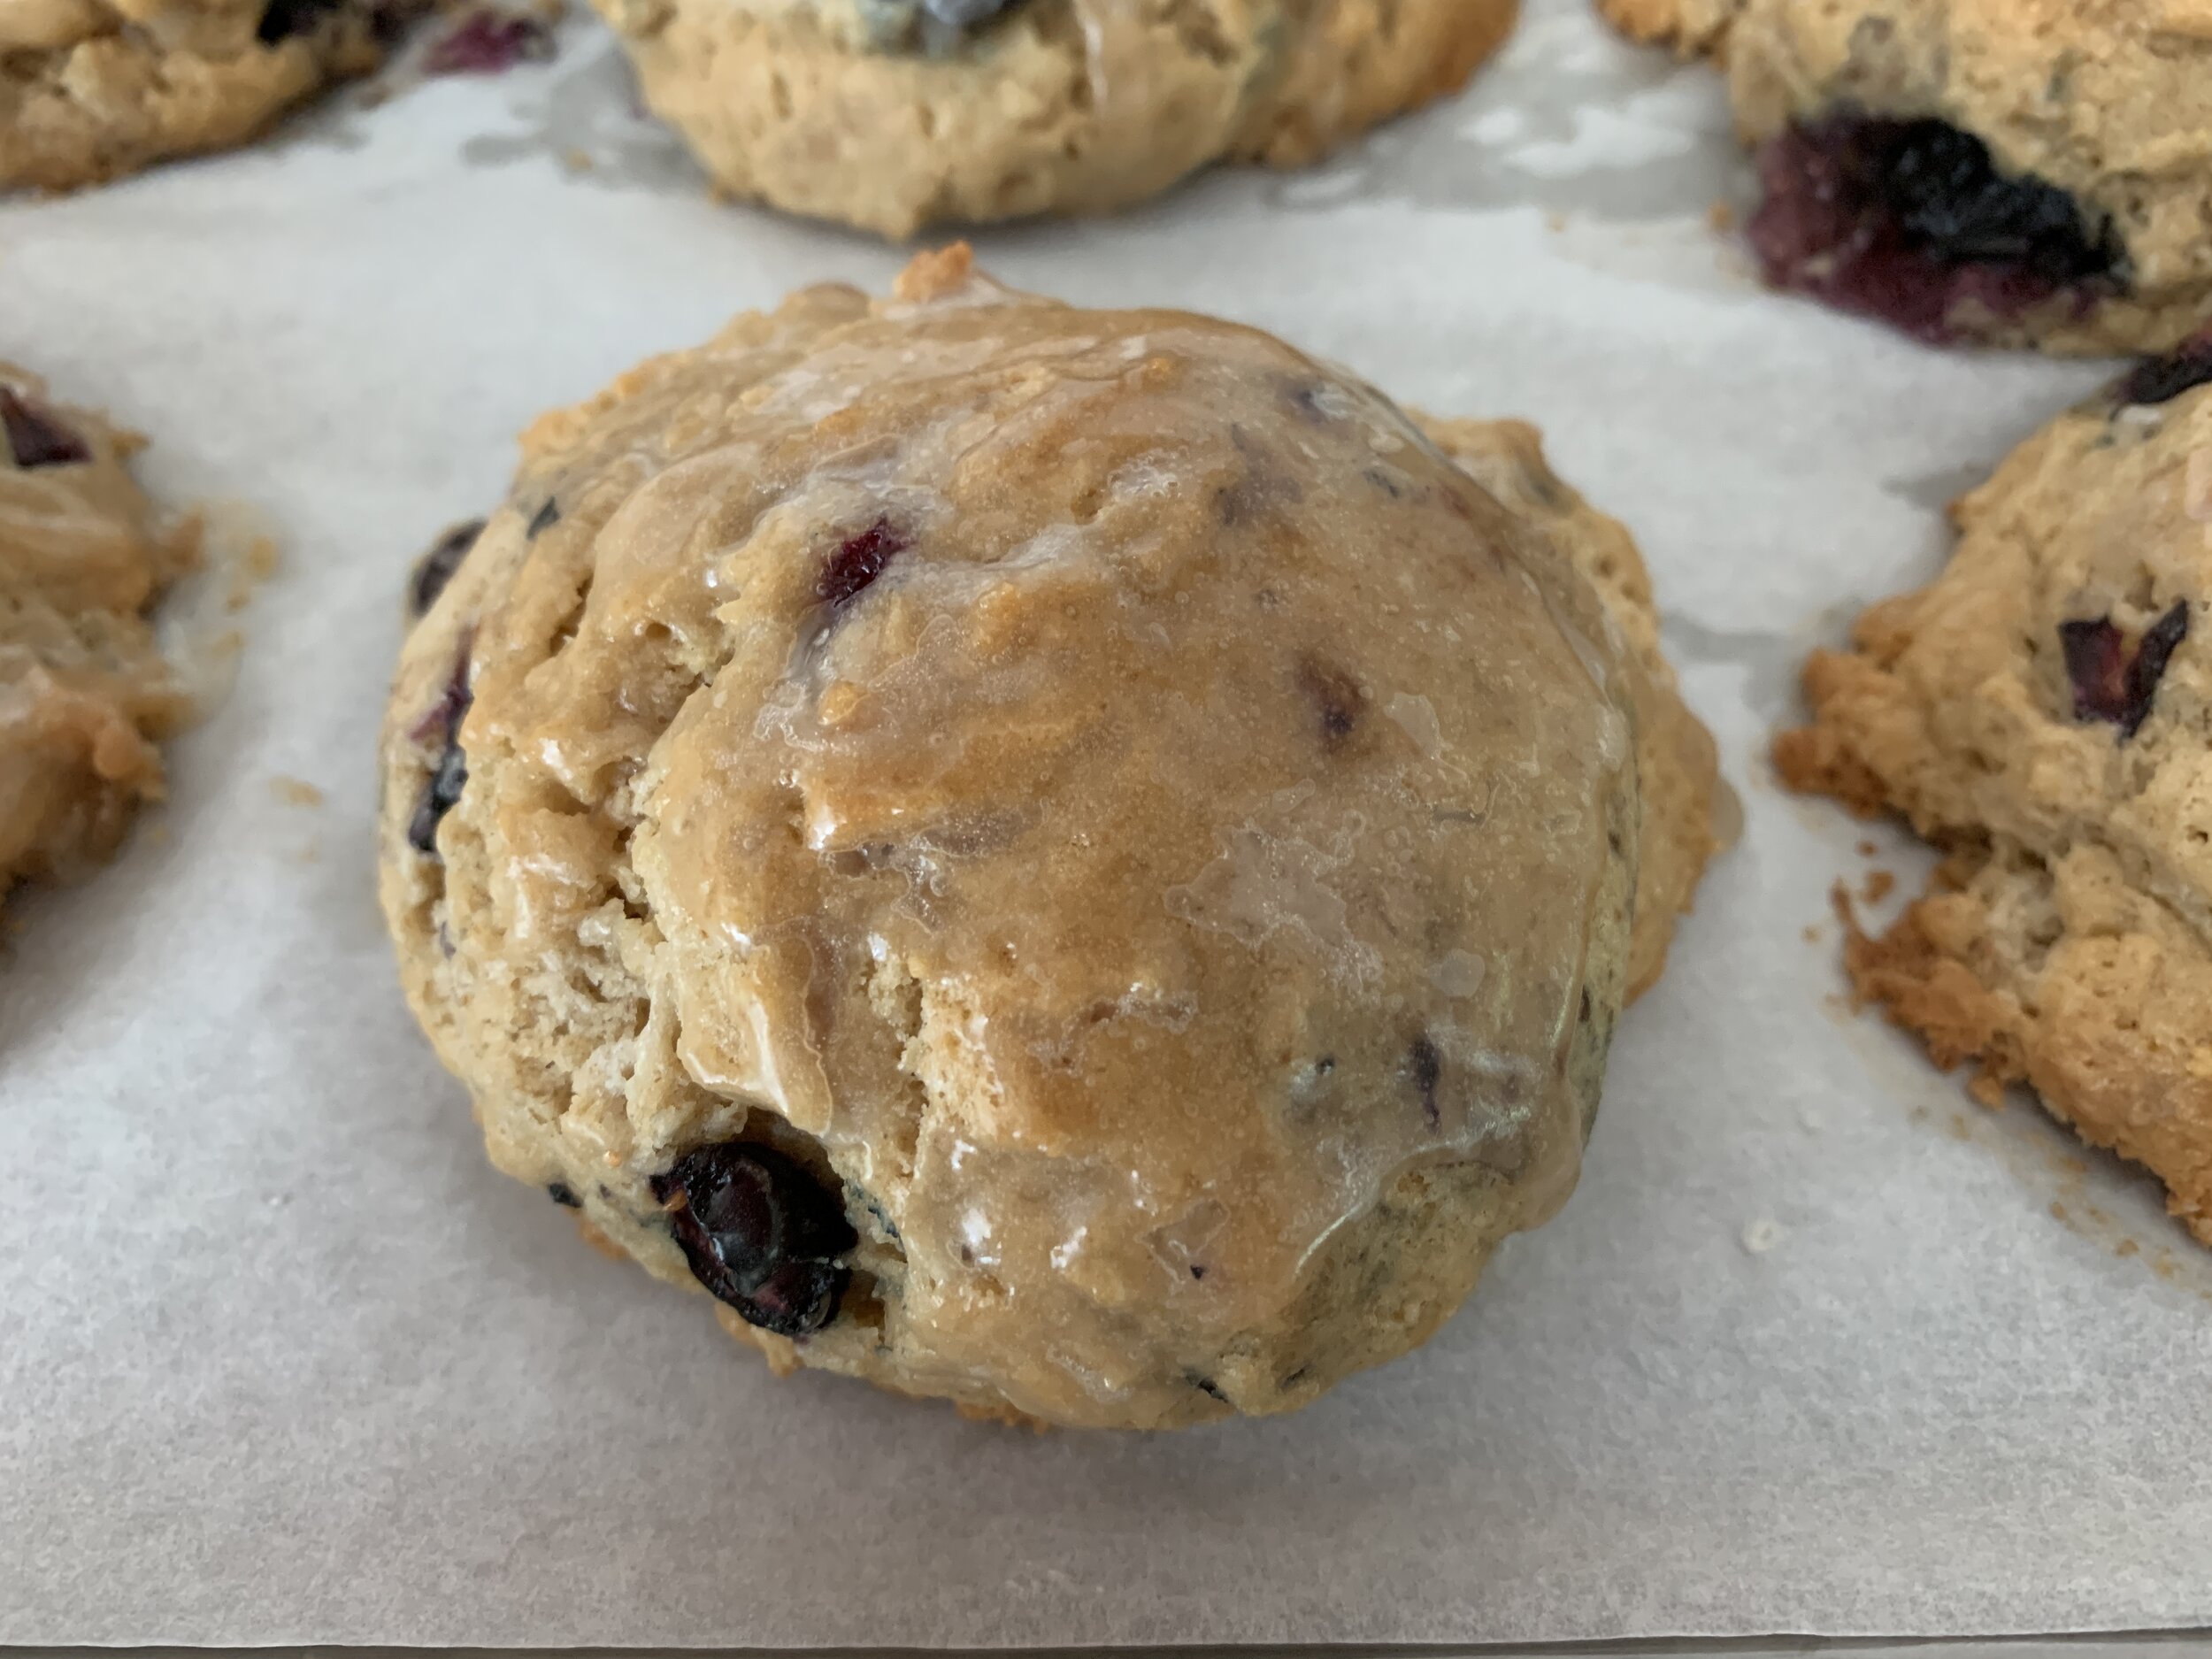
Maple glazed blueberry drop scones

IMG_1295.JPG

I originally included this blueberry drop scone review in my recent “Puttering in the kitchen in August” post but, after consideration and Steve’s helpful encouragement, I’ve broken it out into it’s own post. Enjoy my discoveries on these tasty treats!

IMG_1298.JPG

I’ve now made these scones THREE times since discovering Dorie Greenspan’s NYT article on Joanne Chang’s recipe. Print it out for your own to-do list!

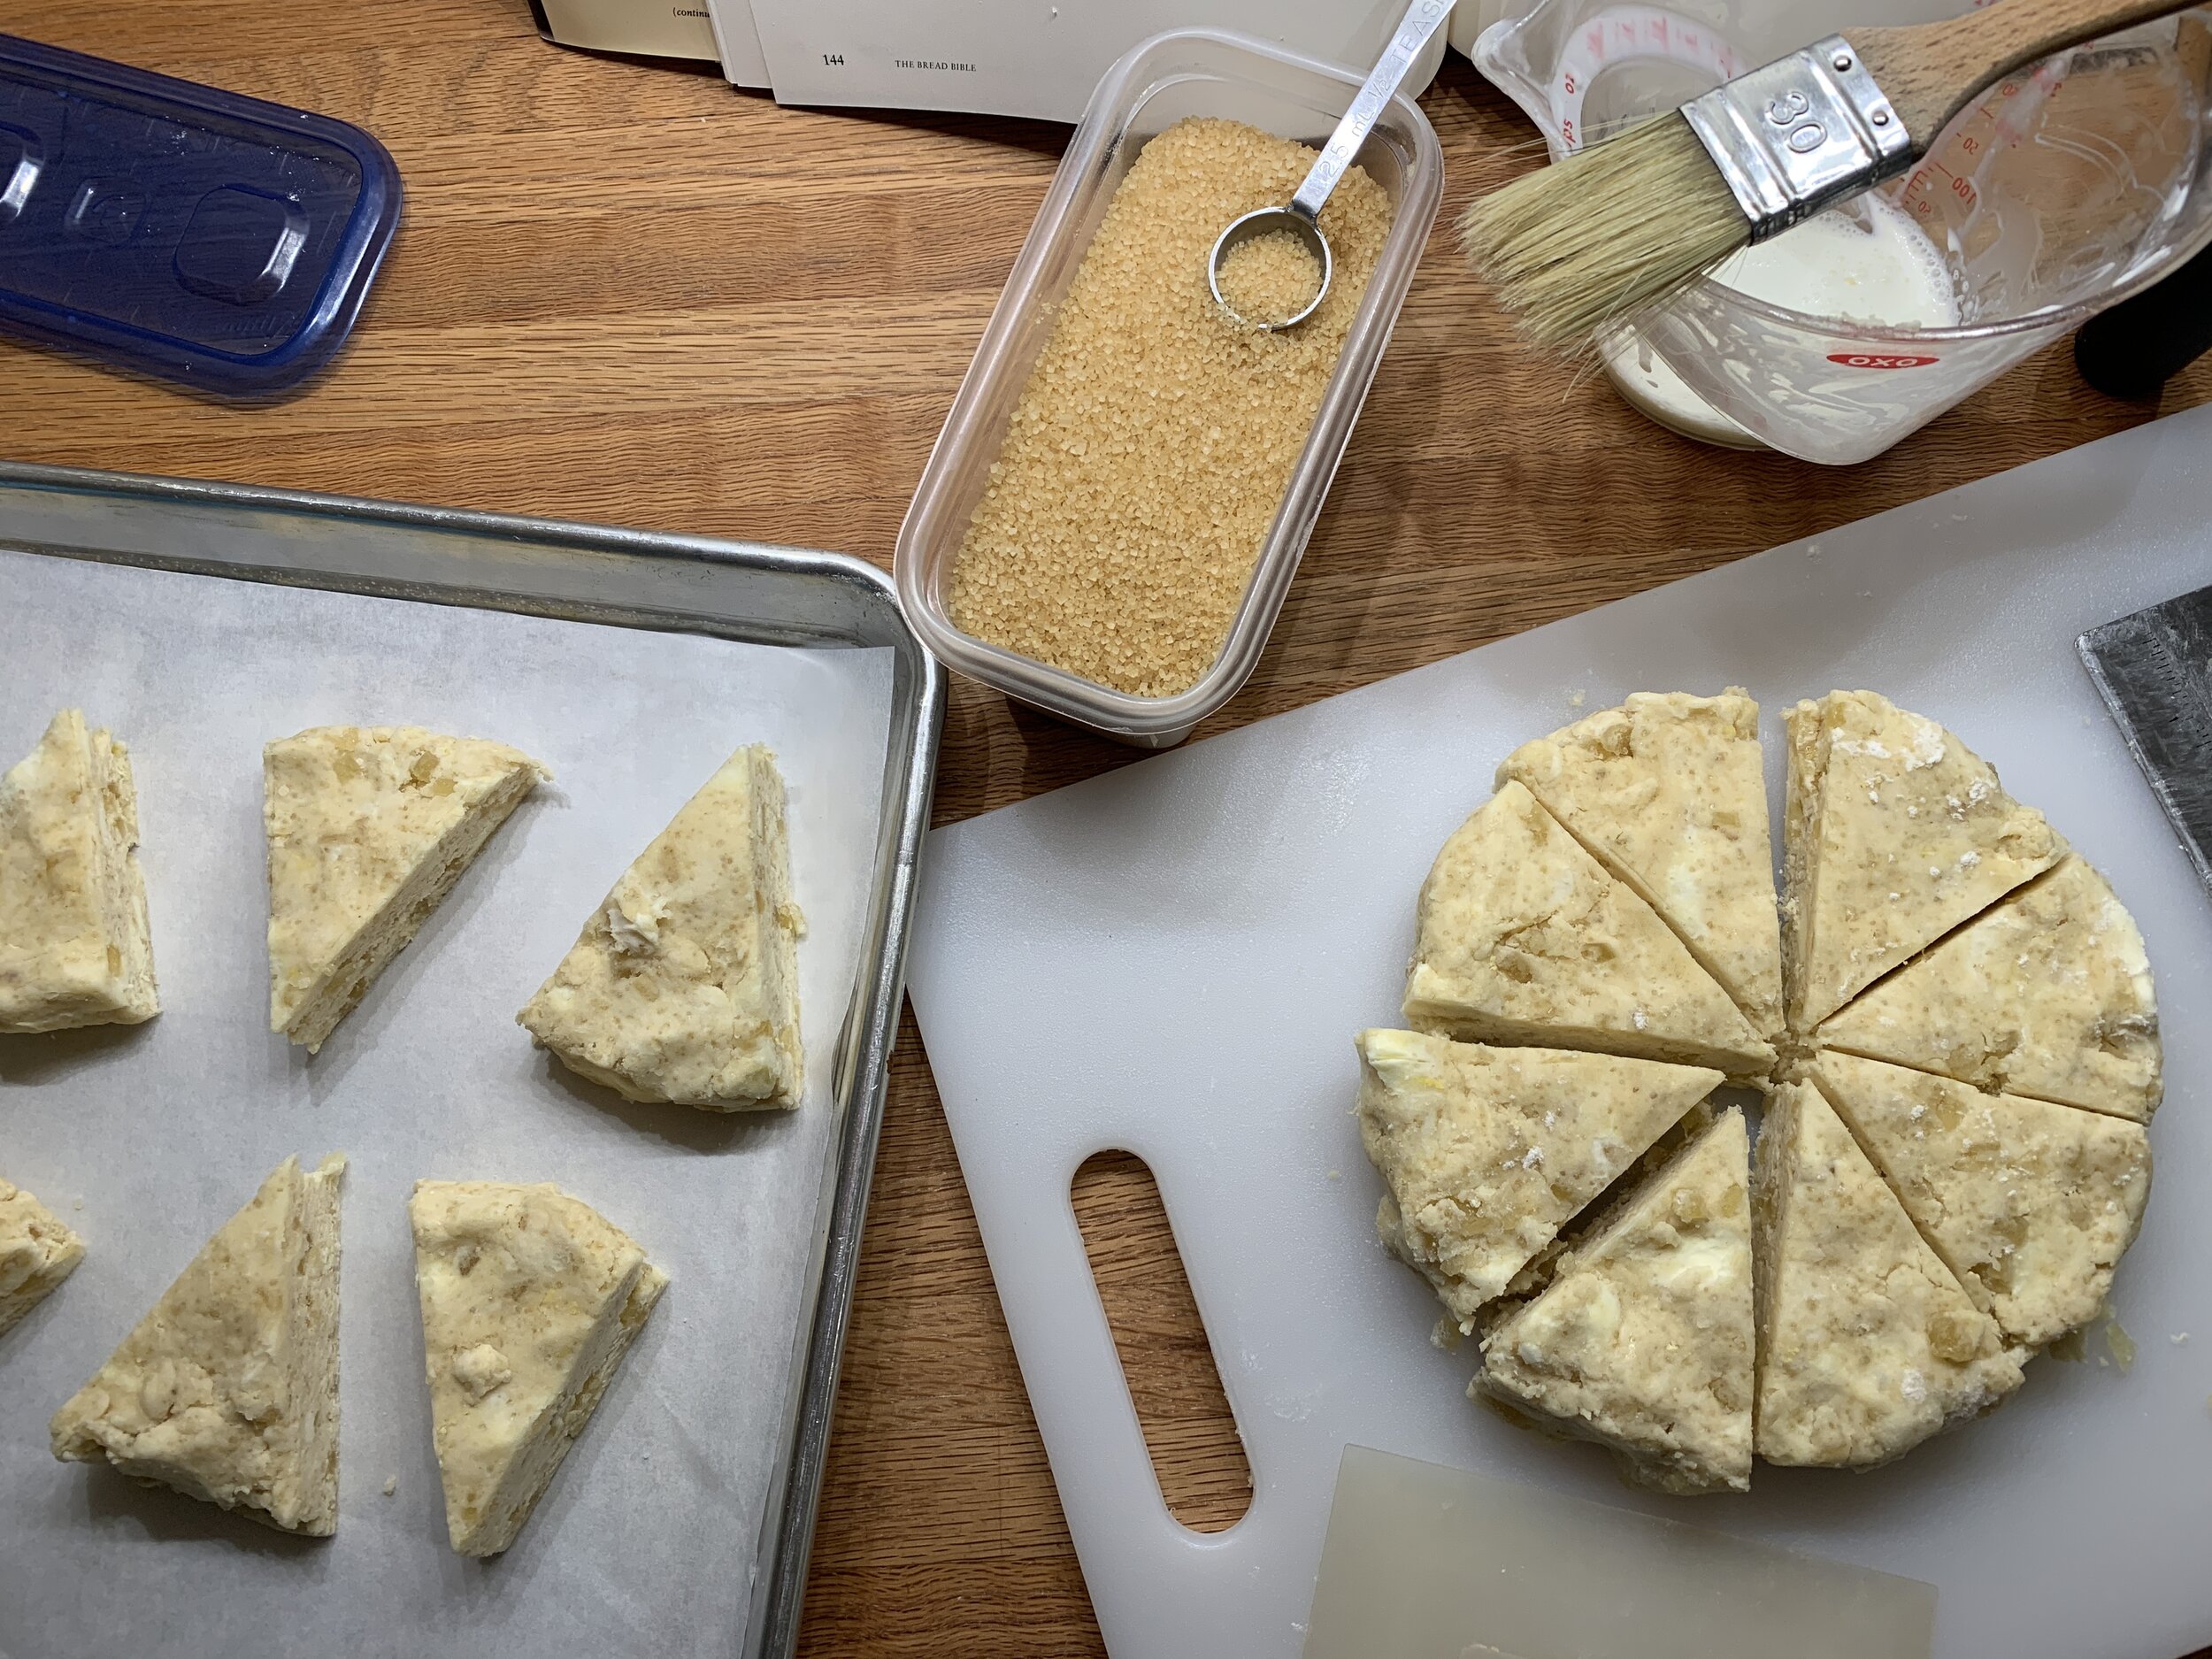
The term drop scones refers to scooping and dropping the balls of dough on the sheet pan as opposed to forming a dough round or rectangle and cutting more uniform triangle shapes for baking as seen below. Both work depending on your vision.

IMG_0881.JPG

Upon first taste test I found them delightful - just a hint of crispy to the outside and more cake like, tender and moist on the inside than my usual scones. The more I ate them, the more they grew on me.

I’m usually not big on cute-sy combo names like cruffins or cronuts, but for these the word “scuffins” definitely comes to mind - a term someone somewhere coined some years back - a cross between a scone and muffin. Oh well, call them what you’d like - they’re good no matter the label. Try them out yourself and see what you think.

IMG_1296.JPG

This recipe involves a slightly different mixing method than the one I’ve come to rely on over the years. Here’s what I discovered about the process (having the recipe on hand as you read through this is helpful). You need to plan ahead - the dough is wrapped and refrigerated for at least 1 and up to 24 hours to allow the flour to fully absorb the moisture before scooping and baking. While the recipe calls for 8 large scones, I made mine smaller using a generous 1/4 cup size scoop with a yield of 16-18 scones.

Chilled dough ready to scoop - check out those butter pieces!

Chilled dough ready to scoop - check out those butter pieces!

First batch: I pretty much followed Joanne’s recipe, using Vermont Creamery’s crème fraiche but since I didn’t have any buttermilk in the house I made the faux version by adding lemon juice to whole milk. I added the first half of the butter into the dry ingredients using the mixer with the paddle to break up the butter pieces (as she suggests), but when it came time to add the second half of the butter, I gave the mixer a rest and used my by-hand method of flaking the butter into the mix by literally flattening the butter pieces with my fingertips and leaving visible pieces in the dough.

The liquid ingredients are all blended together along with fresh blueberries and then added to the flour/butter mixture. Here again I preferred doing this by hand using a spatula and bowl scraper to quickly and gently blend everything, picking up the dry ingredients until a cohesive dough ball forms. I typically don’t add fresh fruit to scones since the fruit can become mushy and macerated during mixing, but the fresh blueberries held up well with a gentle touch.

I refrigerated the dough for four hours and then baked them. Glaze them right out of the oven, cool a bit and enjoy warm or room temperature. Nice!

First batch

First batch

I continued the by-hand approach for the next two batches as well. It speaks to me. Remember our two hands are some of the best tools we have!

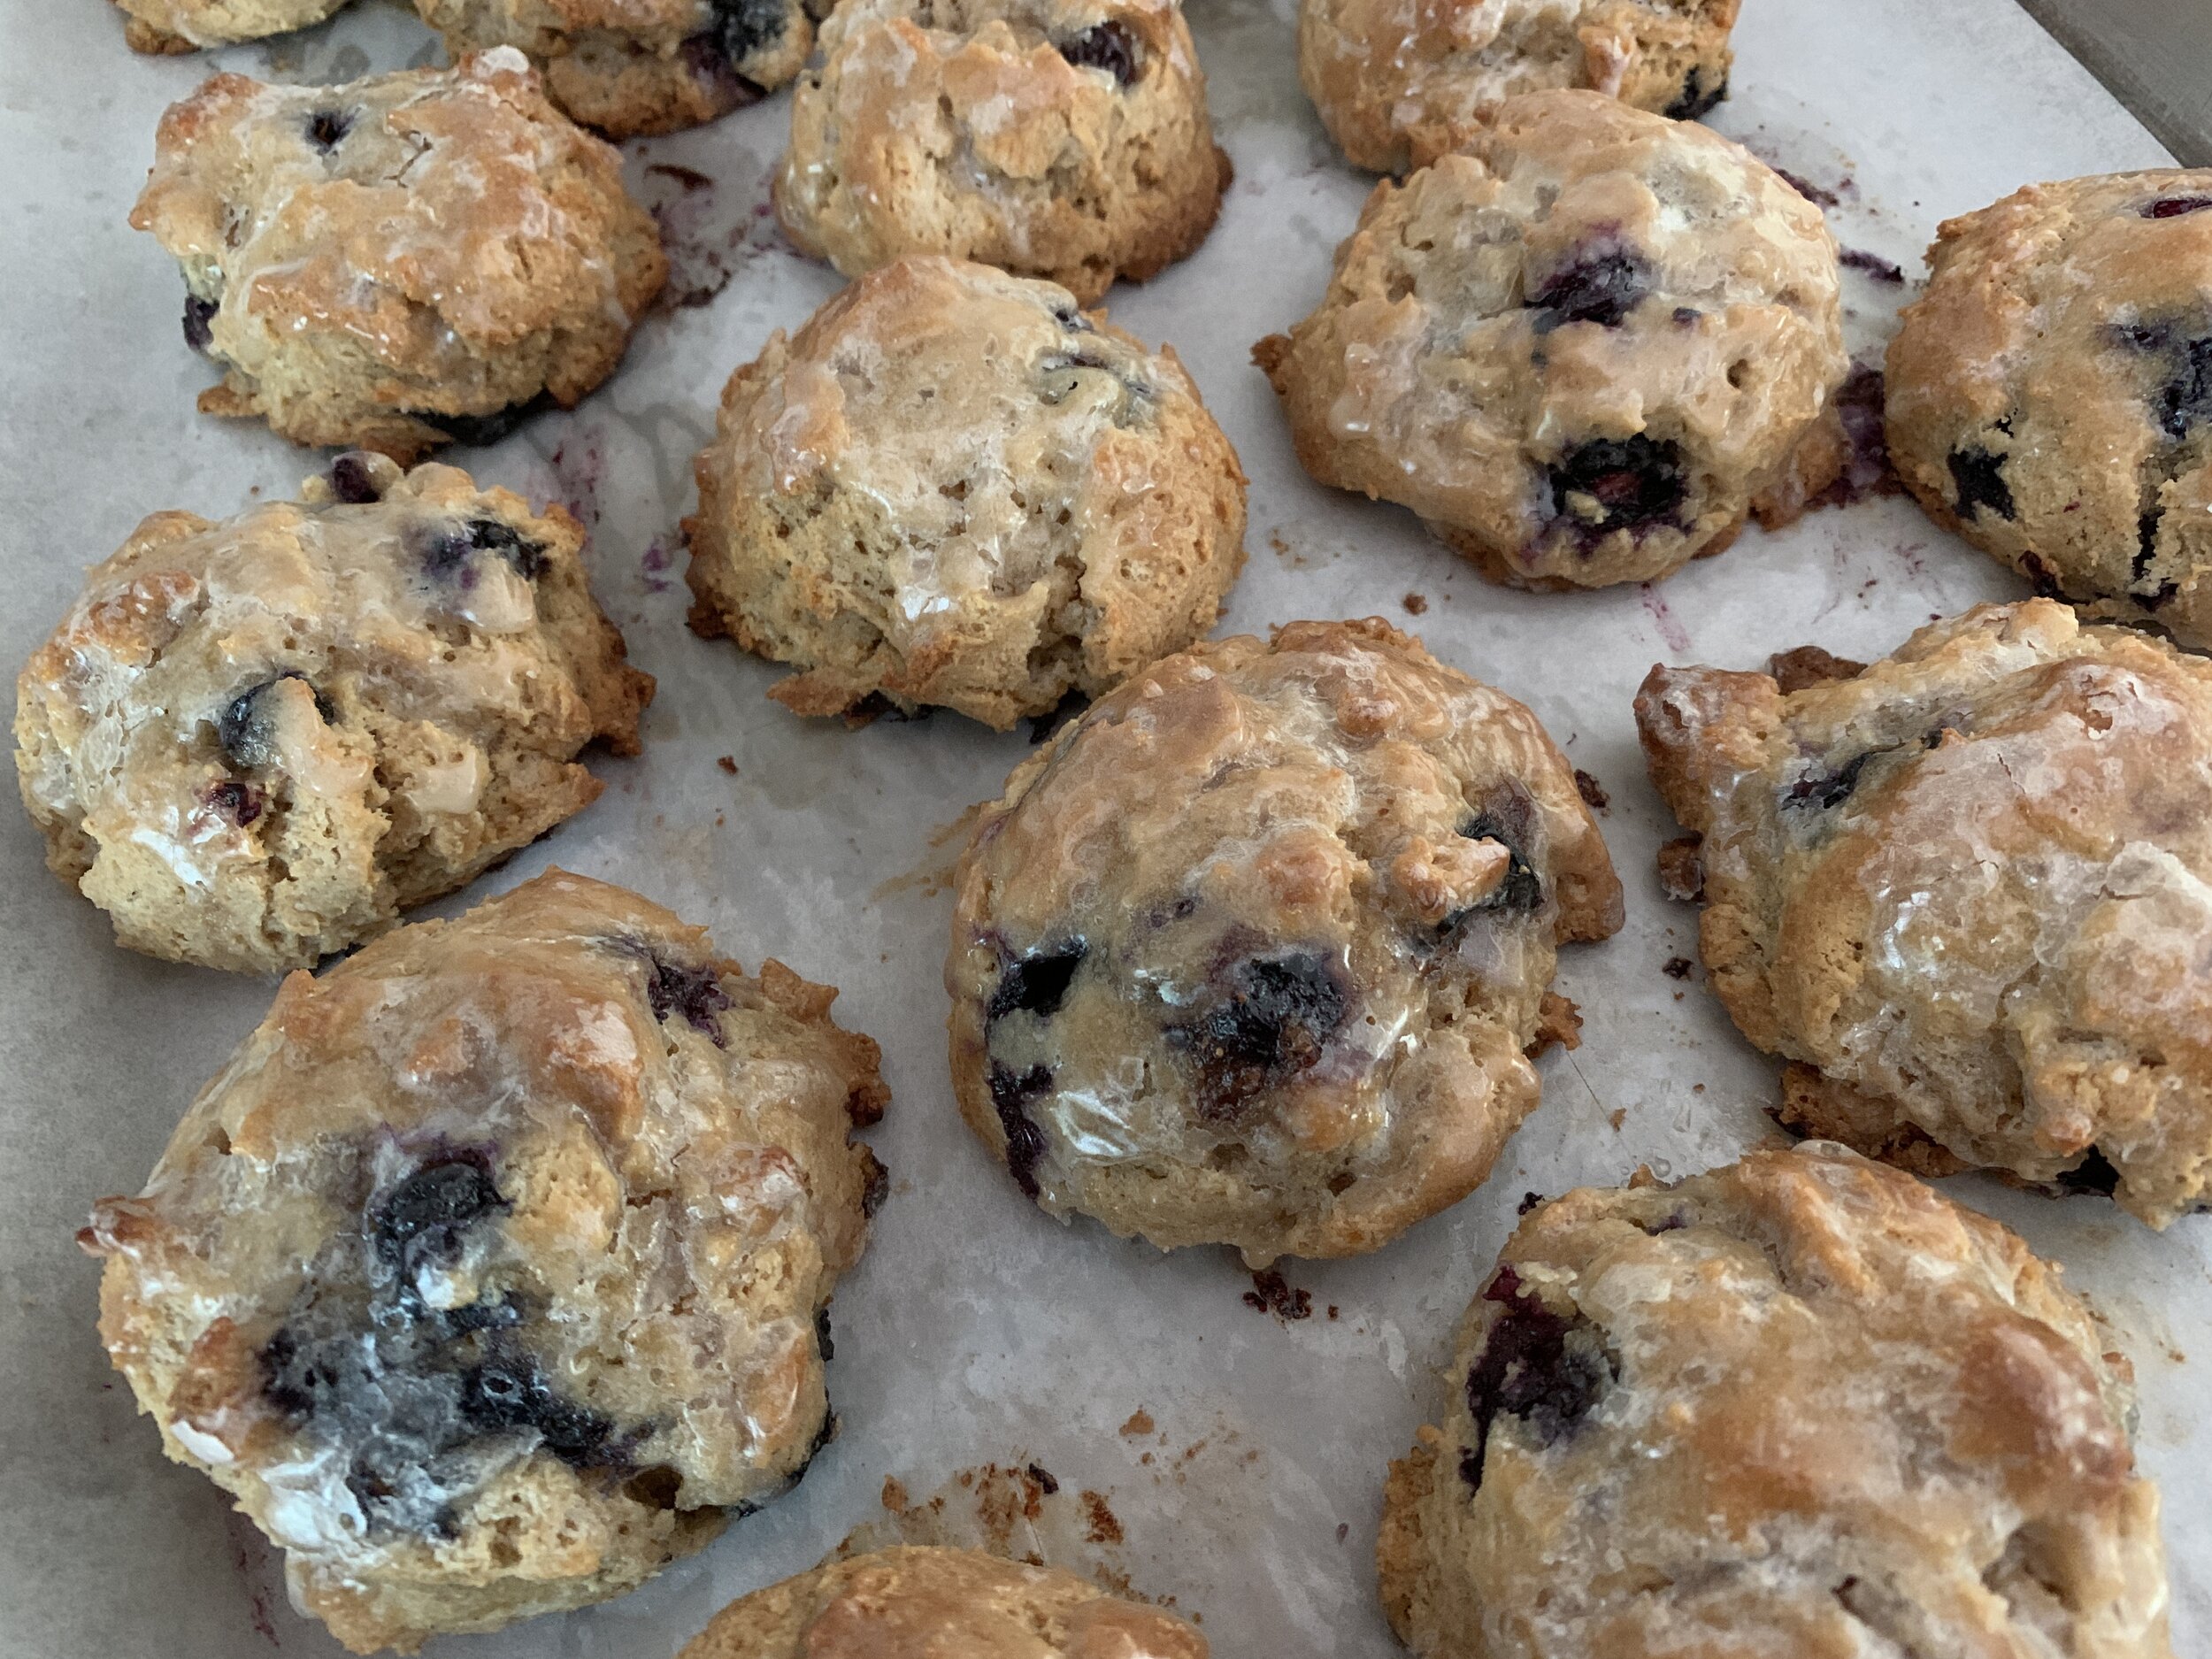
Second batch: no crème fraiche on hand so this time I used Siggi’s Icelandic “touch of honey” whole milk yogurt and actual buttermilk. Once I had the dough mixed and gave it a few hours of refrigeration, I scooped out the dough balls onto a parchment lined sheet pan and froze them. It was a couple of days before I baked them (directly from freezer to oven) and they didn’t bake as evenly as the first batch. I also found they browned more on the bottom and were less tender and delightful. Perhaps you can appreciate their “rough and tumble” look below.

Full disclosure - I messed up the baking powder amount and attempted a fix so accuracy is in question. Even though they rose OK they weren’t as fluffy as batch one. Yikes - not my usual M.O.

True confession time - a few weeks back I tried some roasted tomato, ricotta, herb scones and realized after I had them in the oven that I FORGOT to add the baking powder. Whoa! How many times have I made that base scone recipe?? Just goes to show you how distraction and lack of focus can sneak right in there these days.

Second batch

Second batch

Third batch: I made my own crème fraiche - yay! Here’s the deal: heat a cup of heavy cream to about 95ºF (easy in a glass Pyrex measuring cup in the microwave), stir in a teaspoon of buttermilk, cover loosely and let sit at room temperature for 24 hours. Mine was thickening nicely by then and into the fridge it went. I used it for the scones on day 4 of it’s maturation - nice and tangy. I again used a squeeze of lemon juice in whole milk as my buttermilk. I reduced the whole wheat flour by 20 g and increased the all purpose by 20 g (I just felt like it).

BTW - For all three batches I used white whole wheat flour for the whole wheat portion. In the future I’ll try whole wheat pastry flour (if I can ever get my hands on some again!) for an even more tender result.

This time I kept the dough refrigerated for a full 24 hours before scooping and baking. The end result was much like the first batch. Mmmmm good.

IMG_1295.JPG

What I learned: mix by hand, refrigerate the dough 4-24 hours then scoop the chilled dough and bake soon after. Use the right quantity of baking powder. Duh. Thumbs up on the crème fraiche and buttermilk combo. Maybe don’t freeze them unbaked but I’m not necessarily giving up on that approach. That second batch was the outlier due to a questionable baking powder amount and maybe even the oven temp when baking directly from the freezer.

I encourage you to give these a try. You’ll like them.

Autumn is coming . . .

Puttering in the kitchen in August

Raspberry cream cheese Danish

Raspberry cream cheese Danish

I first published this post a few days ago but I’ve broken out the blueberry scone section into it’s own post and edited this one. So, if you saw it the first go-around, it’s different now.

We’ve had some touch of autumn days (which I LOVE!) but also some heat and humidity coming back in which doesn’t typically inspire one to do much baking. Even so - I still manage to get some quality kitchen time in. Gotta do it.

The raspberry Danish above are a result of tweaking and finalizing my Danish dough recipe mentioned in the recent Swedish cardamom bun post. So delicious!

Following are a few more visuals of some of the things I’ve been doing lately. I stumble across recipes that either get my attention or not, but those that might incorporate a different technique or ingredient are the ones that I put on the to-do pile.

Please enjoy the pics and dream of the things you might create!

First these blueberry scones are from a NYT article by Dorie Greenspan on Joanne Chang’s (of Boston’s “Flour” fame) recipe. Here’s a more fleshed out post on these. You should give them a try!

Maple glazed blueberry drop scones

Maple glazed blueberry drop scones

Next up - dukkah shortbread. I’ve been wanting to do this for awhile now. Dukkah is a middle Eastern and Egyptian concoction made with toasted nuts, herbs, seeds and spices that are coarsely ground and used in marinades or as garnish for soups, salads, meats, veggies or whatever you want really.

There are LOTS of recipes. Just Google it. I used pistachios and hazelnuts, sesame seeds plus cumin, coriander, fennel and sea salt. I blended about 75 g of the mixture into my base shortbread dough made by blending 75 g sugar (consider half or all dark brown sugar here to add some caramel notes to the nuts and spices) with 200 g unsalted room temperature butter; blend in 250 g all purpose flour (or use 60 g whole wheat pastry flour and 190 all purpose) along with the dukkah . Wrap, chill at least an hour, then roll out and cut shapes of choice. This is good. Sweet and savory. I might leave the fennel out next time and add almonds into the mix.

Dukkah shortbread cookies

Dukkah shortbread cookies

Individual cobblers are fun. These are made with fresh Michigan peaches and blueberries. Great with vanilla ice cream of course.

Individual peach blueberry cobblers

Individual peach blueberry cobblers

Financier batter is simply ripe with flavor possibilities.

Coffee walnut streusel financier

Coffee walnut streusel financier

Next up - these maple almond butter cakes are from a recipe on the underside of the foil lid on Siggi’s yogurt. I don’t keep flax meal on hand so I used almond flour instead. Other than adding a bit of almond butter to shortbread dough in the past, this is my first foray into baking with a significant amount of almond butter. Let’s just say I could get used to it.

There are many brands out there - Justin’s is a popular one. I used “Barney Butter” and have since purchased a roasted almond butter from my favorite almond paste supplier Mandelin. I’m looking forward to trying it.

IMG_1294.jpg

I made these twice. It’s an easy mixing process. The first time with some blueberries and/or peaches tucked on top before baking plus a basic crumb top. Two different sizes - 3” Fat Daddio aluminum pans and smaller panettone papers. One of the 3-inchers went to my mom for her birthday.

IMG_1222.jpg

The second time I used one of my favorite silicone muffin molds, didn’t add fruit but made a delicious almond streusel topping.

IMG_1259.JPG

I will say these are growing on me. They have very little sugar in them compared to many muffin recipes (1/4 cup maple syrup and just a couple tablespoons of brown sugar) so at first bite they seem to fall flat on the taste buds yet . . . . the texture and overall experience is nice, and they seem right somehow. Even Steve said so.

Drizzling some maple syrup or honey on before eating is an excellent addition. The fruit version definitely beats the non fruit and with that added almond streusel . . Yum. Methinks a nice dollop of jam in the center of each before baking would be great too. Next time.

A look ahead - even though it has taken me a seemingly endless amount of time, in addition to putting the final touches on a new brioche feuilletée post, I’ve started the draft for a baguette project piece as well. I love sharing details of processes and steps but that also means I spend a lot more time reviewing and comparing in order to offer a reasonable summary of whatever it might be. At any rate, after 24 weeks of essentially being home, each day brings a different vibe to our lives.

Happy baking, be reasonable and don’t forget that periodic deep breathing helps too.

Soon we’ll be deep into official “baking season”. Love it.

Tosca almond torte

IMG_0968.JPG

This project came about as a result of three forces: Lindsey Shere, Brontë Aurell and Dorie Greenspan. Not a bad way to start eh?

For some months I’ve had the simple almond torte recipe from Lindsey Shere’s iconic book “Chez Panisse Desserts” on my to do pile. I still had some of Mandelin’s fabulous almond paste on hand and thought why not?!

IMG_0546.JPG

So I made it and LOVED it!

Here’s the torte run down: butter a 9” springform pan or round cake pan and line the bottom with parchment; heat the oven to 325ºF; beat 250 g/1.25 cups sugar with 227 g/8 ounces soft almond paste (it works well to grate it!) to blend well; beat in 227 g / 8 ounces soft unsalted butter and a teaspoon vanilla extract then cream for several minutes until light and fluffy; beat in 6 large room temperature eggs, ONE at a time, until each is thoroughly blended in; fold in 130 g/1 cup all purpose flour, 1.5 teaspoons baking powder and 1/4 teaspoon salt, blending just until combined. Transfer batter to prepared pan, smoothing the top with a small offset spatula.

IMG_0549.jpg

Bake for about an hour to an hour and a quarter, until a tester inserted in the center comes out clean. Remember - always check sooner than later! Gently touch the center and it should feel springy. Let it cool in the pan about 20 minutes then un-mold and cool on a wire rack.

Here it is in all its simple glory, bottom side up. No muss, no fuss - just one delicious cake. On it’s own dusted with confectioner’s sugar or with some lightly whipped cream and fresh berries, it’s all good.

IMG_0558.JPG

Then two other things happened that pushed me to the next step in this process. I happened upon a Dorie Greenspan piece in NYT Cooking with a recipe for “Swedish Almond Cake”.

Hmmm I thought, this one sounds good too. While the cake itself doesn’t contain any almond ingredients, It’s deelish and buttery and includes a cooked almond/butter/sugar/flour topping (known in Sweden as “tosca” topping) that goes onto the cake part way through the bake.

I made D.G.’s version and it’s fantastic. Just go to the recipe and try it yourself - you won’t be disappointed.

Now cue Brontë Aurell’s book “Brontë at Home” to which I’ve referred in both my rye buns and Danish Kringle posts. That’s where I first learned about tosca topping. Her’s is very much like the one Dorie G. uses with just a few slight variations. Hey! Why not make Lindsey Shere’s almond torte and add the tosca topping to it? What a wonderful almond-y treat it could be!

And so I did.

IMG_0972.JPG

A quick note: I recommend using a springform pan for this since it would be difficult to turn it out of a standard round cake pan due to the topping.

Prepare the almond torte batter and once the cake is in the oven, get the topping ingredients ready to go. I tweaked DG’s topping recipe by reducing the butter and sugar, using brown sugar instead of granulated and subbing heavy cream for milk.

Here’s my mise: 80 g / 5.5 tablespoons unsalted butter; 100 g / ~ a cup sliced almonds; 80 g / scant 1/2 cup dark brown sugar; 2 tablespoons all purpose flour; 3 tablespoons heavy cream.

The baking time for the almond torte is somewhat longer than for Dorie G’s butter cake but either way, bake the cake about half way then make the tosca topping. Mix the topping ingredients in a saucepan over medium heat and stir to melt the butter. Bring to a boil and cook for a minute or so.

Take the partially baked cake out of the oven and gently portion the topping over the cake, spreading with a small offset to cover the top. Pop it back into the oven and finish baking.

IMG_0937.jpg

The topping should become beautifully golden, the liquid-y appearance should set and caramelize and the aroma . . . . Oh my.

IMG_0938.JPG

Soon after it comes out of the oven take a paring knife or offset spatula and gently run it around the edges of the cake so they won’t stick to the pan. Then let it cool 10-15 minutes, remove the sides of the springform pan and finish cooling to room temperature.

IMG_0967.JPG

Enjoy a slice with a fresh cup of coffee or tea or just by itself au naturel. It is SO good.

IMG_0970.JPG

Here’s to a safe and calm summer with beautiful deep blue skies and nature’s varied hues to give us peace.

We can do this.

IMG_1042.JPG

Orange glazed brioche

IMG_3619.JPG

Yes, I admit that I love delicious brioche, both making and eating it. Even though there’s a good deal of butter and egg in this enriched dough, if the base recipe is just right and the process is executed just so, it’s a real winner in my book. Light and pillowy with a tight yet soft crumb, it’s a canvas for so many different creations.

I’ve written about brioche in the past, but I’m one of those folks who loves to peruse recipes, compare and tweak the ingredient ratios as well as the methods used to produce some version of this particular delight. Knot rolls coming up!

IMG_3615.JPG

This time I had citrus (orange to be exact) on my mind. During the winter months I often have a mix of orange segments with their juice plus some cut-up apples in a bowl in my fridge for that all important daily fruit quotient that we all need. Not wishing to waste any part of the orange, I zest my oranges before segmenting them, then wrap the zest in little packets, stashing them in the freezer so the zest is handy for my next citrus baking adventure.

I reviewed Dorie Greenspan’s brioche recipe in her book Baking Chez Moi in addition to Jeffrey Hamelman’s in his book Bread - A Baker’s Book of Techniques and Recipes. While there are tons of recipes out there for brioche, what I took away from this review was one small interesting technique that Hamelman recommends when using a planetary stand mixer (like the ubiquitous Kitchenaid that many of us have). He notes that it’s more difficult to adequately develop the dough in a planetary mixer so suggests holding back half or more of the sugar at the beginning of the knead.

Sugar is hygroscopic and actually acts as a liquefying agent, so if it’s all added at the beginning, the result is a looser textured dough that doesn’t develop as well. Who knew? Learn something new everyday.

NOTE: if you’re interested in a quick run down on planetary (most commonly used) and spiral mixers (more specifically for bread and artisan dough) check this out.

The mixing process went well, the resulting dough had that silky, buttery texture one hopes for before the overnight refrigeration, and the following morning the division and shaping proceeded apace. I divided my dough into 42 g / 1.5 ounce portions, did the preliminary ball shaping and gave them a 10 minute rest.

Balled up dough ready for final shaping

Balled up dough ready for final shaping

I rolled each one into a snake and then formed ‘em into single knots. Kind of reminds me of some sort of creature peaking out of its burrow or a coiled snake (hopefully not ready to strike!)

IMG_3609.JPG

One of the important steps in the brioche making process is the final rise - if it’s too short, the end result isn’t that wonderful light, airy and oh-so delicious creation on which you’ve spent a decent amount of effort. Especially during the winter months in my 69º kitchen, I’m careful to give the dough plenty of time, sometimes up to 2 hours, for that all important rise.

Note that since brioche is such an enriched dough, the rise may not be as obvious as that of lean breads, but you should be able to appreciate the increased fullness and puffiness of the risen dough.

IMG_3612.JPG

These baked at 375º F for about 20 minutes - all nice and golden brown.

IMG_3617.JPG

Once cooled I opted for an orange cream cheese glaze that set these babies off with just the right touch. Delicious. Soft, delicate crumb, light and wonderful.

IMG_3618.JPG

Here’s the recipe for my orange brioche dough, yield 1320 g / approximately 2.9 lbs.

  • 537 g flour, half bread and half all purpose

  • 90 ml whole milk, cold

  • 90 ml water, cold

  • 5 large eggs, cold (~250 g)

  • 11 g salt

  • 68 g sugar, divided in two portions

  • 18 g instant yeast

  • 255 g unsalted butter, cool and pliable, medium diced

  • 1 tablespoon orange zest (from 2 medium oranges)

  1. Place flour, milk, water, eggs, salt, yeast and half the sugar in the bowl of a stand mixer fitted with the dough hook. Mix on low to incorporate then knead on speed 2 for 5-7 minutes until you have a strong dough using the windowpane test.

  2. Add the second half of the sugar and knead for 2 more minutes.

  3. Add butter bit by bit on speed 2. Once all added, knead for 8-10 minutes until the dough cleans the sides of the bowl and sheets nicely.

  4. Place the dough in a lightly floured bowl, tuck plastic on and around the top and let it rest for 1 hour at room temperature.

  5. Fold the dough gently, place it back into the bowl, cover with plastic wrap and refrigerate. De-gas 2-3 times over several hours then refrigerate overnight.

  6. Proceed with dividing and shaping as noted above . For these orange rolls I divided the dough into fifteen 42 g portions, using about half the dough (a full batch would give you 30 rolls!). You don’t have to use all the dough - just tightly wrap any unused dough with plastic wrap and freeze for later.

  7. Once the knot rolls are shaped, cover lightly with buttered plastic wrap and let rise 1.5-2 hours depending on the temperature of your kitchen.

  8. Heat the oven to 375ºF and bake for approximately 20 minutes until golden brown.

  9. Cool before icing.

For the icing I blended 227 g / 8 oz softened cream cheese, 2 T corn syrup, 2 T heavy cream, 75 g / 3/4 cup confectioner’s sugar, 1 tsp vanilla, pinch salt and the zest from one medium orange. You may not need all of it - it keeps in the fridge, covered for a week or so.

I used my leftover glaze on some petite citrus financiers. Deelish. Now go have some brioche fun!

IMG_3625.JPG

Crunchy topped choux

As a brief respite from traveling, moving and trying to figure out where we're going to live, I wanted to prepare something for dessert for my Aunt Marian's birthday lunch.  Part of the reason Steve and I are transitioning back to Michigan is so we can be on the ground, as it were, to lend a hand to my Mom and her sibs and sibs-in-law, all of whom are aging as we speak.  But then, aren't we all??

At first I was going to turn to one of my standards - financier, a tart of some sort, shortbread - all the usual suspects.  And then my thoughts turned to choux!

Some years ago while visiting my pastry friend Misato in Mulhouse (Alsace) I was perusing one of her pastry books by Jean-Michel Perruchon.  I was intrigued by the recipes for crunchy topping for pâte à choux, as well as the different fruity variations of pastry cream - a whole new world opened up to me!

Since then I had tried the crunchy topping thing as well as a pear pastry cream version for a tart I created and found them very satisfying.  For some reason I put those ideas aside as other things in the pastry world seemed to grab my attention.

But now, as I reviewed Dorie Greenspan's "Baking Chez Moi", I found her recipes for "Crackle-Top Cream Puffs" and "Bubble Eclairs".  The wheels started spinning.

Inspired by raspberries on sale at Meijer for $1! per 6 oz, I decided to make a raspberry pastry cream to fill my version of "bubble-crackle-top eclairs".


OK - so let's get to it.

First - the crackle-top dough.  This is basically akin to a crumble - mix 64 gm cool, diced butter, 100 gm sugar (in this case brown sugar), 85 gm all-purpose flour, a pinch of salt and 3/4 tsp vanilla extract . . . .

les ingredients

and form a rough dough that just holds together.

crumbly but holds together when squeezed

Form a disc . . . .


and roll it to 1/16" thick between two sheets of parchment paper.


Freeze it for a couple of hours (or until ready to bake your choux puffs), then cut into rounds that will later top the puffs.  You can hold this dough frozen and wrapped for many days!


I wrapped the scraps and froze them for another time.

Second - the pastry cream.  The beauty of this is its make-ahead-by-a-day-or-two feature.

Initially I found the whole idea of a fruit version of pastry cream (hmmm, fruit puree and milk?) kind of odd.  But, as I thought about it, we use fruit purees and dairy in many ways -ice cream,  smoothies, cheesecake, mascarpone cream to name a few.  Instead of using only milk as the liquid base as is typical for standard pastry cream, one can create variations by using a combination of fruit puree and milk, proceeding with the very same process used to make pastry cream with egg yolks, sugar and cornstarch.  I like to think of it as a cross between pastry cream and curd.

I wasn't sure how much puree my 12 oz of fresh raspberries would yield, so I smooshed and strained them with a yield of 215 gm.  Now I could figure out the quantities for the remaining ingredients.

In Perruchon's recipes a greater proportion of fruit puree is used compared to the milk e.g. 500 gm puree + 100 gm milk.  I tweaked the proportions based on my 215 gm of raspberry puree, using equal weights of puree and milk.

To sum up, my recipe used 215 gm raspberry puree, 215 gm whole milk, 95 gm egg yolk, 77 gm sugar and 40 gm cornstarch; 20 gm butter is added at the end of the cooking process.  If you don't know the standard process for making pastry cream, you can find many sources on line to help you.

Once the raspberry pastry cream was made I covered and chilled it until I was ready to use it the next day.

Next up - pâte à choux.  For this I went with my standard recipe from Michel Roux - in a medium pan bring 125 gm milk, 125 gm water, 1 1/2 tsp sugar, 1/2 tsp salt, 100 gm diced butter to a boil; remove from the heat and stir in 150 gm flour all at once; place back on the heat and stir for a minute or so to dry it (you'll see a thin film on the bottom of the pan); stir in 4 eggs, one at a time, until you have a smooth, silky paste.

Here is the panada (the paste before the eggs are added) . . . .

check out the thin coating on the bottom of the pan

and after the egg addition . . .


silky smooth

I piped out the puffs in series of three, each ball snuggling up to the next . . .


and topped them with the chilled crackle dough rounds.


ready for the oven

 Pretty cool!

Bake them at 375º for about 35 minutes until the tops are browned and the puffs are golden and firm to the touch.


Oh yeah - lookin' good!

Once the puffs are cooled it's time to garnish.

I typically lighten my pastry cream with a small percentage of whipped cream.  In this case I blended 100 gm whipped cream into my raspberry pastry cream.

whipped cream and pastry cream ready to be blended together

One can garnish puffs or eclairs in two different ways - slice the choux, pipe the cream decoratively on the bottom half and sandwich- OR fill the choux from the bottom.


the non crackle-top in the foreground was my practice version!

I opted for the fill-from-the-bottom technique, finding it much more user friendly than slicing each one in half.  Plus, I've filled a LARGE share of puffs and eclairs over the years, and it's like riding a bicycle.


Poke holes in the bottoms and, using a pastry bag with a 6 mm tip, fill each section until the cream starts to ooze out of the adjacent holes.  That way you know you've filled adequately.  Once you've done this multiple times you begin to understand what the "heft" of a well filled puff is all about.

I'm told that Parisians get mighty peeved if their eclairs and profiteroles aren't filled properly!

I scrape the excess off with a small offset spatula, place them crunch side up and dust them with powdered sugar.  And we're off to the races!


These were well received by the family, who had gathered at Uncle John's Clear Bottom Lake cottage to celebrate Aunt Marian's 86th birthday.  The crunchy top is such a wonderful contrast to the cool, creamy filling and the light as air choux.  I enjoyed the raspberry cream, although Steve still holds out for classic pastry cream (praline and chocolate are some of his faves too).

Happy Birthday Aunt Marian!

Cannelés Bordelais

cannelés Bordelais

I first made a Christophe Felder recipe for cannelés back in late winter/early spring of 2013 in my pastry studio at Hope Artiste Village in Pawtucket RI.  While the batter is trés simple I soon learned these delectable treats required baking in a hot oven (450-500º) for a good hour (or more!)   Since I couldn't justify dedicating the oven to one thing for that long, I didn't bake them on a regular basis.  But man are they good!

We're talking one tasty little tidbit.  With a custard like interior and darkly caramelized exterior they are a true taste and mouth-feel experience.


Also known as canelé de Bordeaux these babies are well known and very popular, not only in and around Bordeaux, but in many parts of France.  For years they have been baked traditionally in copper molds coated with beeswax, but, now that silicone molds are so prevalent, there's much less muss and fuss involved, especially for the home baker.

One of the big producers in France is Baillardran.  They have a shop in Paris, and when Steve and I were there in May, 2013 (soon after I had first made cannelés) we felt we HAD to try them.


yup - nicely caramelized

custardy pockets are de rigueur as I understand

Sad to say, we found them rather dry and unappealing, not like the delicious, custardy treats we had sampled at The French Tarte.

At any rate, fast forward 2 years to now.  Inspired by Dorie Greenspan's "Baking Chez Moi" it seemed only natural to try out her recipe for cannelés.


The batter preparation is straightforward and includes milk, sugar, butter, egg, flour, vanilla and usually rum.  Not being a rum fan, I substituted hazelnut liqueur.  Part of the planning involves making the batter at least a day before baking since it requires a good 12 hour (or more) rest in the fridge.


les ingredients

Here we go.  Bring 480 ml (2 cups milk), 150 gm (3/4 cup) sugar and 28 gm (2 TBSP) butter to a boil, stirring occasionally to make sure the sugar is dissolved.  Let it cool 10-15 minutes.

In a separate bowl sift 136 gm (1 cup) flour plus 100 gm (1/2 cup) sugar together.

Whisk 2 large eggs and 1 yolk in another bowl, then slowly add the warm milk mixture while whisking.  Then whisk in the flour/sugar mixture, beating vigorously as needed to blend everything.


ready to strain

Strain it into a clean bowl or pouring container and whisk in 2.5 TBSP rum (or liqueur of choice) and 2 teaspoons vanilla extract.


ready to cover and pop into the fridge

Cover and refrigerate for at least 12 hours (FYI - you can keep it in the fridge for several days).

On baking day brush the cannelé molds with melted butter and put them in the freezer for 30 minutes while heating the oven to 450º.


getting ready to butter the molds

When ready, take the batter out of the fridge and whisk it up, since the ingredients have a tendency to separate during their chilling time.  Fill each mold about 3/4 full.


ready for the oven

Bake at 450º for 30 minutes then lower the temp to 400º and bake another 30 minutes.  In my case I took Dorie's advice and removed one of the cannelé from the mold with a bamboo skewer so I could check the progress at about 40 minutes.


after a 40 minute bake

custardy pockets

I kept the remainder of the batch in the oven for another 10 minutes (total 50 minutes) and felt the browning was just right.


just out of the oven (the empty spot is the for the one I removed early)

Once out of the oven let them cool on a rack for 10 minutes before turning them out of the molds.


whoa baby!

not bad, eh?

Upon cutting one open the interior had the same custardy pockets as the one I had taken out of the oven ten minutes earlier.


So could I reduce the oven time in the future?  With these petite molds I say "yes"!  However, based on my previous experience a couple of years ago when I used a slightly larger mold, the cannelés required a full hour (if not more) in the oven.  Just remember that baking times vary depending on the size of the goods.

The moral of the story?  Pay attention to what's going on in your oven.

A quick note about the taste - firm and chewy on the outside yet with a moist and custardy interior.  In a word - delicious!

Steve took a bunch of these to work, later reporting that they were gone in 5 minutes and were enjoyed by all!

Yes, I would make these again (and again and again and again)!!


Golden raisin toast apple tart, thanks to Janet and Dorie

There are some occasions when I buy an ingredient that I wouldn't normally keep on hand for day to day use.  Golden raisins are one of those.  I purchased them awhile back when I was preparing to make biscuits fondants amande et fruits épicés for my 1/14/15 post.  I used only a portion of the box and was eager to finish it off.  But what, pray tell, might I make?

It was thus that I turned to a book that Steve and I have owned for a number of years - "The Cheese Course" by Janet Fletcher.  While I don't pull it off the shelf very often it offers some great ideas for accompaniments to cheese, including breads, salads with light and simple vinaigrettes, fruits, nuts, honey, olives and more.


I recalled that it contained a recipe for golden raisin bread, so I decided to go for it.  The bread is meant to be toasted and served with Bellwether Farms' crescenza, described as a yeasty, creamy cheese, similar to Italian stracchino.  But I digress - on to the subject at hand.


Besides chomping at the bit to bake more bread, I've been wanting to make a not so run-of-the-mill tart - something with a Parisian twist.  I had my eye on an apple tart recipe in Dorie Greenspan's book "Paris Sweets" (one of my faves) that calls for toast points to be tucked in between apple slices before baking.  I was on my way to a new adventure.

First the bread.  Soak 2 cups of golden raisins in 2 cups warm water for an hour or so.  Drain them, reserving 320 ml (1 1/3 cups) of the raisin water (add additional water if you don't have quite enough).  I wanted a bit of je ne sais quoi, so I added the zest of an orange and pinches of nutmeg, allspice and coriander to the dry ingredients.


les ingredients

Weigh out 488 gm (3 3/4 cups) all purpose flour, holding 98 gm (3/4 cup) aside; whisk 390 gm (3 cups) flour with 8 gm (1.5 tsp) salt, 15 gm (1 TBSP) sugar, 8 gm (~ 2.5 tsp) instant yeast; stir in the tepid raisin water and 10 gm (2 tsp) soft butter.

When it becomes too stiff to stir, turn it out onto a floured surface and knead, adding in the remaining flour as you go.  Knead about 5 minutes until the dough is firm, smooth and elastic and shape it into a ball.


after the knead, ready for the first rise

Place in an oiled bowl, cover with plastic wrap and let rise about 1.5-2 hours.


after the rise

Pat the raisins dry and toss them in 3 tablespoons of flour.


Without punching the dough down turn it onto the work surface and pat it firmly into a 14" circle.  Top it with 1/3 of the raisins, pressing them gently into the dough.


Fold the sides of the dough toward the center (I folded it into thirds, just like with a laminated dough) and then roll into a cylinder.


the first cylinder

Again flatten the dough into a circle, add another 1/3 of the raisins, fold the sides into the center and roll again into a cylinder.  Cover and let rest for 15 minutes before you do the same thing a third time, finishing up the raisins and forming the final cylinder.


kinda rough and tumble I'd say
 
Now divide the dough in two and shape each half into a loaf about 12" long (mine came out shorter).


ready for the final rise

I will say these are not the most attractive loaves I've ever shaped.  The raisins made them all lumpy-bumpy, plus you have to keep the raisins tucked into the dough so they don't burn during baking.

Cover with a towel or lightly oiled plastic and let rise for an hour or so.  They look like some kind of funky subterranean creature!


after the rise, ready for the oven

Heat the oven to 400º, bake for 5 minutes, then lower the temp to 375º and continue baking about 30 minutes more.  They should be nicely golden brown and have that tell-tale hollow thump of doneness.


the end result

Once cooled, I sliced one for a taste test and was pleased with the hint of orange and spice, the plump raisins and the not too chewy texture.  I ultimately used about 1/2 loaf for the apple tart and froze the rest - lots of breakfast raisin toast coming up these next few weeks.  Yes!


So let's move on to the apple tart.  Dorie G's "Paris Sweets" recipe is an adaptation from Lenôtre and calls for the following components.

1.  Caramelized white bread (in my case golden raisin) toasts:  slice the bread, cut off the crusts, spread one side with a mixture of soft butter and light brown sugar (made by mixing 30 gm/2 TBSP butter with 30 gm/2 packed TBSP brown sugar) . . . .


then pop under the broiler for 2-3 minutes, flip over and broil another 2 minutes or so.  Pay close attention so they don't burn (if necessary, just scrape off any black edges with a sharp knife).


2.  A blind baked crust (I used my 240 mm / 9.5" tart ring and my favorite pâte d'amande dough) . . . .


waiting for weights and ready to blind bake

3.  Peeled, cored, cut-in-eighths Golden Delicious apples (4 of 'em) sautéed in butter, sugar and vanilla pulp . . .


4.  A custard mixture made by whisking together one large egg, 3 large yolks, 70 gm (1/3 cup) sugar and the pulp from 1/2 vanilla bean until somewhat thickened and pale.

Then boil 300 gm (1 1/4 cups) heavy cream (stovetop or microwave - you decide) and pour the hot cream over the egg mixture bit by bit while whisking constantly.  Try not to be too vigorous - you don't want a lot of bubbles (tapping the container on the counter will help dissipate any bubbles that may have formed).


On to the assembly.  Heat the oven to 325º.  Place the blind baked tart shell on its parchment lined pan onto a second sheet pan (this provides some insulation and more gentle heat).  Slice the toasts.


everything at the ready  

This was definitely the clunky part.  The idea is to line the apple slices up in the tart shell, then tuck the toast triangles (or in my case, more like rounds) decoratively between the apples slices.  Easier said than done.


I had a few gaps into which I tucked smaller pieces of apple, and I did my best with the toast placement.  Pretty rustic.

Dorie calls for sprinkling a couple tablespoons each of walnut pieces and raisins over it all, but, since I was using raisin bread, I left them out.

Carefully pour about 1/3 of the custard over the apples, letting it find its way into the crevices.  Bake for 10 minutes to settle the custard a bit.  Then pour additional custard over until it reaches the tart rim - not too much or it will spill over (I didn't use all of mine).


the custard poured in


Bake for another 40-45 minutes until the custard is set.


interesting look, eh?

one more view

I served this for dessert that same evening, garnished with a dollop of chantilly and some nut crumble.  Despite my skepticism going in, this turned out to be one delicious tart!  Dick, Dor, Carl and Steve all thought so too.  And I still have golden raisin bread in the freezer - cool!

And next time?  I'm already envisioning thinner apple slices and a rectangular tart pan to allow for more attractive rows of apples and toast.  Yes, I would do this again.

My second recipe from "Baking Chez Moi"

I was delighted to receive Dorie Greenspan's recently published book "Baking Chez Moi" as a Christmas gift from Steve.  I simply love immersing myself in a new baking book, perusing the recipes and all of the great tips and techniques offered throughout the pages.  And, to top it off, Dorie's Paris connections and on-the-ground access to so many local French recipes makes it all the more enticing!

A few weeks back I made the custard apple squares recipe that had been highlighted online, and, being on the hook for dessert for a family gathering this past weekend, I was eager to delve deeper into the book for my second trial.

But, before I launch into that . . .

Last evening we took a quick drive through the entrance roads to Meijer Gardens to take a gander at the holiday lights.  The sun had just set and there was still a hint of pink in the western sky, but the lights were all illuminated and a pleasure to behold!

entrance to the main building at Meijer Gardens

There were many more lights to see and the picture doesn't even begin to do them justice, but, suffice it to say, if you happen to be in Grand Rapids over the Christmas and New Year holidays, be sure to stop in for a visit.

Now on to the recipe!  I decided on a version of the "pear tart with crunchy topping", since I had already purchased apples for my dessert prep.  I even had some of my pâte d'amande tart dough in Mom's freezer from my late summer visit, so out it came, making my prep much more straight forward.

In a nutshell this tart consists of a fully blind-baked crust, fruit filling and a crunchy nut topping made with egg whites, confectioner's sugar and nuts (in this case sliced almonds).  Dorie's recipe calls for sautéeing diced pears in sugar and butter to caramelize them, after which they are placed into the blind-baked crust and topped with the nut mixture.  Bake at 400º for about 25 minutes until the topping is golden and shiny and voila!

just out of the oven

For my version I used a combo of Golden Delicious and Granny Smith apples instead of pears and added some orange zest and a splash of OJ to my sauté mixture.  My fruit didn't caramelize like I had hoped, but I didn't want to cook it too long for fear of mushiness (I always prefer a hint of crunch to my apple tarts.)

My first bite gave me pause.  Although the apples were just the degree of al dente I wanted, I wasn't sure about the overall flavor of the apple mixture and the ever-so-subtle hint of orange.  The crust was done to perfection, but the crunchy almond topping seemed almost too much.  I think I prefer a nice nut crumble to add the necessary crunchy texture and light buttery sweetness that marries so well with the fruit.

All in all the tart was a hit with the family, no doubt due in part to the accompanying vanilla bean gelato.

And I must say - not bad with the next morning's cup of coffee!

Tarte Tatin

Before I jump into the topic at hand I'd like to share a photo of this gorgeous maple tree that we've been viewing from our window every day these past few weeks.  It's a beauty!

Making a classic tarte tatin has been on my to-do list for some time now.  So when a recent NYT article with the tatin recipe from Gotham Bar and Grill was published online, I felt it was time.

Over the years I've tried my hand at a couple of variations, one being a few summers ago when I made petite versions in mini muffin pans with plums and peaches. They were messy but deeeelicious. More recently, a second attempt involving a mango version from Christophe Felder's book Les Folles Tartes, turned out OK, but something about the flavor of the mangoes put me off.

As is my wont, when I'm planning to make a classic of anything, I compare a number of recipes to see how different chefs approach the process.

In addition to Felder's I reviewed recipes from Dorie Greenspan, Michel Roux, Philippe Conticini, Sherry Yard, Francois Payard and the above mentioned Gotham B&G. Each had a slightly different take on the process.

The recommended apples ran the gamut from Golden Delicious, Gala, Braeburn, Granny Smith, Cox and Honeycrisp, typically requiring 6-8 apples for a 9-10" tart. I opted for a mixture of Braeburn and Granny Smith, partly because I had never baked with Braeburns and thought it a good test.  I like G. Smith because they hold their shape, and their tartness goes so well with buttery pastry and caramel.

Most recipes call for pâte feuilletée (puff pastry), although a couple used pâte brisée.  

Sherry Yard likes to use croissant dough as her tart base.  Go figure.  The quantity of dough is generally about 8 ounces.  This is another one of those times when it's great to have some puff pastry already made and in your freezer!

Typically sugar and butter (amounts vary from recipe to recipe) are used to create a caramel. Some variations involve making the caramel, pouring it into a moule à manqué (cake pan) and temporarily setting it aside. The prepped apples are then placed over the cooled caramel and baked in a 350-375 oven for perhaps 30 minutes to soften and caramelize them. They are then topped with a round of pastry and placed back in the oven to continue the caramelization and bake the pastry until golden brown.

Alternatively some recipes have you bake the pastry round separately and then place it onto the baked apples. The whole thing is then turned out onto a platter before serving.

After a while all these variables become a bit overwhelming. I decided to go the classic route, starting on the stove top and then moving into the oven. I followed the guidelines in Dorie Greenspan's "Paris Sweets" recipe, although I did not make the vanilla tea version as she does.

First I rolled out my puff pastry to about 3 mm thick, and using a cake circle as a guide, cut a round slightly larger than my pan.  I pricked it with a fork, covered it and held it in the fridge until later. Interestingly, both Michel Roux and Gotham B&G have you put the raw pastry over the apples while still on the stovetop before even going into the oven. To each his own.

Then I took my new 10" Lodge cast iron pan (can't believe it took me so long to buy one!), coated it in 113 gm (4 oz) soft butter and sprinkled 150 gm of sugar over it. I used a mixture of my own vanilla sugar and granulated sugar.

I had peeled, cored and quartered a total of 6 apples . . . .

which I layered over the butter/sugar:

The pan is placed over medium heat on the stovetop until a light to medium caramel develops. The time for that will vary, and one must keep on eye on things and adjust the heat as needed to prevent burning.

Here is where one must use judgement about the extent of the caramelization.  I thought this was looking nicely ready so I retrieved my pastry from the fridge and placed it over the apples:

Recommended baking temperatures ran from 350-375ºF and baking times varied from 30-50 minutes with the ultimate goal being a nicely browned pastry.  I baked mine at 375 for about 35 minutes and thought it had achieved just that very look:

I gave it just a minute or two to let any bubbling subside, then, placing a flat platter over the pan, handily flipped the tart out with nary a hitch (I was a bit worried as to how I would fare with that step). Imagine my disappointment when I saw before me a much paler version than what I had anticipated! Plus the Braeburn apples, while actually still holding some shape, were on the verge of mushy applesauce!!

Even the edge of the pastry looked underdone, and I dreaded biting into a doughy mouthful (the worst).

But have no fear.  Steve arrived home soon after the tart came out of the oven and said "why don't you put it back in?" So I slipped the whole thing back onto a parchment lined sheet pan, apple side up and baked it for a good 30 minutes more.  The fix was in . . .

Check out the caramelized pastry now!

Lesson learned.  Next time I would let the caramel on the stove top go a tad further and would definitely extend the baking time to a decent 50-60 minutes. Since one can't see what's going on with the apples underneath the pastry, it takes practice to understand the timing of it all. Other than that I found the whole thing really very straight forward and wondered why I hadn't made this long ago.

In preparation for this tarte tatin I had made a classic vanilla bean crème anglaise ice cream base the day before which had spent the night chilling in the fridge. I processed it in my good old Cuisinart canister model ice cream maker and held it in the freezer until serving.

Nothing fancy . . .

but delicious and well worth it!

Yes, I would definitely make this again.

A simple apple dessert

I've been a fan of Dorie Greenspan's for some years now.  With her book "Paris Sweets" in hand,  I spent a few weeks in Paris during the spring of 2009 searching out the pastry shops from whence the recipes came and then making and comparing my results with the shops' products.   I only made it through a portion of the book, but it was great fun and a terrific way to visit the many wonderful pâtisseries à Paris.  I hope to resume the project some day.

At long last I finally got off my duff and subscribed to Dorie's blog in which the current focus is her new book "Baking Chez Moi".  I was slated to make dessert for a family supper at my brother's this past weekend, and my interest was piqued by the "Custardy Apple Squares" video and recipe.

What a simple and delicious dish!  Here it is in all of its golden glory.

Dorie recommends using Fuji apples, so I followed her lead.  I think this is actually the first time I've baked with Fuji's, and they worked beautifully in this recipe. With so many apple varieties available, it can be somewhat dizzying to decide which ones to use. For example when I make chausson aux pommes, I like to use Granny Smith, diced and sautéed in a little butter and vanilla sugar before assembly. The tart apples marry so nicely with the buttery puff pastry. Whereas when making an apple tart, I often use a mixture of Macintosh or Macoun with Golden Delicious. With those apples there is a pleasant flavor and texture combo going on that I find very appealing.

Here we go. I'm calling this a custard apple cake.  It's rather clafoutis-like and trés simple!

Butter an eight inch cake pan.  Heat the oven to 400º.

The ingredients couldn't be more straight forward:  flour, baking powder, egg, sugar, a pinch of salt, vanilla extract, milk, melted butter and, of course,  three peeled, cored and thinly sliced apples.

Whisk 1/2 cup flour and 1 teaspoon baking powder.  In a separate bowl whisk 2 eggs with 1/3 cup sugar and a pinch of salt; blend in 2 teaspoons vanilla extract, 6 tablespoons of milk, 2 tablespoons melted butter; fold in the dry ingredients, then the apples to coat them in the mixture.

Heat the oven to 400ºF. Scrape the apple mixture into the prepared pan . . .

and arrange the apples, if you must . . . .

This baked about 40-45 minutes in my convection oven. I looked for the filling to be set and the apples to be oh so golden brown before calling it done.

Mmmmm!

After about 15 minutes I turned the cake out onto a wire rack to finish cooling. You have the option of serving it still warm, but, since Steve and I were transporting it elsewhere, I opted to serve at room temperature.

Before serving I gave it a dusting of powdered sugar . . .

then portioned and garnished with a dollop of crème chantilly and a sprinkling of nutty granola and toasted sliced almonds.

Yes indeed!  Thanks Dorie!!