
Tuiles au caramel et gingembre confit - trials and tribulations
/
Now that I've resumed working on the recipes in Philippe Conticini's book La Pâtisserie des Rêves (Biscuit Secs section, to be exact) I am reminded of the frustrations I encountered with some of the previous recipes. Editing? Recipe testing? Who's doing it??
I've made tuiles on rare occasions, and, since I'm always up for doing something that isn't in my usual repertoire, I approached this recipe with a light heart and an excitement for a unique version of this crisp cookie.
Tuile is the French word for tile and refers to a light, thin cookie which is usually formed over a rolling pin while warm, giving it a curved, terra-cotta-roof-tile appearance. It's a great dessert vehicle, particularly as an accompaniment for mousses, ice creams, sorbets or what-have-you.
Most tuile recipes are very straight forward and come together in a flash! Some use ground nuts and most use egg whites, not yolks or whole eggs. You refrigerate the mixture until you're ready to bake. What's not to like? This one, although not really time consuming, takes a bit of thought before putting it all together.
In a nutshell, it requires making two different caramel sauces (la sauce au caramel and la ganache au caramel) in addition to the pâte à tuiles. The sauces are then incorporated into the pâte.
A word about caramel sauce: it isn't difficult - it's a matter of cooking sugar (110 gm here) and a little water (3 tablespoons here) to an amber color, removing from the heat and adding cream (in this case 25 ml of milk and 35 ml of cream ) and a bit of butter (10 gm), creating a lovely, smooth concoction that is so good for sooooo many things! And it keeps for weeks in the fridge. I always have a batch of caramel sauce on hand (I've been using the recipe from Emily Luchetti's "Star's Desserts" for years and love it!).
Pay attention! Wear gloves, particularly when adding the dairy, since there's a lot of bubbling going on - and this stuff is hot, hot, hot!!!
This caramel sauce recipe led me to contemplate some differences. While Em's recipe uses a 3:2 ratio of sugar to cream, this one uses 2:1. The end result was indeed a deeper, richer amber caramel due to the lower amount of cream (you'll see it in an upcoming picture.)
The second caramel recipe was a tad more involved. It called for 80 gm sugar and 3 tablespoons water cooked to 125º C at which time a scant teaspoon of glucose is added.
The addition of glucose (I substituted honey) at the early stage of sugar boiling is intended to prevent crystallization, but I'm not sure why Philippe uses it here and not in the first caramel. Artistic license? Perhaps it's to insure a smooth, silky caramel ganache with the addition of the white chocolate at the end?
Continue the cooking to a nice amber color, then, off the heat, add 65 ml heavy cream and a noisette de beurre (use your judgement - I used a walnut sized piece).
After a bit of cooling add 45 gm chopped white chocolate and a pinch of fleur de sel and blend til smooth.
Both caramel sauces can be made ahead and refrigerated. Since I was making the pâte à tuiles the same day, I proceeded once the caramels had cooled a bit.
This preparation is trés simple: melt 180 gm butter; whisk together 4 egg whites, 4 eggs and 35 gm brown sugar; add 90 gm flour and the melted butter; after brisk whisking add in 130 gm sauce de caramel (there was just enough!) and 30 gm ganache au caramel (plenty with leftovers) and blend.
In the above photo note the deep caramel sauce on the right and the lighter ganache au caramel below it.
Place the covered mixture in the fridge for a good hour (I left it over night).
Mince 20 gm crystallized ginger and have some fleur de sel on hand for garnish.
When ready to bake, heat the oven to 350º. Philippe calls for parchment lined sheet pans and instructs you to form oval discs, the diameter of which you choose. The recipe claims a yield of 20 tuiles, but there is no guideline as to how much batter to use per tuile or how thin it should be.
To get a sense of apportionment I divided the total batter weight by 20 and came up with 40 gm (or about 3/4 of a 1/4 measuring cup). I had to start somewhere, so I used the 1/4 cup as my ladling device . . .
and proceeded to scoop the batter onto the sheet pan. I must admit I was harboring some skepticism, so I only did three on a 1/4 sheet pan as my initial trial.

I spread them out into ovals and sprinkled some ginger and fleur de sel on top.
I wasn't sure how long they would bake, since the recipe gave no hint of baking time. Now I do understand that principle, since I was always taught that "you bake until it's done", but it is a bit helpful to have a general time frame, ne c'est pas?
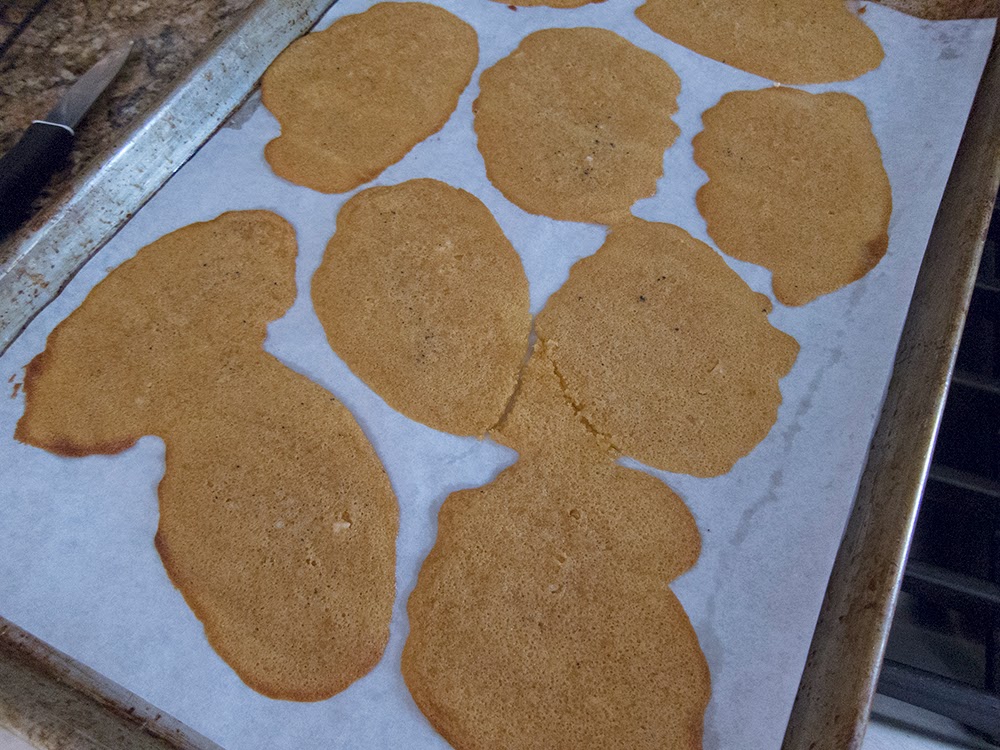
This first batch baked for about 15 minutes. The batter ran together and I had to trim around the edges to neaten up the shapes. They stuck to the parchment paper and were obviously too thick and underdone. I did proceed to shape them but knew this was NOT the result I was seeking!
For the next batch I used one of my handled ice cream type scoops to dole out a lesser quantity of batter in hopes of making a thinner, smaller tuile. This batch baked about 15 minutes, and I even bumped up the oven temp a tad; the batter again ran, requiring some trimming before they finished baking. Not a pretty picture.
However, I was getting there - even though these also stuck to the paper, they shaped up quite nicely and didn't look too bad in the final analysis . . .
Finally the light bulb went on - Silpat!! Why didn't I think of that sooner??
For my final batch I used even less batter and tried to smooth it out thinly on Silpat lined sheet pans.
This time they baked about 15 minutes, became nicely browned and peeled off the silicone as easy as pie!
Onto the rolling pin they went . . .

At last! These shaped beautifully, came out nice and crisp and didn't look half bad!!


And finally - what about the taste?? Steve and I agreed that, even though I used a light hand (or so I thought) with the fleur de sel, there was too much salt - and there should have been more ginger coming through. They were also very greasy, leaving our fingers with a coating that had to be wiped off.
The texture was crisp and the caramel flavor quite pleasing, but overall a disappointment, particularly considering the steps involved for component prep, and the trials and tribulations of portioning and baking times.
Too bad - here's another one that's going into the "don't do again" file!
If I ever makes tuiles again, I'll go to the many basic recipes available in my baking books or on line and choose a straight forward approach. Live and learn.
And what did I do with the finished product? Crushed 'em up, put 'em in the freezer and hope to use the crumbs to create a croustillant (a crunchy layer for desserts generally made with ground toasted nuts (or nut paste), melted chocolate and crushed gavotte crepe cookies.) Yeah!
 |
| the recipe |
I've made tuiles on rare occasions, and, since I'm always up for doing something that isn't in my usual repertoire, I approached this recipe with a light heart and an excitement for a unique version of this crisp cookie.
Tuile is the French word for tile and refers to a light, thin cookie which is usually formed over a rolling pin while warm, giving it a curved, terra-cotta-roof-tile appearance. It's a great dessert vehicle, particularly as an accompaniment for mousses, ice creams, sorbets or what-have-you.
Most tuile recipes are very straight forward and come together in a flash! Some use ground nuts and most use egg whites, not yolks or whole eggs. You refrigerate the mixture until you're ready to bake. What's not to like? This one, although not really time consuming, takes a bit of thought before putting it all together.
A word about caramel sauce: it isn't difficult - it's a matter of cooking sugar (110 gm here) and a little water (3 tablespoons here) to an amber color, removing from the heat and adding cream (in this case 25 ml of milk and 35 ml of cream ) and a bit of butter (10 gm), creating a lovely, smooth concoction that is so good for sooooo many things! And it keeps for weeks in the fridge. I always have a batch of caramel sauce on hand (I've been using the recipe from Emily Luchetti's "Star's Desserts" for years and love it!).
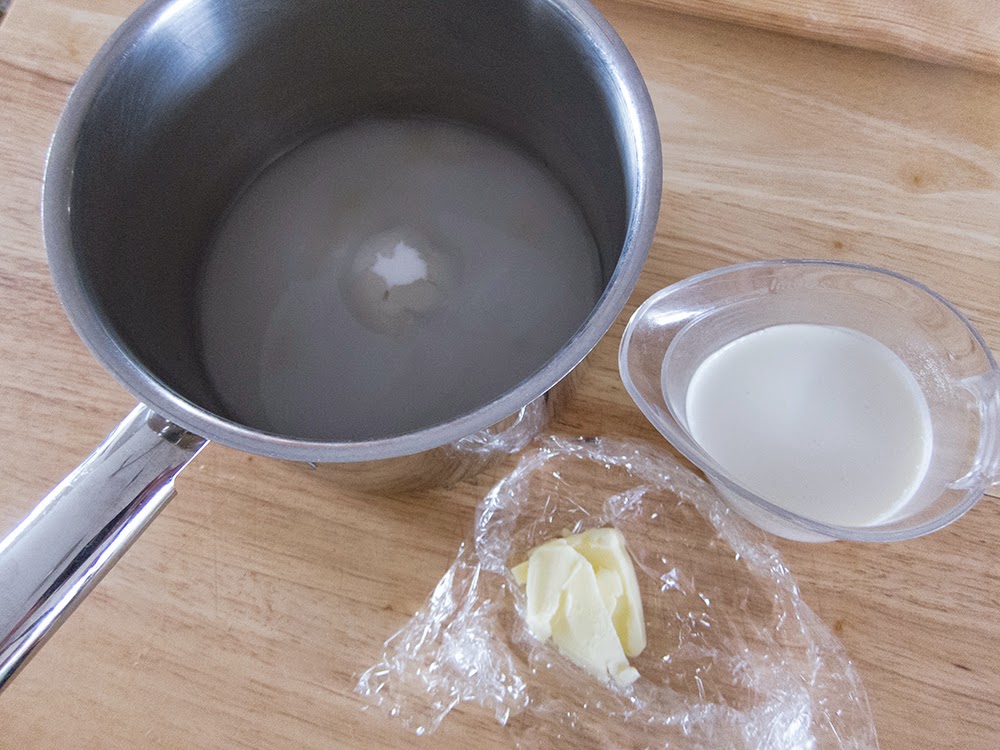 |
| les ingredients pour la sauce au caramel |
Pay attention! Wear gloves, particularly when adding the dairy, since there's a lot of bubbling going on - and this stuff is hot, hot, hot!!!
 |
| adding the dairy - notice the oven glove! |
This caramel sauce recipe led me to contemplate some differences. While Em's recipe uses a 3:2 ratio of sugar to cream, this one uses 2:1. The end result was indeed a deeper, richer amber caramel due to the lower amount of cream (you'll see it in an upcoming picture.)
The second caramel recipe was a tad more involved. It called for 80 gm sugar and 3 tablespoons water cooked to 125º C at which time a scant teaspoon of glucose is added.
The addition of glucose (I substituted honey) at the early stage of sugar boiling is intended to prevent crystallization, but I'm not sure why Philippe uses it here and not in the first caramel. Artistic license? Perhaps it's to insure a smooth, silky caramel ganache with the addition of the white chocolate at the end?
 |
| les ingredients pour la ganache au caramel |
Continue the cooking to a nice amber color, then, off the heat, add 65 ml heavy cream and a noisette de beurre (use your judgement - I used a walnut sized piece).
After a bit of cooling add 45 gm chopped white chocolate and a pinch of fleur de sel and blend til smooth.
 |
| les ingredients pour la pâte à tuiles |
In the above photo note the deep caramel sauce on the right and the lighter ganache au caramel below it.
 |
| the finished pâte à tuiles |
Place the covered mixture in the fridge for a good hour (I left it over night).
Mince 20 gm crystallized ginger and have some fleur de sel on hand for garnish.
When ready to bake, heat the oven to 350º. Philippe calls for parchment lined sheet pans and instructs you to form oval discs, the diameter of which you choose. The recipe claims a yield of 20 tuiles, but there is no guideline as to how much batter to use per tuile or how thin it should be.
To get a sense of apportionment I divided the total batter weight by 20 and came up with 40 gm (or about 3/4 of a 1/4 measuring cup). I had to start somewhere, so I used the 1/4 cup as my ladling device . . .
 |
| ginger and fleur de sel garnish, tuile batter |
and proceeded to scoop the batter onto the sheet pan. I must admit I was harboring some skepticism, so I only did three on a 1/4 sheet pan as my initial trial.
I spread them out into ovals and sprinkled some ginger and fleur de sel on top.
 |
| ready for the oven |
This first batch baked for about 15 minutes. The batter ran together and I had to trim around the edges to neaten up the shapes. They stuck to the parchment paper and were obviously too thick and underdone. I did proceed to shape them but knew this was NOT the result I was seeking!
 |
| the first try - too thick and soft! |
For the next batch I used one of my handled ice cream type scoops to dole out a lesser quantity of batter in hopes of making a thinner, smaller tuile. This batch baked about 15 minutes, and I even bumped up the oven temp a tad; the batter again ran, requiring some trimming before they finished baking. Not a pretty picture.
 |
| running batter and weird shapes! |
 |
| the second batch |
For my final batch I used even less batter and tried to smooth it out thinly on Silpat lined sheet pans.
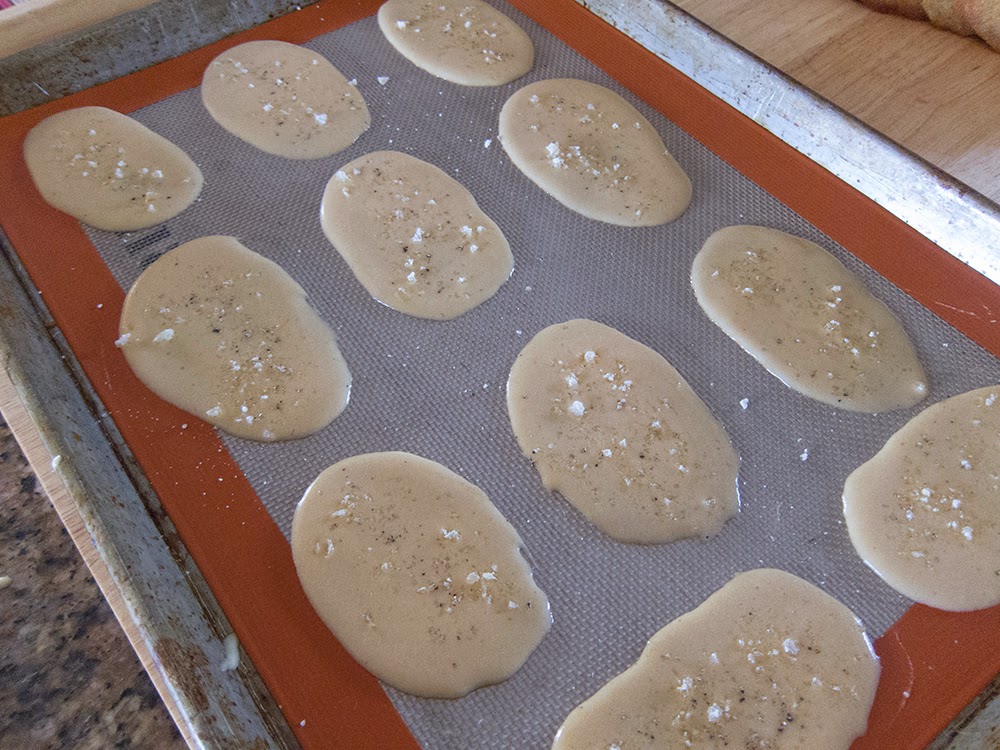 |
| ready for the oven |
This time they baked about 15 minutes, became nicely browned and peeled off the silicone as easy as pie!
 |
| and no running! |
Onto the rolling pin they went . . .
At last! These shaped beautifully, came out nice and crisp and didn't look half bad!!
 |
| I used vanilla fleur de sel - see the grains? |
And finally - what about the taste?? Steve and I agreed that, even though I used a light hand (or so I thought) with the fleur de sel, there was too much salt - and there should have been more ginger coming through. They were also very greasy, leaving our fingers with a coating that had to be wiped off.
The texture was crisp and the caramel flavor quite pleasing, but overall a disappointment, particularly considering the steps involved for component prep, and the trials and tribulations of portioning and baking times.
Too bad - here's another one that's going into the "don't do again" file!
If I ever makes tuiles again, I'll go to the many basic recipes available in my baking books or on line and choose a straight forward approach. Live and learn.
And what did I do with the finished product? Crushed 'em up, put 'em in the freezer and hope to use the crumbs to create a croustillant (a crunchy layer for desserts generally made with ground toasted nuts (or nut paste), melted chocolate and crushed gavotte crepe cookies.) Yeah!
