Adieu Sur La Table Grand Rapids

IMG_1485.jpeg

A chapter has come to an end, not only for me but for many who enjoyed what this place had to offer.

Sur La Table Breton South here in Grand Rapids MI has closed permanently. Once the virus hit, Sur La Table stores across the country were closed for a solid three+ months. Some went under the axe, although Breton South survived the first cut and opened for retail in early July. But Chapter 11 bankruptcy and sale of the company led to more closures including Breton. Classes never resumed and now the space is available for the next business that might want to set up shop. Who knows, eh?

It was a great place to teach pastry classes. The kitchen well appointed, sunny and light with plenty of room to do what needed to be done. I met lots of interesting people (both co-workers and students), learned a lot myself and enjoyed being busy with prepping, setting up and instructing all types of folks with all levels of interest and experience. Good stuff.

Morning buns

Morning buns

Macarons

Macarons

Rustic Dutch oven bread

Rustic Dutch oven bread

New York style bagels

New York style bagels

Thanks for the memories.

On to the next chapter, whatever that may be. Meanwhile my new mantra is “I walk, I bake, I blog, I dream”.

Enjoy autumn and may you find your own new adventures.

168A4DD5-1F5E-43E1-9606-B8F9F32B9A7B.jpg

Victoria sponge

IMG_4556.jpg

Sur La Table is currently offering a “Great British Baking” class on the winter/early spring calendar and I’m on the docket to teach these British specialties.

In addition to sticky toffee pudding and sausage rolls, the classic Victoria sponge cake is on the menu, so why not trial SLT’s recipe along side another one by British chef Will Torrent - just for fun of course!

Chef Torrent has written a number of books, one of which I purchased a year or so ago. It’s chock full of goodies for one of my most enjoyable past times - afternoon tea. His recipe for Victoria sponge is a tad different due to the replacement of about a quarter of the all purpose flour with cornstarch, the result being a lighter texture.

IMG_4534.jpg

I also reviewed a number of other Victoria sponge recipes and found that some call for self-rising flour (or self-raising as the Brits say) which is a softer flour with baking powder and salt already in the mix. Some call for cake flour, another softer flour without any leavening additions. Many simply use all purpose flour. As always, there’s more than one way to skin a cat!

I’m sure many of you know the substitution if you don’t happen to have cake flour in your pantry - place 2 tablespoons cornstarch in a one cup measure, top it off with all purpose flour to yield one cup. Sift it together and voilà! Cake flour.

The base recipe for Vic-sponge is similar to pound cake: equal weights butter, sugar, and flour, plus eggs (usually a bit less by weight), baking powder, salt and vanilla. Many also have a small amount of milk blended in at the end - some give a specific amount, some a range of anywhere from 1-4 tablespoons (depending on the amount of batter/size of the cake). The milk is intended to “slacken” the mixture making it less stiff for spreading evenly in the pan.

This recipe is for a six inch double layer cake. The batter can be baked in ONE buttered/parchment lined/buttered again/floured pan and then sliced into two layers once cooled OR in TWO prepared six inch-ers which takes out the layer slicing step. Just remember the two shallower layers won’t need quite as long to bake.

Note: double the recipe for an 8” cake, either baked in one pan sliced into two layers or two pans with shallower layers ready to assemble.

IMG_4531.JPG

All ingredients should be at room temperature. The differences between the SLT and Torrent recipes are a tad more baking powder in SLT’s and the replacement of about a quarter of the flour with cornstarch in Torrent’s.

Here you go:

Heat your oven to 350ºF. Butter the bottom of your cake pan(s), place a round of parchment down, butter parchment and sides of pan(s) and dust with flour.

Break 2 large (~ 100 g) eggs into a small bowl and lightly beat them. In the bowl of a stand mixer fitted with the paddle attachment, cream 113 g softened unsalted butter with 113 g granulated sugar on medium high for 3-5 minutes until light and fluffy. Scrape down the bowl. Reduce speed to medium low and add 1 teaspoon vanilla extract (or vanilla bean paste) and the lightly beaten egg in three additions, blending fully and scraping down after each addition. On low speed add 113 g all purpose flour (88 g ap + 25 g cornstarch in Torrent’s version), 1.5 teaspoons baking powder (1 tsp in Torrent’s) and 1/4 teaspoon fine sea salt and mix just until combined.

I like to take my bowl right off the mixer and finish things up by hand with a spatula - it helps to get down into the bottom to be sure everything is blended in. Then fold in 1-2 tablespoons whole milk as needed to slacken the mixture. I went with the smaller quantity and both batters came out with a bit of heft, yet nice and smooth and easy to work with.

IMG_4532.JPG

Transfer batter to the prepared pan and smooth the top . Below is SLT’s - they both looked pretty much the same going into the oven.

IMG_4533.jpg

Bake about 25 minutes until springy to touch in the center and a cake tester comes out clean.

Torrent’s rose into a dome while SLT’s stayed flat with just a bit of a dent in the center. Not to worry.

IMG_4542.JPG

Once cooled, slice into two layers. A little tighter crumb on Torrent’s perhaps.

IMG_4547.jpg

Spread a layer of strawberry (or jam of your choice) on the bottom and then spread a layer of lightly sweetened whipped cream over the jam. Sandwich ‘em up!

IMG_4548.jpg
IMG_4549.JPG

Dust with powdered sugar and you’re good to go!

When slicing you’ll invariably get some cream and jam ooze but it certainly doesn’t affect the flavor. On the right below is Torrent’s more domed version. They both have a nice crumb and golden color.

IMG_4561.jpg

And guess what! They both taste great. What a lovely combo of jam, cream and vanilla cake. Steve and I noted that Torrent’s texture was a bit lighter but not really a huge difference at all.

Store covered in the fridge and enjoy a slice for several days to come. Not bad.

IMG_4562.JPG

Until next time. Stay warm and think spring!

IMG_4555.JPG

Happy spring!

IMG_3678.JPG

Better late than never, it’s high time I sent welcome-to-spring wishes to everyone. Even though we actually had a bit of SNOW! the other evening, we’re seeing green shoots coming out of the bare ground and some tree limbs showing their first hints of leaves. We’ll take it!

It seems life has a way of carrying us onward, often to the point of prompting us to ask “what I have been doing these past few weeks/months?!” While I don’t have a specific recipe or new project to share with you on the blog this time around, I thought it would be nice to show you what I’ve been up.

Oh - news flash! I’ve finally added a search box in the blog’s sidebar so you can type in key words, e.g. “croissant”, and find posts I’ve written on that particular topic. Cool!

Crunch top berry mascarpone profiteroles

Crunch top berry mascarpone profiteroles

Hazelnut choux rounds getting ready for Paris-Brest

Hazelnut choux rounds getting ready for Paris-Brest

Lemon mascarpone cake with orange honey buttercream

Lemon mascarpone cake with orange honey buttercream

Petite citrus cakes

Petite citrus cakes

Next up is my new favorite version of financier, those delightful teacakes that I love so dearly. This one is coffee hazelnut, dipped in dark chocolate ganache and topped with chopped toasted nuts. SO GOOD.

Coffee hazelnut financiers

Coffee hazelnut financiers

I simply cannot ignore fresh fruit tarts - they always make me smile! These contain a baked ricotta custard/vanilla scented filling - deelish with fresh berries.

IMG_3721.jpg
Sea salt caramel and espresso nib shortbread

Sea salt caramel and espresso nib shortbread

Current shortbread flavors, all tubed up!

Current shortbread flavors, all tubed up!

Breton blueberry almond tarts

Breton blueberry almond tarts

Ham and cheese whole wheat spirals

Ham and cheese whole wheat spirals

Lemon ricotta cakes

Lemon ricotta cakes

Cream cheese Danish

Cream cheese Danish

Ham/cheese spirals and Danish combo

Ham/cheese spirals and Danish combo

Another thing that keeps me busy involves planning and preparing for my classes at Sur La Table in Grand Rapids. Things like figuring out the best way to set up the class for optimum hands-on experience, determining quantities of dough that might have to be prepped ahead for topics like croissants or artisan breads, orchestrating a smooth flow to the class with delicious baked goods as the end result. What’s not to like.

Below is a test I did for a no-knead rustic bread baked in a Dutch oven style enameled cast iron pot. The loaf on the right was done in a gorgeous Le Creuset 2.25 quart lidded saucepan (sorry the lid is missing from the picture!) and the one on the left on a sheet pan. Not only the rise but the crusty, golden, shiny surface of the one from the cast iron pan can’t be beat! NOTE: one pound of dough worked very nicely in this size pan, the taller sides giving just the right lift to the dough.

Rustic no knead loaves

Rustic no knead loaves

There’s lots to be learned. Check out the class calendar on Sur La Table’s website for all sorts of topics, both savory cooking and baking/pastry classes. There are a number of chef instructors, myself included, just waiting to share their knowledge with you.

Until next time - happy baking!

2019 - here we go!

Chocolate chip brioche swirls

Chocolate chip brioche swirls

Wow! We’re already a full week into 2019, and I’ve baked barely a thing, much less written a blog post. After the busy-ness of the mid-November through Christmas hustle and bustle, I’ve been taking a little stay-cation and easing into the New Year. You know - tidying up the house, putting away holiday decorations, starting some financial summaries for tax time (THAT’S vacation you ask??), working on a jigsaw puzzle, going for my walks and contemplating the weeks and months ahead.

I recently learned that in France it’s not proper to wish anyone Happy New Year until January 1st and then you have the entire month to express that particular wish. But come February 1st - nuh-uh, not allowed. So I still have plenty of time, right? Happy New Year everyone!!

At the start of a new year it’s fun to go back over the past year and look at various projects completed and goodies baked. Here are just a few.

My current favorite cookie - Raspberry almond thumbprints

My current favorite cookie - Raspberry almond thumbprints

Maple pots de crème with maple walnut shortbread

Maple pots de crème with maple walnut shortbread

Quiche Lorraine -mmmmm good!

Quiche Lorraine -mmmmm good!

Raspberry pistachio spirals and chausson aux pommes

Raspberry pistachio spirals and chausson aux pommes

Pistachio orange cakes with orange honey Swiss meringue buttercream

Pistachio orange cakes with orange honey Swiss meringue buttercream

Caramel apple tarte

Caramel apple tarte

Cheesy gougères

Cheesy gougères

Blueberry custard buns

Blueberry custard buns

Melt-In-Your-Mouth chocolate cakes/white and dark ganache

Melt-In-Your-Mouth chocolate cakes/white and dark ganache

And Let’s not forget the ever favorite croissant aux amandes

And Let’s not forget the ever favorite croissant aux amandes

Just before Christmas I returned to Sur La Table here in Grand Rapids as Pastry Chef Instructor. So far, so good - macarons, croissants, cast iron desserts (tarte tatin, cherry/chocolate bread pudding, bananas foster) - and more to come in the upcoming weeks. Each month’s schedule almost always has macaron and croissant classes, with seasonal variations in the other baking topics offered. Just visit Sur La Table’s class page to see what’s on the calendar. While the chef instructor schedule isn’t posted until a week ahead, chances are I’ll be teaching a decent percentage of the baking and pastry related classes. Hope to see you there!

So what might 2019 bring? As I age and we experience the loss of the generation before us as well as some of our own generation, it becomes more and more clear how important it is to enjoy each day, take care of ourselves, revel in the company of family and friends and remain upbeat about the future and all that we have. As Steve often says “life is short - go to Paris”.

And of course, here’s to many new baking adventures (sorghum flour anyone?), continuing to learn and teach others this craft that I’ve come to love so much.

Once again - a big Happy New Year to all!

Raspberry custard tartelettes

Raspberry custard tartelettes

New York style bagels


After teaching several bagel classes recently I was gung-ho to make my own New York style bagels at home.  Chewy, molasses-y and yummy.

The process is pretty straight forward.  Make the dough, let it rise, divide the dough, shape the bagels, let 'em rest a bit, boil 'em, egg wash and top 'em, then bake them in the oven for the finale.

All in an afternoon's work.

Following the Sur La Table recipe for 8 bagels, combine 500 g bread flour and 1 tablespoon salt in the bowl of a stand mixer fitted with the dough hook.  Mix briefly to combine.

In a separate bowl place 1.5 cups warm water and sprinkle in 2 teaspoons active dry yeast and 1 tablespoon sugar.  Let stand for 5 minutes until the yeast starts to foam.  Add in 2 tablespoons barley malt syrup and stir to dissolve (see note).

NOTE: since I didn't have barley malt syrup on hand I substituted 4 teaspoons molasses at 2/3 the quantity.  

With the mixer on low add the yeast mixture to the flour/salt and mix to combine.  Then knead the dough on medium speed for 6-8 minutes until smooth and elastic. The dough is a bit sticky.

Place the dough in a lightly oiled bowl and allow it to rise in a warm spot for about an hour (until doubled).

after the rise

Now comes the fun part!  Shaping - yes! 

Before you start, get the oven heating to 425ºF convection (450 conventional).

Turn the dough out onto a lightly floured surface, deflate lightly and divide with a bench scraper into 8 pieces.


Shape each piece into a smooth, tight ball.  This step is the most fun, especially once you get the feel of the dough as it rounds up and develop the muscle memory in your hand to make it happen.  You gotta be there to understand it.


OK, so maybe THIS step is really the most fun - forming the bagel.

First stick your thumb through the center.


Once the hole is formed, place your index and middle fingers through it and rotate to stretch out the hole to about 2 inches.


This is just one of the ways to shape a bagel. The other involves rolling each piece into a snake, bringing the ends together in an overlapping fashion, then putting your fingers through the center, palm down, with the overlap on the work surface and rolling to seal.

Once the bagels are shaped, place them on a lightly floured surface, cover with a damp cloth and let them rest about 10 minutes.


Meanwhile, bring about 4 quarts of water to a boil, adding about 3 tablespoons barley malt syrup (or in my case, about 2 tablespoons molasses).

Drop the shaped and rested bagels into the boiling water and boil for a minute on each side.


Lift them out with a slotted spoon and place on a grid to drip a bit, then brush with egg wash and sprinkle with topping(s) of choice.  I chose sesame seeds for some and left the rest plain at Steve's request.  

Have a sheet pan ready lined with parchment and sprinkled with cornmeal.


Now pop 'em into the oven and bake for about 20 minutes until nicely browned.  

ATTENTION! Don't open the oven for the first 10 minutes. The initial steam produced by the wet bagels as they go into the hot oven contributes to the crusty exterior.  Plus I'm told that if you open the oven too soon, your bagels may deflate a bit.  Oh no!

But DO rotate your pan after the first 10 minutes to get a nice even bake. It's a rule I follow regularly, no matter what I'm baking.
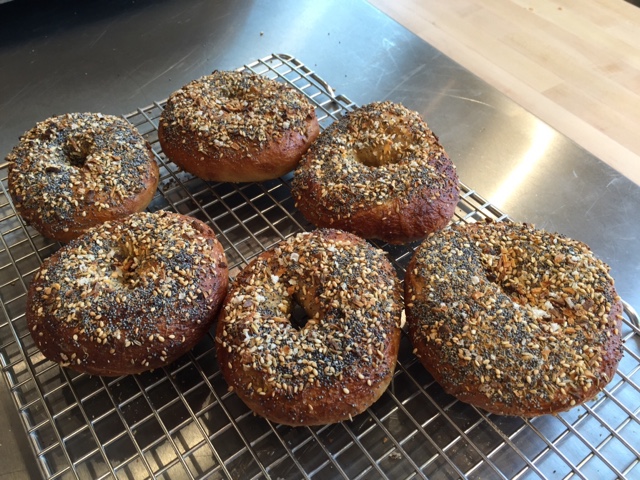

Looking good.


Let these babies cool, then slice right in and enjoy.  I decided for a simple cheddar cheese on mine.


The chew, crumb and molasses essence of this was soooo good.  Yes indeed.

Exciting news!

This past week The French Tarte became licensed to work out of the kitchen at Patricia's Chocolate in Grand Haven, Michigan.  Hooray!

What does this mean you might ask?  Well to start out I'll be baking and offering my tasty all butter shortbread in Patty's shop, accepting orders for shortbread gift boxes and developing a schedule of travel from GR to GH to dovetail with my teaching schedule at Sur La Table here in GR.

Shortbread bar

Taking it step by step. In the meantime I wanted to share with you some of things I've been making in recent months.  

In early August, as I birthday present to myself, I baked an assortment of goodies (from left to right): pavé aux amandes, cocoa hazelnut financiers, bubble eclairs with raspberry currant cream (Yum!) and chocolate milkshake tarts.

By now many of you know my attraction to financiers and tarts. What can I say? I just can't help it!

Once we returned from our trip to France in early October, I've been back in the kitchen doing this and that as well as trying some new shortbread flavors (how about coffee cardamom, oatmeal ginger or coconut lime?!).

My baking activities often seem to revolve around what I happen to have in the fridge - some of my lightly spiced poached pears being just one example. What better than a batch of financier batter to create pear-caramel and raspberry-pistachio crumble versions for our freezer.

The pears also encouraged me to make some individual versions of tarte bourdaloue using the recipe that I had brought back from Le Notre in Paris.

Of course I simply can't forget the household favorite (hint, hint - guess what Steve loves?), the quintessential caramel nut tart. This go around I used some chocolate tart dough that had been waiting in the freezer for that very thing.

Chock full-o-nuts, oh-so-delicious and always a hit.

And for something just a little different - bagels!  These were from a class I taught at Sur La Table where the results were stupendous.  Chewy, not tough, great depth of flavor and definitely a make-again recipe. These are the "everything" version, the deeply browned exterior being due to molasses in the dough as well as some molasses in the bagel boiling water.  Yup!

And so the adventures continue.  Stay tuned.