Sesame cumin crackers

Nothing fancy here folks but these babies are delicious! My first foray into baking with chickpea flour, I came across this recipe when browsing back through some old issues of SIFT magazine (Holiday 2018, No. 12) from King Arthur Baking Company (King Arthur Flour back then). The company published this beautiful magazine over 5 years, 3 issues per year, but, alas, they stopped with the holiday issue at the end of 2019. I have all of them except the very first and they tell me it’s not available. I did find an old press release with a PDF of the first 5 pages and also this link to what’s in that first issue if you’d like to check it out.

This cracker recipe comes from Sofra, the popular middle Eastern bakery/cafe in Cambridge MA. Steve and I have experienced some of their goods in past years, since it’s not far down the road from Mt. Auburn cemetery. During our Providence days, we would occasionally take a drive to stroll the beautiful grounds, enjoy the arboretum and pay our respects to the likes of Henry Wadsworth Longfellow, Dorothea Dix, Winslow Homer and Isabella Stewart Gardner. There’s a great view of Boston from the higher elevations, and birding is popular too. A calming place!

The dough is simple to put together but plan ahead since you roll out quarters of the dough, stack them between parchment and chill them for at least 4 hours or overnight before cutting and baking.

Here’s the recipe: In a small bowl blend 3/4 cup buttermilk with 2 tablespoons tahini (be sure and stir it up well first!). In the bowl of a stand mixer with the paddle combine 227 g / 1.75 cups all purpose flour, 50 g / 1/2 cup chickpea flour (I use Bob’s Redmill), 1 tablespoon sugar, 1 teaspoon kosher salt, 1 tablespoon ground cumin, 1/4 teaspoon ground allspice and 113 g / 4 ounces cold unsalted butter cut in 1/4” cubes. Blend on low until butter is in small pieces then add the buttermilk mixture and mix to a wet dough.

The dough is pretty easy to handle when the work surface is properly floured. Divide the dough in 4, keeping the waiting quarters in the fridge as you roll out one at a time. Roll each quarter to a 12”x13” (ish) rectangle - mine was pretty loose-y goose-y since I envisioned my crackers would end up in a variety of shapes and sizes, and I didn’t mind some rough edges. The main thing is rolling the dough nice and thin (1/16”) for better crisping up during the bake.

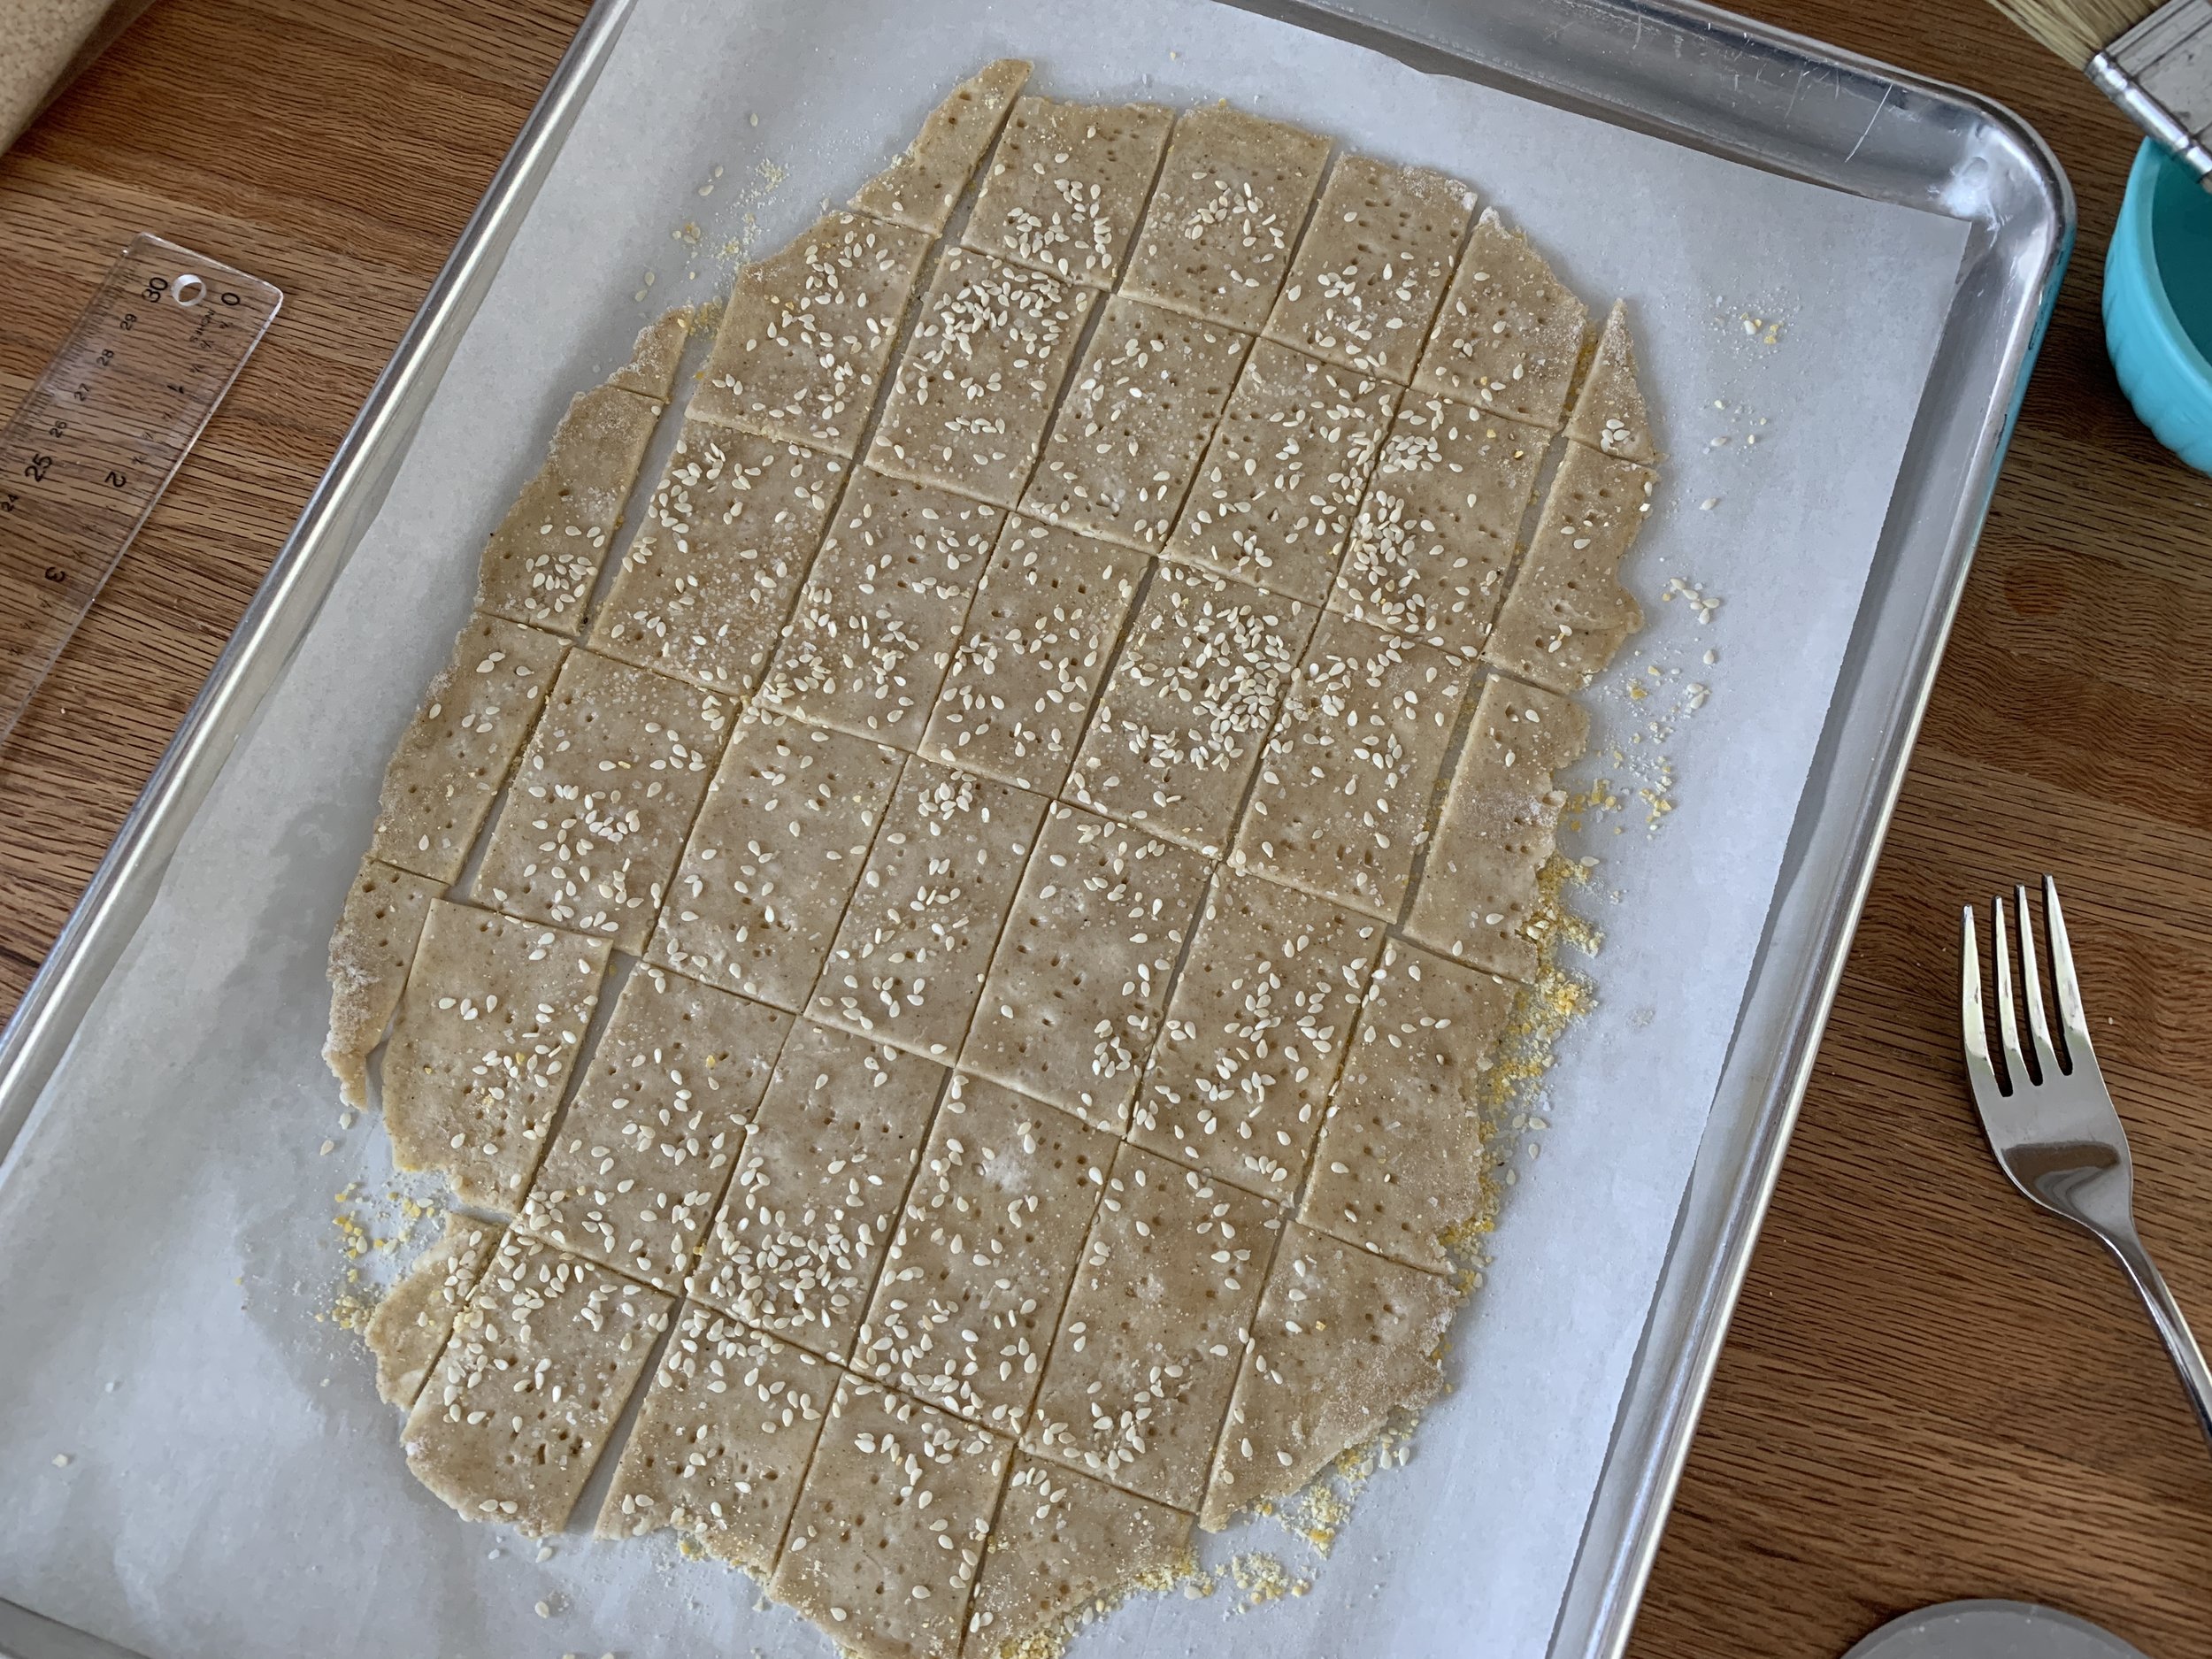
Line a half sheet pan with parchment, sprinkle with cornmeal (or semolina) and place the first rolled out dough quarter on it. Place a second piece of parchment on the dough, sprinkle again with cornmeal and place the rolled out second quarter on it. Repeat with the other two portions. Cover with plastic and refrigerate 4 hours or overnight. I chose overnight.

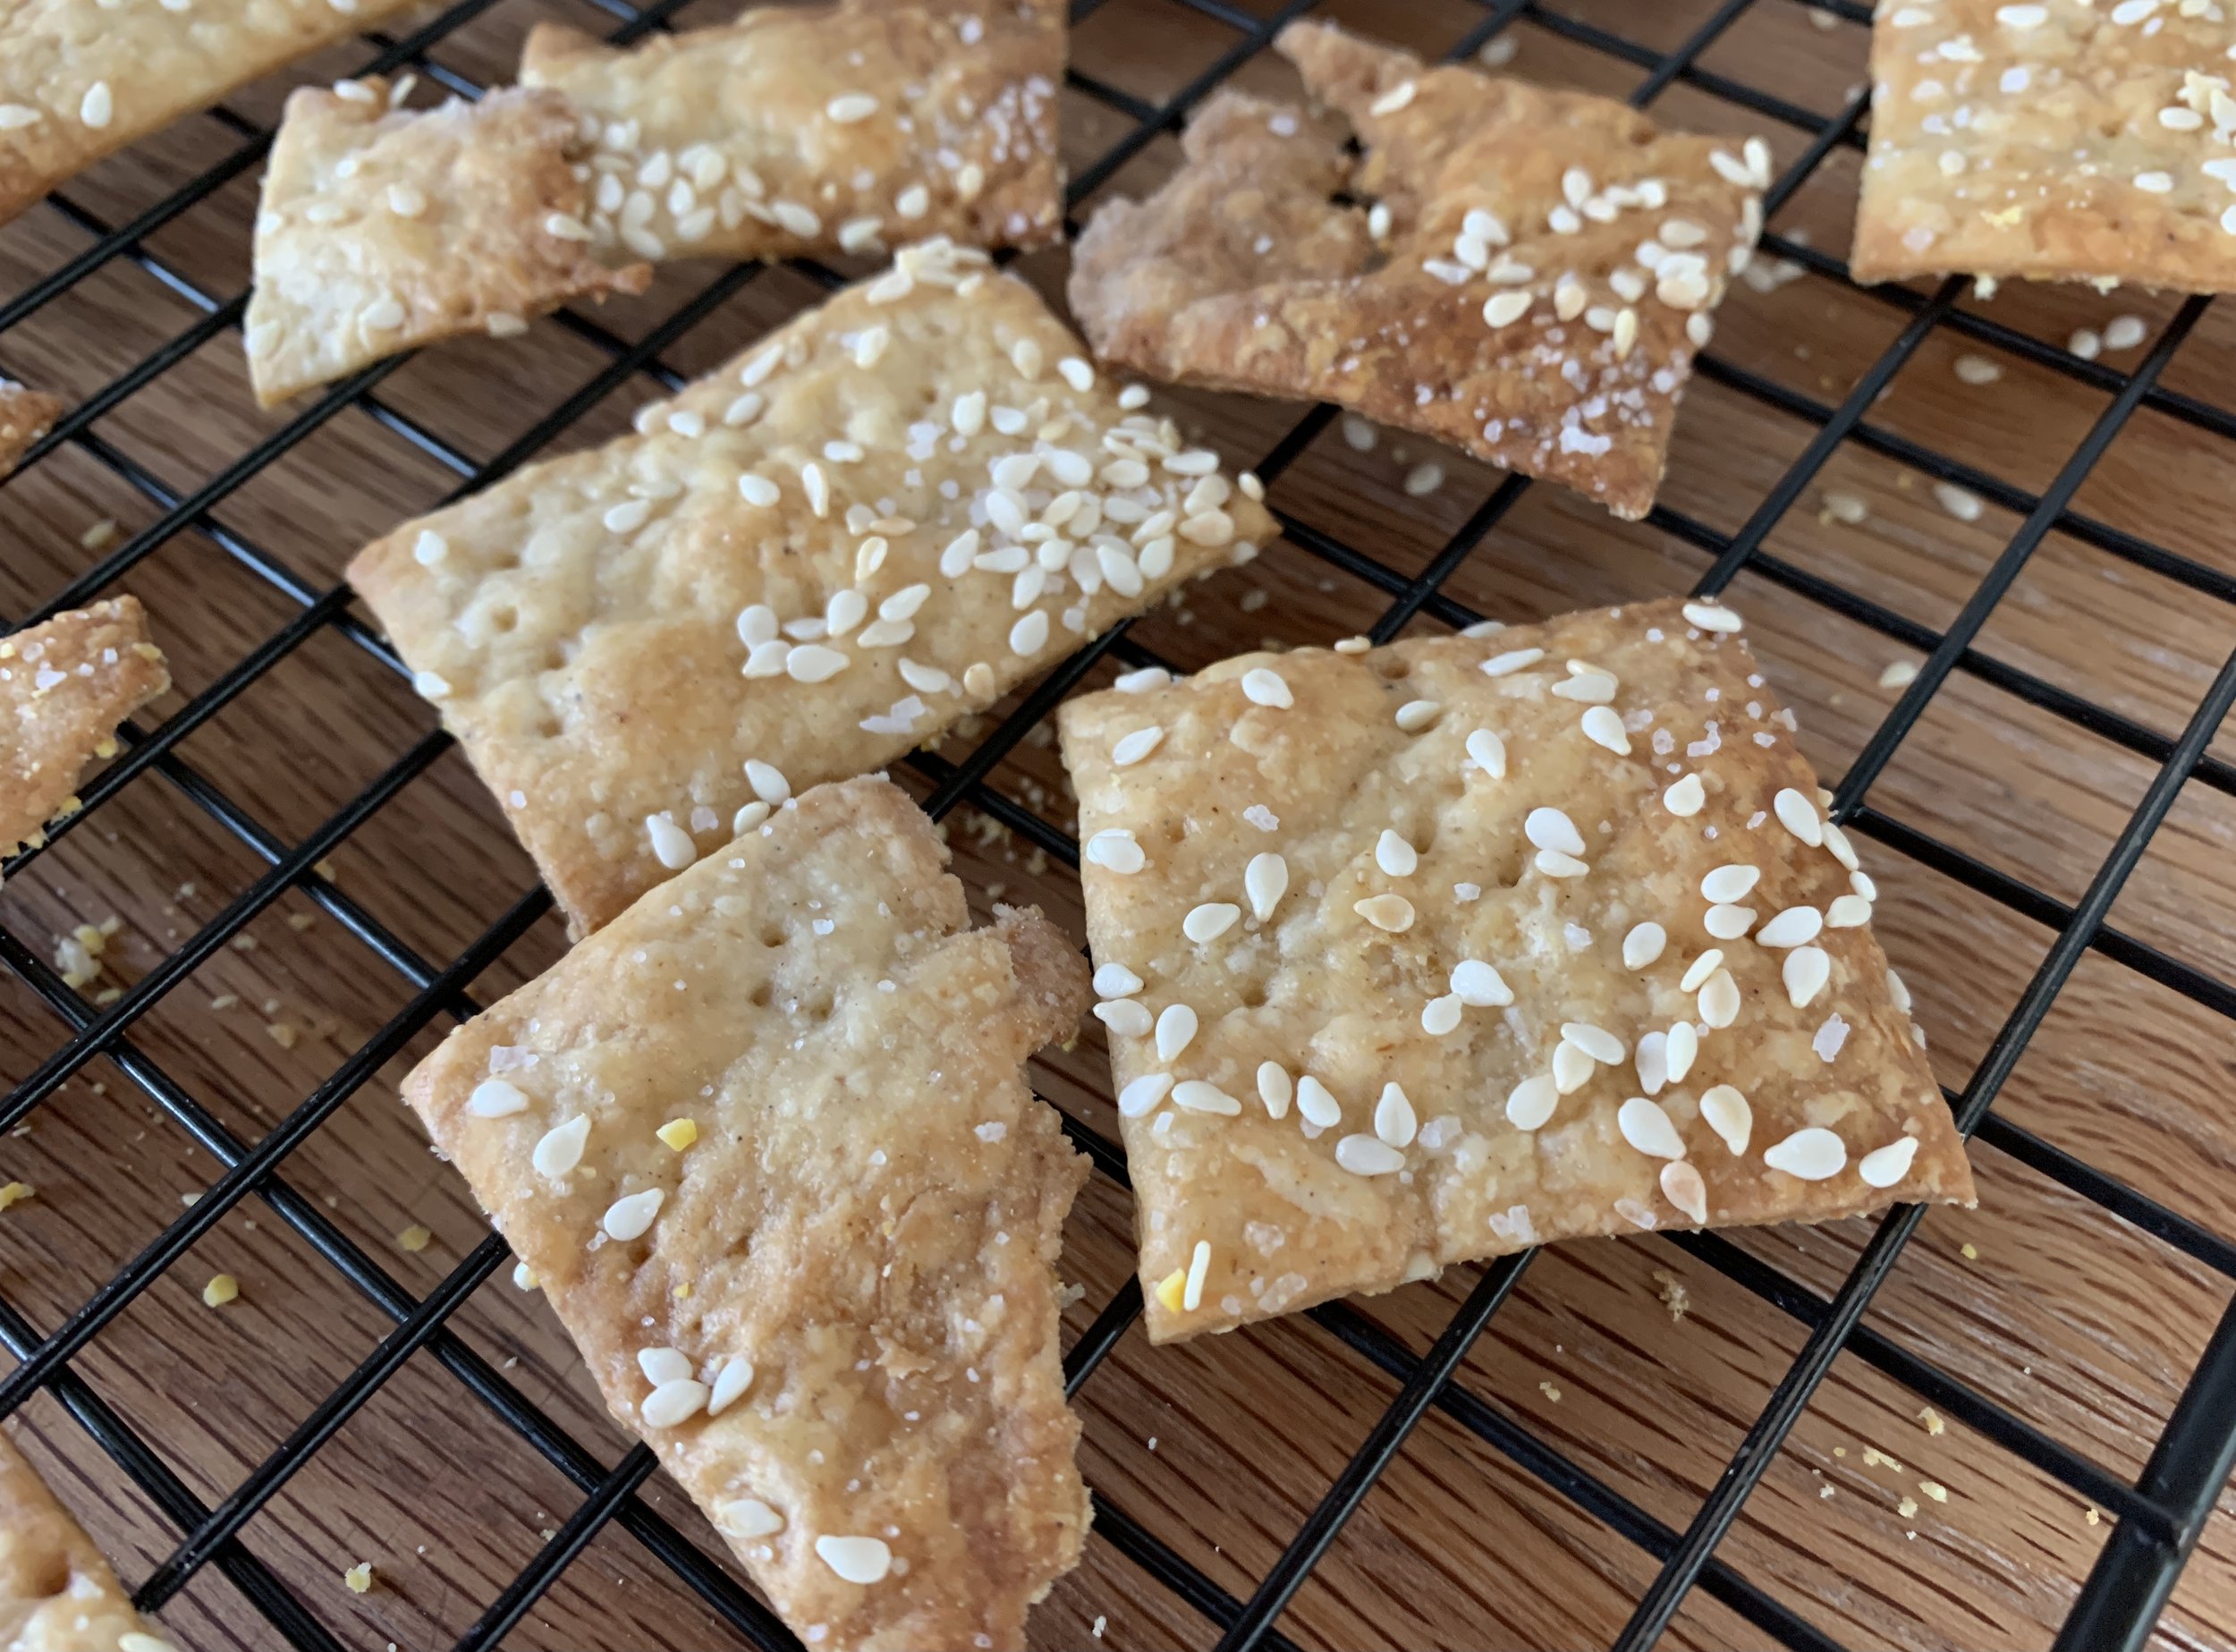
When ready to bake, heat the oven to 350ºF. Have a teaspoon of kosher salt and 2 tablespoons sesame seeds on hand. Lift one of the dough portions on its parchment onto an empty sheet pan. Fork prick it all over, brush lightly with water and sprinkle 1/4 teaspoon kosher salt and 1/2 tablespoon sesame seeds over the top. Cut into squares or rectangles (or whatever shape and size you’d like) with a pizza cutter.

Repeat the above with the next batch of dough on a second empty sheet pan. NOTE - I baked two pans in one go but if you prefer to bake one at a time, go for it.

If you only have one or two half sheet pans and need to rotate batches, pull the baked sheets off onto cooling grids and let the pans cool completely before you continue the above steps with the remaining dough quarters.

Bake about 15 minutes, rotating your pans half way through. I baked mine a bit longer since they weren’t deeply browned and crispy at the 15 minute mark. Remember - all ovens are different! Let cool then recut or break apart and enjoy.

Steve and I found them very tasty with a schmear of hummus or a nice slice of Cotswald cheese. Yum. One note - the medium grind cornmeal that I used for “dusting” the parchment sheets had too much coarse crunch for our tastes. I’d suggest using either fine-grind cornmeal or semolina to 86 that problem.

They keep well in a closed container for a good week. Try ‘em, you’ll like ‘em.

Have a wonderful week!

Coriander buttermilk "bouchon"

4EB2E90F-732A-47F2-9372-9D24BF4EDB79.jpeg

If you’re dreaming of the perfect buttermilk pancake and donut hole rolled into one, this is it! Moist with hints of nutmeg, coriander and ginger, these small bites go down so smoothly that you’ll clamor for more. I first made these in 2012 in my small shop inside Hope Artiste Village in Pawtucket RI. When Steve and I saw them, we immediately knew what they should be called.

Bouchon is the French word for cork, and the champagne cork shape develops as they bake in small round flexi-molds. The key is to fill the wells enough so that the top poofs out over the edges as the cakes rise, giving that signature look.

C96BA31E-C45A-4E25-A209-745282A6BE15.jpeg

The process is your basic creaming method of cake prep. In a nutshell: cream butter and sugar, add eggs and vanilla, blend in dry ingredients alternating with wet (1/3 dry, 1/2 wet, 1/3 dry, 1/2 wet and end with 1/3 dry), scraping down after each addition.

In the plan ahead phase, bring 170 g / 6 ounces unsalted butter, one cup buttermilk and 2 large eggs to room temperature. While not a complete deal breaker, this will cut down on any curdling that can occur during mixing when things are too cold.

Heat the oven to 425ºF.

In a medium bowl whisk 200 g all purpose flour, 146 g whole wheat pastry flour, 3/4 teaspoon salt, 1.5 teaspoons baking powder, 1/4 teaspoon baking soda, 1 teaspoon ground coriander, 1 teaspoon freshly grated nutmeg (I eyeball it and probably end up using less) and 1/4 teaspoon ground ginger.

Place the 170 g room temp butter with 75 granulated sugar and 67 g dark brown sugar in the bowl of a stand mixer fitted with the paddle. Cream for 2-3 minutes and scrape down the bowl.

F6A292E1-B87B-4ADD-BCA7-89C3082631D9_1_201_a.jpeg

Add the eggs, one by one, as well as a teaspoon of vanilla extract. Do the dry/wet additions as mentioned above.

In the image above you can see the Demarle Flexipan mold 2266 I use for this - at purchase it is a 48 well mold, but I cut it in half to fit on a half sheet pan. I probably haven’t mentioned this for some time now, but I always set silicone flexi-molds on a wire grid on the sheet pan. This allows for better oven heat circulation and more even baking.

This cake batter is quite thick so I use a wide round tip (20 mm / 3/4” diameter) to pipe and hold my offset spatula in the other hand to cleanly “cut” the batter away from the tip as I go. Works like a charm.

1C7EFC8F-AE31-46CC-AB97-ECDAC5D20ACF.jpeg

Pipe the batter to nearly the top of each mold with a nice dome at the finish. Not having made these for some time, I had to fine tune my piping as I went. The yield varies but I typically get 32-34 cakes from a recipe. I ended up with 42 this time which tells me I need to be more generous with my piping for the next go. Gotta get those cork tops!

10882B23-27EA-4C10-AE5F-A41B616508ED.jpeg

Bake about 15 minutes until golden. The cakes should feel firm when gently pressed on top.

While the cakes bake, melt 4 tablespoons butter in a small bowl; in another small bowl mix 1/2 cup sugar with 1 teaspoon ground coriander, 1/4 teaspoon ground ginger and a few grates of fresh nutmeg.

Once out of the oven, let cool about 5 minutes then pop the cakes out onto the wire racks.

4C546743-233F-4898-AFA3-70A5F8E9D097.jpeg

Working in small batches, dip the tops in the melted butter, give them a couple of minutes for the butter to absorb and then dip/roll them in the coriander sugar mixture.

CD2DC2B3-368E-4767-BEA3-7DCE944F77C1.jpeg
4401CEBC-E22A-49F8-AF99-DC81818DC89E.jpeg

I didn’t dip and roll the whole batch since I wanted to freeze some au naturel to have on hand for later. You never know when a bouchon occasion might arise.

These babies are dense yet light, not too sweet and with just the right warmth from the spices.

B27D230E-B550-4F2A-97EC-F7F9E5FDBEDD.jpeg

My inspiration for making these after a number of years was two-fold: I was dreaming about them and just happened to have some buttermilk in the fridge, plus a weekend visit from sister Joyce for whom I had to have a little treat or two on hand. Thanks for your visit Joybell!

Oh - and let’s not forget that Steve loves them!!

47285A62-0BCD-4763-B726-E79C630FC89A_1_201_a.jpeg

Happy bouchon making everyone and here’s to more autumn baking adventures.

Ciao for now.

Maple glazed blueberry drop scones

IMG_1295.JPG

I originally included this blueberry drop scone review in my recent “Puttering in the kitchen in August” post but, after consideration and Steve’s helpful encouragement, I’ve broken it out into it’s own post. Enjoy my discoveries on these tasty treats!

IMG_1298.JPG

I’ve now made these scones THREE times since discovering Dorie Greenspan’s NYT article on Joanne Chang’s recipe. Print it out for your own to-do list!

The term drop scones refers to scooping and dropping the balls of dough on the sheet pan as opposed to forming a dough round or rectangle and cutting more uniform triangle shapes for baking as seen below. Both work depending on your vision.

IMG_0881.JPG

Upon first taste test I found them delightful - just a hint of crispy to the outside and more cake like, tender and moist on the inside than my usual scones. The more I ate them, the more they grew on me.

I’m usually not big on cute-sy combo names like cruffins or cronuts, but for these the word “scuffins” definitely comes to mind - a term someone somewhere coined some years back - a cross between a scone and muffin. Oh well, call them what you’d like - they’re good no matter the label. Try them out yourself and see what you think.

IMG_1296.JPG

This recipe involves a slightly different mixing method than the one I’ve come to rely on over the years. Here’s what I discovered about the process (having the recipe on hand as you read through this is helpful). You need to plan ahead - the dough is wrapped and refrigerated for at least 1 and up to 24 hours to allow the flour to fully absorb the moisture before scooping and baking. While the recipe calls for 8 large scones, I made mine smaller using a generous 1/4 cup size scoop with a yield of 16-18 scones.

Chilled dough ready to scoop - check out those butter pieces!

Chilled dough ready to scoop - check out those butter pieces!

First batch: I pretty much followed Joanne’s recipe, using Vermont Creamery’s crème fraiche but since I didn’t have any buttermilk in the house I made the faux version by adding lemon juice to whole milk. I added the first half of the butter into the dry ingredients using the mixer with the paddle to break up the butter pieces (as she suggests), but when it came time to add the second half of the butter, I gave the mixer a rest and used my by-hand method of flaking the butter into the mix by literally flattening the butter pieces with my fingertips and leaving visible pieces in the dough.

The liquid ingredients are all blended together along with fresh blueberries and then added to the flour/butter mixture. Here again I preferred doing this by hand using a spatula and bowl scraper to quickly and gently blend everything, picking up the dry ingredients until a cohesive dough ball forms. I typically don’t add fresh fruit to scones since the fruit can become mushy and macerated during mixing, but the fresh blueberries held up well with a gentle touch.

I refrigerated the dough for four hours and then baked them. Glaze them right out of the oven, cool a bit and enjoy warm or room temperature. Nice!

First batch

First batch

I continued the by-hand approach for the next two batches as well. It speaks to me. Remember our two hands are some of the best tools we have!

Second batch: no crème fraiche on hand so this time I used Siggi’s Icelandic “touch of honey” whole milk yogurt and actual buttermilk. Once I had the dough mixed and gave it a few hours of refrigeration, I scooped out the dough balls onto a parchment lined sheet pan and froze them. It was a couple of days before I baked them (directly from freezer to oven) and they didn’t bake as evenly as the first batch. I also found they browned more on the bottom and were less tender and delightful. Perhaps you can appreciate their “rough and tumble” look below.

Full disclosure - I messed up the baking powder amount and attempted a fix so accuracy is in question. Even though they rose OK they weren’t as fluffy as batch one. Yikes - not my usual M.O.

True confession time - a few weeks back I tried some roasted tomato, ricotta, herb scones and realized after I had them in the oven that I FORGOT to add the baking powder. Whoa! How many times have I made that base scone recipe?? Just goes to show you how distraction and lack of focus can sneak right in there these days.

Second batch

Second batch

Third batch: I made my own crème fraiche - yay! Here’s the deal: heat a cup of heavy cream to about 95ºF (easy in a glass Pyrex measuring cup in the microwave), stir in a teaspoon of buttermilk, cover loosely and let sit at room temperature for 24 hours. Mine was thickening nicely by then and into the fridge it went. I used it for the scones on day 4 of it’s maturation - nice and tangy. I again used a squeeze of lemon juice in whole milk as my buttermilk. I reduced the whole wheat flour by 20 g and increased the all purpose by 20 g (I just felt like it).

BTW - For all three batches I used white whole wheat flour for the whole wheat portion. In the future I’ll try whole wheat pastry flour (if I can ever get my hands on some again!) for an even more tender result.

This time I kept the dough refrigerated for a full 24 hours before scooping and baking. The end result was much like the first batch. Mmmmm good.

IMG_1295.JPG

What I learned: mix by hand, refrigerate the dough 4-24 hours then scoop the chilled dough and bake soon after. Use the right quantity of baking powder. Duh. Thumbs up on the crème fraiche and buttermilk combo. Maybe don’t freeze them unbaked but I’m not necessarily giving up on that approach. That second batch was the outlier due to a questionable baking powder amount and maybe even the oven temp when baking directly from the freezer.

I encourage you to give these a try. You’ll like them.

Autumn is coming . . .

Cherry-berry feuilleté and peach buttermilk ice cream


The summer annuals are showing off their colors here in Grand Rapids MI . . . .

lovely coleus in our little garden courtyard

and the summer peaches are out in full force!


Fresh Michigan peaches are one of my favorite fruits.  So of course I've been thinking of the many wonderful ways to use them.  This time I was inspired by a peach buttermilk ice cream recipe from "Food and Wine" magazine.


I followed the recipe for my usual ice cream base (2 cups heavy cream, 1 cup whole milk, 3/4 cup sugar, 5 large egg yolks, pinch of salt) replacing the cup of whole milk with buttermilk.  I blanched 1.5 pounds of peaches, then peeled, pitted, sliced and blender-ized them with a squeeze of lemon juice, folding the purée into the cooled base.

peach purée at the ready

ice cream base finishing its chill down

I usually chill my base in the fridge for a day or two, then process in my ice cream maker and transfer to a freezer container several hours before serving.

I also wanted to use some cherries and blueberries I had on hand to complement the peach ice cream in a dessert I was planning for a family meal.  And, to top it off, there was some reverse puff pastry in my freezer just waiting to be made into something oh-so-delicious.

The beauty of the feuilleté preparation is that I can roll, shape and bake them ahead of time and hold them either at room temperature if using the same day, or in the freezer for a number of days if planning a bit farther ahead.


When ready to fill them, I simply push down the center layers of puff to make room for the fruit mixture that will be mounded in the feuilleté.

I mixed 4 cups of fruit (cherry/blueberry combo) with a teaspoon of fresh lemon juice, 3-4 tablespoons granulated sugar (I like my fruit on the tart side) and 1 tablespoon cornstarch. I then cooked this concoction on med-low heat until bubbly and thickened.

Note:  this quantity of fruit filling was enough for 7-8 feuilletés about 3.5 inches square.

Then I scooped a mound of filling in the center of each feuilleté and baked at 350ºF for about 10-15 minutes.  Since the puff pastry is already baked and the filling already cooked, it's really just a matter of heating everything up.

Once cooled, I topped each one with previously baked matcha crumble (really more for color contrast than taste) and gave them a light powdered sugar dust.

the end result!

I know I've mentioned crumble before in this blog.  It's a great thing to have on hand and is so easy to make.  Make as much or as little as you'd like.  

Simply mix equal weights flour and sugar in a medium bowl, sand in the same weight of cool, diced butter to form coarse crumbs.  In this case I added some matcha powder with the flour and sugar (you don't need much).

Spread the crumbs out on a parchment lined sheet pan and bake at 325ºF, stirring and breaking up clumps every 5 minutes or so until lightly browned and crisp, 10-15 minutes total.  Let cool.

Store in a zip-top bag in the freezer and use at will!

For serving I simply placed a scoop of peach buttermilk ice cream atop each feuilleté (no muss, no fuss) and handed 'em out.

Mmmmmm!

While the ice cream was a bit more icy in texture than I had hoped (I suspect due to using low fat buttermilk rather than whole milk, plus the water content of the fruit purée), the contrast of the tangy peachy coolness with the tart cherry-berry filling and buttery, flakey puff was oh-so-good indeed.

Three cheers for summer fruits!  Hip hip hooray . . . .


Jour de l'Indépendence et les tartes aux saison - cerises et fraises

Happy July 4 tout les mondes!

Steve and I visited the Fulton Street Farmers Market here in Grand Rapids MI yesterday with the express purpose of buying fresh cherries for the tart I was planning for the day's celebration.

Not only did we find cherries, cherries, cherries but soooo much more.  The covered outdoor market is a colorful and enticing destination with all manner of veggies, fruits, perennials, herbs, meats, cheeses and a smattering of local artisans selling their wares.  And surely I've omitted some of the other goods we saw.

Fulton Street Farmers Market

As is often the case, I plan my tarts (and baking in general) around what fridge stock needs to be used up. This time it's ricotta and buttermilk, both perfect complements to fresh summer fruit.

I decided to bake two different tarts as a way to highlight some of the local seasonal fruit.  I was already planning on cherries but when I saw the strawberries, they looked so succulent I couldn't pass them up. I also bought a small box of California lemons for only ONE DOLLAR (such a deal!) - perfect for my lemon buttermilk filling.

So the day's duo includes tarte citron aux fraises and tarte aux cerises/vanille/ricotta.

laying out the fruit

I used my favorite pâte d'amande, blind baked, for both of the tarts.  First up is the tarte citron which is actually a lemon buttermilk tart à la Emily Luchetti.  She makes hers with raspberries baked in the tangy filling, but I baked it sans fruit, saving my fresh strawberries for the after baking garnish.

ready for blind baking

The filling is trés simple and is made by whisking together 3 large eggs, 1 1/2 cups sugar, 1 1/2 cups buttermilk, 2 tablespoons heavy cream, 1 tablespoon fresh lemon juice, 1/4 teaspoon vanilla extract, 8 tablespoons melted unsalted butter, zest of 2 lemons, 1/3 cup flour, 1/4 teaspoon salt and a pinch of ground nutmeg.

working on the filling

Pour the filling into the blind baked crust and bake at 325º for about 50 minutes until set.

just out of the oven

Once cooled I garnished the top with fresh strawberries brushed with a hint of vanilla syrup for a bit of sheen.

Next up - the cherry/vanilla/ricotta tart.  This filling is another straight forward preparation, made by whisking together 4 large eggs, 1/2 cup sugar, 1 tablespoon flour, the seeds scraped from one vanilla bean, plus 1 teaspoon vanilla extract and 2 cups ricotta (whole milk or part skim - your choice).

les ingredients

Pit and halve 1 1/2 cups of sweet cherries and place them on the bottom of the blind baked tart shell.

Pour the filling over . . . .

ready for the oven

and bake at 350º for about 30-35 minutes until set.

just out of the oven

Once cooled I garnished with a central pile of whole, unpitted cherries just for fun.

Nothin' fancy here folks!

Time to eat.

Slicing was a bit messy.  Steve and I shared a sample piece of each.  The lemon buttermilk was tasty with a nice tang that went well with the fresh, ripe strawberries, but we both found the cherry ricotta lacking a little something.  The texture was smooth but there wasn't much bold cherry flavor to complement the ricotta custard, and I would have liked a more intense vanilla component.

All in all not bad but next time I'd roast the cherries in raw sugar ahead of time (as I've done for gateau Basque) to provide a richer cherry experience.

So Happy Birthday USA!  On to the fireworks!!