Roasted strawberry ice cream and ginger shortcakes

IMG_1009.jpg

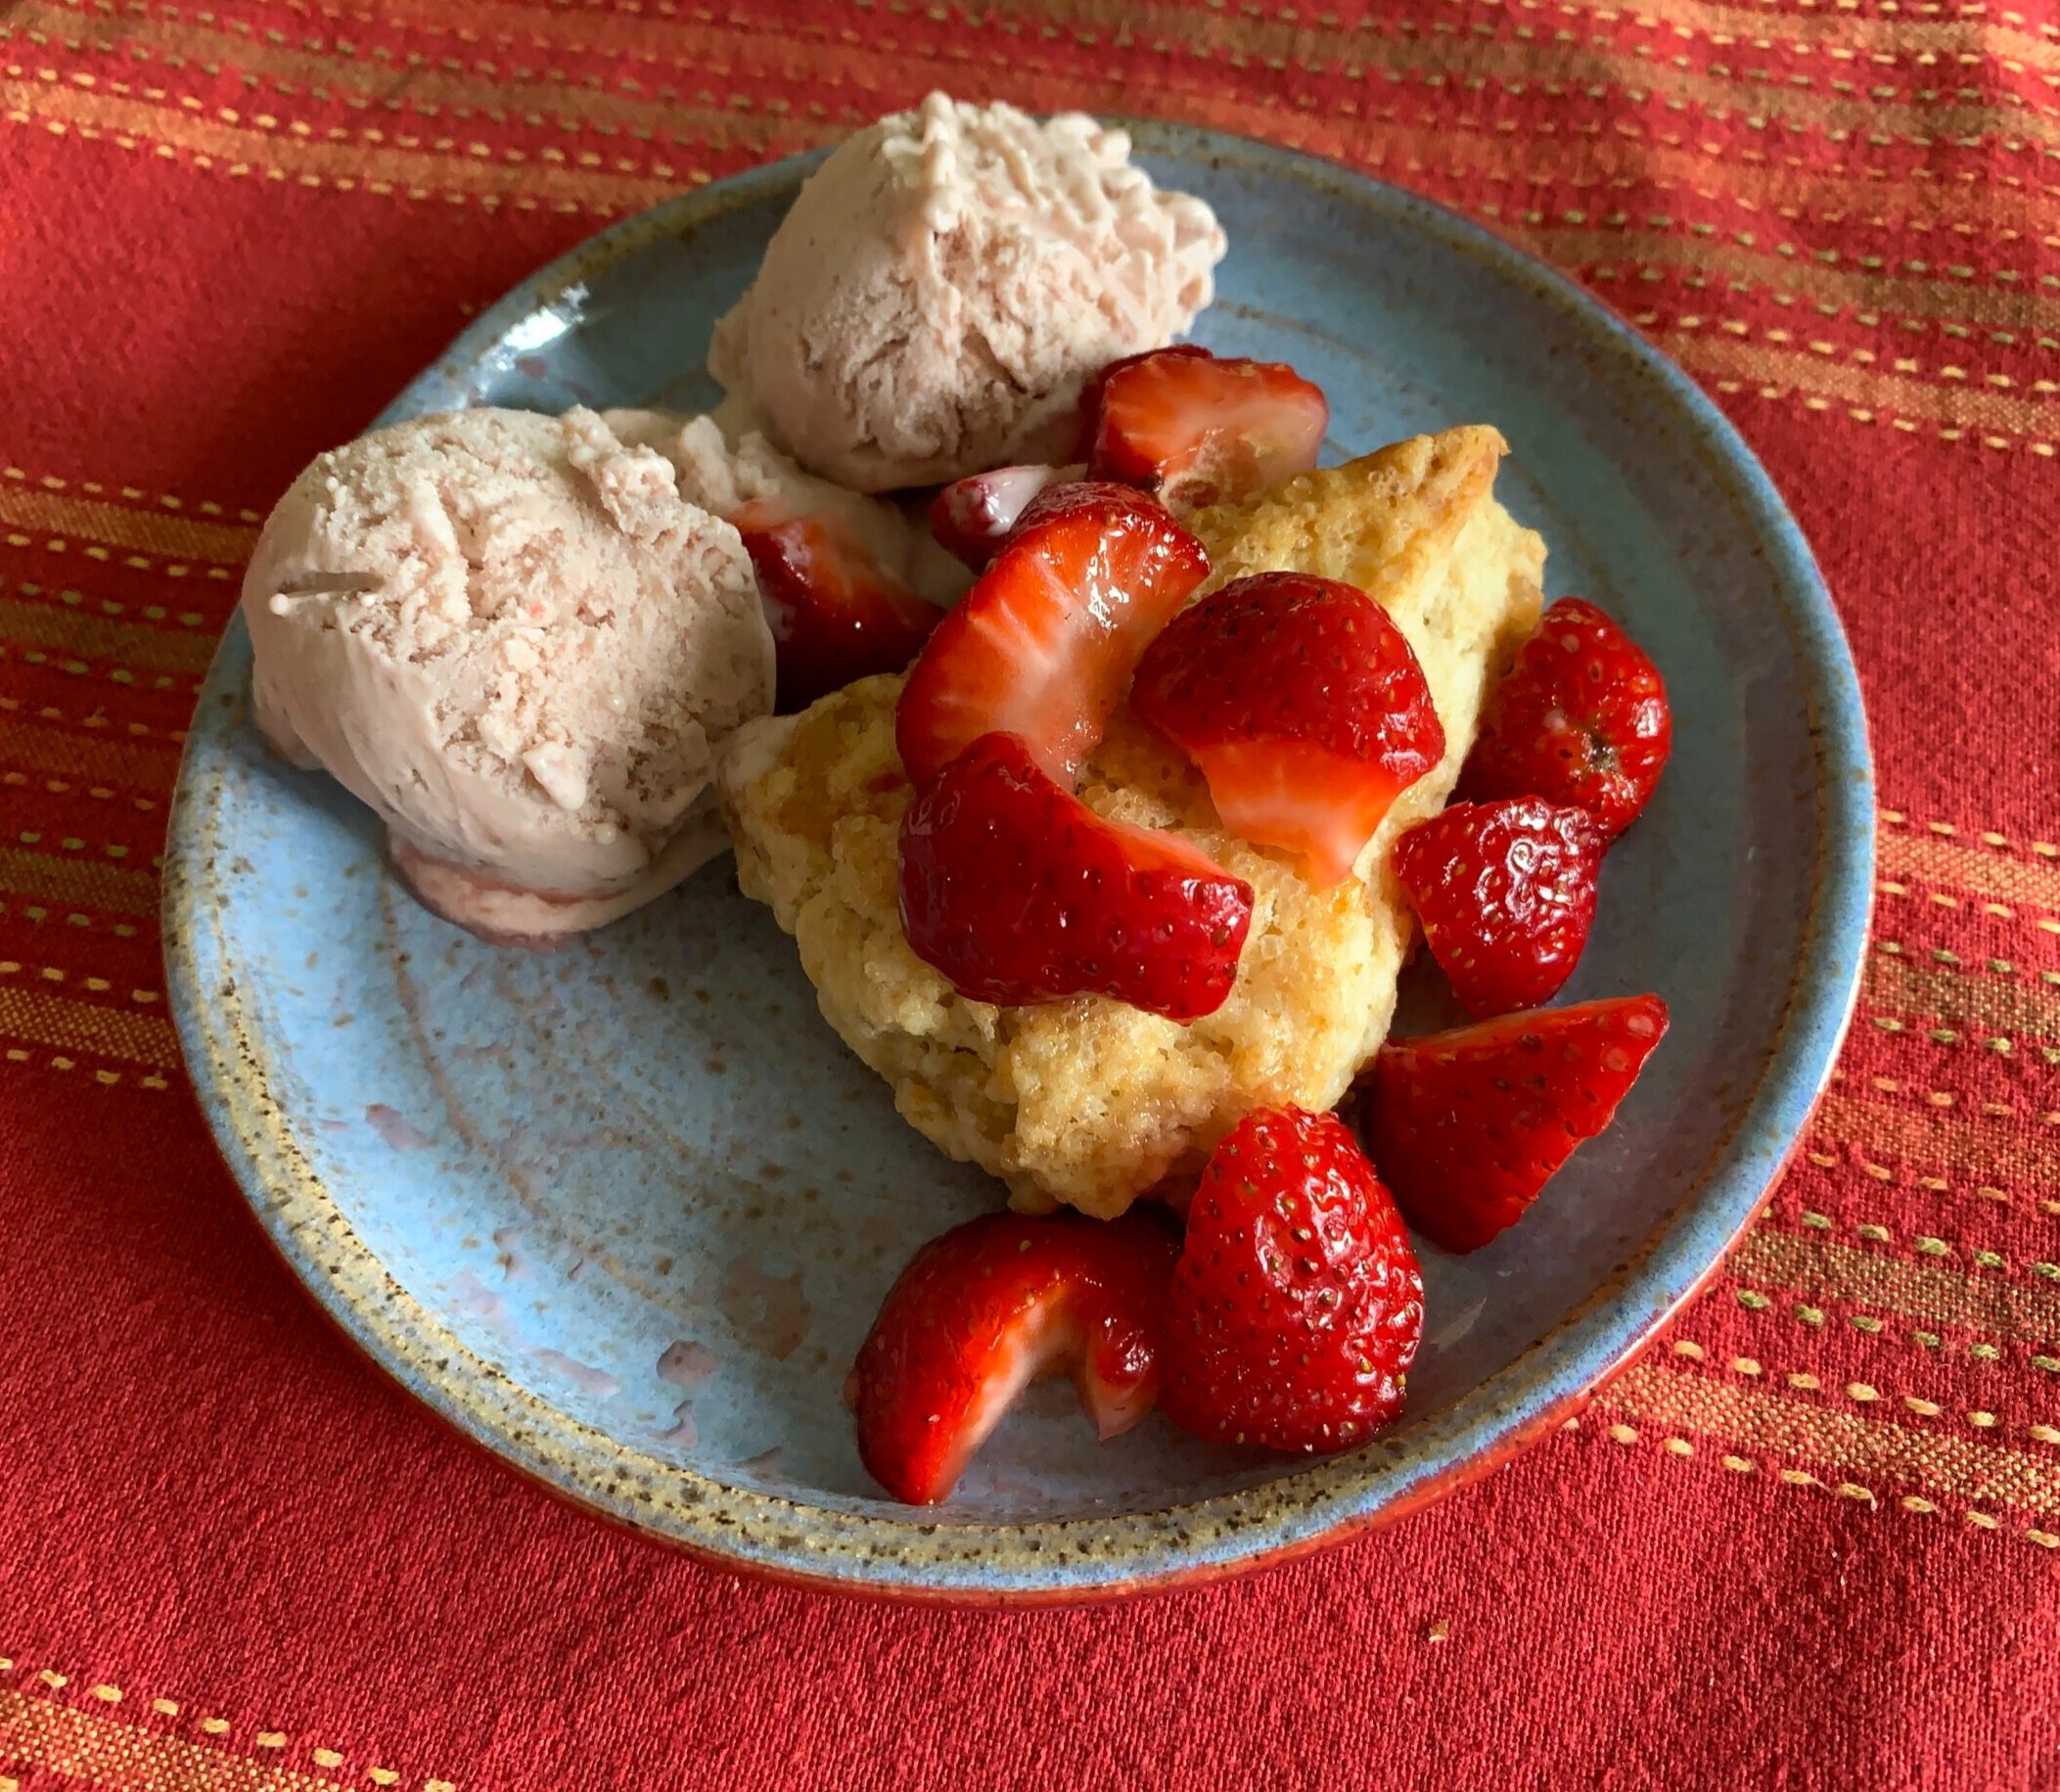
This is strawberry shortcake at it’s best! Roasted balsamic strawberries churned into a deelish ice cream, paired with fresh strawberries and ginger scones. Oh boy!

Recently I was perusing Rose Levy Beranbaum’s “The Bread Bible” (I can’t remember exactly why!) when I came across “Rich and Creamy Ginger Scones”. I had forgotten that she includes a section on quick breads, muffins, biscuits and scones in this wonderful bread tome of hers.

Never one to deny myself a new scone experience, since I had crystallized ginger in my cupboard (still working through the pantry!) and heavy cream in my fridge, I definitely wanted to give these a try.

IMG_0878.jpg

It also just so happened that I had purchased some strawberries at our local Meijer supermarket that wouldn’t necessarily be considered primo, if you get my drift. I decided to roast them up, purée em and make strawberry ice cream. The strawberry ginger shortcake idea was born.

IMG_1011.jpg

When you hear the terms scones, shortcakes and biscuits, one can’t help but ask “What’s the diff?” They’re pretty similar all-in-all although some have egg, some not; some heavy cream, some buttermilk or other dairy like yogurt or even ricotta; some softer self-rising flour like Lily White (i.e. biscuits) and some with a flour twist like replacing a portion of all purpose flour with spelt or whole wheat pastry flour. LOTS of options.

Most shortcake recipes I’ve used or reviewed contain flour, sugar, baking powder, salt, cold butter chunks and cream, all put together with a light touch. The word short refers to the fact that the butter coats the flour to prevent gluten strands from lengthening (hence short), keeping the product flaky, light, crispy and delicious all rolled into one!

Let’s make the principal players.

IMG_0879.jpg

To roast the berries hull and chunk up about a pound of strawberries, toss them with a tablespoon of good quality balsamic vinegar, a tablespoon of brown sugar (light or dark, it’s up to you) and 1/4 teaspoon freshly ground pepper. I used a Silpat but parchment is fine too. Roast them at 375ºF for about 20 minutes until dark and syrupy, stirring them a couple of times. Note to self - punch up the balsamic and pepper next time.

IMG_0880.JPG

Let the berries cool then either mash them with a potato masher or purée them if you’d like them a bit more refined. I made my usual ice cream base and blended in the berry mash while chilling the base over an ice bath. I let the strawberry blended base mature in the fridge for a couple of days before processing and freezing.

On to the ginger scones. The primary difference in this recipe from the one I normally use is more butter (170 g vs 113 g), twice as much sugar, no egg, same amount of cream (but whipped!), a teaspoon of ground ginger, zest of a lemon and the addition of 113 g finely diced crystallized ginger.

To get ready, whip the 180 g/3/4 cup cold heavy cream to soft peaks and cube the cold 170 g/6 ounces of butter - hold both in the fridge. The mixing steps are the same as for your typical scone, biscuit or shortcake: blend in a medium mixing bowl 260 g/2 cups all purpose flour, 66 g/1/3 cup turbinado sugar, 14 g/1 tablespoon baking powder, 1 teaspoon ground ginger, zest of a lemon and 1/8 teaspoon salt; rub and flatten the cold butter pieces into the dry ingredients to a mix of coarse crumbs and visible pieces of butter; add in the crystallized ginger; fold in the whipped cream. You got it!

Remember the key to scone mixing is cool, quick, decisive - don’t over handle the dough. Turn it out onto a lightly floured surface and give a few quick kneads to bring it together.

I like the way RLB divides the dough in half, forms 2 six-inch rounds about 3/4” thick, then cuts them in either 6 or 8 pieces depending on the size one prefers.

IMG_0881.JPG

Heat the oven to 400ºF with either a baking stone or a sheet pan on the middle rack. The scones go onto a second sheet pan, parchment lined, brushed with cream and sprinkled with raw sugar then placed in the freezer for 15 minutes or so to firm them up and keep that butter COLD!

Don’t forget that you can take it to this step and freeze them for baking another time. I love plan ahead projects.

IMG_0883.jpg

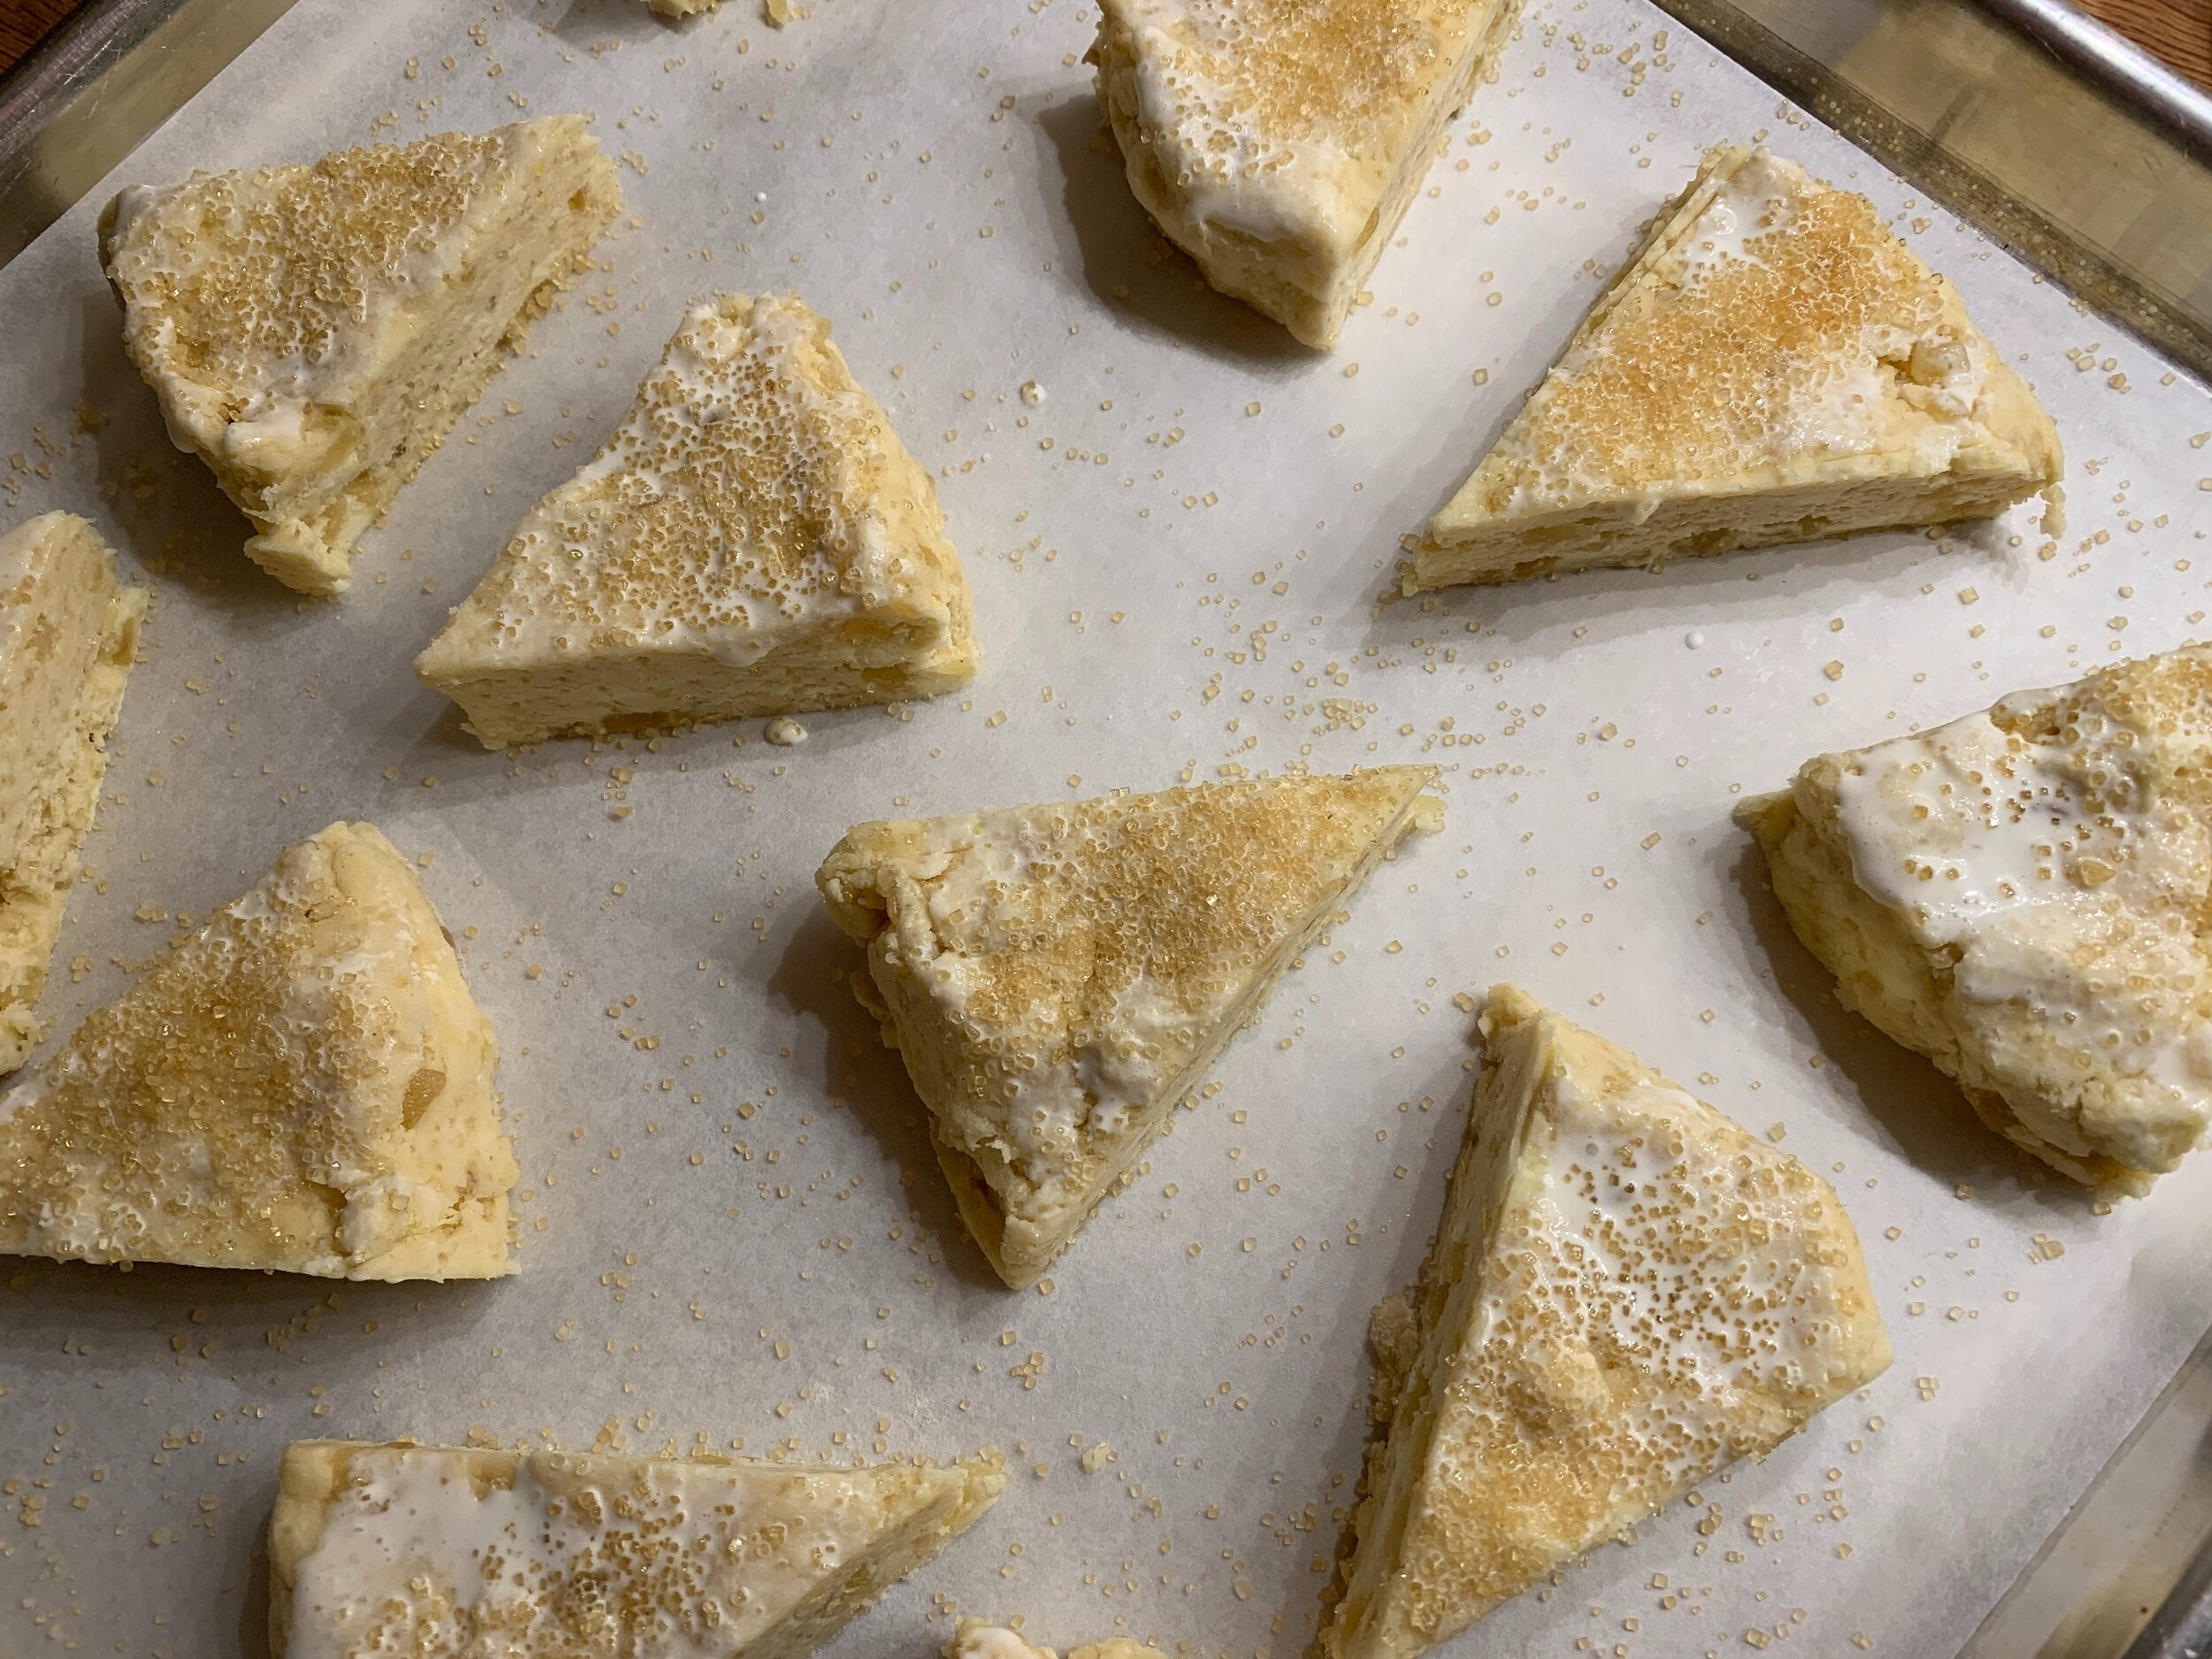
Pop the baking sheet onto the heated sheet pan and bake for 15-20 minutes. I usually give them 10 minutes, rotate the tray and check again in about 8 minutes. If they seem to be browning too quickly I turn the oven down to 375ºF.

IMG_0885.JPG
IMG_0888.JPG

These have an ethereal quality -crispy outside, light and flaky inside, just the right amount of ginger and oh so good.

I’m a firm believer in eating scones, shortcakes and biscuits the day they’re made, otherwise freezing them the day they’re baked to preserve their like-fresh quality. This time I did a little test: I took 4 baked scones out of the freezer, loosely wrapped them in parchment paper, left them at room temp and the next morning gave one a 5-8 minute warm up in a 300º oven. Still SO GOOD. Crisp out and light in, a match made in heaven.

I repeated this over the following 2 days and found they continued to offer that just baked enjoyment. For THREE days, they sat wrapped in parchment at room temperature and did not disappoint. Amazing.

Steve and I enjoyed the combo of roasted strawberry ice cream, great quality fresh berries that we happened upon at Kingma’s market and of course the perfect ginger scones. Thanks Rose.

IMG_1010.jpg

Petits gâteaux part one - sesame crunch gâteau de Pâques

IMG_2641.JPG

For our recent Easter dinner at cousin Jennifer's lovely home in the woods on Clear Bottom Lake, I created a couple of bite size gâteaux for the occasion. I've been on a sesame kick lately, having discovered a terrific way to create sesame brittle, compliments of Yotam Ottolenghi and Helen Goh. More about that in a bit.

IMG_2614.JPG

Rather than cramming a lot of recipe info into one post, I'm doing a two-parter, one part for each little cake.

First up is gateau de Pâques, a classic chocolate biscuit for Easter that I've made a number of times and have never found wanting.

The French word biscuit generally refers to a cake in the sponge family that's made with eggs that are first separated, then the yolks and whites are beaten separately before combining various components at the end to make a light and tasty cake.  On the other hand, biscuit sec usually refers to a cookie.

In English the word biscuit has a completely different connotation. While the Brits call cookies biscuits (as the French do biscuit sec), we Americans think of shortcake à la buttermilk biscuits or biscuits and gravy. Language is so cool and fun to figure out, don't you think?!

IMG_2626.JPG

For this fun little cake I used one of my favorite square savarin fleximolds from Silikomart, which allows me to fill the "dent" with something good before garnishing with a swirl of another something good.

IMG_2633.JPG

And then adding another something even better!

IMG_2635.JPG

That sesame brittle is oh-so addicting - just ask Steve.

Let's do the recipes!

First the sesame brittle, so you'll have it ready to go for the garnish. And it keeps for a number of days.

IMG_2356.JPG

Sesame brittle (makes plenty!)

The beauty of this brittle method is you don't have to use a candy thermometer or worry about reaching a certain temperature. I LOVE that!

  1.  Toast 125 g sesame seeds (mix of 1/3 black and 2/3 white or all white like I did) either in the oven at 325ºF for about 10 minutes until nicely brown, stirring occasionally, or in a skillet on medium-low on the stove top. Do what you're most comfortable with. Set aside. Increase the oven temp to 350ºF.

  2. Have two half sheet pans and four pieces of parchment at the ready. 

  3. In a medium saucepan put 100 g granulated sugar, 100 g light corn syrup, 50 g unsalted butter and 1/8 teaspoon salt. Stirring constantly on high heat, blend the mixture and bring to a boil. Remove from the heat and stir in the toasted sesame seeds.

  4. Put two pieces of parchment (or Silpat!) on a heat proof surface (I used two overturned half sheet pans) and pour half of the sesame mixture on each. Cover with the other parchment pieces and roll with a rolling pin until about 1/8 inch thick. 

  5. Slide the paper with the sesame caramel onto half sheet pans and remove the top layer of parchment. Peel it back gently and push down any caramel that might stick. Bake for about 20 minutes until nicely browned. Remove from oven, cool and break into shards.

  6. Stores nicely in single layers between pieces of parchment or waxed paper in a well sealed container. The first batch I made lasted a couple of weeks and served as garnish for a number of goodies!

IMG_2616.JPG

Gateau de Pâques (for one 8-9" cake or multiple small cakes) - find recipe PDF here

  1. Heat your oven to 350ºF and have your molds of choice at the ready. Butter and flour a 8-9" cake or springform pan OR you can use any shape multi-well silicone flexi-mold (no butter/flour needed) or mini-muffin tins lined with decorative papers. You decide.

  2. Melt 200 g dark chocolate (I used 61%) and 200 g unsalted butter gently over a bain marie. I like to do this over very low heat and once the melting has begun, I turn the heat off and let the residual warmth finish the melting process. Stir the mixture every once in awhile as it melts.

  3. Once you have that going, separate 4 cold eggs. NOTE: Eggs separate best when cold so do that at the beginning of your prep. The whites will be beaten separately and whip best when warm so it's all part of planning ahead!!

  4. In a large bowl whisk the 4 yolks with 150 g sugar until thickened and more pale. Blend in the melted chocolate/butter mixture.

  5. Blend in 100 g all purpose flour.

  6. In a clean bowl beat the 4 egg whites with a pinch of salt to soft peaks. Gently fold the whites into the the above mixture.

  7.  Pipe or scoop the mixture into your chosen molds and bake. Your baking time will vary depending on the size of your molds. An 8" cake may take about 30 minutes, whereas mini cakes may take about 10. Look for a more dry appearance to the surface of the batter without gooey centers. 

  8. Let cool and unmold. Garnish with ganache or whatever you'd like! I made a basic 1:1 dark chocolate ganache to fill the wells, then piped a swirl of whipped white chocolate ganache (1:1 cream to chocolate, chilled then whipped) on top and added some shards of sesame brittle. Whew!

IMG_2634.JPG

The texture of these cakes is light and oh so smooth. And the whipped white chocolate ganache and sesame brittle finished 'em off so deliciously. You gotta try these, I'm telling you now.

Stay tuned for Part 2: toasted coconut lime cakes!

Nutty rosemary and lemon/pistachio/sesame shortbread

IMG_2610.JPG

I LOVE shortbread! I think back to those childhood days of eating Lorna Doone cookies and how much I enjoyed their crumbly butteriness (was there really butter in those babies??). I've come a long way down the shortbread trail since then. Yes, I know I've gone on about this topic in the past, but good things deserve a little review every now and then, right?

Depending on what part of the world you hang out in, these cookies can be referred to as biscuits (thanks to the Brits), shortbread (more Scottish - think Walkers) or sablés (thanks to the French).

My approach follows the traditional Scottish method - a simple combo of sugar/butter/flour, and you're good to go. Typically along the lines of 1-2-3 dough, you weigh out 1 part sugar to 2 parts butter to 3 parts flour and mix 'em up. You can play around with the ratios (decrease the sugar and increase the butter a bit) to yield an even more buttery cookie.

I have two base recipes that I use regularly. One uses granulated cane sugar and one confectioner's sugar (gives 'em a slightly more tender texture?). You can play around with different sugars on your own and decide which gives you the texture you most enjoy.

And why do I use two different bases you might ask? Because I can and so can you!

Add in your favorite citrus zest, spices, chopped nuts, chopped chocolate, dried fruit - the possibilities go on and on.

There are two mixing methods: sanding and what I like to call blending (I think of this one as just short of creaming - you're not trying to aerate the dough, just blending everything together).

The first involves weighing your sugar and flour into a mixing bowl, dicing cold butter and sanding it into the dry ingredients to coarse crumbs. At that point you just press into a pan and bake it. You can take the mixing a step further, going past the coarse crumbs until the dough holds together, then wrap, chill and roll out later, cutting into any shape that suits your fancy.

Both methods result in a lovely crumbly/crispy/buttery cookie, although, with the sanding and press in method, the texture is a bit more crumbly and melt-in-your-mouth. I make mine both ways and enjoy them equally.

If you look at LOTS of shortbread cookies recipes, you may notice that many of the French sablés add egg (whole or yolk) to the dough as a binder. They're delicious too! 

Periodically I enjoy changing up my flavor offerings. This time I had pecans in the freezer and sesame seeds in the cupboard.

First up - rosemary pecan.

IMG_2492.JPG

Over the years I occasionally make rosemary roasted nuts, usually walnuts or pecans, that are absolutely delicious as an appetizer along with a cheese or two. For a savory cookie, I chop some of the already rosemary-ied nuts and add them into my dough. Yum. So delicious.

IMG_2609.JPG

Next - lemon pistachio sesame.

IMG_2545.JPG

This one adds in some toasted sesame seeds, lemon zest/juice and chopped unsalted raw pistachios. Once baked, I brush them with honey and pop them back into the oven for a few minutes to set the honey. Oh man are they good!

IMG_2538.JPG
IMG_2611.JPG

On to the base recipes (plus additions!)

Rosemary pecan:

  1. In a stand mixer with the paddle attachment blend 75 g granulated cane sugar with 200 g diced, room temperature unsalted butter. 
  2. Add 250 g all purpose flour and blend in just until the dough comes together. Note/tip: I've started replacing about 1/5 of my all purpose flour with white whole wheat for some added whole grain goodness. 
  3. For the rosemary pecan version, chop 75 g rosemary roasted pecans (recipe below) and add them into the dough. Wrap, chill for at least an hour before rolling out and cutting desired shapes.

How easy is that??!

Lemon pistachio sesame:

  1. In a stand mixer with the paddle attachment blend 75 g confectioner's sugar with 227 g diced, room temperature, unsalted butter (notice a slight bump in the butter content here).
  2. Add 1 teaspoon vanilla extract, the zest of two lemons plus 2 teaspoons freshly squeezed lemon juice and blend in.
  3. Add 260 g all purpose flour (or sub 1/5 of that as white whole wheat flour) and 1/2 teaspoon salt and mix just until it comes together.

Blend in 50 g toasted sesame seeds and 50 g chopped raw pistachios. Wrap and chill for an hour or so before rolling out and cutting desired shapes.

I bake my shortbread at 325ºF (convection) for about 15 minutes or until gently browned (watch what's happening in there!!). Don't forget - it's your job to learn your own oven. 

Now how about those roasted rosemary pecans, you might ask? Here's the recipe (you'll have PLENTY of nuts for your shortbread dough - feel free to halve the recipe OR, even better, make the full batch and have plenty for apps and snacks):

  1.  Heat oven to 325º F.
  2. In a microwave safe bowl melt 2 tablespoons unsalted butter. Add 2 tablespoons olive oil, 1/3 cup chopped fresh rosemary (or 2 tablespoons crumbled dried), 2 teaspoons kosher salt, 1 teaspoon paprika and 1/8 teaspoon cayenne.
  3. Place 4 cups nuts (walnuts, pecans or a mixture of the two) in a bowl and toss with the above mixture, coating the nuts evenly.
  4. Spread onto a 1/2 sheet pan and bake 15-20 minutes, stirring every 5 minutes or so, until browned and fragrant.
  5. Drain on paper towels, cool and serve at room temperature (or chop some up for your shortbread - yay!!).
  6. Store leftovers in an airtight container and enjoy for many days.
IMG_2493.JPG

Now get in that kitchen of yours and create your own version of delicious, crumbly, buttery shortbread. You can do it!