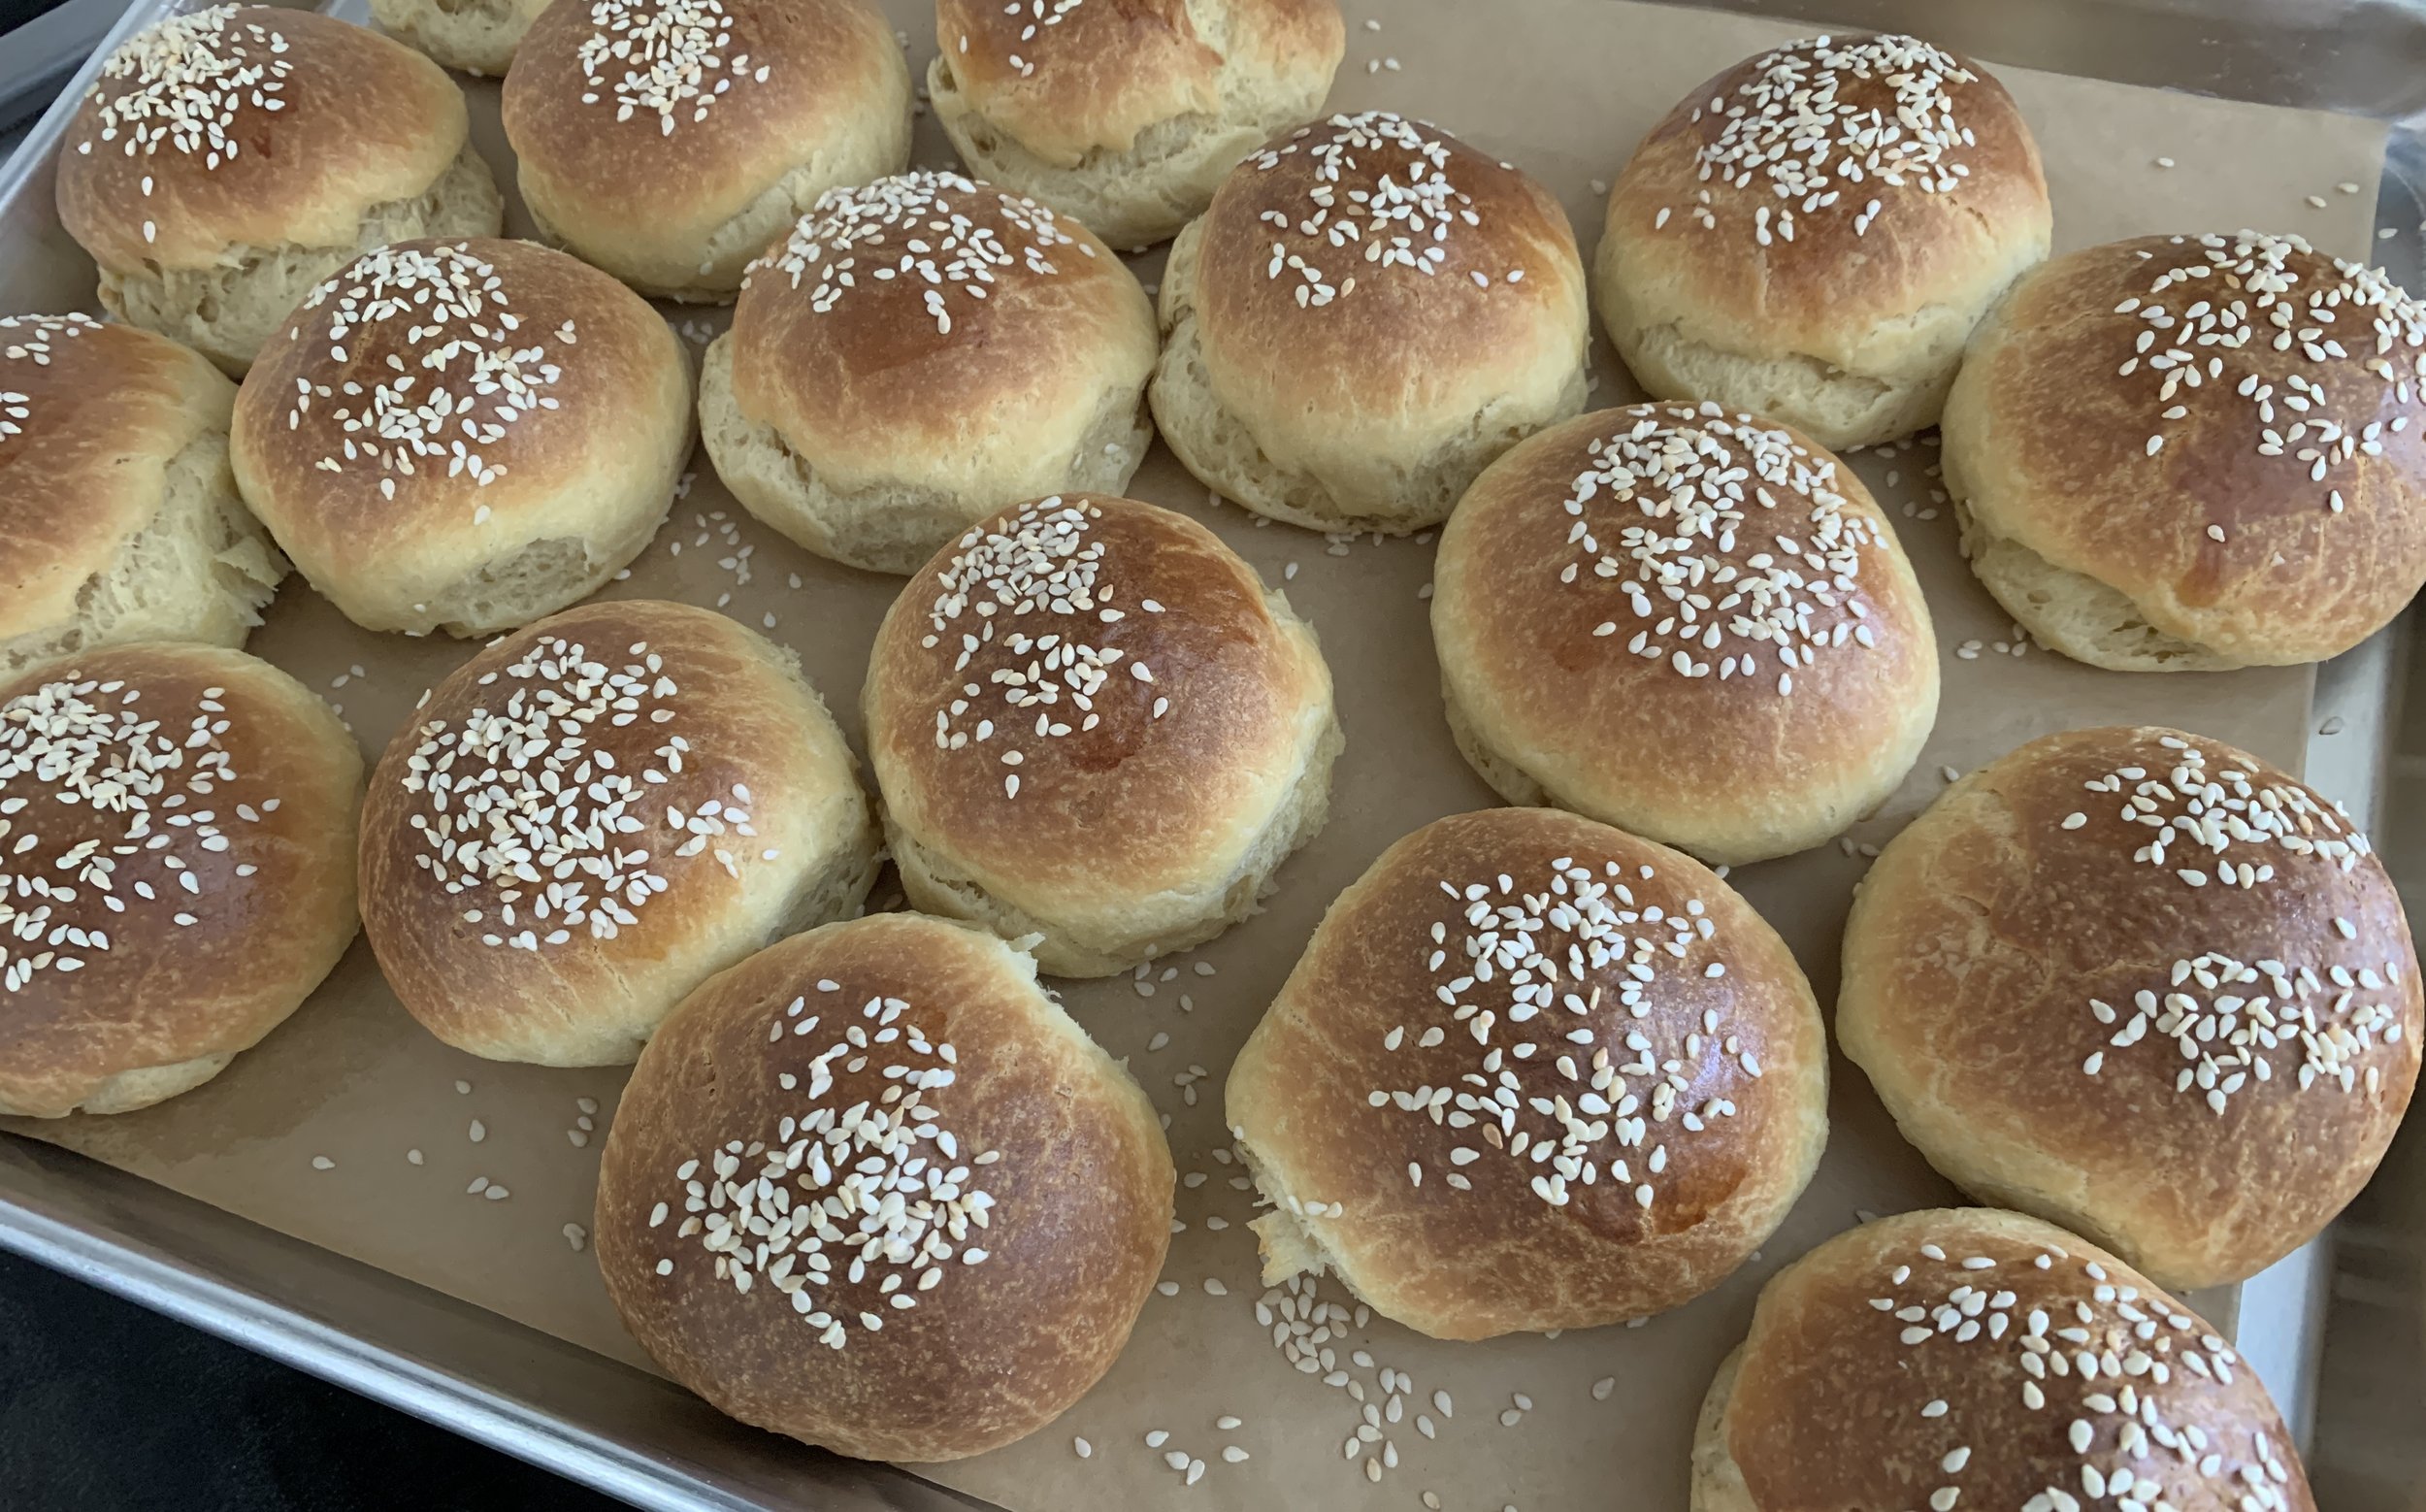
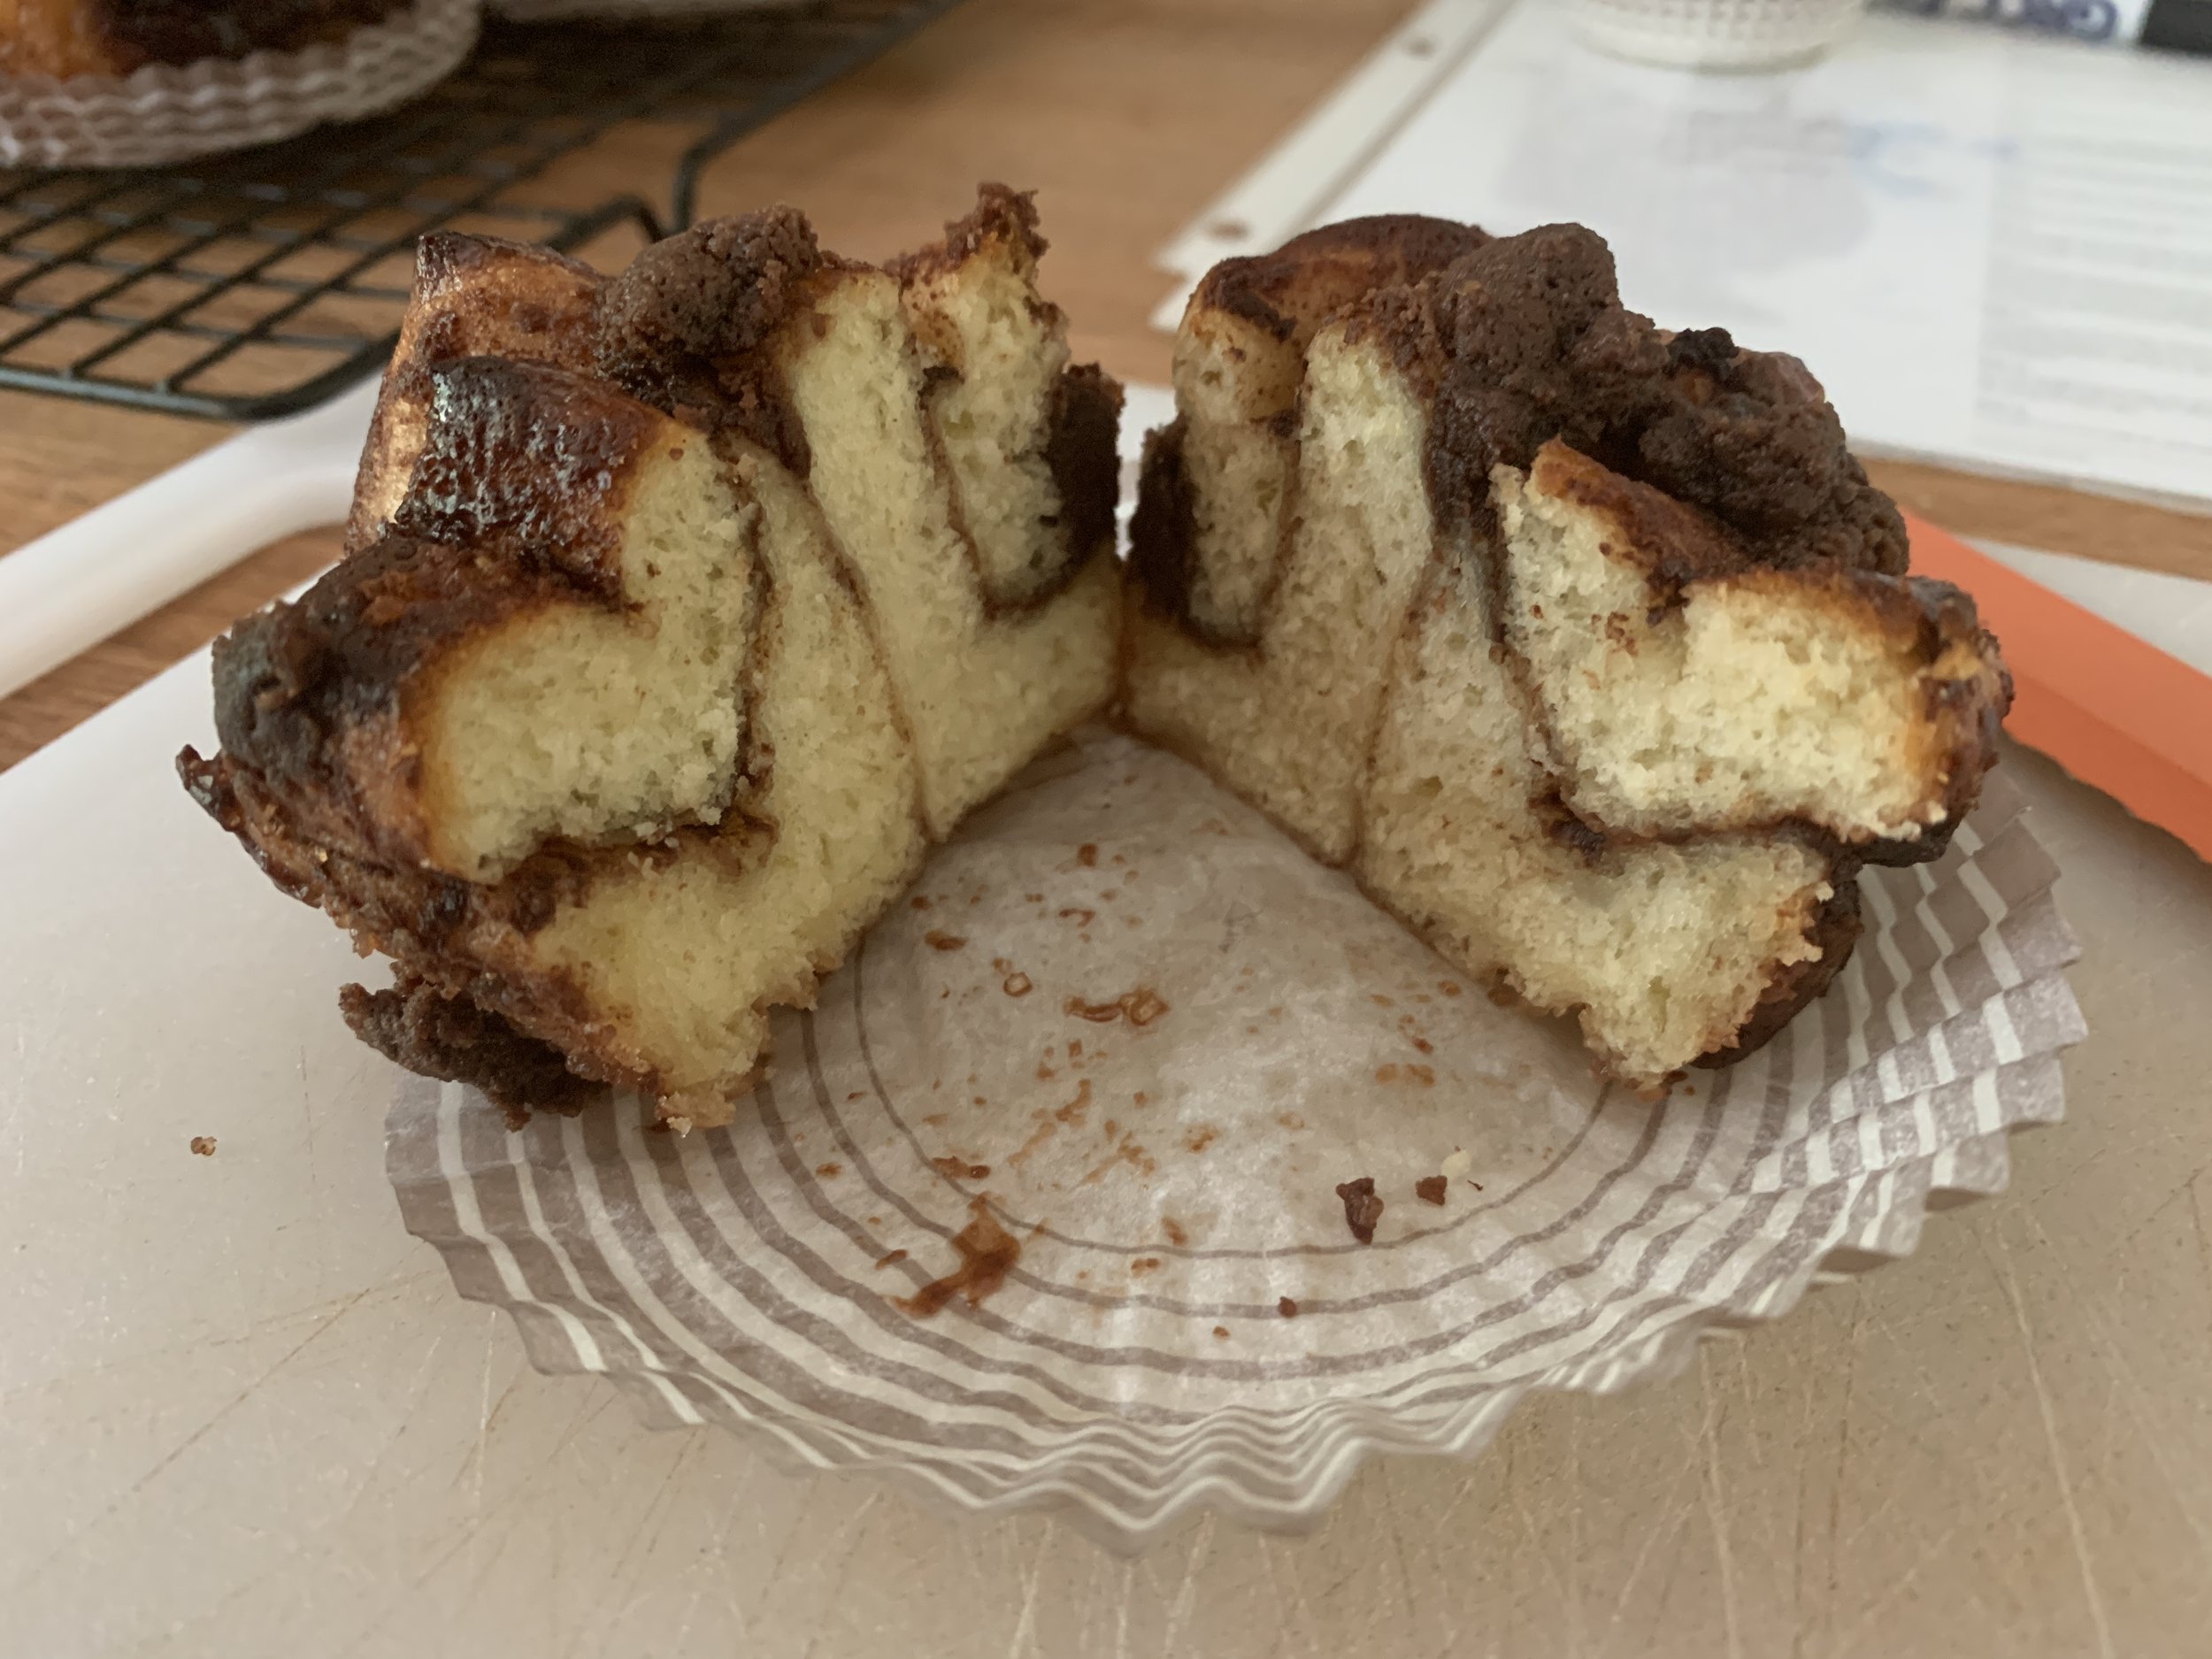
Sesame brioche rolls

Hmmmm . . . more sesame you say? This time let’s talk tahini brioche. While I don’t always have tahini on hand, once purchased and used for its intended project, it sits in the cupboard waiting. I think Steve and I bought a jar some weeks back to make a dressing or marinade for something. Fortunately the shelf life is good, but I don’t like to let it linger too long before figuring out ways to use it up.

Always up for trying a new brioche recipe, I thought I’d give this one a try. As was true of the sesame cumin crackers of which I wrote recently, the recipe comes from Sofra, the popular middle Eastern bakery/cafe in Cambridge MA. It was presented in the holiday 2018 issue of King Arthur Flour’s erstwhile magazine “SIFT”, a beautiful, glossy presentation of all things baking and pastry. Please note - all credit goes to Sofra and King Arthur - I’m simply here to share my experience as I went through the steps.

i love a buttery brioche and have tried and tweaked many a recipe. My current go to recipe involves the usual long mixing time for this enriched dough, followed by an overnight rest in the fridge before dividing, shaping and baking the intended rolls or buns or whatever. The primary difference with Sofra’s is the first step of making a sponge before mixing the final dough. A sponge belongs to the family of pre-ferments like poolish, biga, pâte fermentée and levain and is intended to give the dough a chance to develop more flavor as well as give it a longer shelf life.

After a quick review of pre-ferments in Rose Levy Beranbaum’s “The Bread Bible”, as well as a few recipes that utilize the sponge approach, I realized that the sponge in this brioche sits for a short 30 minutes. It seems that 1-4 hours at room temperature or even overnight refrigeration are more typical, buuuuuut . . . . . I opted to follow the recipe - you gotta try, right!

The image below shows my mise with the sponge not quite at the 30 minute stage (as you see above).

OK - let’s go through the steps. For the sponge blend together 60 ml / 1/4 cup tepid whole milk, 7 g / 2.25 teaspoons instant yeast, 1/2 teaspoon sugar in the bowl of a stand mixer; once the yeast has dissolved, whisk in 2 large eggs and stir in 130 g / 1 cup all purpose flour.

Sprinkle another 65 g / 1/2 cup all purpose flour over the top of the mixture.

Cover and set aside for 30 minutes until the top flour layer is cracked, a sign that the yeast has started its work.

Now add to the sponge: 227 g / 1.75 cups all purpose flour, 50 g / 1/4 cup sugar, 10 g / 2 teaspoons salt, 3 large eggs, 1 large yolk and 110 g /~1/3 cup well stirred tahini. Mix on low speed with the dough hook to bring everything together. Then increase to medium for 8-10 minutes until the dough starts forming around the hook.

Scrape down the sides and give it a high speed mix for a minute more.

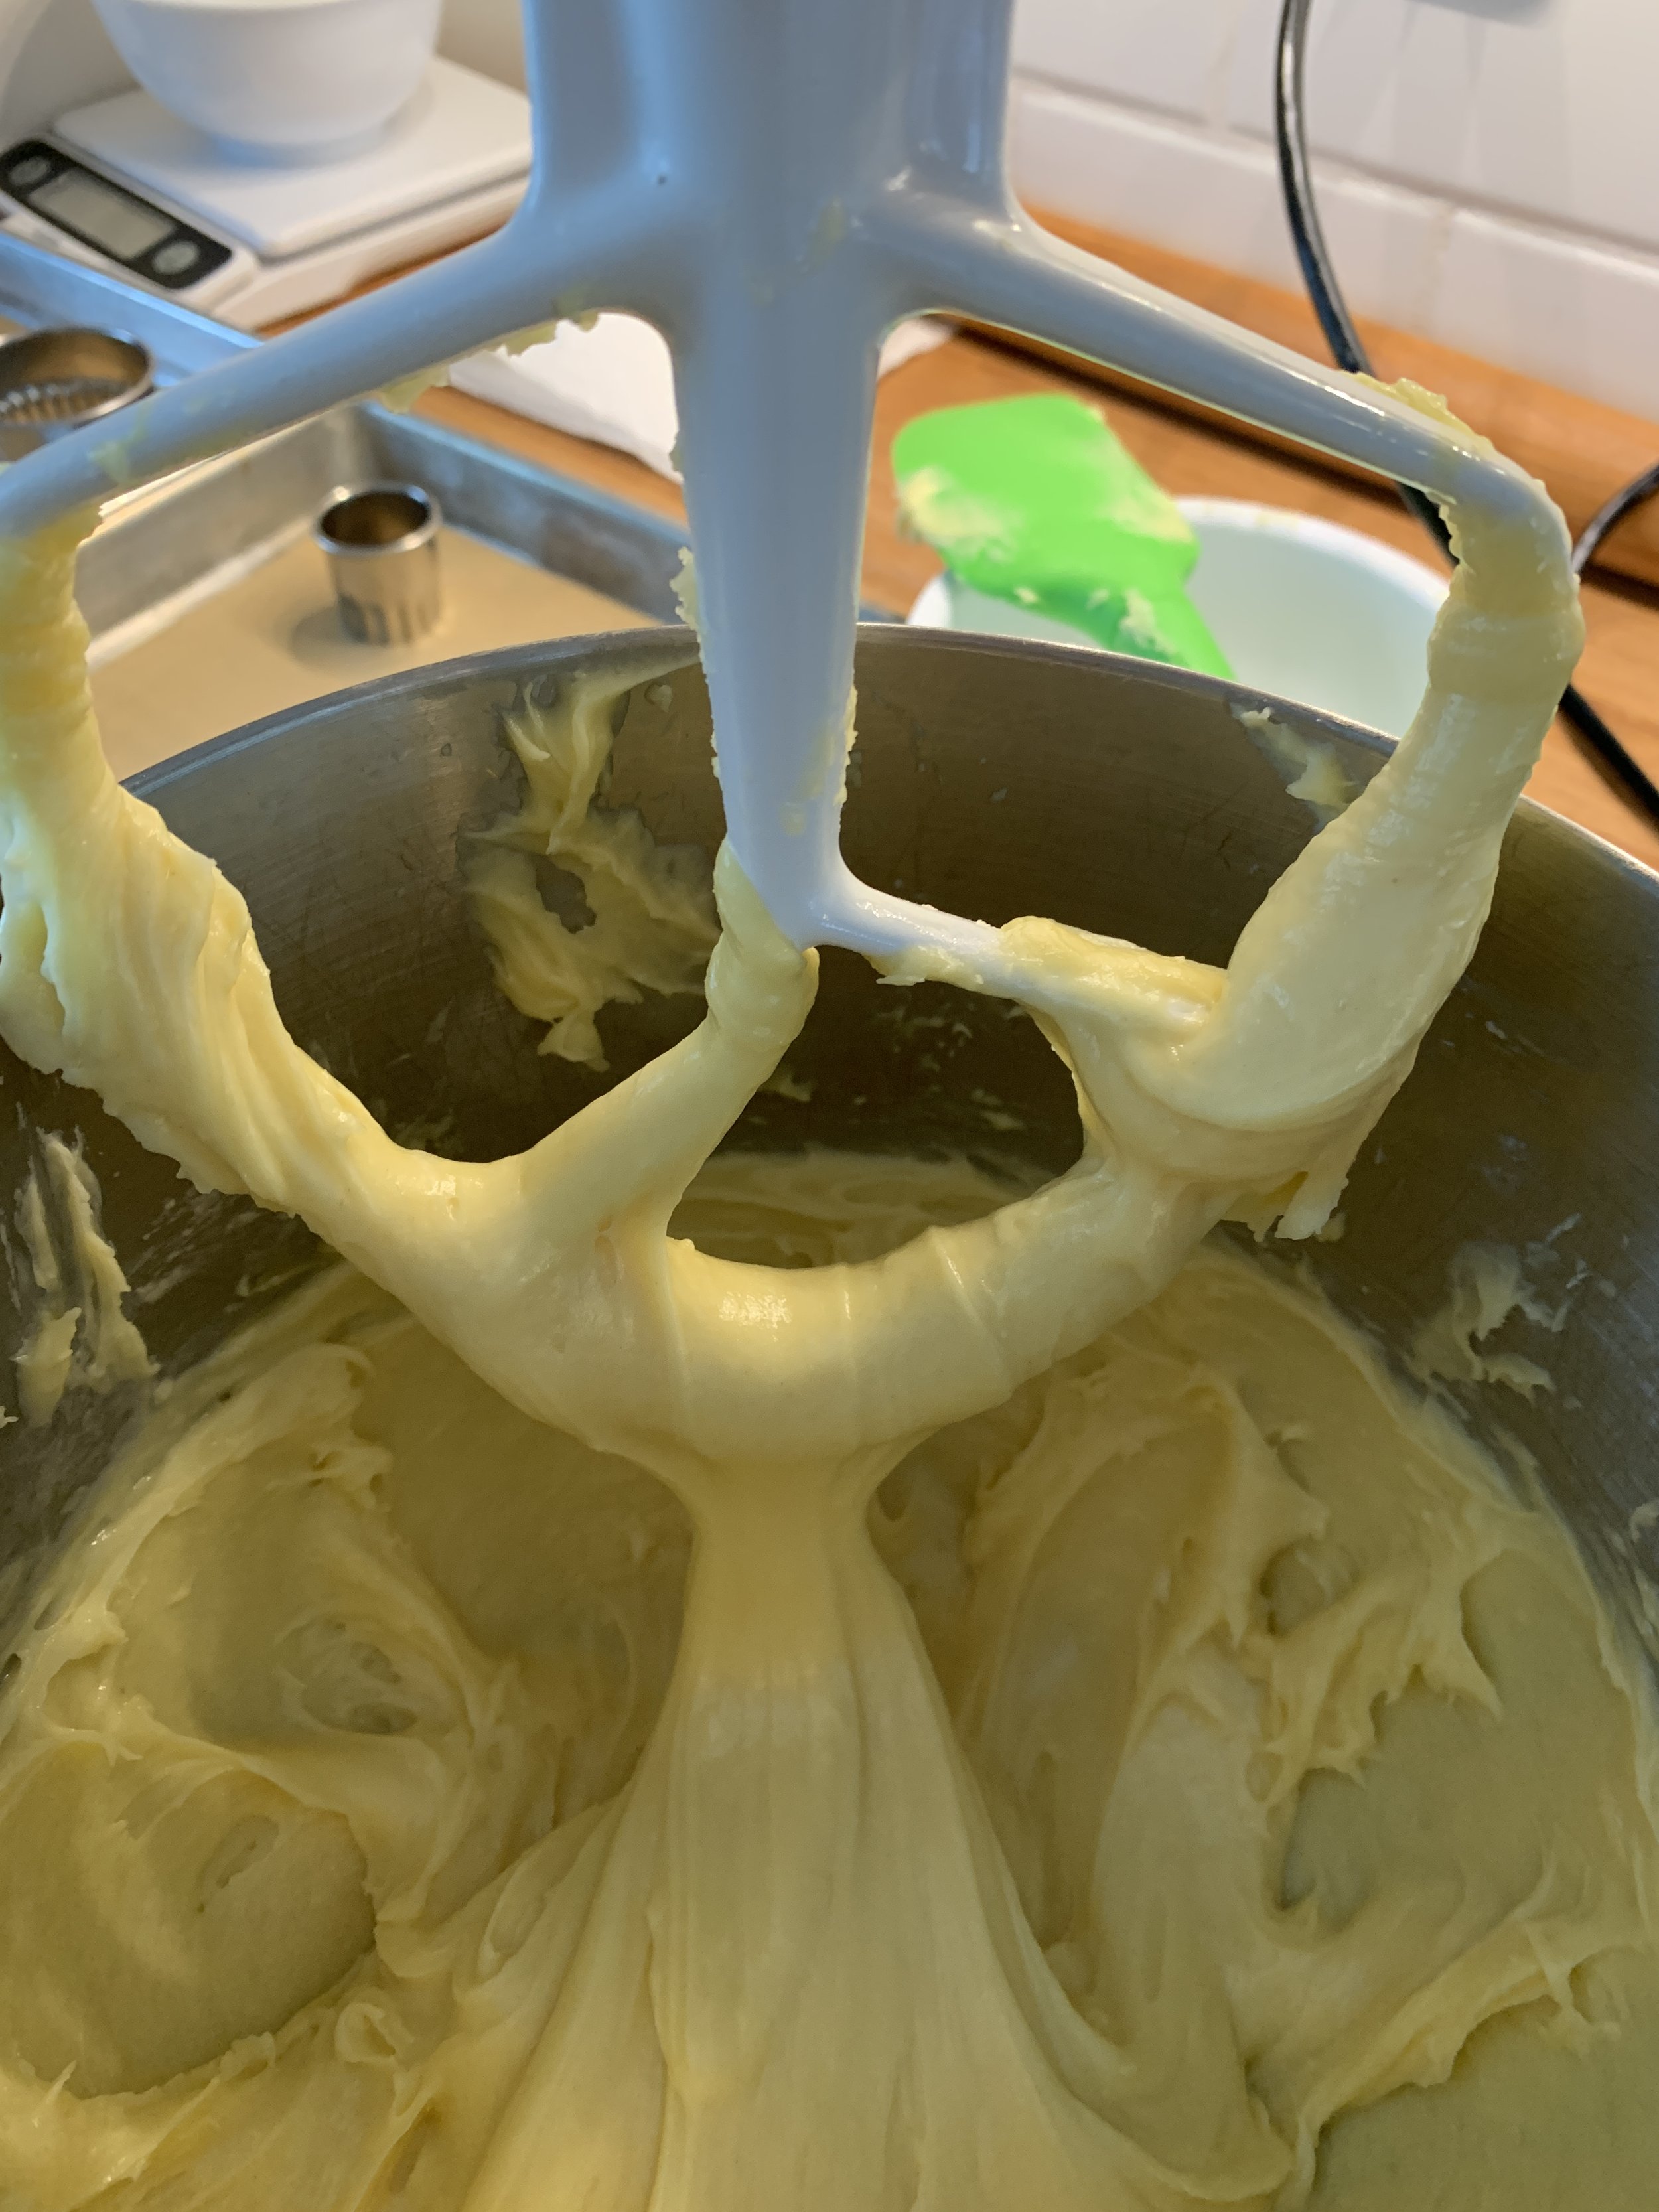
On medium speed add half (100 g) of the cold, cubed butter; mix until incorporated; add the remaining 100 g butter and mix about 10-15 minutes more until silky smooth. Give it one more minute on medium high - you want the dough pulling away from the sides of the bowl.

Oooooooh - love that sheen!

Lightly butter a 3 or 4 quart bowl or container, place the dough in and press into a rectangle. Fold the edges in, turn the dough over and press again into a rectangle. Cover or tightly wrap and refrigerate 6 hours or overnight. Being such an enriched dough, it doesn’t tend to rise too aggressively.

Here it is the next morning. Rise and shine!!

In general when shaping brioche dough it’s best to keep it cold, so leave it in the fridge until you’re ready to go. I envisioned a smallish roll so I figured about 60 g / 2 ounces for each piece (Sofra’s yield is a dozen rolls, making each a generous 90-ish g each). My total dough came to 1100 g; divide that by 60 g which yields 18 rolls. Sounds good to me.

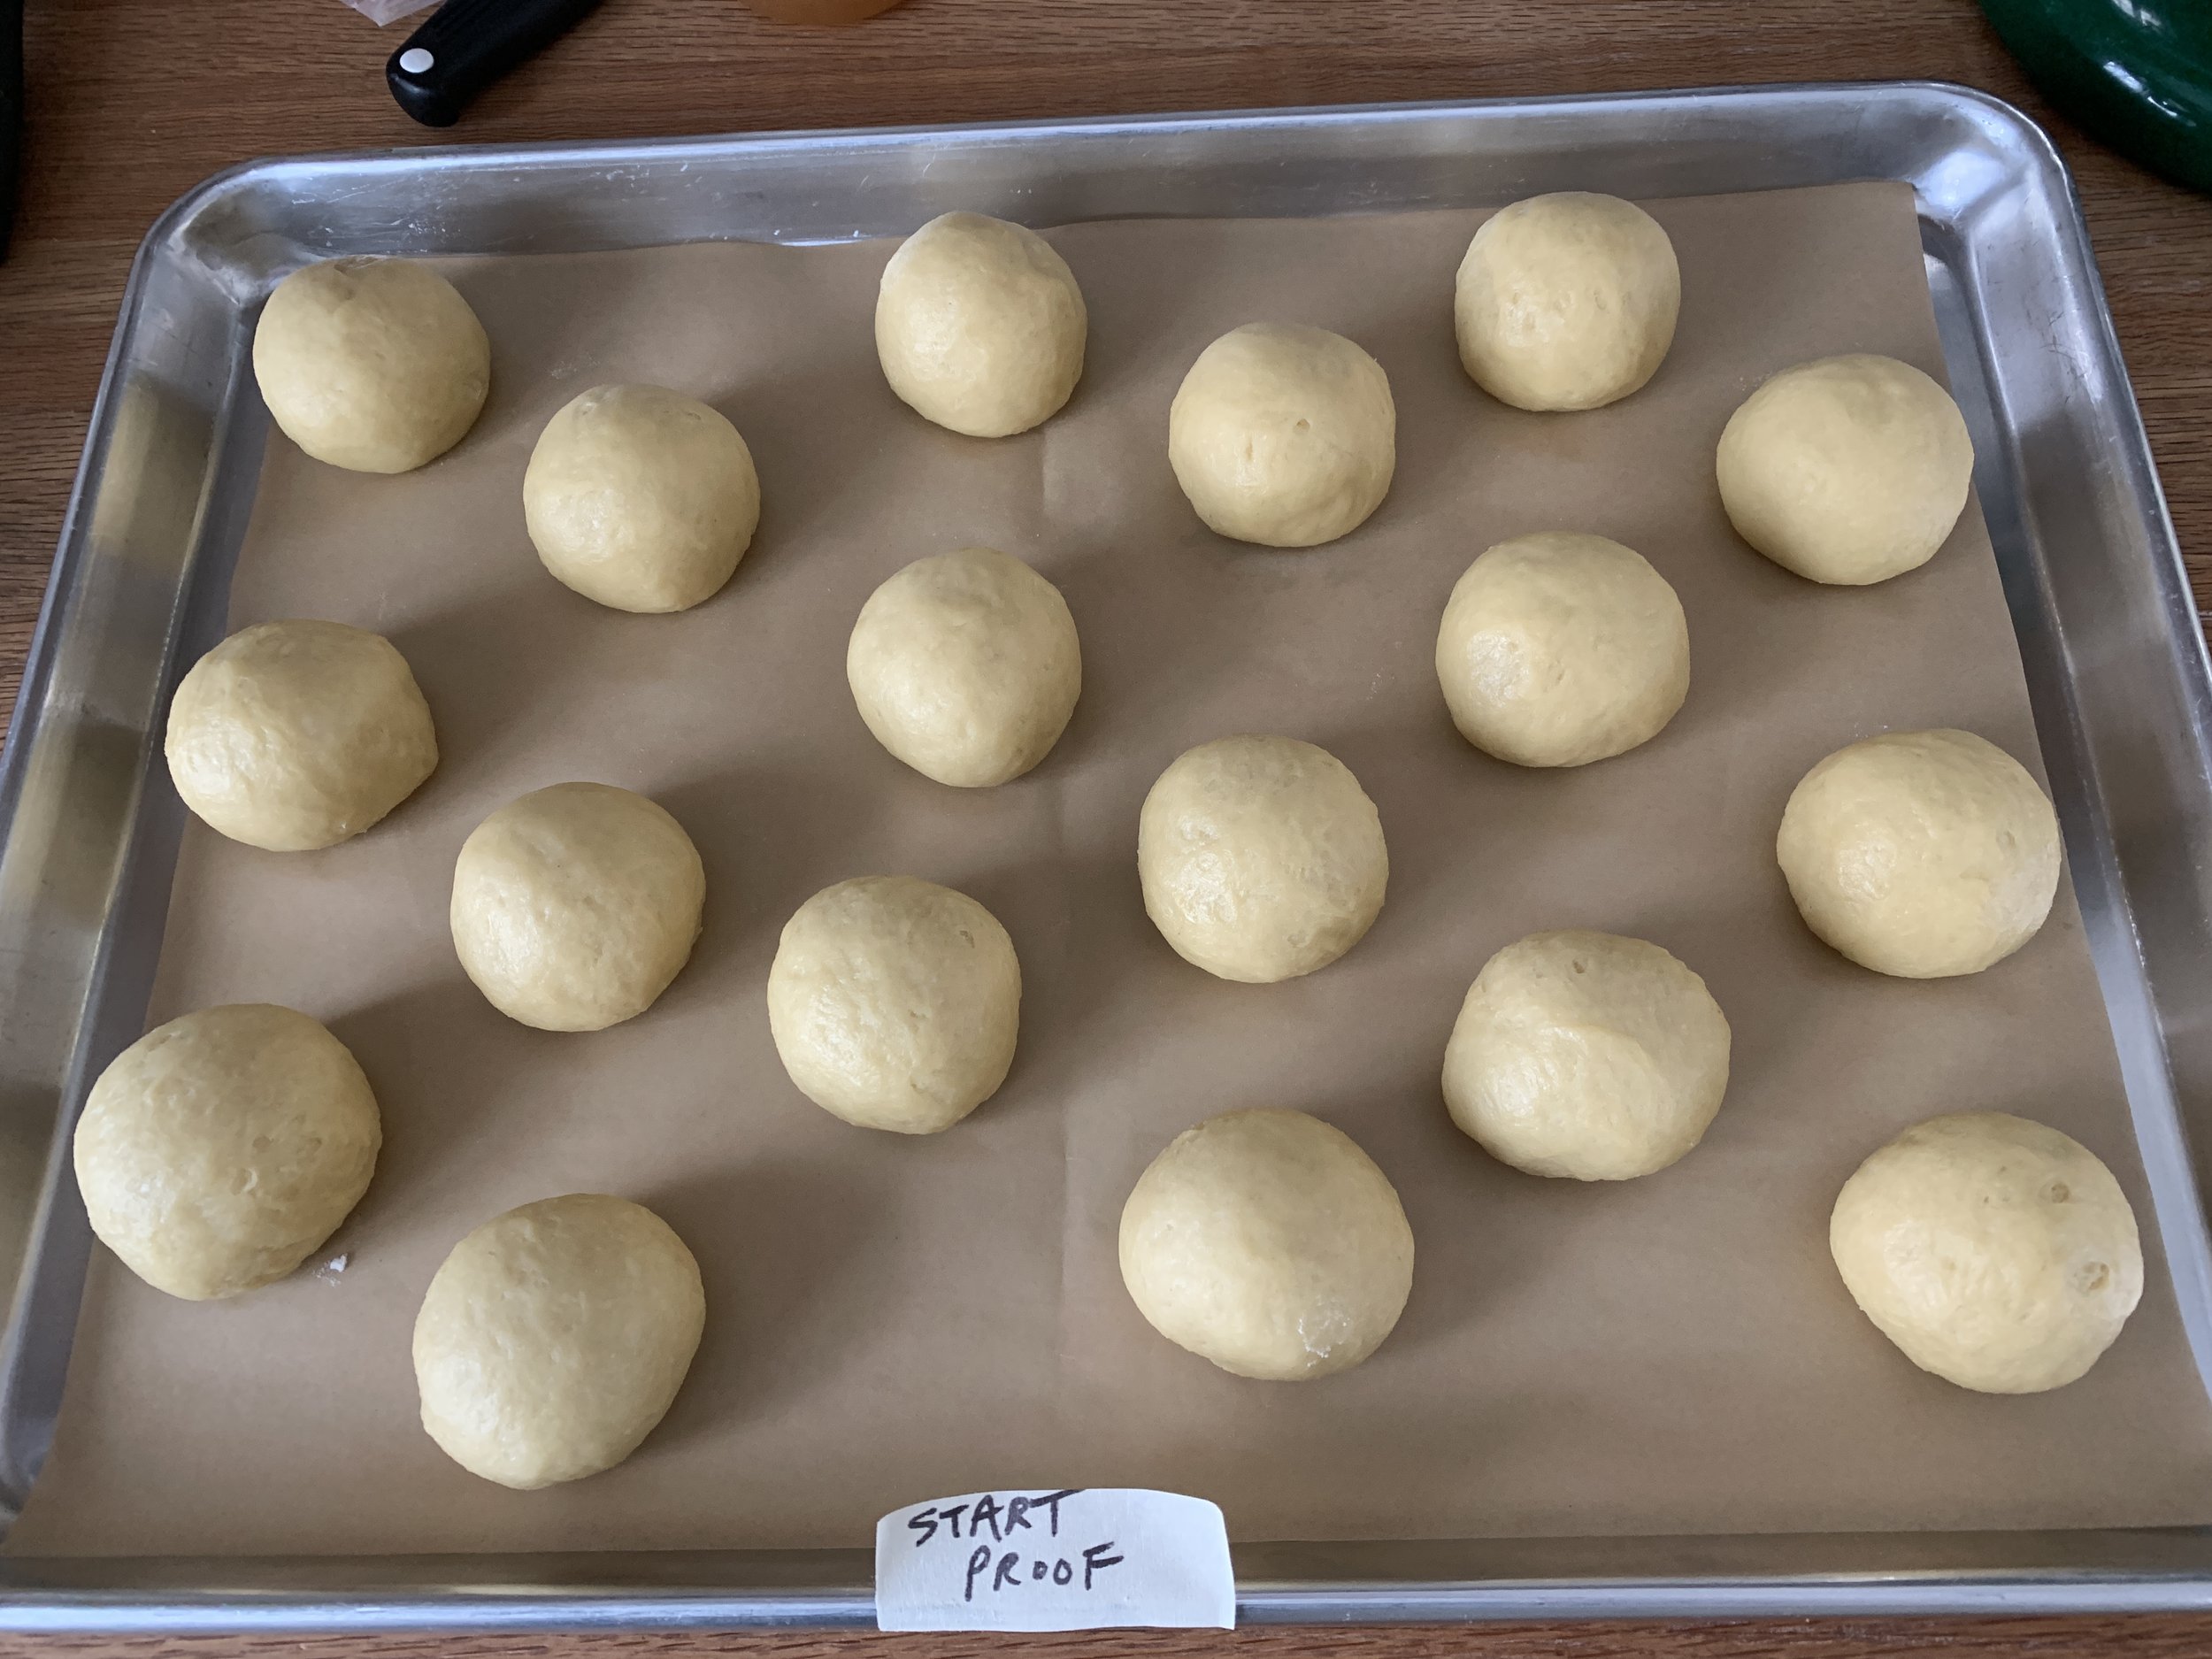
Divide the dough and shape each piece into snug balls.

Place rolls on a parchment lined sheet pan. NOTE: Sofra’s recipe directs use of a buttered 9 or 10” springform pan, tucking the rolls in and ending up with pull-apart rolls.

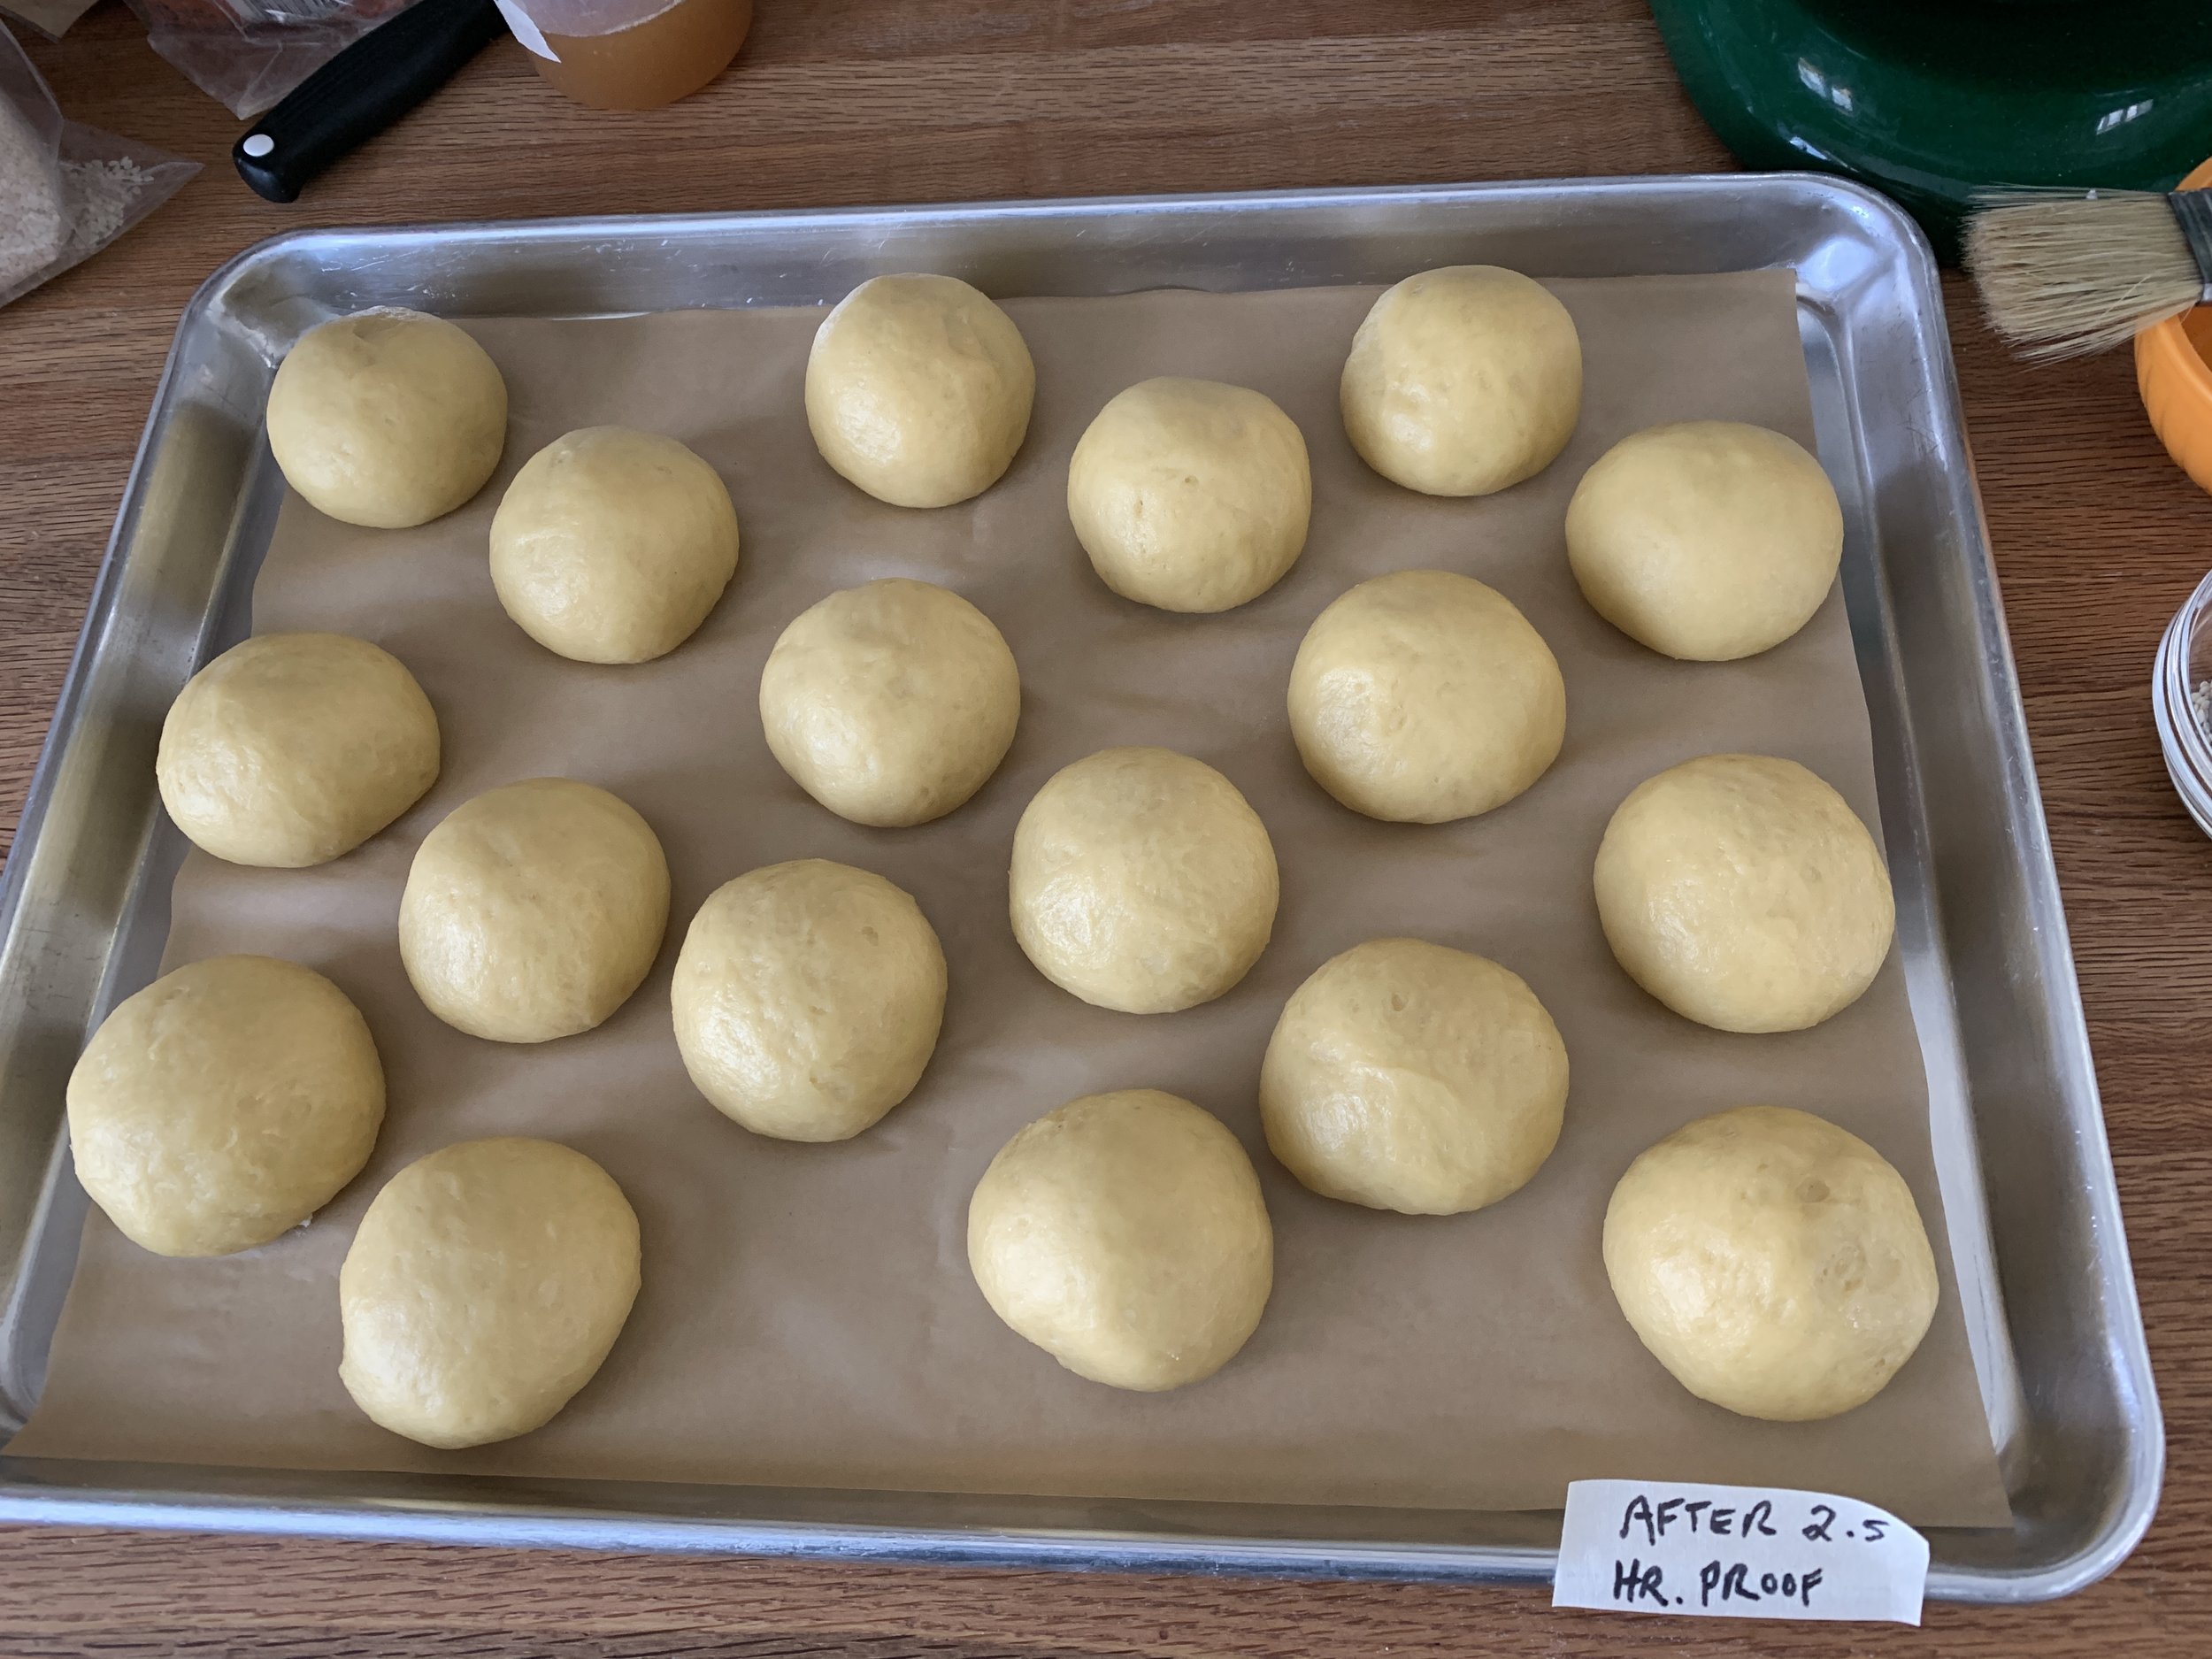
Cover with lightly buttered plastic wrap and let rise 2 to 2.5 hours. On a cold winter day and in my kitchen at 69ºF, I give them the longer rise. Since brioche is so enriched, it needs plenty of time and won’t appear to rise as robustly as lean yeasted doughs. Toward the end of the rise, heat your oven to 350ºF.

Brush the tops with a bit of egg white (or water or milk) and sprinkle with sesame seeds.

Bake about 30-35 minutes until nicely browned (internal temp 190ºF). Cool and enjoy!

Of course Steve and I had to taste test a warm roll with a drizzle of honey (good!) and followed that the next day with sliced/lighted toasted versions served along side (or sandwiched with!) Sunday morning scrambled eggs. Yummy.

These will keep for several days well wrapped but I chose to freeze the majority of my batch (dinner rolls coming up?). I’m imagining a tasty chicken salad sandwich or sliced/cheesed up and broiled to go along with some of the great soups Steve has been making lately. Yes indeed.

Meanwhile , in spite of winter’s attempts to hold on, we’re getting little whiffs of spring - red wing blackbirds, the sandhill cranes who hung around all last summer have returned, pussy willows are starting to open and there’s a different feel in the air. You just know it.

Take care until next time!

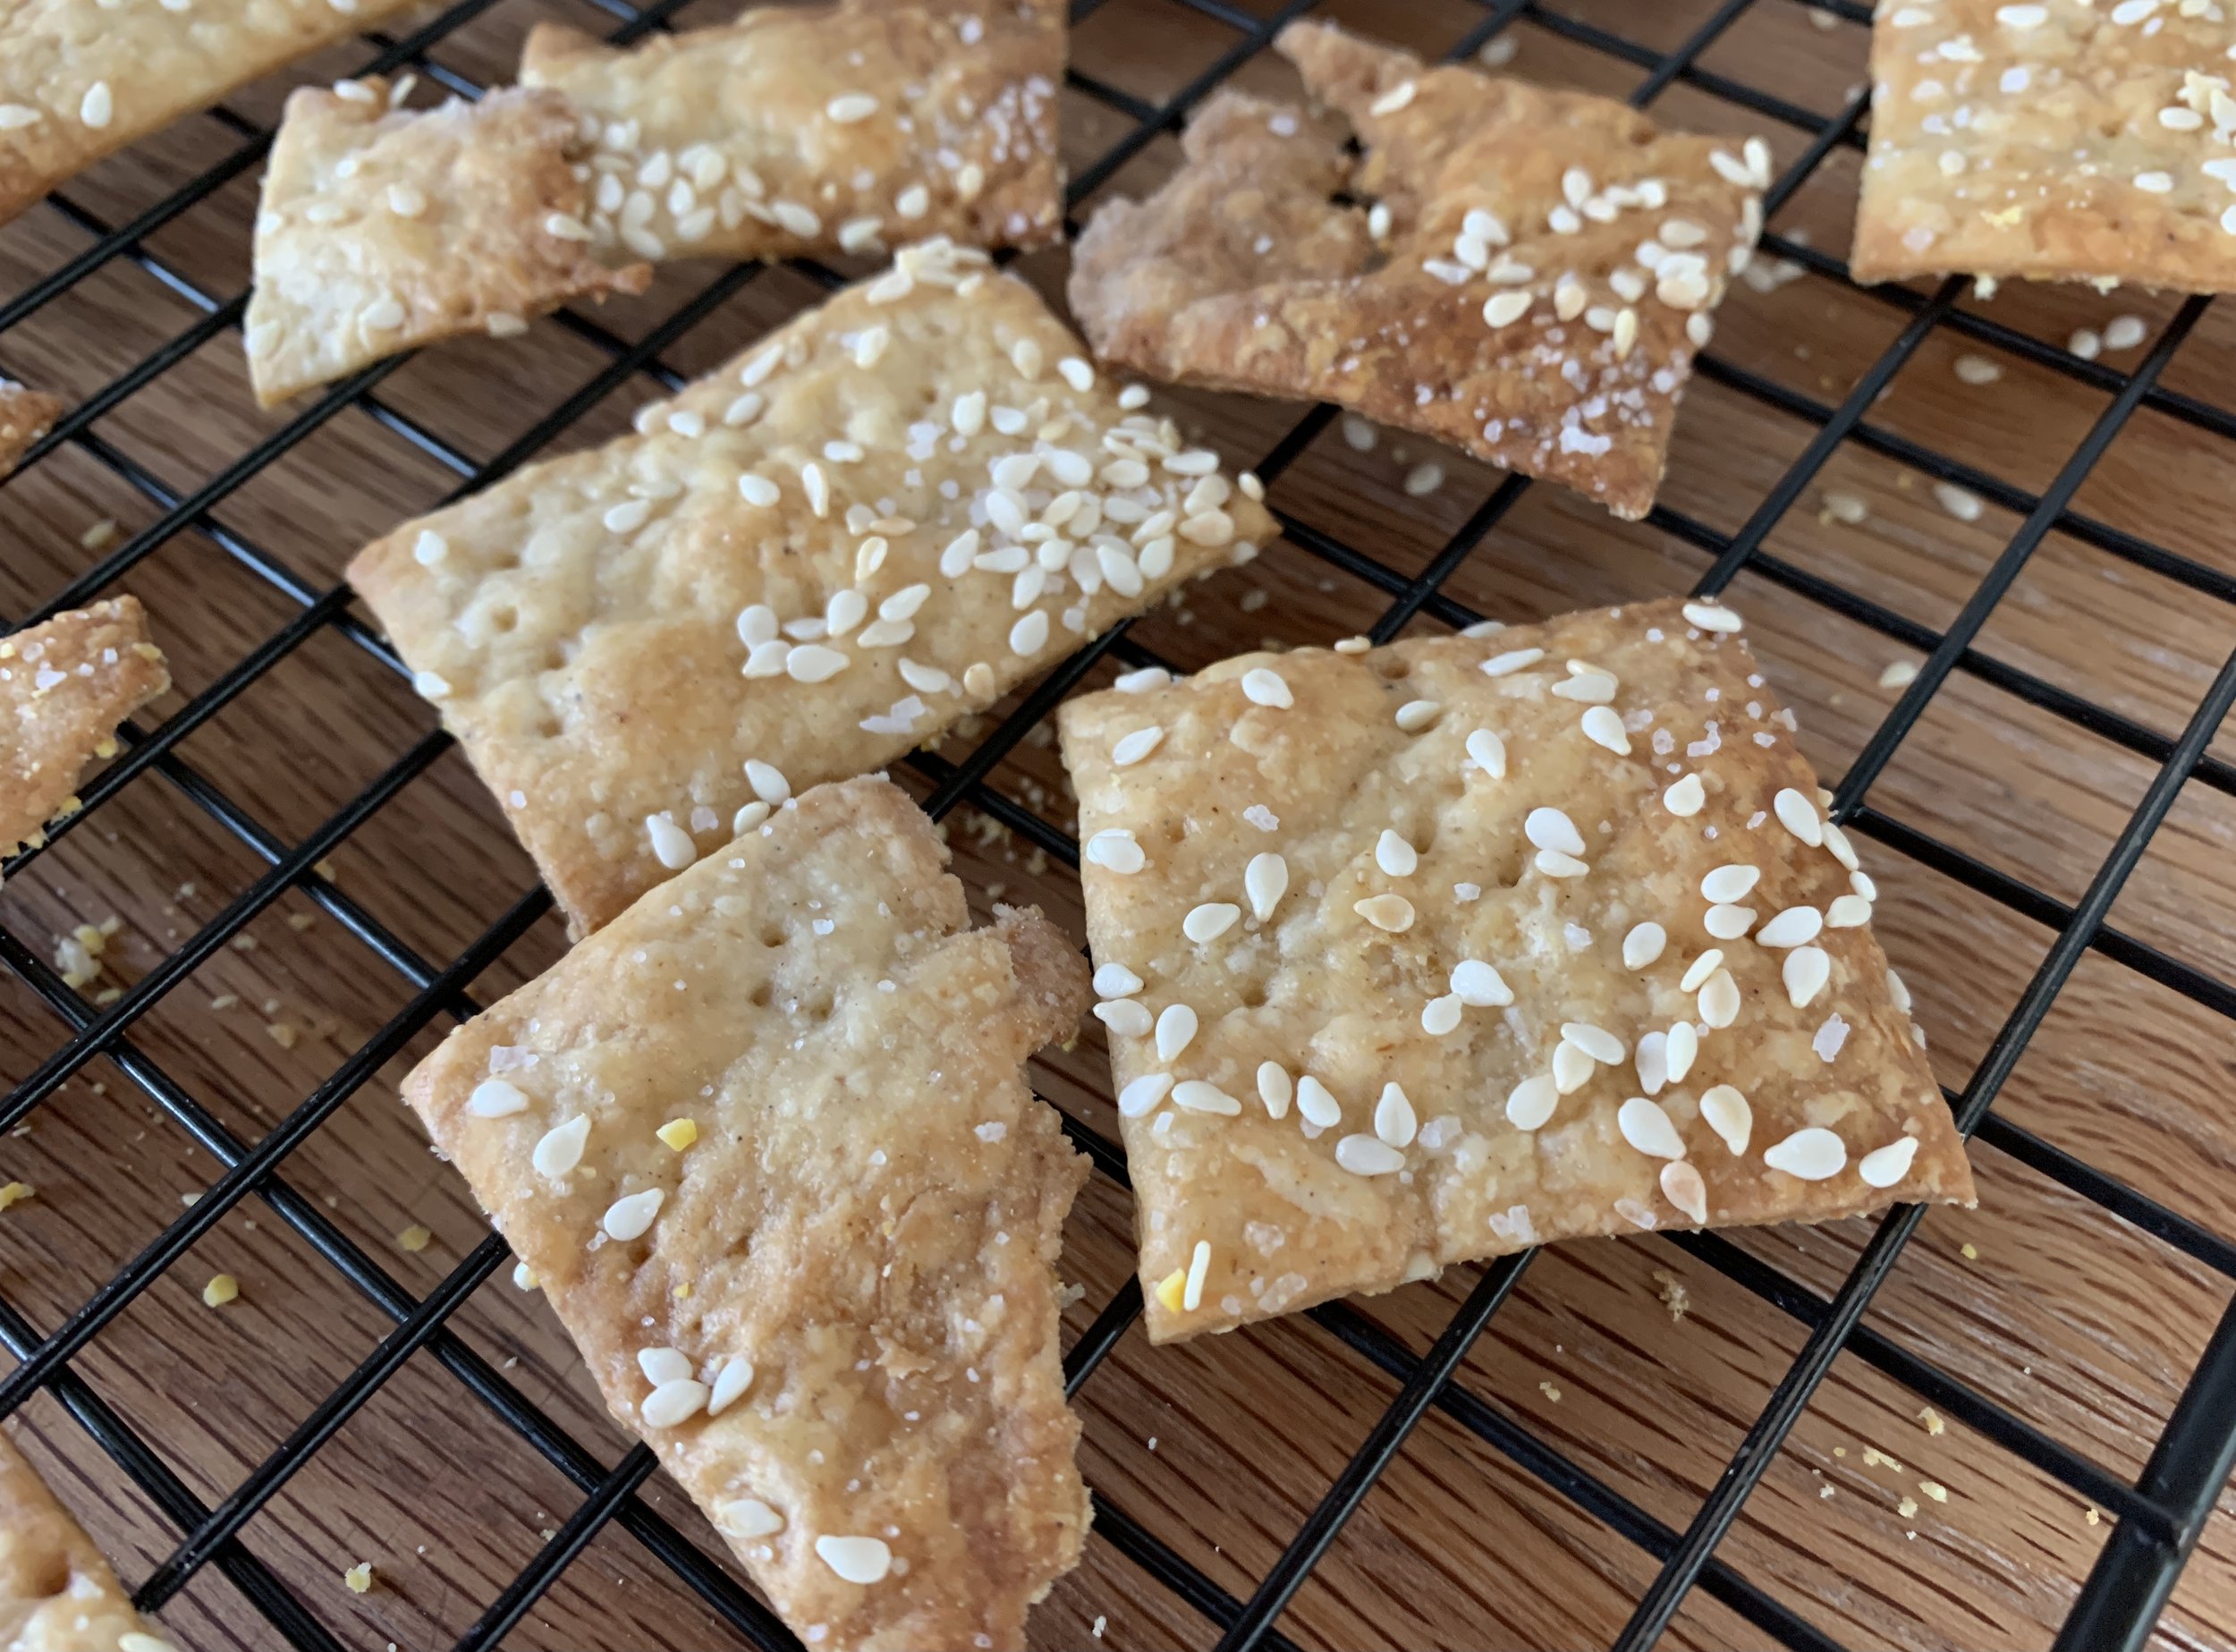
Sesame cumin crackers

Nothing fancy here folks but these babies are delicious! My first foray into baking with chickpea flour, I came across this recipe when browsing back through some old issues of SIFT magazine (Holiday 2018, No. 12) from King Arthur Baking Company (King Arthur Flour back then). The company published this beautiful magazine over 5 years, 3 issues per year, but, alas, they stopped with the holiday issue at the end of 2019. I have all of them except the very first and they tell me it’s not available. I did find an old press release with a PDF of the first 5 pages and also this link to what’s in that first issue if you’d like to check it out.

This cracker recipe comes from Sofra, the popular middle Eastern bakery/cafe in Cambridge MA. Steve and I have experienced some of their goods in past years, since it’s not far down the road from Mt. Auburn cemetery. During our Providence days, we would occasionally take a drive to stroll the beautiful grounds, enjoy the arboretum and pay our respects to the likes of Henry Wadsworth Longfellow, Dorothea Dix, Winslow Homer and Isabella Stewart Gardner. There’s a great view of Boston from the higher elevations, and birding is popular too. A calming place!

The dough is simple to put together but plan ahead since you roll out quarters of the dough, stack them between parchment and chill them for at least 4 hours or overnight before cutting and baking.

Here’s the recipe: In a small bowl blend 3/4 cup buttermilk with 2 tablespoons tahini (be sure and stir it up well first!). In the bowl of a stand mixer with the paddle combine 227 g / 1.75 cups all purpose flour, 50 g / 1/2 cup chickpea flour (I use Bob’s Redmill), 1 tablespoon sugar, 1 teaspoon kosher salt, 1 tablespoon ground cumin, 1/4 teaspoon ground allspice and 113 g / 4 ounces cold unsalted butter cut in 1/4” cubes. Blend on low until butter is in small pieces then add the buttermilk mixture and mix to a wet dough.

The dough is pretty easy to handle when the work surface is properly floured. Divide the dough in 4, keeping the waiting quarters in the fridge as you roll out one at a time. Roll each quarter to a 12”x13” (ish) rectangle - mine was pretty loose-y goose-y since I envisioned my crackers would end up in a variety of shapes and sizes, and I didn’t mind some rough edges. The main thing is rolling the dough nice and thin (1/16”) for better crisping up during the bake.

Line a half sheet pan with parchment, sprinkle with cornmeal (or semolina) and place the first rolled out dough quarter on it. Place a second piece of parchment on the dough, sprinkle again with cornmeal and place the rolled out second quarter on it. Repeat with the other two portions. Cover with plastic and refrigerate 4 hours or overnight. I chose overnight.

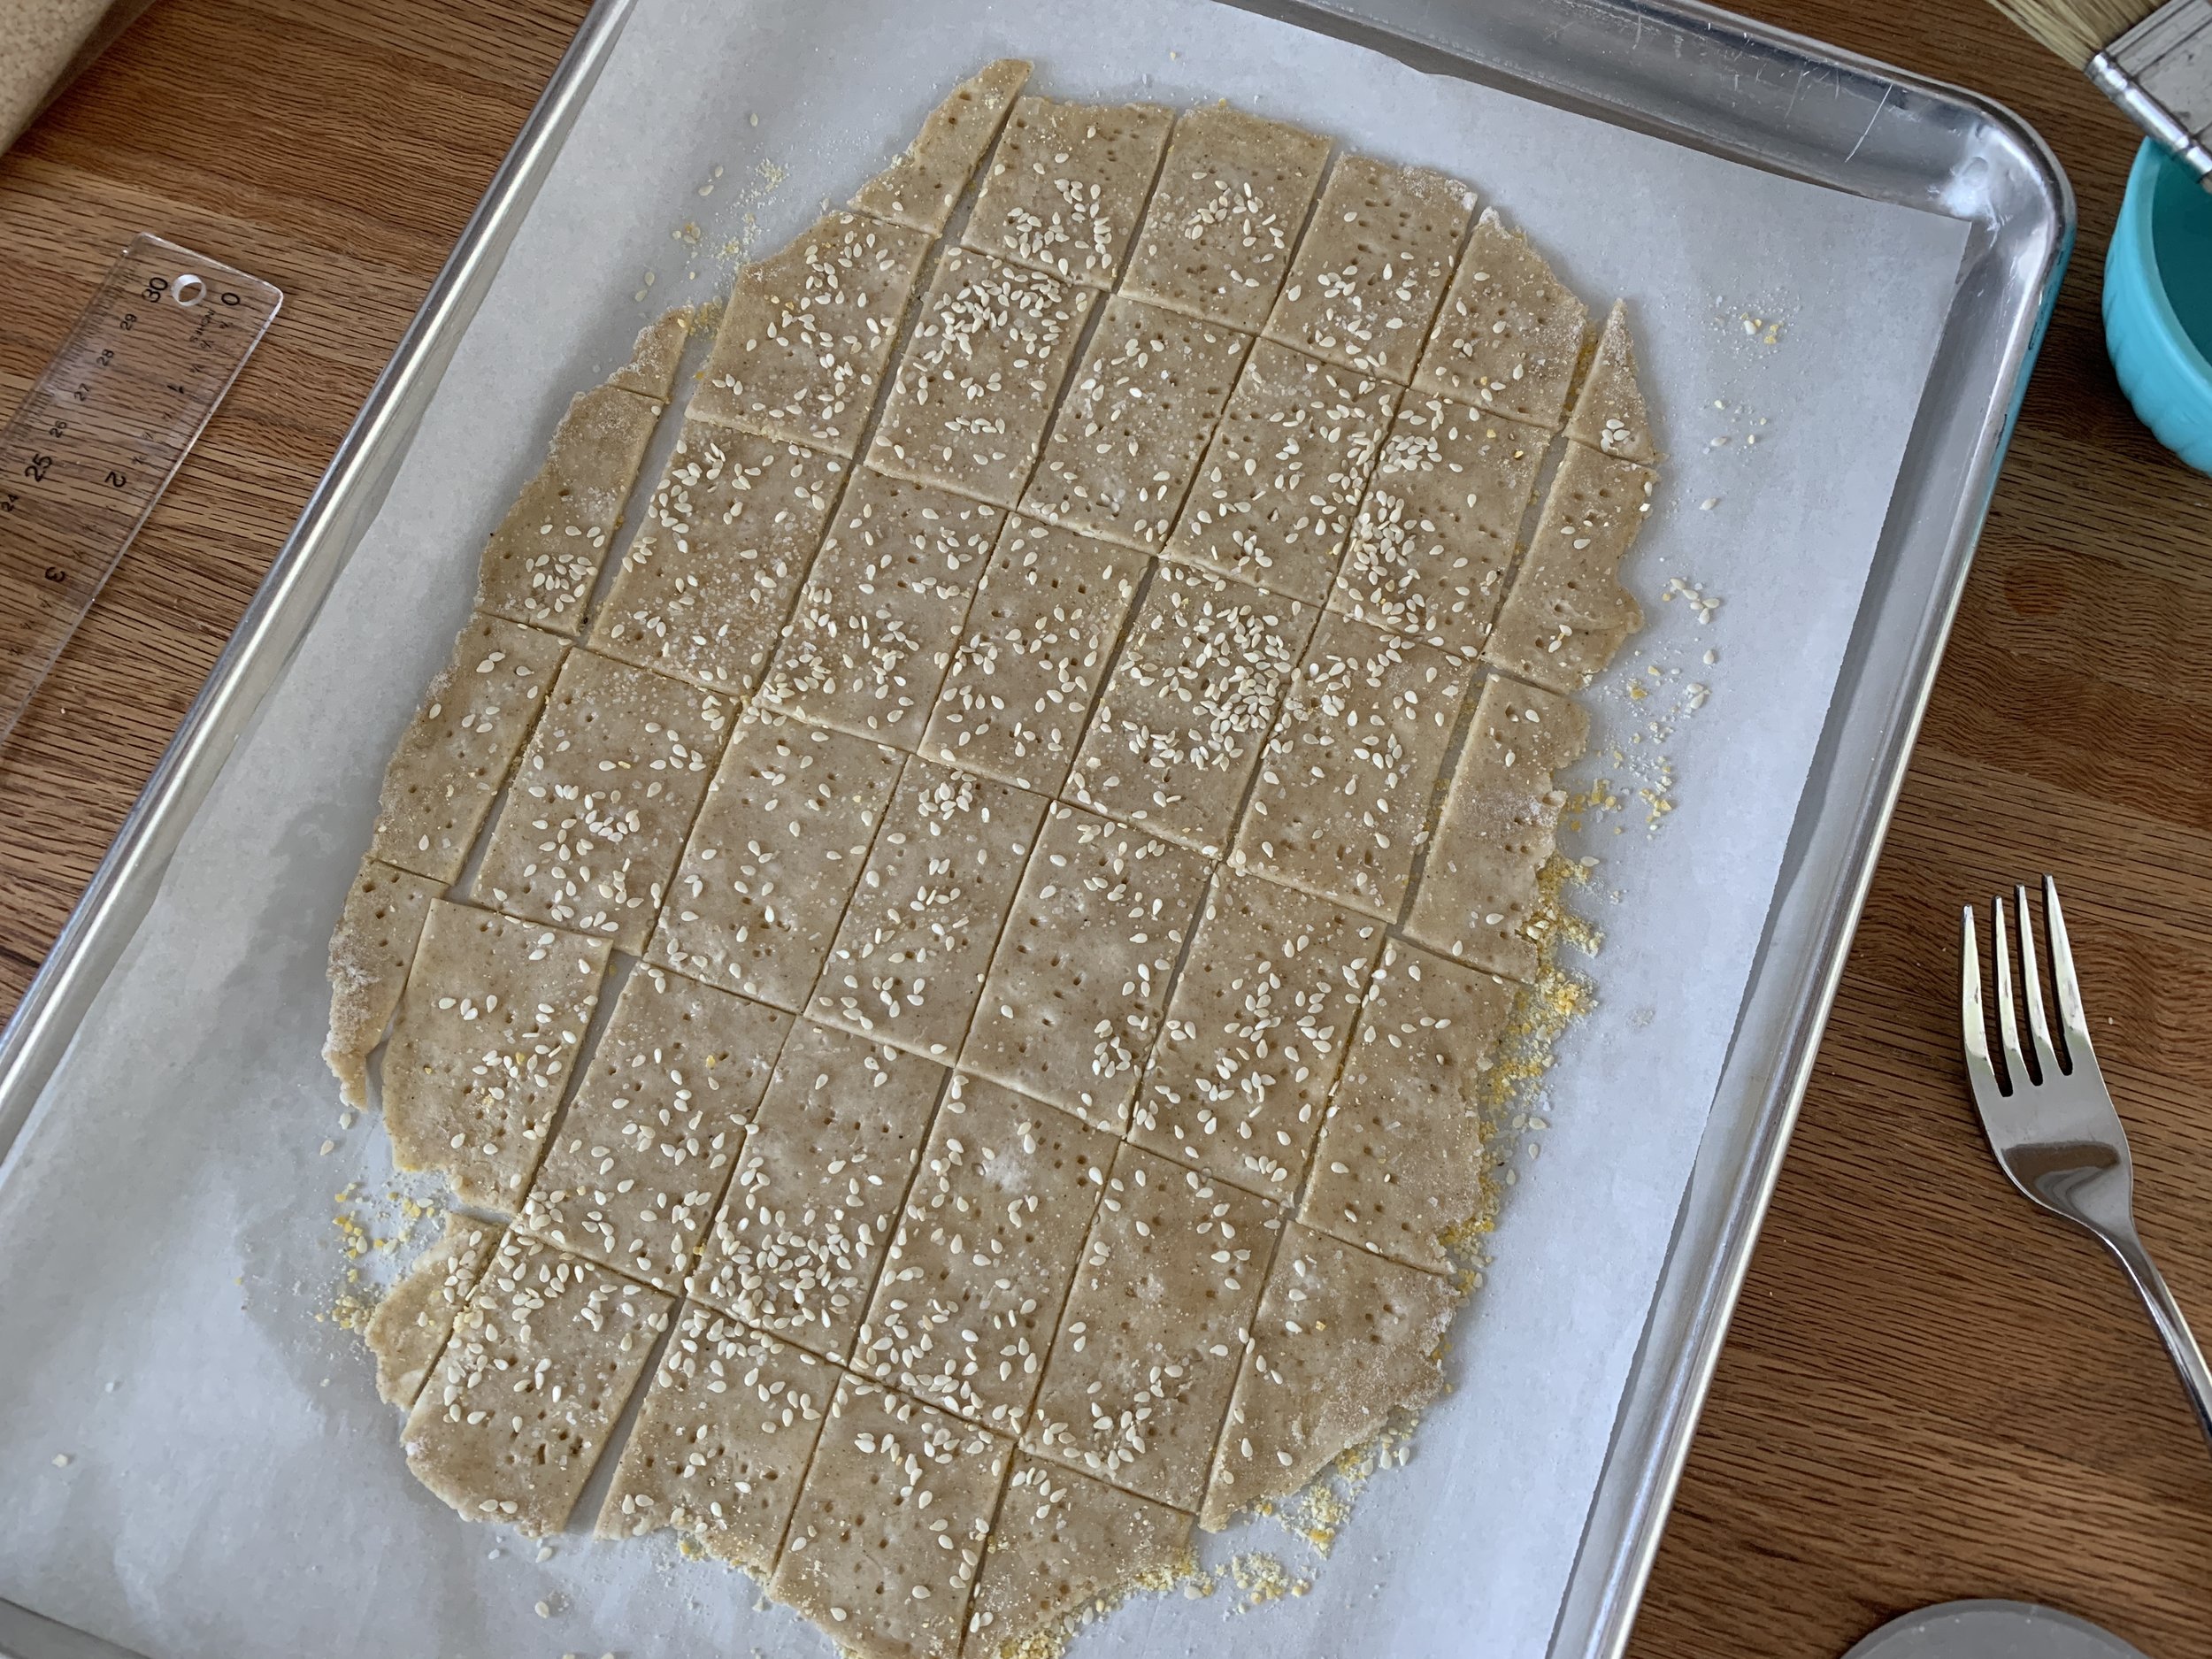
When ready to bake, heat the oven to 350ºF. Have a teaspoon of kosher salt and 2 tablespoons sesame seeds on hand. Lift one of the dough portions on its parchment onto an empty sheet pan. Fork prick it all over, brush lightly with water and sprinkle 1/4 teaspoon kosher salt and 1/2 tablespoon sesame seeds over the top. Cut into squares or rectangles (or whatever shape and size you’d like) with a pizza cutter.

Repeat the above with the next batch of dough on a second empty sheet pan. NOTE - I baked two pans in one go but if you prefer to bake one at a time, go for it.

If you only have one or two half sheet pans and need to rotate batches, pull the baked sheets off onto cooling grids and let the pans cool completely before you continue the above steps with the remaining dough quarters.

Bake about 15 minutes, rotating your pans half way through. I baked mine a bit longer since they weren’t deeply browned and crispy at the 15 minute mark. Remember - all ovens are different! Let cool then recut or break apart and enjoy.

Steve and I found them very tasty with a schmear of hummus or a nice slice of Cotswald cheese. Yum. One note - the medium grind cornmeal that I used for “dusting” the parchment sheets had too much coarse crunch for our tastes. I’d suggest using either fine-grind cornmeal or semolina to 86 that problem.

They keep well in a closed container for a good week. Try ‘em, you’ll like ‘em.

Have a wonderful week!

Favorite garnishes, the end: crumbles

Banana rye cakes with hazelnut crumble (and a bit of chocolate tucked underneath)

Ready to bake mixed berry crisp with pistachio crumble

Time for the garnish finale in what has become a 4 parter on some favorite ways to dress up and enhance your baked goods.

Crumbles are easy, ever so adaptable, perfect for layering or topping and they keep either unbaked or baked in the freezer for many weeks. What a great way to be ready for any garnish occasion. Yes!

If you plan to make some crumble, feel free to double, triple or quadruple the recipe for future projects. Simply mix equal weights of flour and sugar in a medium bowl then sand in the same weight of cool, diced butter with your fingertips, work it to smallish coarse crumbs and voilà, that’s it!

A basic starter quantity is 60 g each of flour, sugar and butter which easily tops a dozen muffin size teacakes, a 9” fruit tart or a 9”x9” pan of fruit crisp.

Ready for sanding

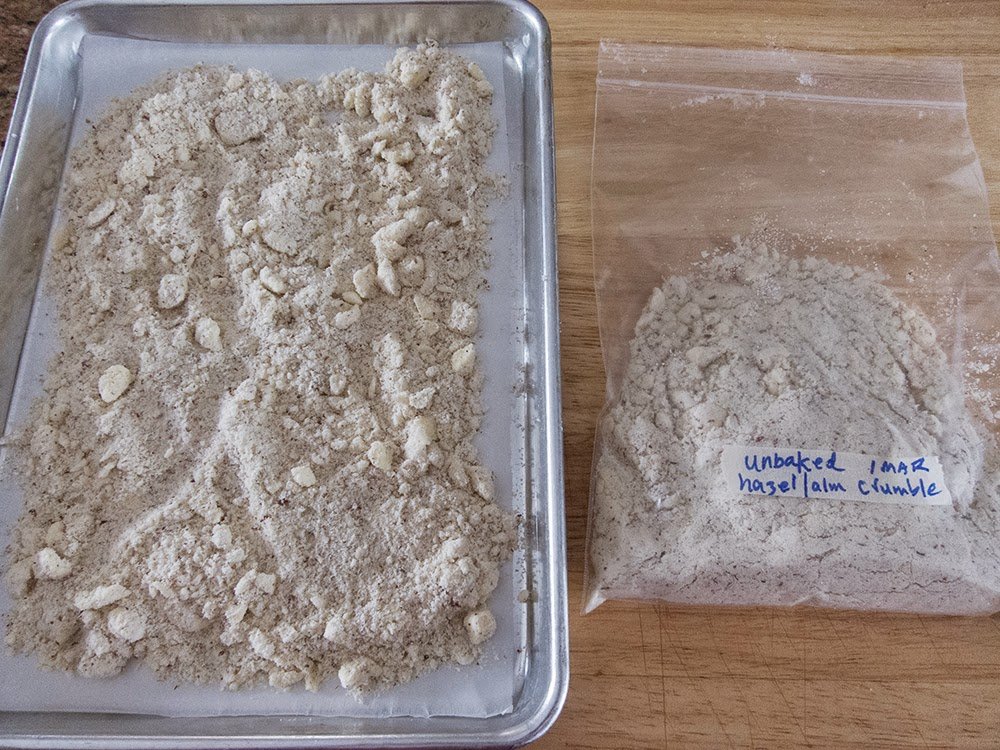
If you’re not using it right away, either spread it out on a sheet pan to bake ahead (350ºF for 15 to 20 minutes, stirring occasionally until golden brown), cool and bag up for the freezer OR store unbaked in a zip-top bag until ready to use.

Tray ready to bake/bag going into the freezer

All baked up

You can change up your crumble by subbing in spelt, whole wheat pastry or rye flour for all purpose (or do a mix) and swap out granulated sugar for raw or dark brown. Make it more nutty by adding an equal weight of nut flour or finely ground toasted nuts. Or simply add in chopped nuts (use anywhere from half to equal the weight of the other ingredients) for more texture and crunch. Add in your favorite spice(s) and/or some citrus zest. Create!

For an alternate crumble approach I use my favorite chocolate shortbread dough (recipe compliments of Thomas Keller’s “Bouchon Bakery”) and rather than bake it as cookies I just crumble up the dough in a single layer on a sheet pan and bake it up. There’s always a bag of the stuff in my freezer. Steve and I love it on ice cream, and I use it to top teacakes garnished with Swiss meringue buttercream or my favorite chocolate ganache tart.

Black gold!

Dark chocolate ganache and caramel apple teacakes

Chocolate ganache tart

You can do the same with your favorite crispy gingersnap dough or basic shortbread dough. I love making my own graham crackers too, both for crumb crusts as well as crushing them up for a garnish.

There’s nothing like the crispy crunch of crumble married with juicy, baked fruit, layered with luscious cream or as a topping for citrus curd or ganache - the list goes on. Just go for it and have fun.

Cheers until next time.

Hazelnut ricotta berry entremet layered and topped with almond/hazelnut crumble

Paris Brest - more fun with pâte à choux

After my recent post on religieuses and the steps of making pâte à choux, while we’re in the mood let’s take a look at Paris Brest. Another classic choux paste creation, it’s reportedly named to commemorate the famed Paris to Brest bicycle race, being created years ago by a pastry chef to resemble a bicycle wheel. I’m only one in a long, long, long line of folks who have written about this very thing.

One can make the round any size - large, medium or individually small - it’s all up to you. I used to make individual ones on occasion back in our Providence days, but it’s certainly been awhile. Since Steve and I are the only ones around to eat the goods, I decided on a round about 6-7 inches in diameter that would yield decent wedges to be consumed over 2-3 days.

I piped and baked the Paris Brest rounds the same day as the religieuses then held them in the freezer overnight before assembly the following day. One can pipe one ring with two tiers, splitting it in half once baked, but I decided to bake two separate rings, one for the top and one for the bottom.

Here’s the breakdown. Draw two circles of your chosen size on parchment, overturn the paper and place it on a sheet pan. Using a medium star tip I piped a ridged bottom layer and a more swirly top layer. I tucked in small rounds of “crunchy top” circles then sprinkled on some chopped hazelnuts.

Here they are nicely baked and browned.

When you’re ready to assemble, carefully slice off the top edges of the bottom layer to shave off any unevenness (snack time!).

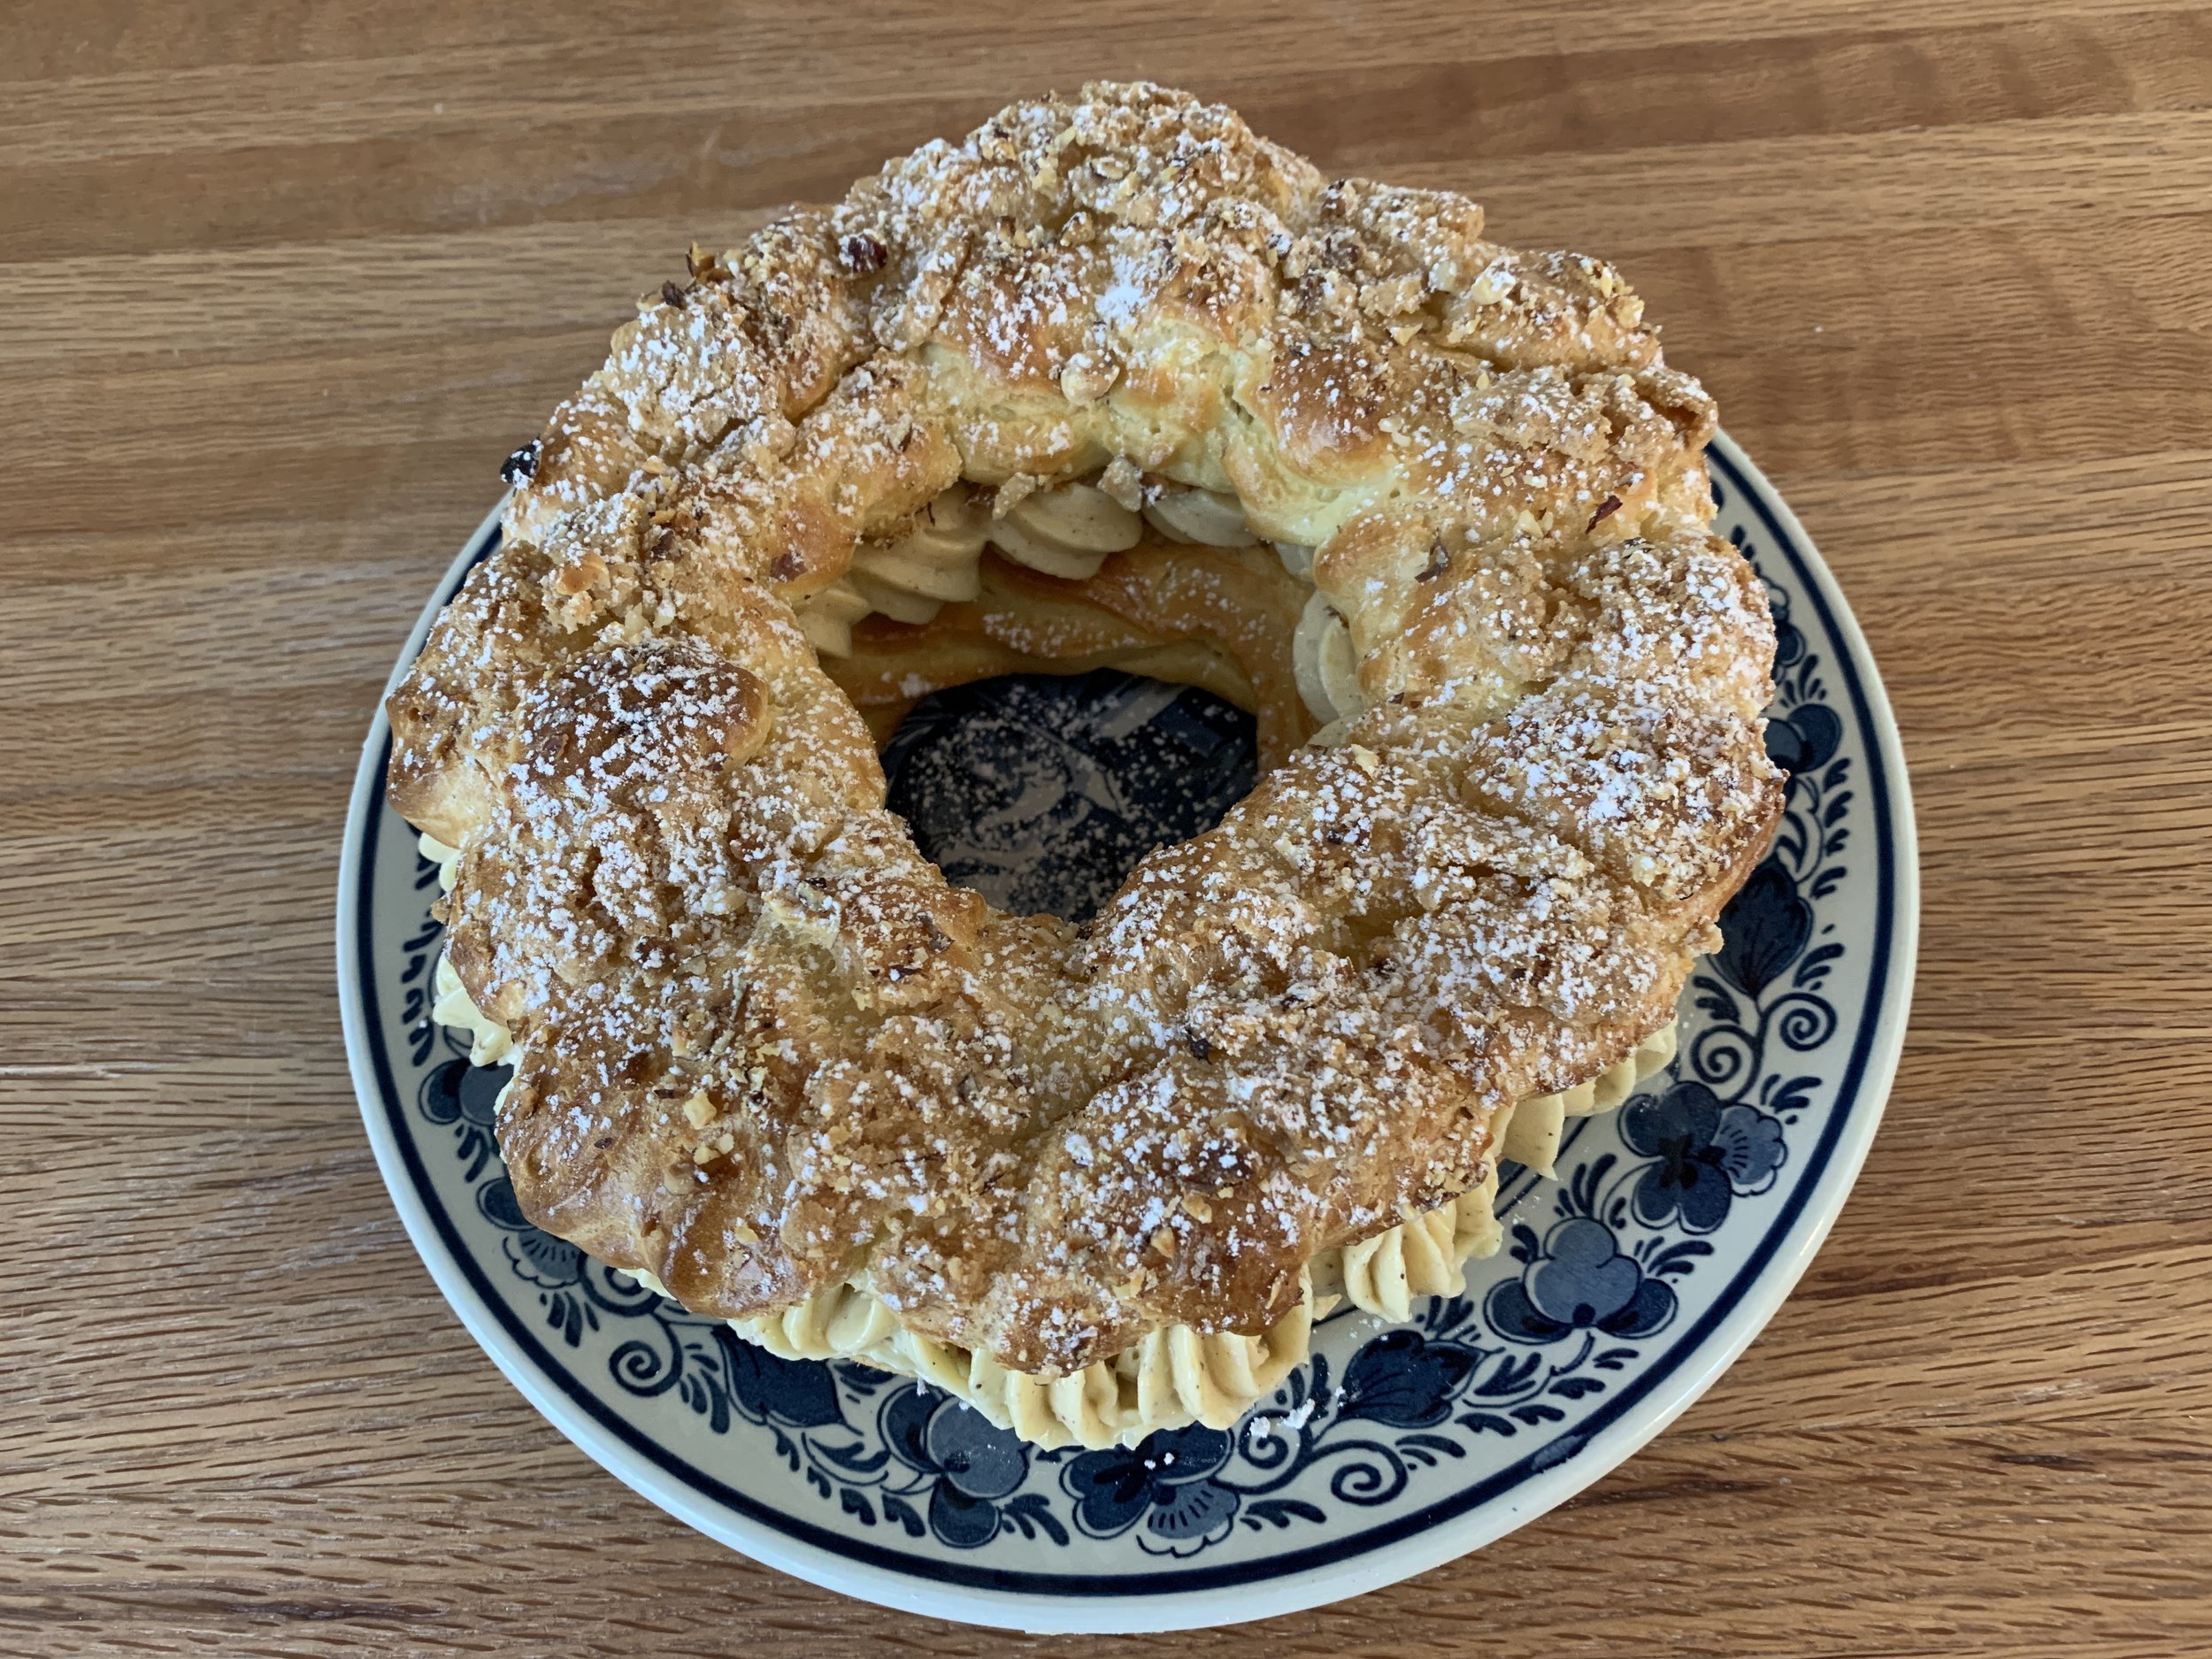
I went with classic praline pastry cream for the filling. The same day that I had made the crème pat for the religieuses, I separated out 200 g and blended in praline paste made by processing 40 g sugared hazelnuts to a paste consistency. Once chilled I added a nice dollop of whipped cream to lighten it. Using a medium star tip I got a little carried away with my squiggles and ruffles. Have fun with it!

Set the top on and gently nestle it in place. I like to give it a dusting of confectioner’s sugar too.

Now slice and enjoy. You won’t be sorry.

Wherever you are and whatever you’re doing, keep up the good work and live happily. It’s not always easy, that’s for sure.

Religieuse - fun with pâte à choux

Steve LOVES anything made with choux paste, and coffee religieuse (French for nun) is at the top of his list. He’s been asking me to make these for awhile now, and what better time than during the down days of January as we catch our collective breaths and ease into 2022.

Pâte à choux takes me back to Le Cordon Bleu school days and my stage at Pascal Pinaud’s in Paris’ 5th arr. (15 years ago this month!!). My task each morning was to fill and garnish the èclairs and religieuses for the day. As a matter of fact, the job I was given that very first morning oh so long ago was to make a big batch of traditional crème pâtissière (and make it I did!). Yes, I can do this!!

Chocolate and coffee crème pat (in Brit speak) are de rigueur for the fillings, with fondant of each flavor used to garnish. In recent years dedicated choux shops have popped up in and around Paris with all manner of flavors available.

Even though fondant is typically used to cap the choux buns, I felt no joy when working with the stuff and have avoided it ever since. I choose to use a lovely ganache instead when dressing up my ladies. The collar consists of buttercream piped in a ruffle fashion, another morning job for which I was often chided when not piping perfectly. Looks like I still have a ways to go on the perfect ruffle. Live and learn. BTW - you’ll see all manner of ruffles if you search the internet for religieuse. Lots of variations.

For the filling I used my base crème pâtissière recipe. Since I planned to make just a few religieuse, I divided out 200 g of the warm cream and blended in 30 g of chopped milk chocolate and some coffee extract to taste to go the mocha route.

Let’s do a quick run through of the choux making process. Here’s the recipe - I’ll highlight what I feel are the important things to notice through the steps.

Have your flour and eggs ready in separate bowls. Place the milk/water/butter/sugar/salt in a medium saucepan on low heat. You want the butter completed melted before you turn the heat up.

Up the heat to medium high and bring it to a boil. Have the flour at the ready.

Remove from the heat and dump the flour in all at once, stirring quickly to incorporate. It will look kind of clumpy at first like rough mashed potatoes.

Move it back onto the heat and stir vigorously to release some steam and dry it out for a minute or two. Look for the paste to start forming a smoother ball and there will be a light coating on the pan bottom.

Transfer the paste to the bowl of a stand mixer and let it sit a minute to release some more steam. With the paddle attachment on low add the first egg and blend on medium to incorporate completely. It will look gloppy and will seem like it doesn’t want to come together. Don’t worry.

Note: you can blend the eggs in by hand with a sturdy wooden or silicone spoon - you just have to have enough elbow grease to bring it together!

As you add each egg and blend it in, the paste will become more uniform and smooth. The base recipe I use calls for four large eggs. Here’s the paste after three eggs have been added.

Before I proceed I assess by checking the mixture. It should hold, not tear, and start ribboning down as you lift the paddle and let it hang in a “v”. Not quite ready.

I break up the last egg and add about half, blending and reassessing. I don’t consider myself superstitious but it usually works out for me that about 3/4 of the last egg is just right to call it good. Here’s the “v’ coming off the paddle. Notice the paste has more of a smooth, luscious looking sheen too.

Time to pipe! I pulled out a couple of round cutters to help me eyeball what size I wanted my heads and bodies. I forgot to include my trusty ruler in the shot, but in the image below I’m using a quarter sheet pan which measures 8x12”. That gives you some scale. I used a round tip for the bodies and a star tip, just because, for the heads (which you can sort of appreciate in the final analysis, but a round tip is just fine).

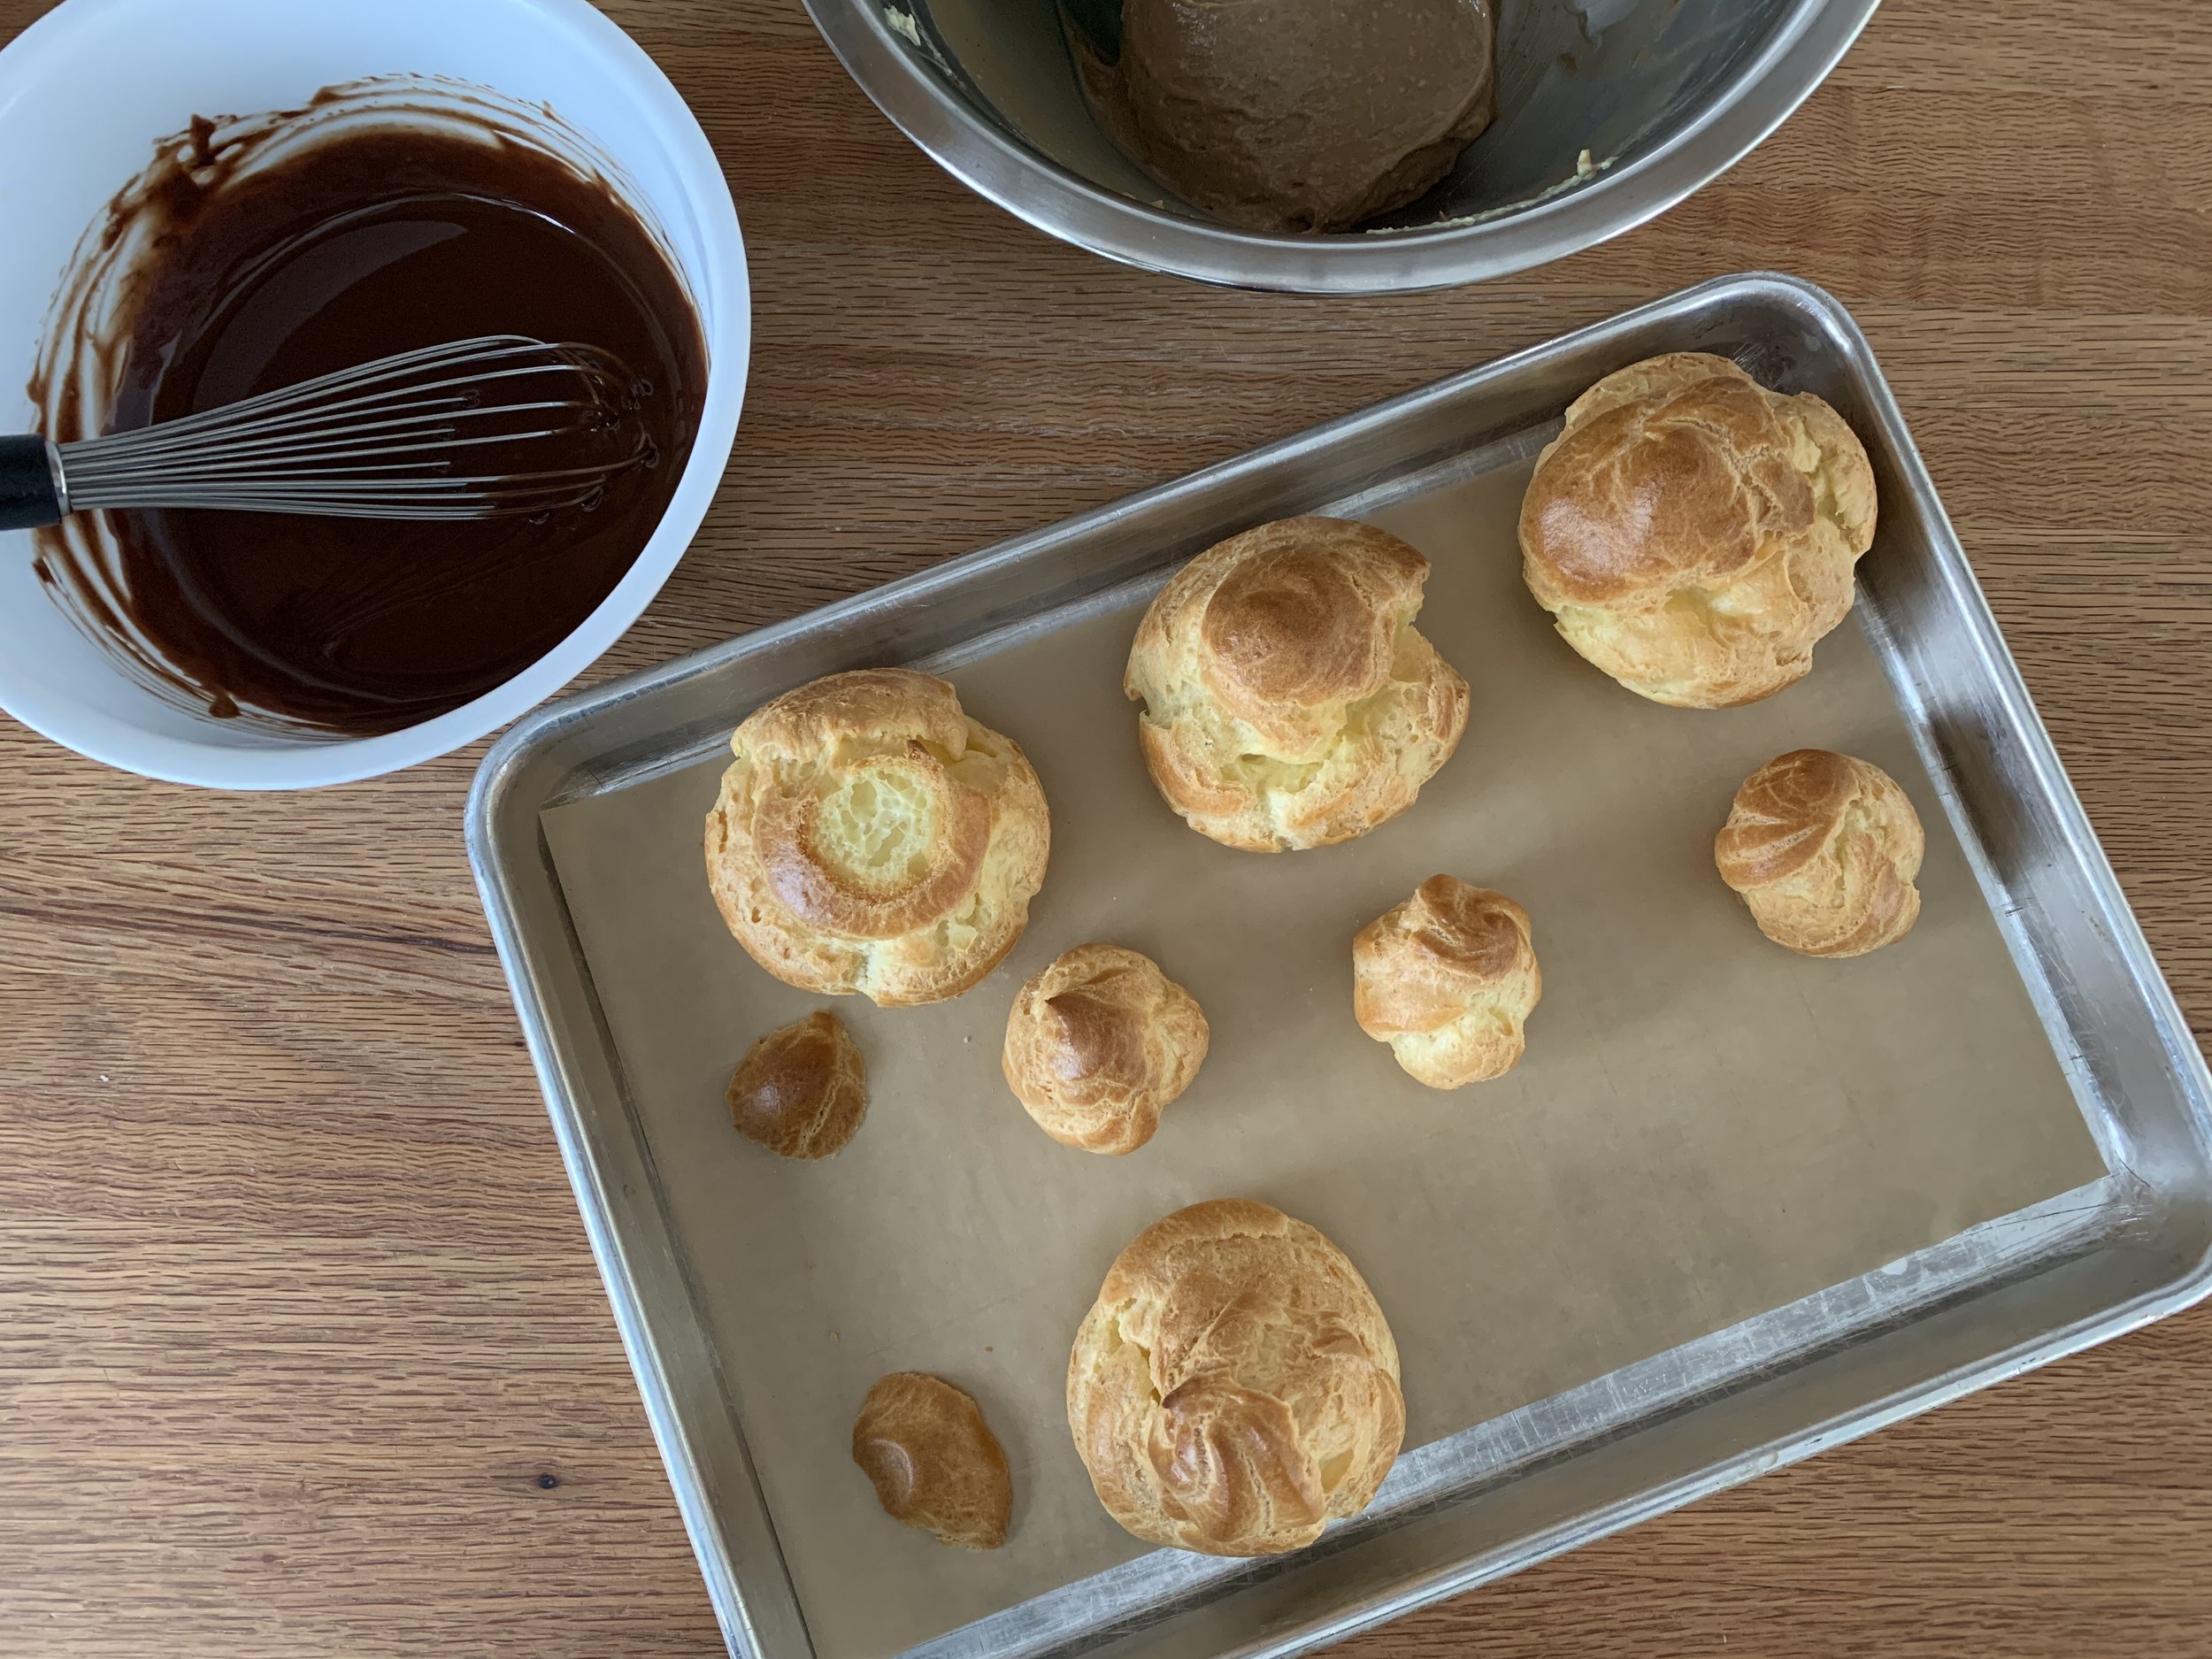
Here they are all baked and cooled. I had an extra head which I filled with a bit of mocha cream and ate. Gotta test the product.

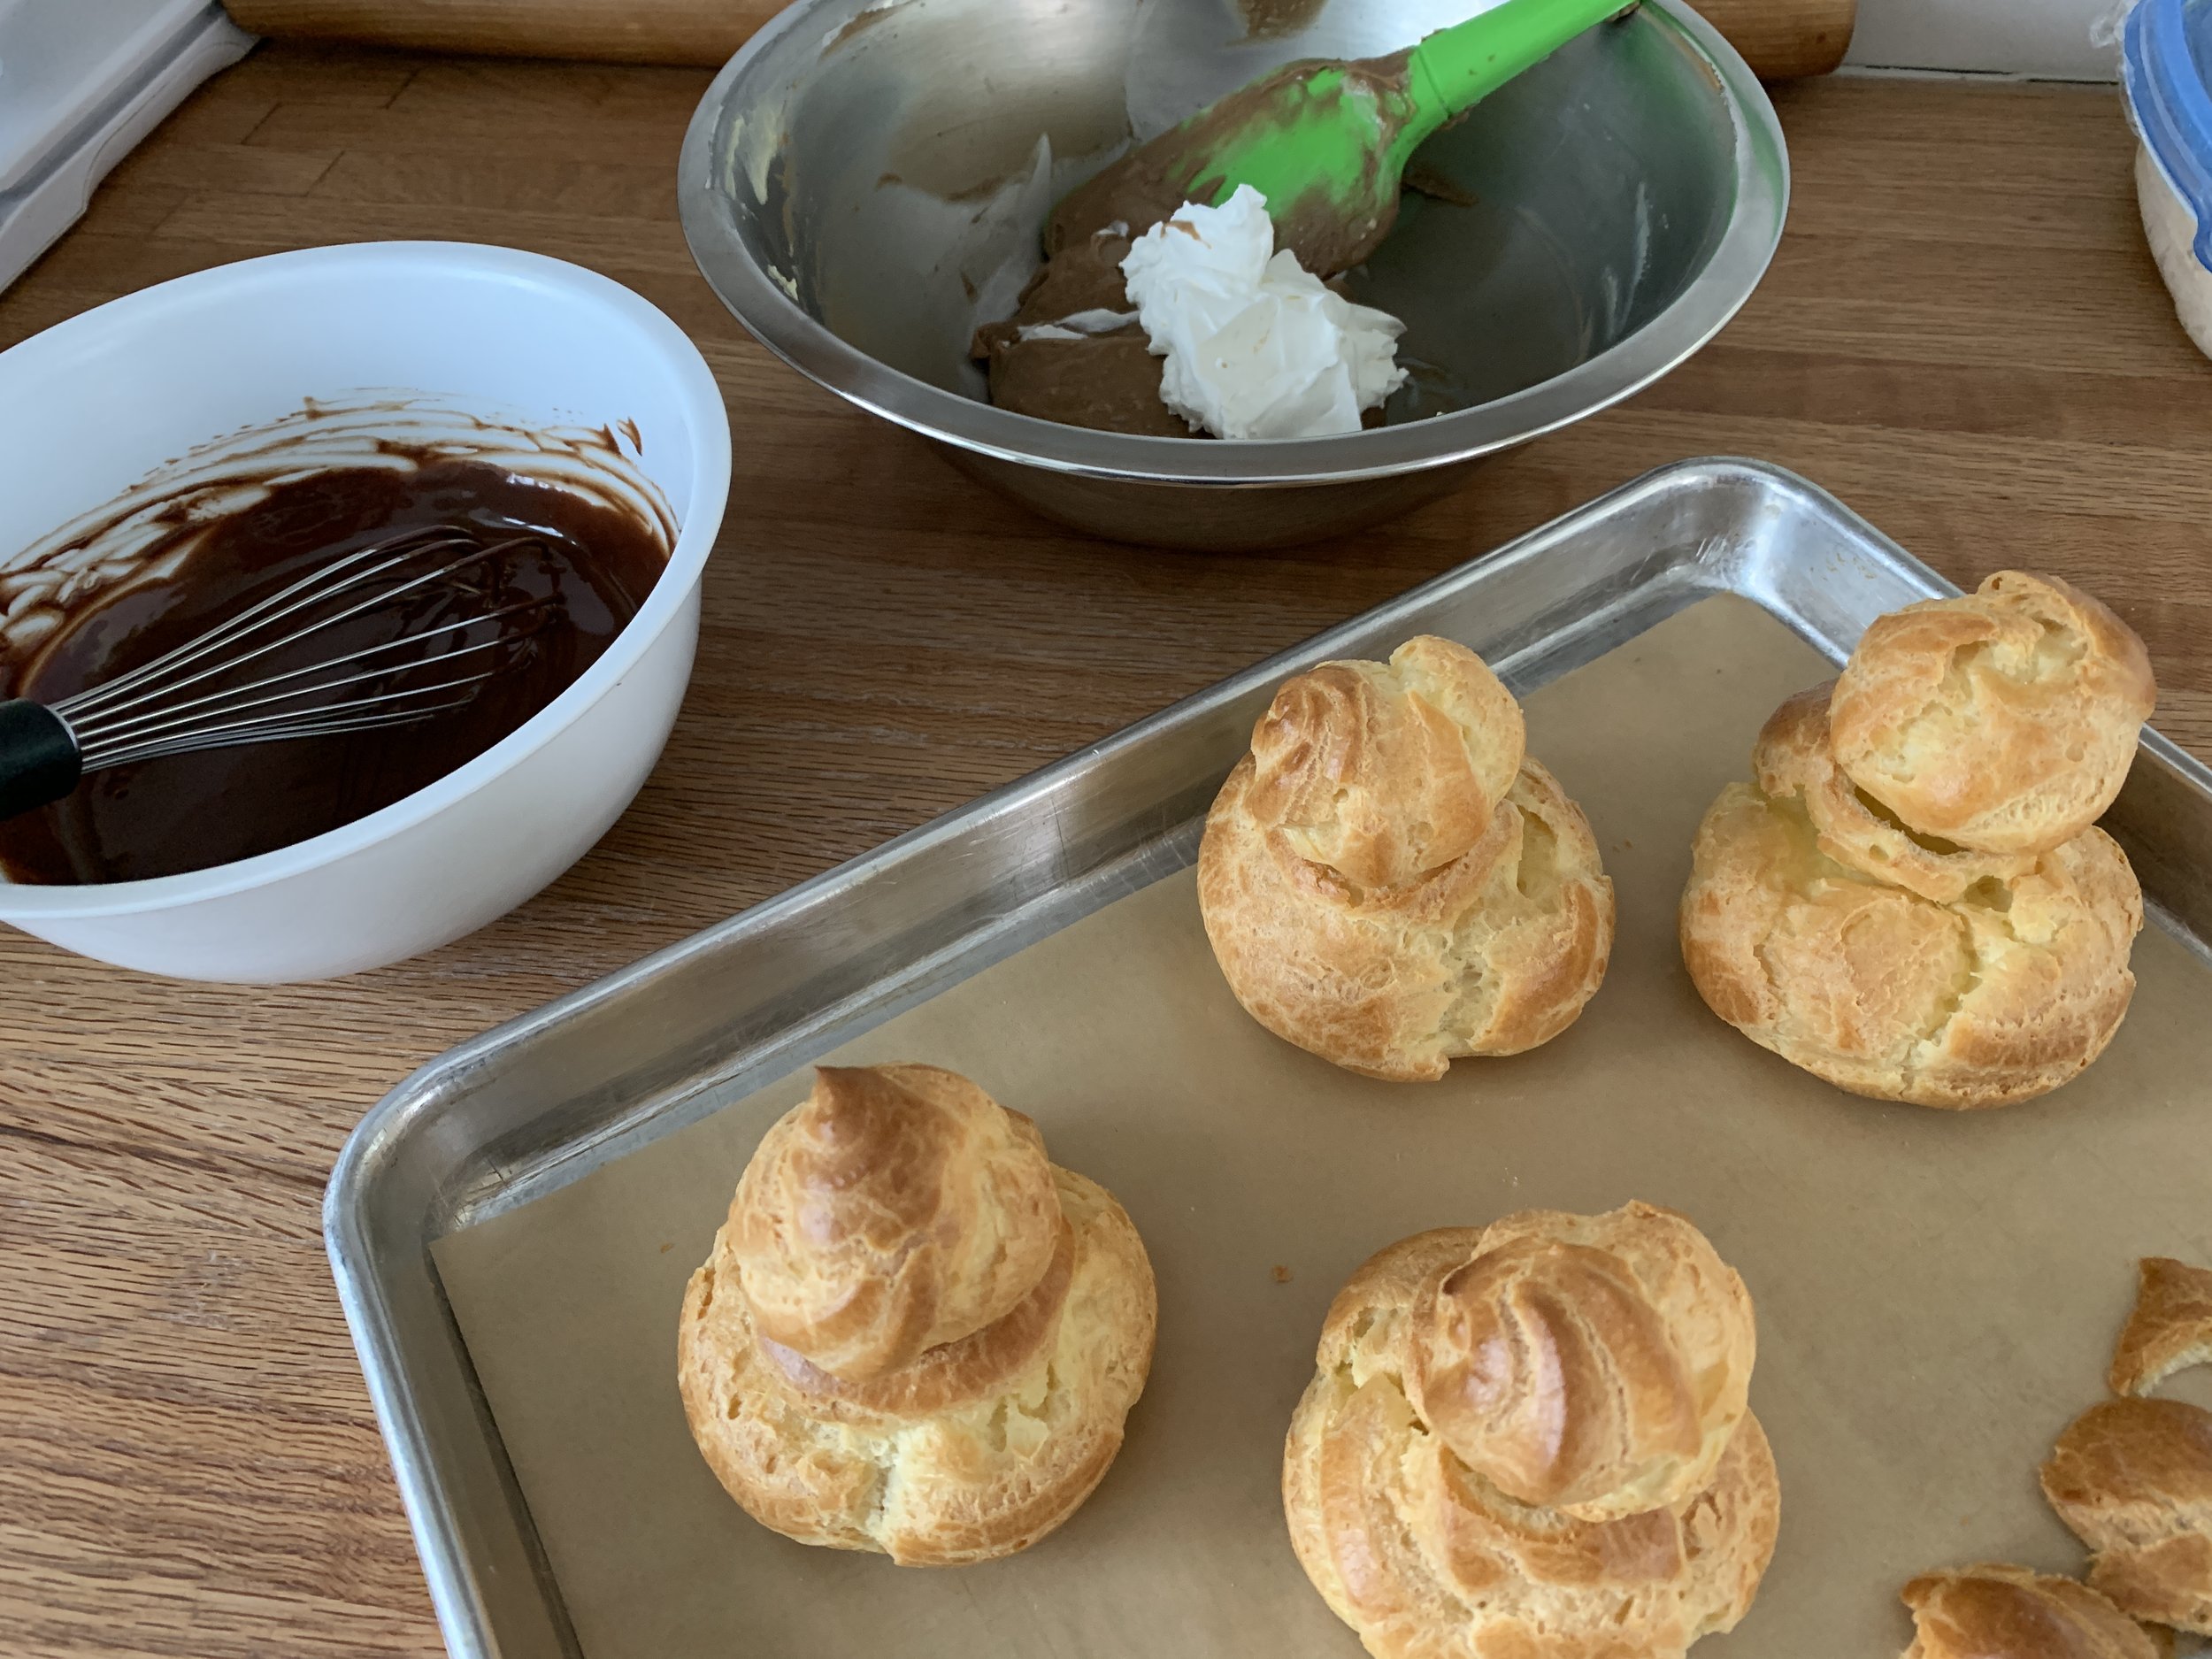
Match the heads and bodies and shave enough top off the bodies to give a flat surface on which to perch the head.

When ready for the filling portion of the program, I give the chilled cream a good smoothing out in the mixer with the paddle or in a bowl with a spatula, then fold in a dollop of whipped cream to lighten it. I learned early on that Parisians are none too happy if their choux aren’t properly filled. There has to be a certain heft to show that the job is done well.

I have a basic one to one dark chocolate ganache on hand for dipping (once made, let it cool a bit so it doesn’t run down the sides). Fill first, dip second.

Poke holes in the bottoms of the heads and bodies then pipe in your cream. As you hold the choux with your non-piping hand, you’ll appreciate the heft as you fill. Fill until some cream starts to ooze out, a sign that you’ve filled adequately. You can scrape off the excess and have a snack.

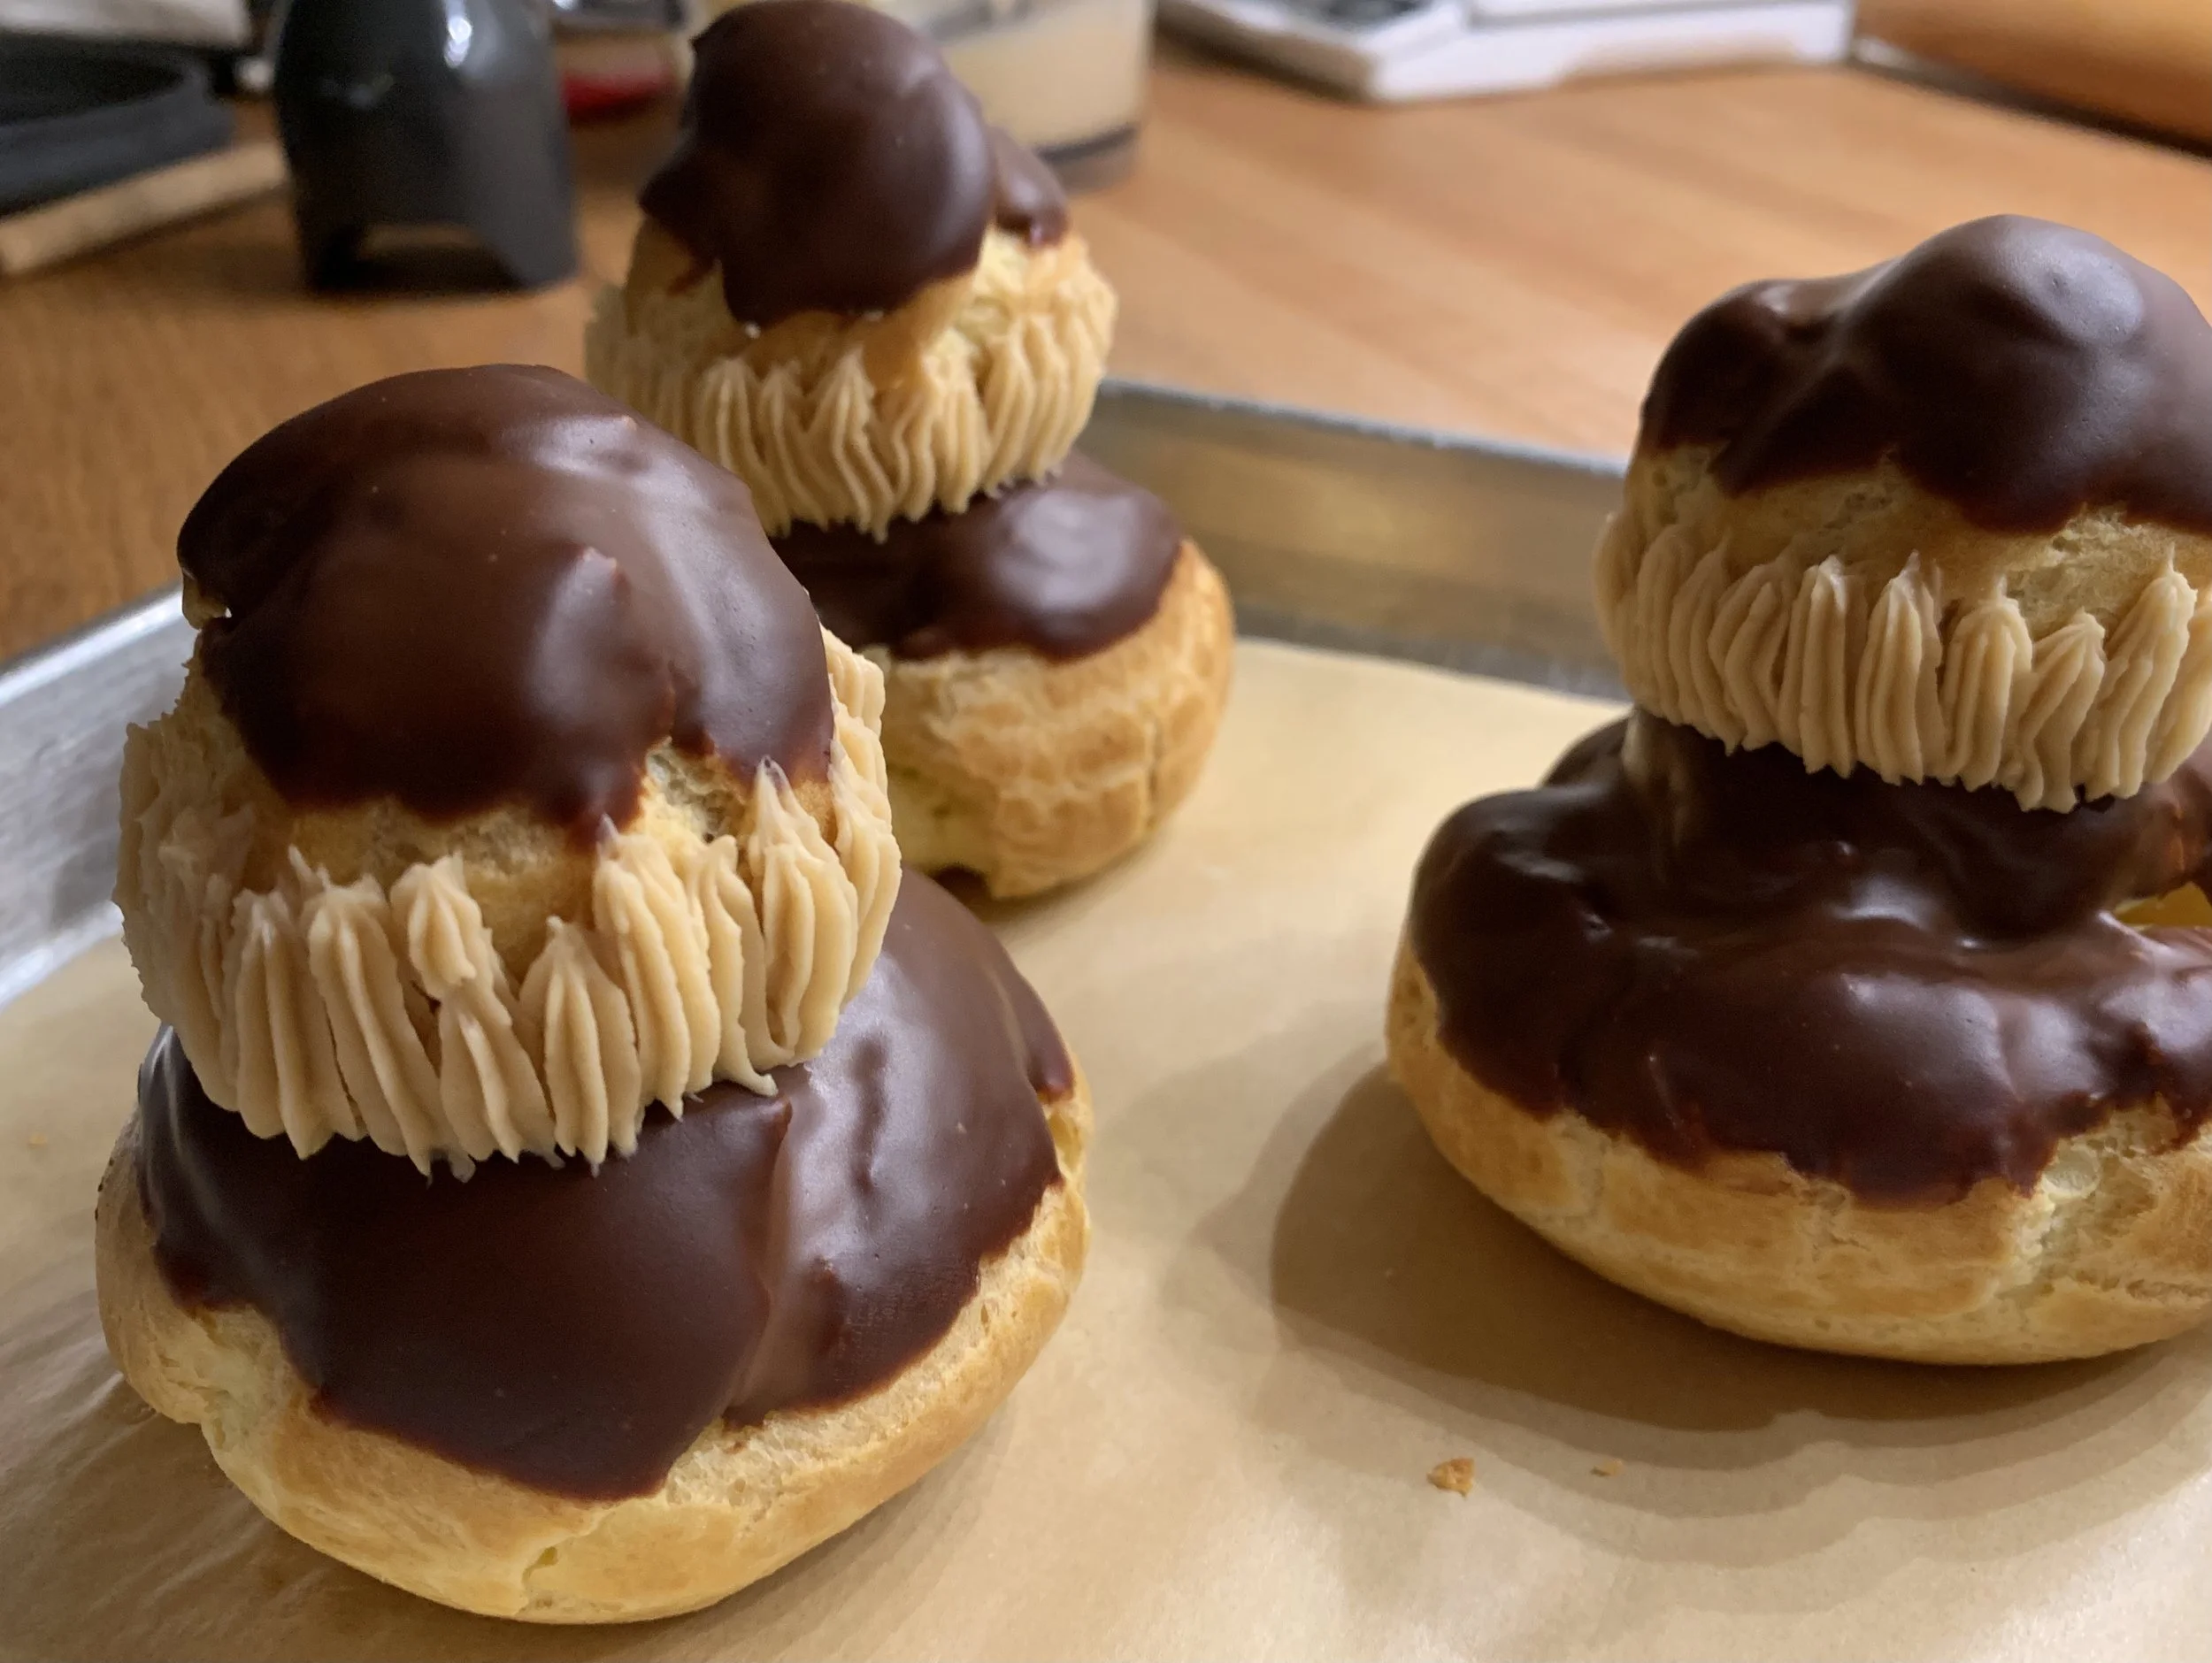
Set the buns upright and dip both bodies and heads in ganache to give a nice cap. Set the heads on the bodies - the ganache will hold them together.

Once assembly is complete, I usually hold them in the fridge until I’m ready to do the collar. I used sea salt caramel Swiss meringue buttercream for my ruffles, piping with a small star tip.

I think of these nuns as roly-poly with a mock turtleneck look.

As you might imagine, Steve was a happy camper. Filled choux will keep well in the fridge for a couple of days to give you some time to savor the treats.

Here’s a cross section - you can see they are chock full of cream. The Parisians would be happy.

Coming soon! More choux fun with Paris Brest.

Stay warm and stay healthy. Ciao for now.

Chocolate semifreddo (or what to do for a holiday dessert when your oven is on the fritz)

Chocolate semifreddo

Wouldn’t you know that a mere 10 days before Christmas my oven decided to take a vacation. Fortunately I had a good deal of holiday baking already completed, plus we have a couple of neighbors who were more than game to let me use their ovens for the few tarts and pastries that still needed attention.

While this type of occurrence can certainly frustrate, I saw it as the chance to think about how I might function without said oven for a short time. It’s not unlike many things we’ve had to adjust to in the past couple of years as we’ve done our best to navigate through the current state of the world.

My mind starting listing off the goodies that can easily be created without an oven - semifreddo, ice cream, fruit fools, chocolate/nut/dried fruit barks, brittles, chocolate truffles, lemon curd/cream with berries, whipped ganache with caramel and chocolate crunchies, crepes with sautéed fruit, crepe cake . . . . You get the idea.

Perhaps I should be thinking of this as the “ghost of Christmas past” since we’ve already slid into January, but I think it’s still fun to tell you about this deelish semifreddo. Remember - Valentine’s day isn’t far away.

For our small family gathering for Christmas Eve (also a celebration of what would have been my father’s 100th birthday), I chose a chocolate semifreddo, a classic Italian “half-frozen” dessert. While many semifreddo recipes are based on the incorporation of whipped cream or meringue into a sabayon type of mixture (egg yolk, sugar, liqueur or wine or citrus juice), this one is a combination of a Swiss meringue and whipped dark chocolate ganache placed in a mold of choice, frozen and essentially ready to serve whenever the time is right. A perfect make ahead dish.

I chose the simple loaf pan approach in which you lightly grease the pan then line it with plastic wrap that overhangs the sides and gives you enough to cover the semifreddo once it’s in the pan. For individual portions, it’s fun to use small ramekins ready to serve right out of the freezer. Just garnish with a dollop of whipped cream and some crunchies or fresh berries. Easy peasy. You can also scoop it like ice cream to top a crisp or crumble (if your oven is working - ha!).

For the ganache portion, place 170 g / 6 ounces dark chocolate (chopped or discs if that’s what you have) in a medium heat-proof bowl. Bring 360 ml / 1.5 cups heavy cream to a boil in a saucepan on the stovetop or in a glass Pyrex measuring cup in the microwave (my preference). Pour the hot cream over the chocolate, let sit a minute then gently stir to blend. Add in 2 teaspoons vanilla extract and 1/4 teaspoon kosher salt. Cover the surface with plastic wrap and chill in the fridge a good hour or two.

NOTE: You’ll be whipping the ganache then blending the cooled Swiss meringue into it so think about your timing. I used my trusty Kitchenaid hand mixer for the chilled ganache while the Swiss meringue was in progress.

For the Swiss meringue, fill a medium saucepan half full with water and bring to a simmer. In a separate bowl that will nest nicely in the saucepan, whisk together 3 large egg whites (this process goes faster if they’re already at room temp) and 133 g / 2/3 cup granulated sugar then place it over the simmering water. Whisk constantly until the mixture reaches 160ºF. Transfer the meringue into the bowl of a stand mixer with the whisk attachment and beat on high speed until cooled and thickened with shiny, stiff peaks (I usually give it a good 10 minutes).

Blend the meringue into the ganache in three additions, folding to incorporate. It’s OK if there are a few meringue streaks left.

Part way through the folding

Scrape the mixture into the prepared pan, cover and freeze. Give it a minimum of 6 hours but overnight or up to several days is even better.

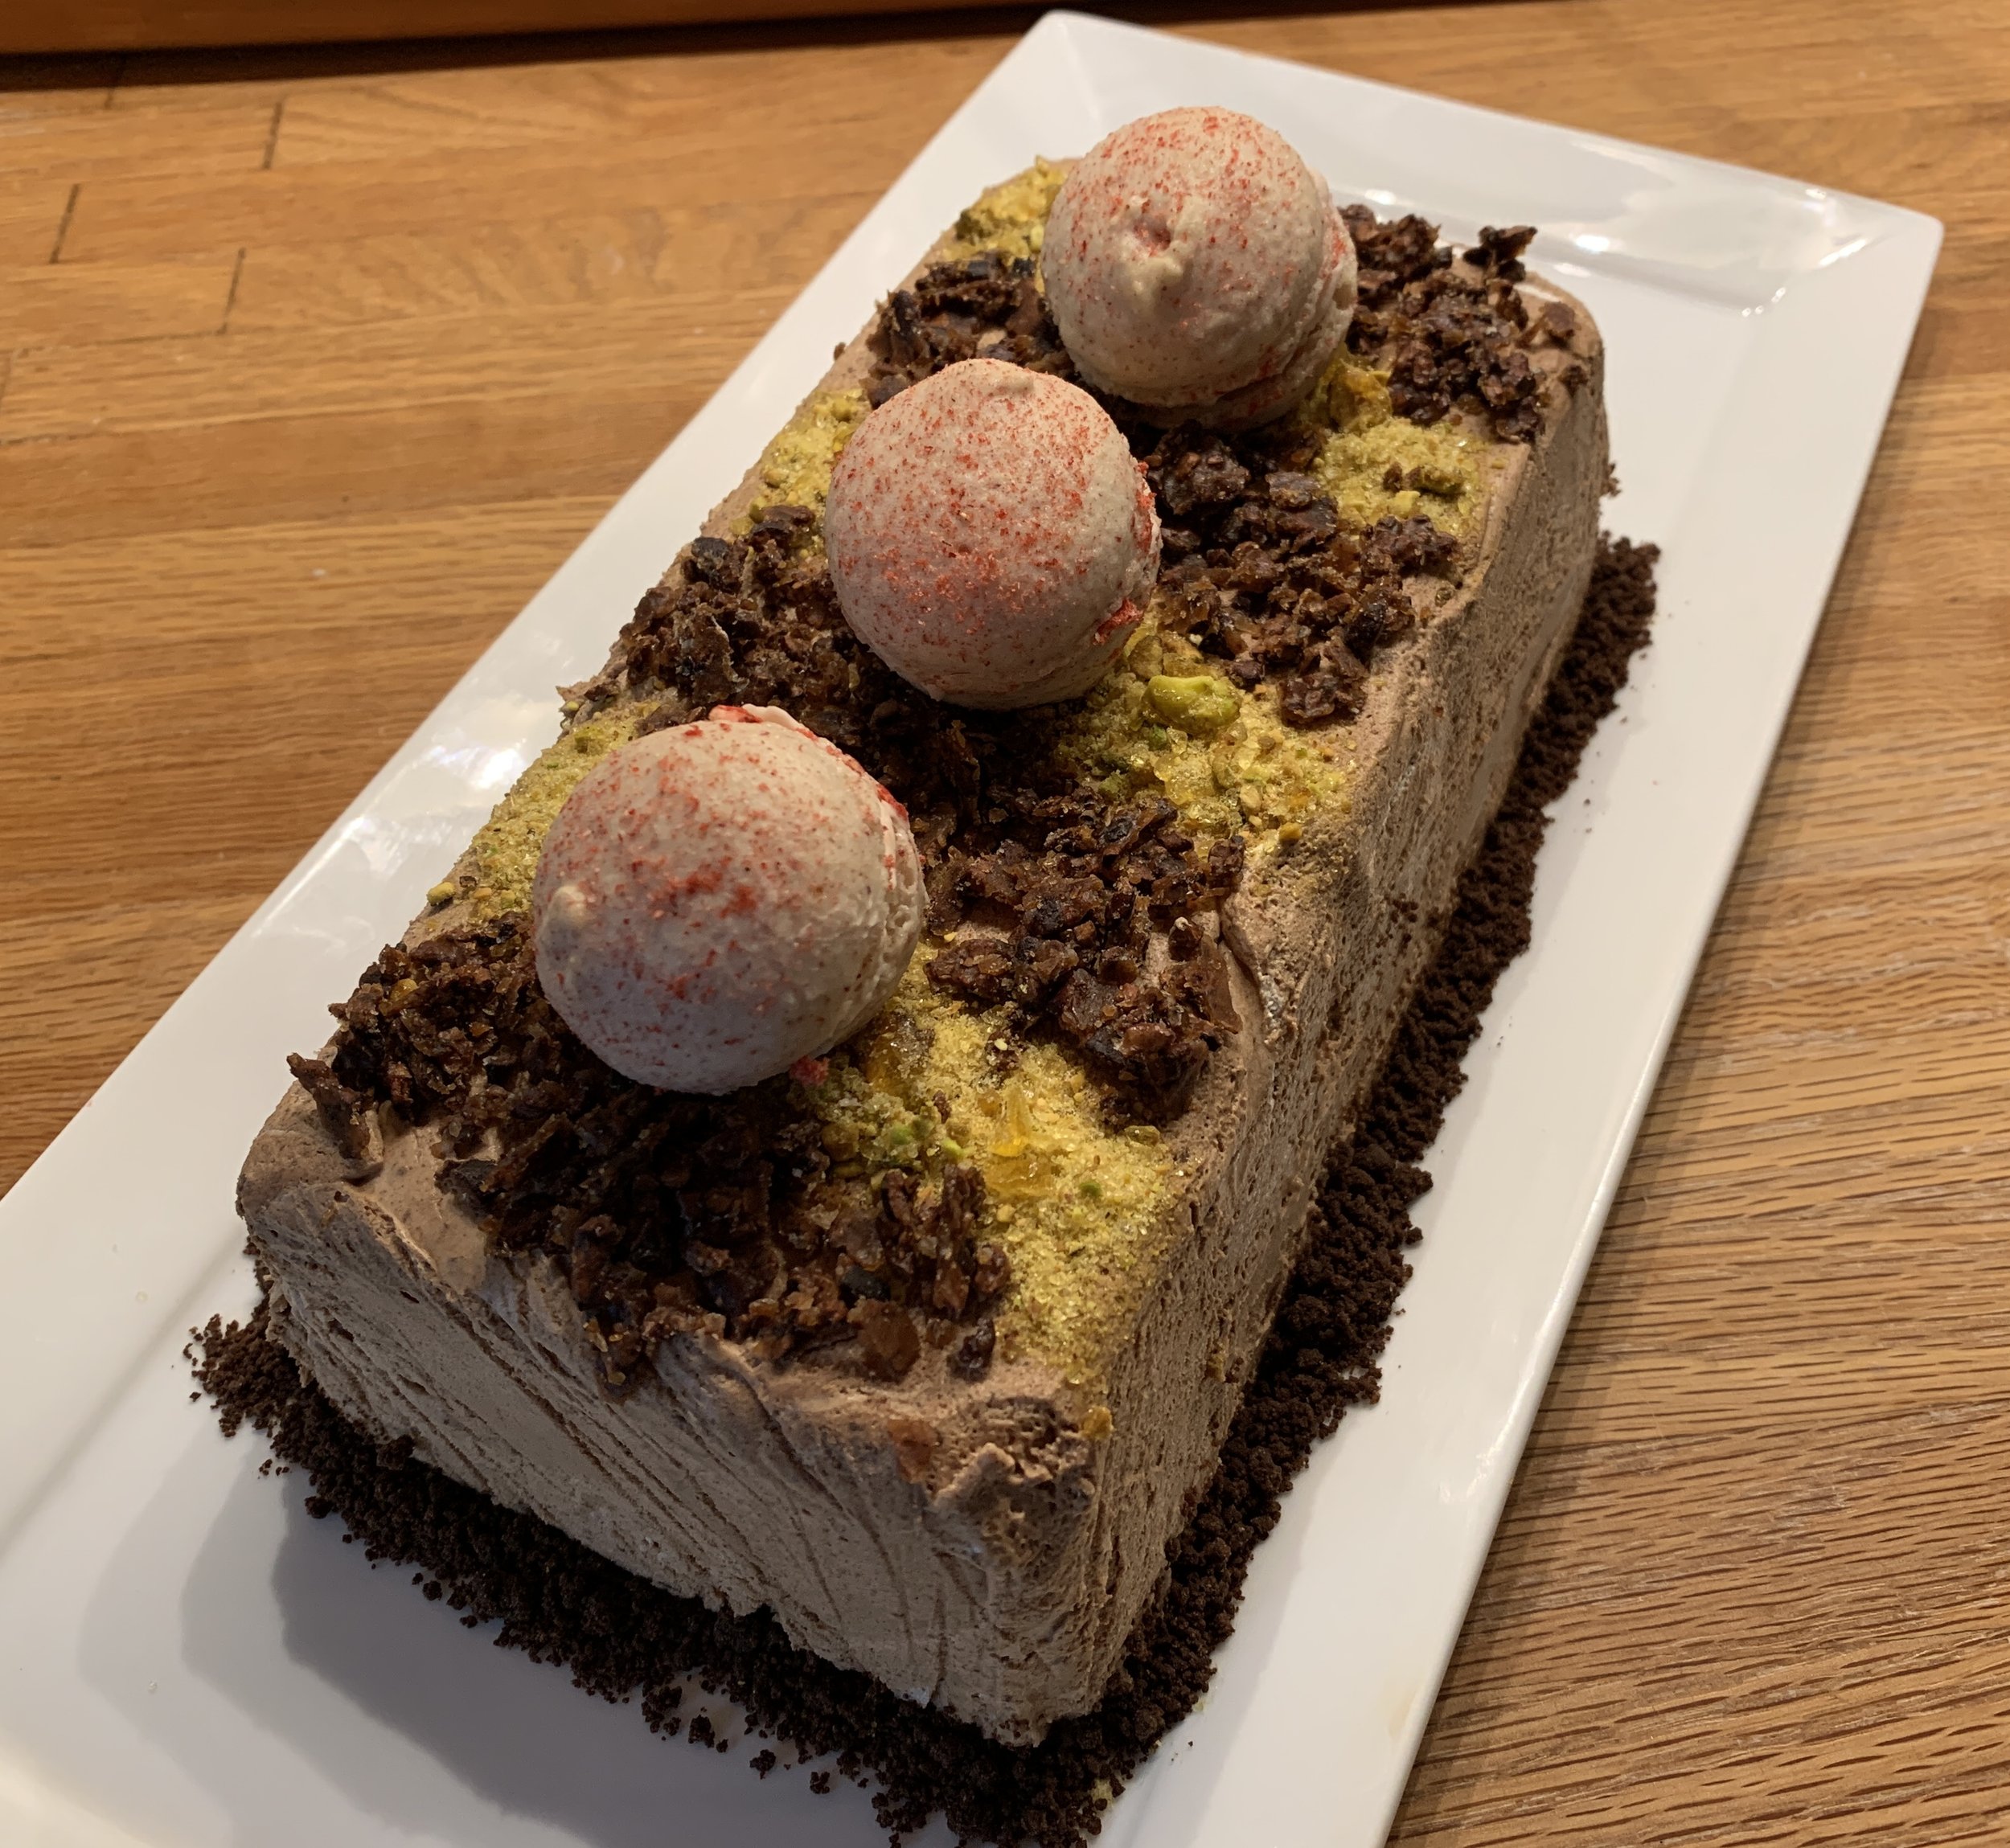
When ready to serve, I find it easiest to overturn it gently onto a plate and peel off the plastic. For garnish I have cocoa nib brittle, pistachio nougatine, chocolate cookie crumbs, and, for the pièce de resistance, freezer stash strawberry macarons filled with strawberry Swiss meringue buttercream, a center of chocolate ganache and a dusting of strawberry powder on top. Whoa!

Stripes of brittle and nougatine across the surface, a bottom collar of chocolate cookie crumbs and a crowning flourish of strawberry macs.

I finished off the decor earlier in the afternoon on Christmas Eve so that I could have my garnishing completed and the whole thing ready to slice. Then I held it in the freezer until dessert time. Yes!

For serving I spooned out a small pool of this past summer’s roasted Michigan strawberry purée from my freezer stash, a slice of semifreddo, dollop of whipped cream, chocolate cookie crumbs and a strawberry macaron.

You can’t go wrong with marrying tastes and textures like these. Chocolate-y, creamy, crunchy, chewy and fruity. Yum yum yes.

The good news is, as of January 4th, the oven has been repaired and is functioning in good form. Of course I had to bake some croissants don’t ya know.

Keep on keeping on everyone. Make 2022 your best year yet.

Our first “BIG” winter storm of the season

Favorite garnishes part 3: easy brittles (and Happy New Year!)

Moelleux chocolat/mascarpone cream/sesame brittle

I freely and proudly admit that I’m a dough loving gal in the pastry kitchen. Give me tart dough, puff pastry, croissant and Danish dough, yeast breads (lean and enriched) and shortbread and I’m a happy camper.

Other than the occasional chocolate nut bark or cluster, soft caramel or chocolate truffle, candy making isn’t something I do often. But, particularly when it comes to a tasty garnish, there’s nothing like a snappy brittle to brighten up one’s day. Not only great for a small snack when you’re craving a hint of sweet crunch, they’re a wonderful way to dress up small cakes, custards, ice cream, tarts . . . . . . . . I think you know where I’m going with this.

Here I’ll focus on what has become my go-to-perfect-for-garnsh brittle recipe, compliments of Yotam Ottolenghi”s book “Sweet”. So straight forward with nary any muss nor fuss with candy thermometers or sugar cooking stages. Let’s keep it easy!.

Ottolenghi’s sesame brittle

Here’s a previous post with the recipe and one of the ways I’ve used it. And here’s the recipe again with a printable PDF here.

  1. Toast 125 g sesame seeds (mix of 1/3 black and 2/3 white or all white like I did) either in the oven at 325ºF for about 10 minutes until nicely brown, stirring occasionally, or in a skillet on medium-low on the stove top. Do what you're most comfortable with. Set aside. Increase the oven temp to 350ºF.

  2. Have two half sheet pans and four pieces of parchment (or two parchment and two silicone mats) at the ready.

  3. In a medium saucepan put 100 g granulated sugar, 100 g light corn syrup, 50 g unsalted butter and 1/8 teaspoon salt. Stirring constantly on high heat, blend the mixture and bring to a boil. Remove from the heat and stir in the toasted sesame seeds.

  4. Put two pieces of parchment (or Silpat!) on a heat proof surface (I used two overturned half sheet pans) and pour half of the sesame mixture on each. Cover with the other parchment pieces and roll with a rolling pin until about 1/8 inch thick.

  5. Slide the paper with the sesame caramel onto half sheet pans and remove the top layer of parchment. Peel it back gently, using an oiled silicone spatula to push down any caramel that might stick. Bake for about 20 minutes until nicely browned. Remove from oven, cool and break into shards.

Oiled spatula to hold the brittle down while removing the parchment

Bubbling away in the oven

Out of the oven

Pumpkin custard tart with sesame brittle from a Thanksgiving past

I also made a HALF recipe of a cocoa/cacao nib version by subbing cacao nibs (60 g in this case) for the sesame seeds and adding 10 g sifted Dutch process cocoa powder into the sugar/butter mixture along with the nibs. It’s another great addition to teacakes and ice cream as well as a garnish or crunchy layer for desserts, particularly when you need a bit of chocolate-ness.

Note: the cacao nibs I use are pretty chunky so I put them in a zip-top bag and pound them with the smooth side of a meat mallet to crush them up. It works!

Cacao nib version

These brittles come out thin and crispy without fear of any tooth-sticking pull. They store nicely in single layers between pieces of parchment or waxed paper in a well sealed container (ideally in a cool/non-humid environment) and can also be frozen for several weeks.

Get creative with your own version. I’ve done one with puffed rice. Finely chopped nuts of choice are always an option and crushed pumpkin seeds aren’t bad either.

Before I go, here’s a quick tart project I did to use up some leftover components in my fridge and freezer. I had enough dough for a few small tarts; some dark chocolate ganache (3 parts cream to 2 parts chocolate); a handful of petite, frozen ricotta custard rounds from an earlier project; some thawed roasted Michigan strawberry purée that I had used for our Christmas Eve dessert (more on that later); a little bit of white chocolate to make a loose ganache for whipping; plenty of cacao nib brittle.

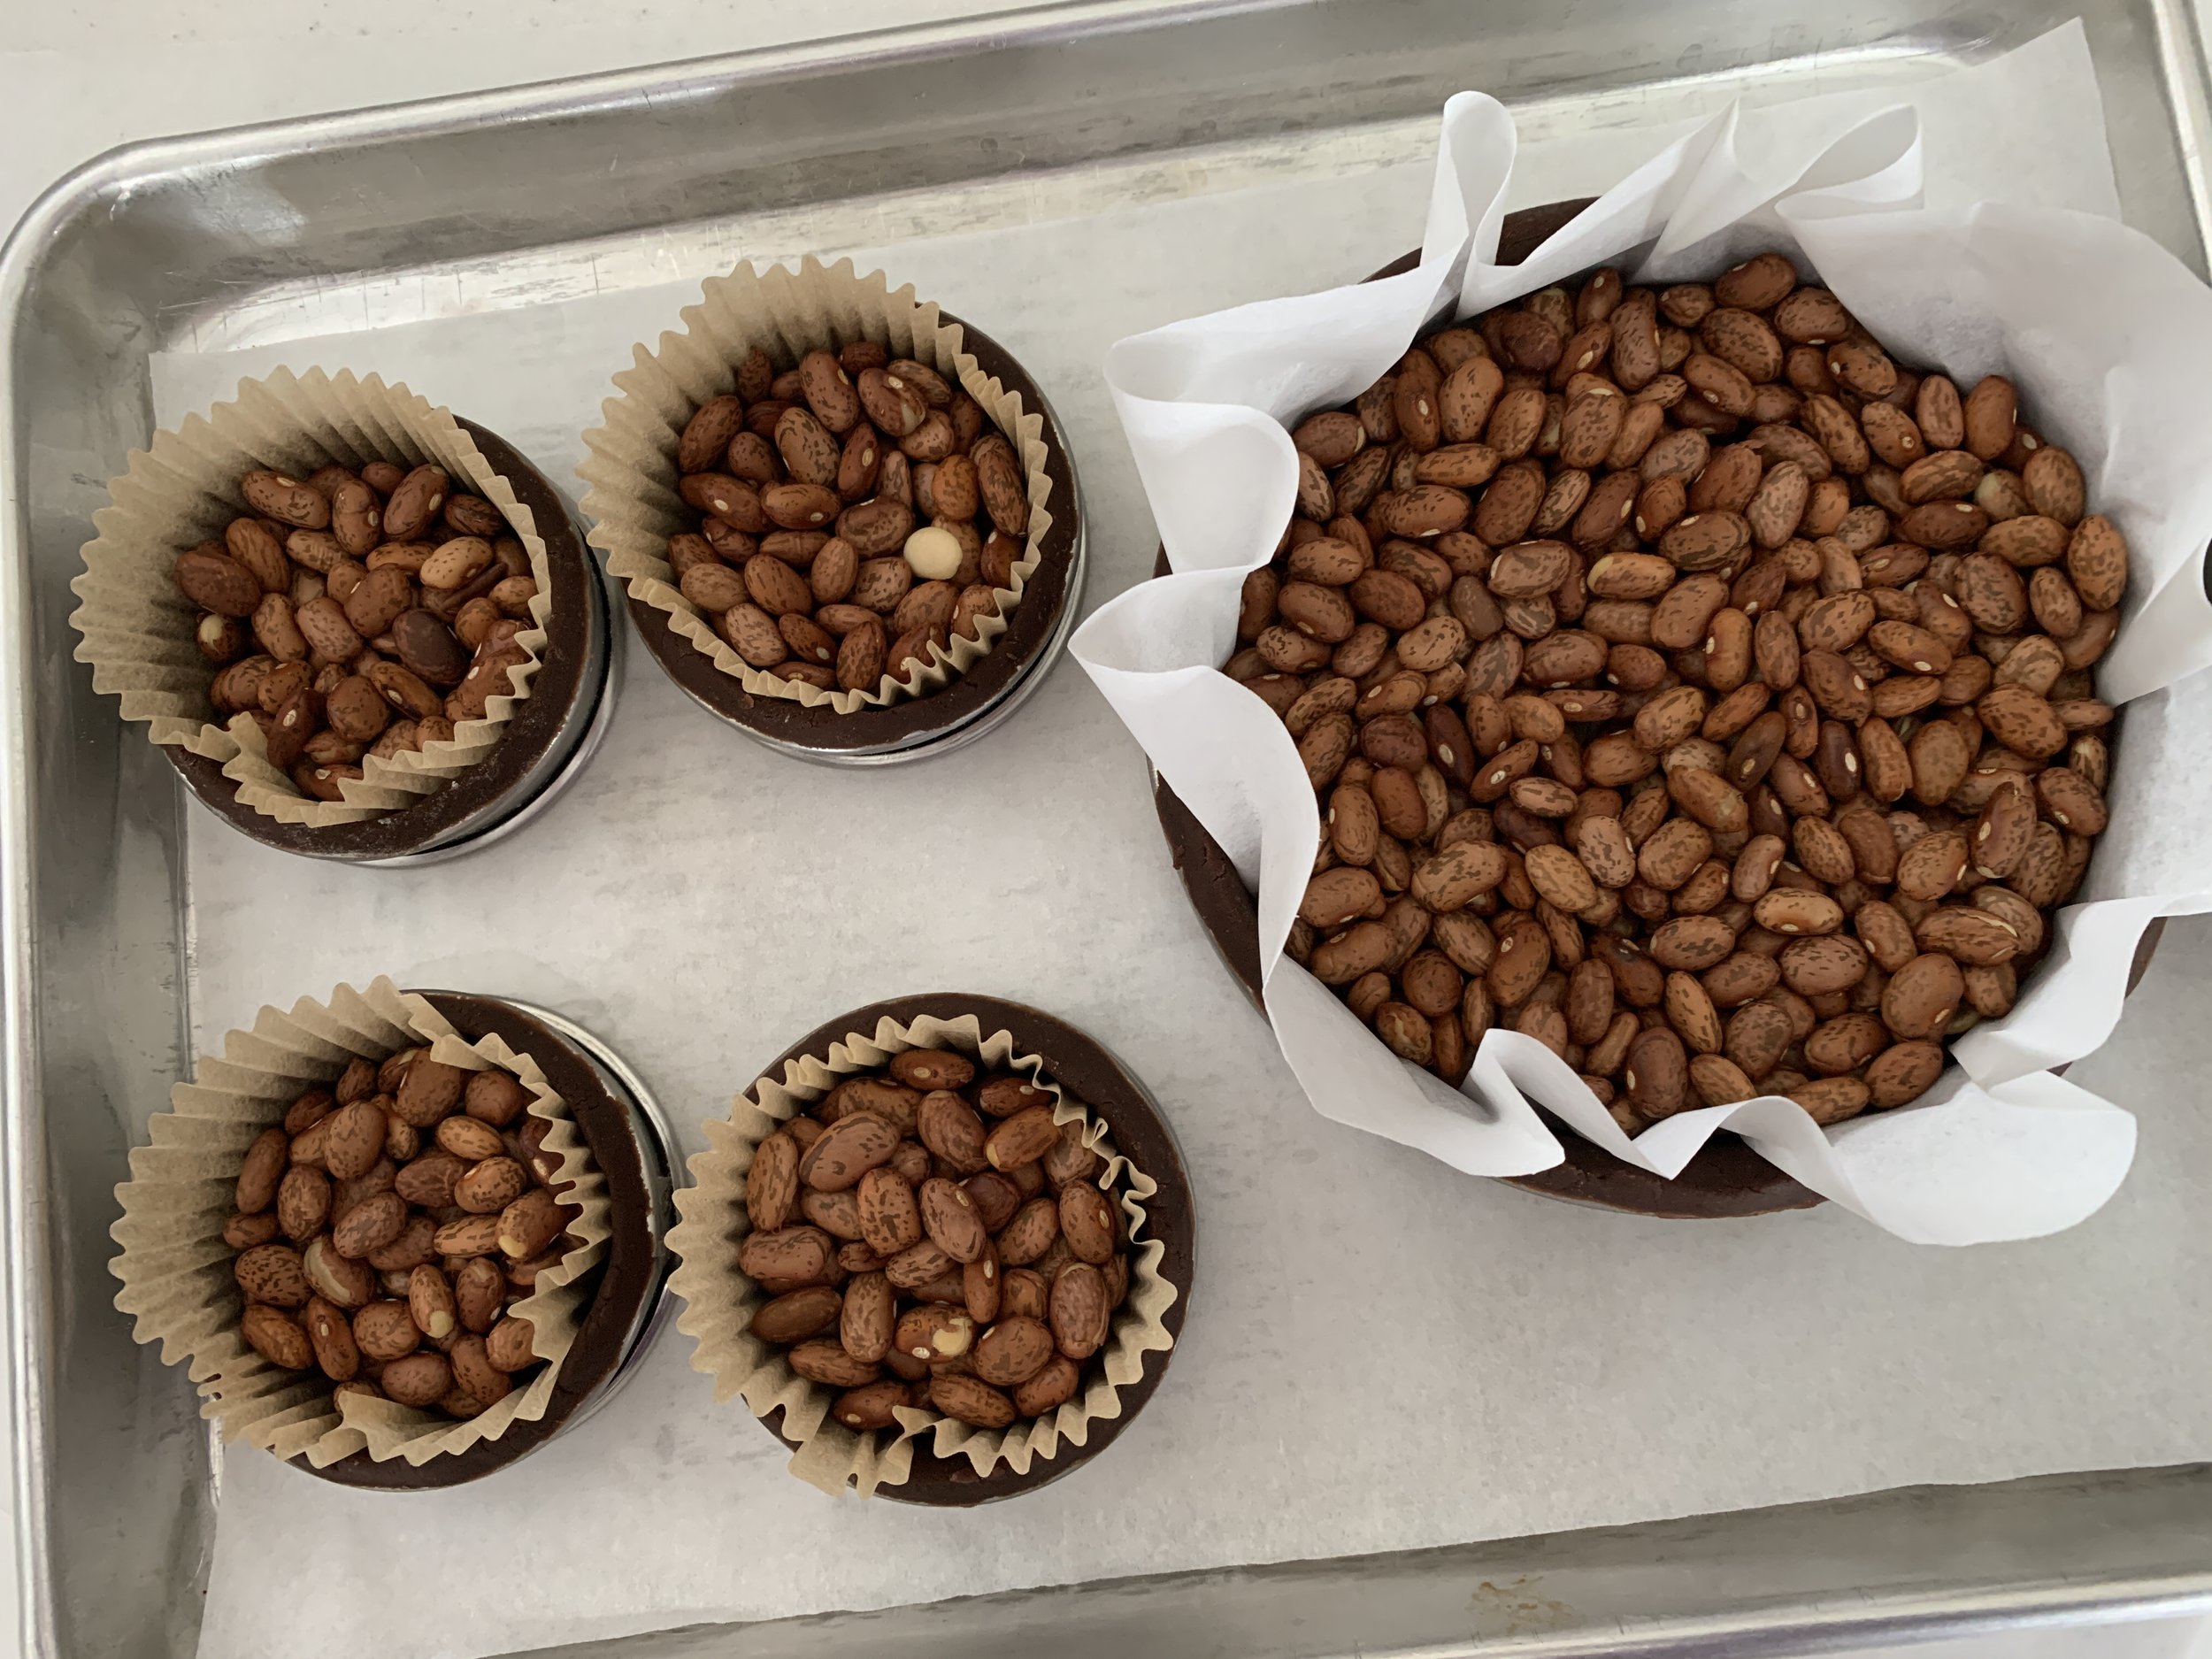
I blind baked some chocolate tart shells with my favorite chocolate tart dough - one 140 mm “sharing” size and four 65 mm individual sizes. TIP: this is a good plan ahead step since you can freeze blind baked tart shells for days.

Two of the smaller tarts served as a quick dessert after the Christmas holiday, filled with ganache, topped with whipped cream and crushed nibs. So tasty.

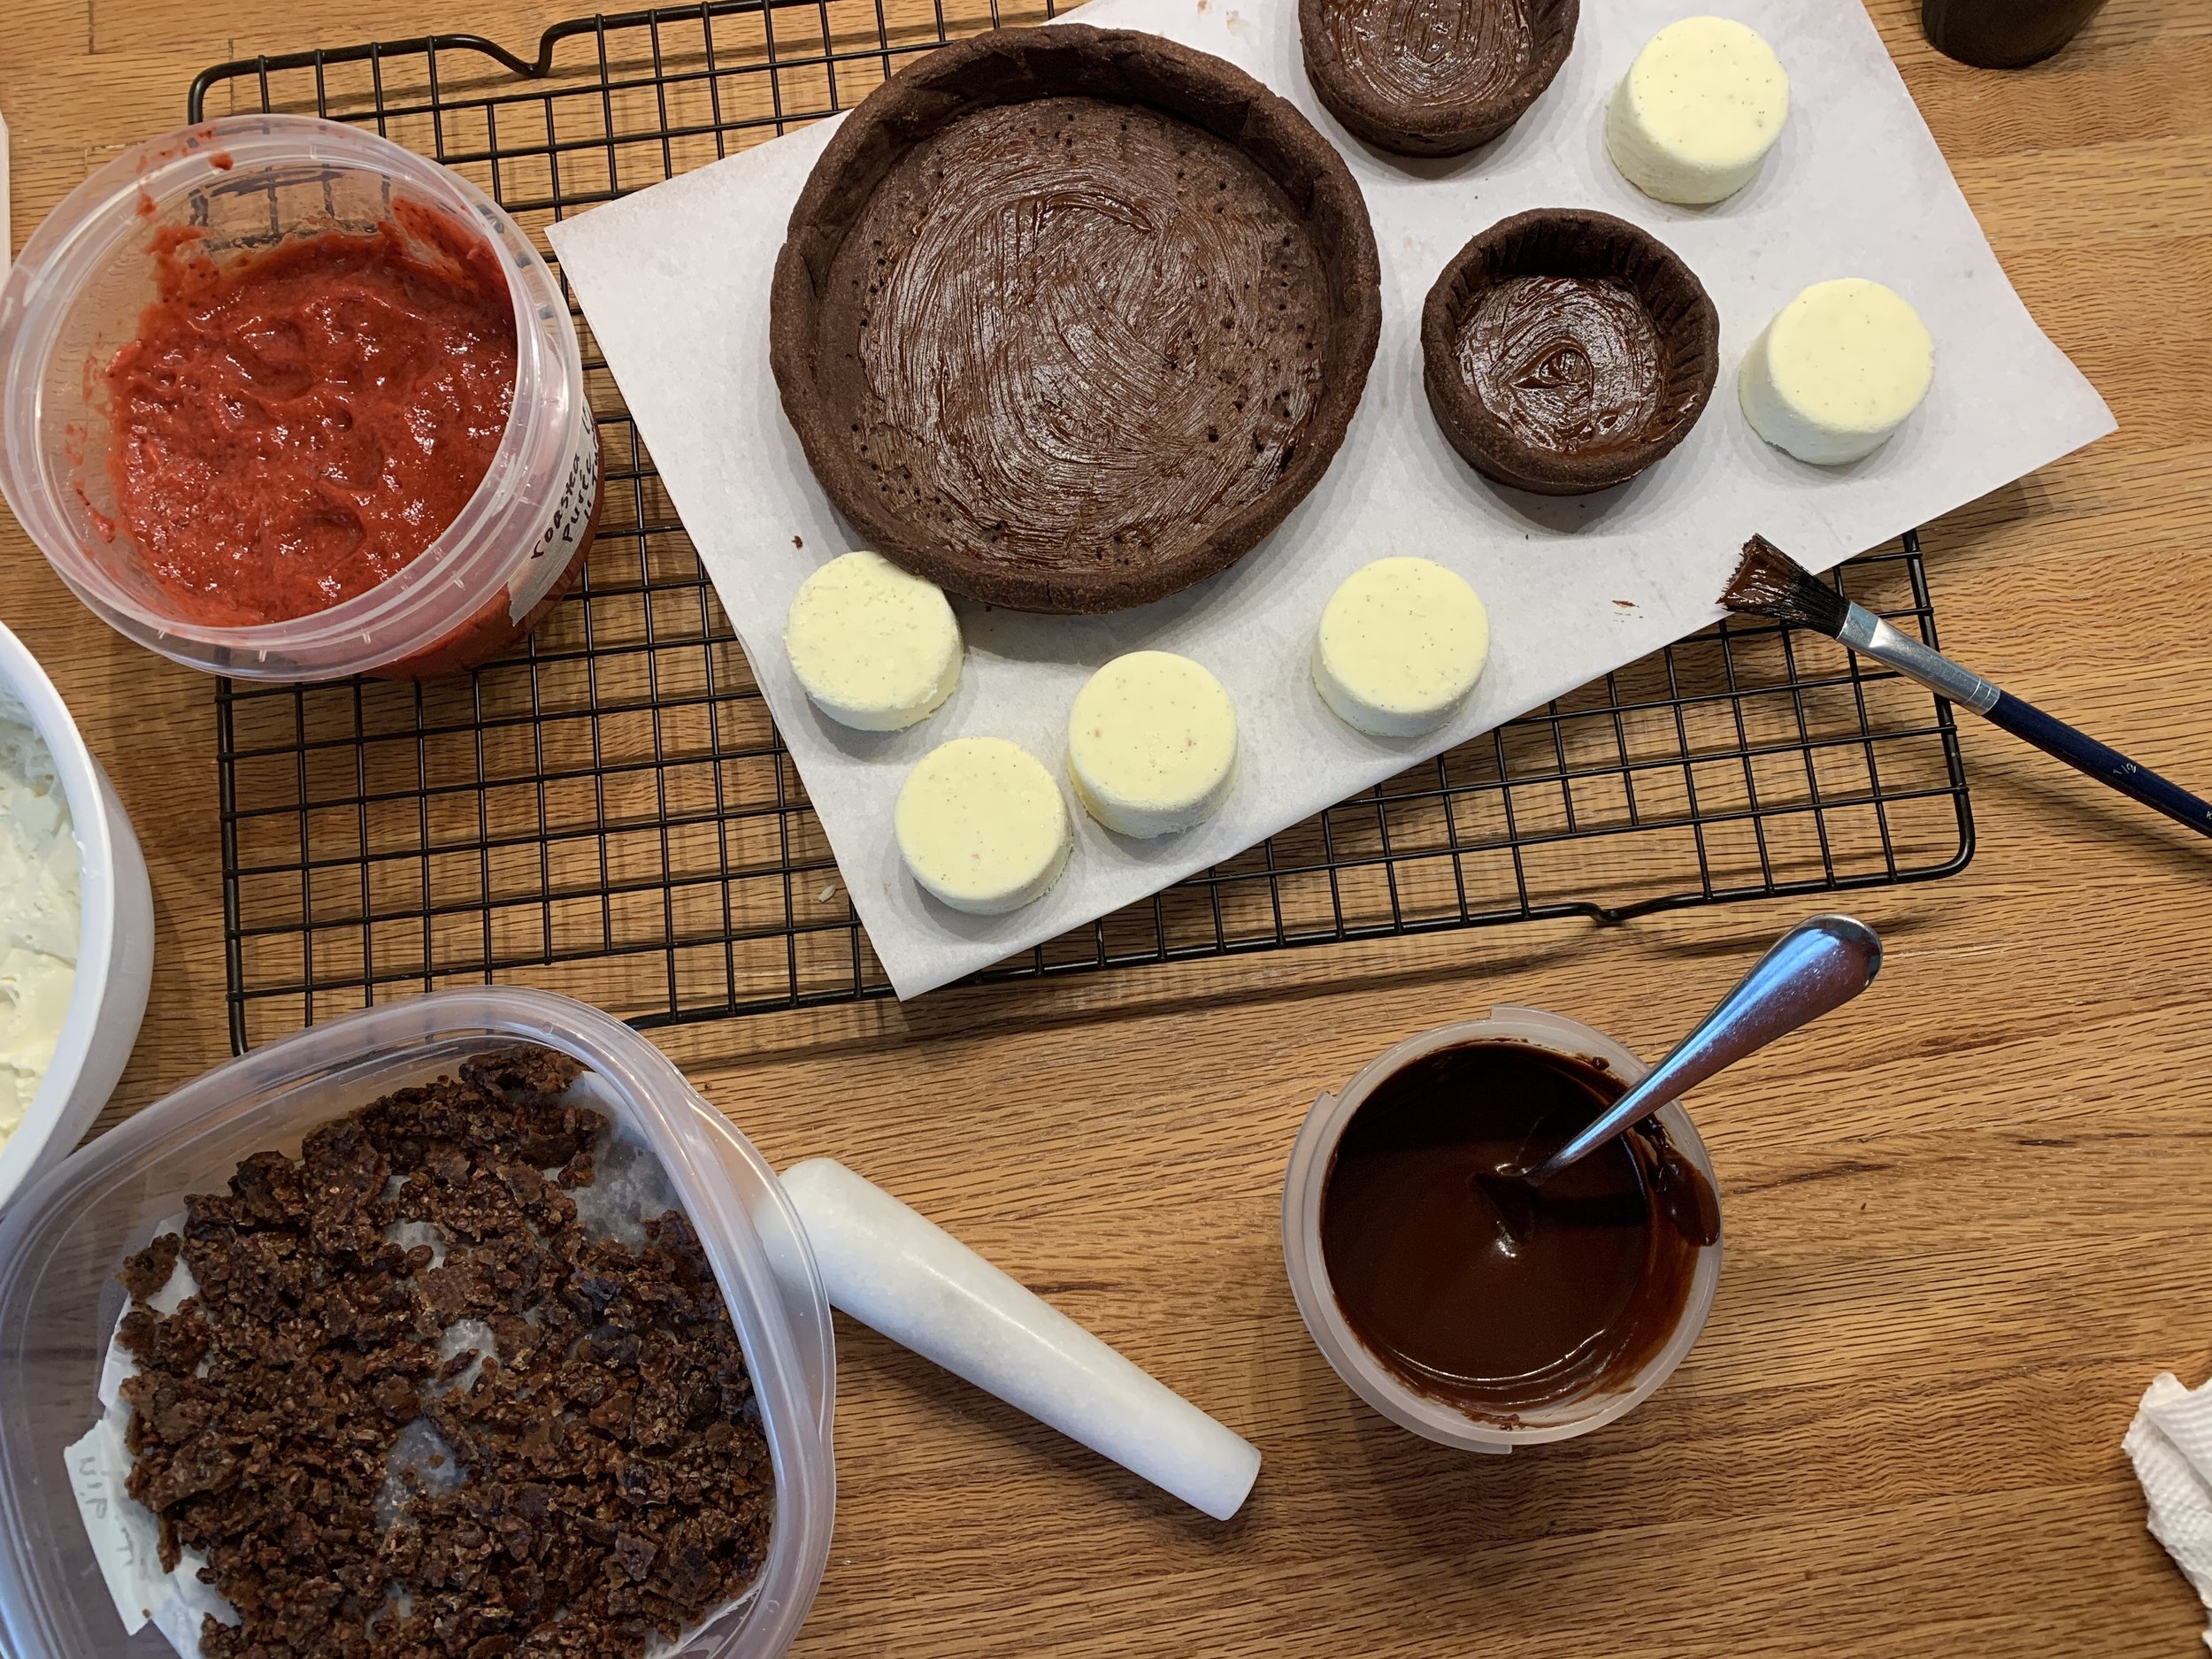
For the remaining tarts I brushed some dark chocolate ganache on the bottoms . . . . . .

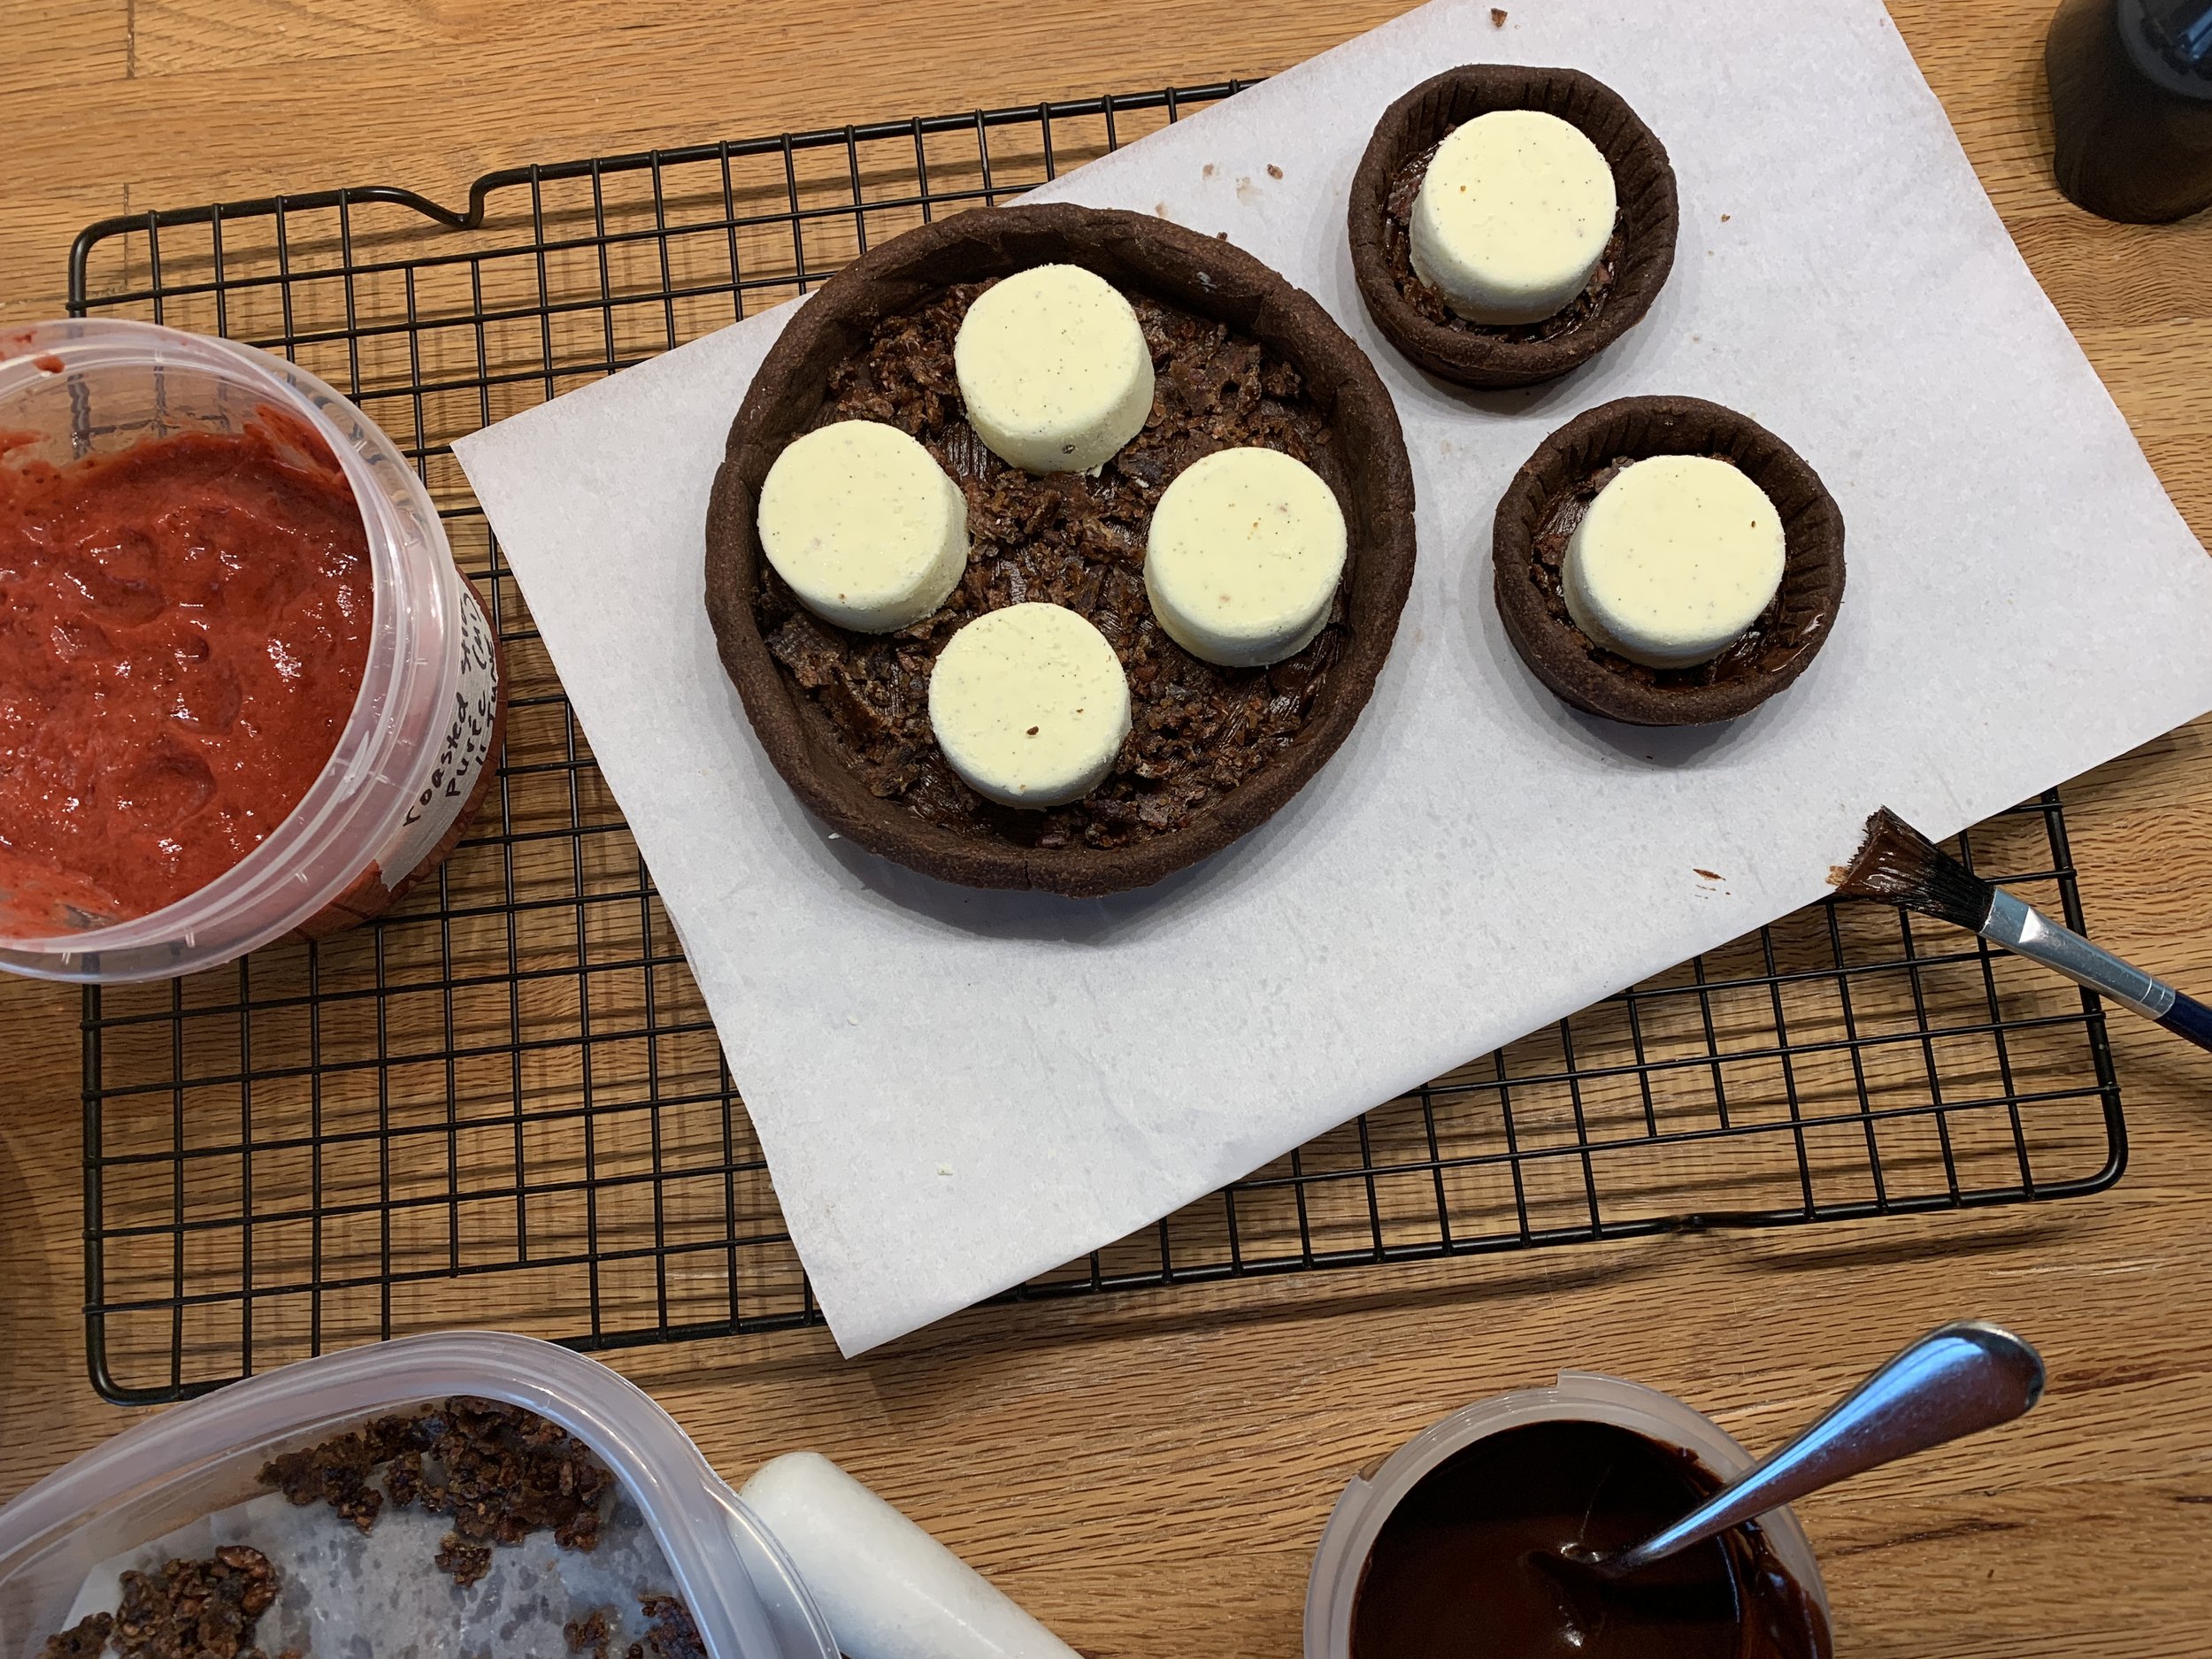
then sprinkled crushed cacao nib brittle over the chocolate and popped in the frozen ricotta rounds (they thaw pretty fast but hold their shape).

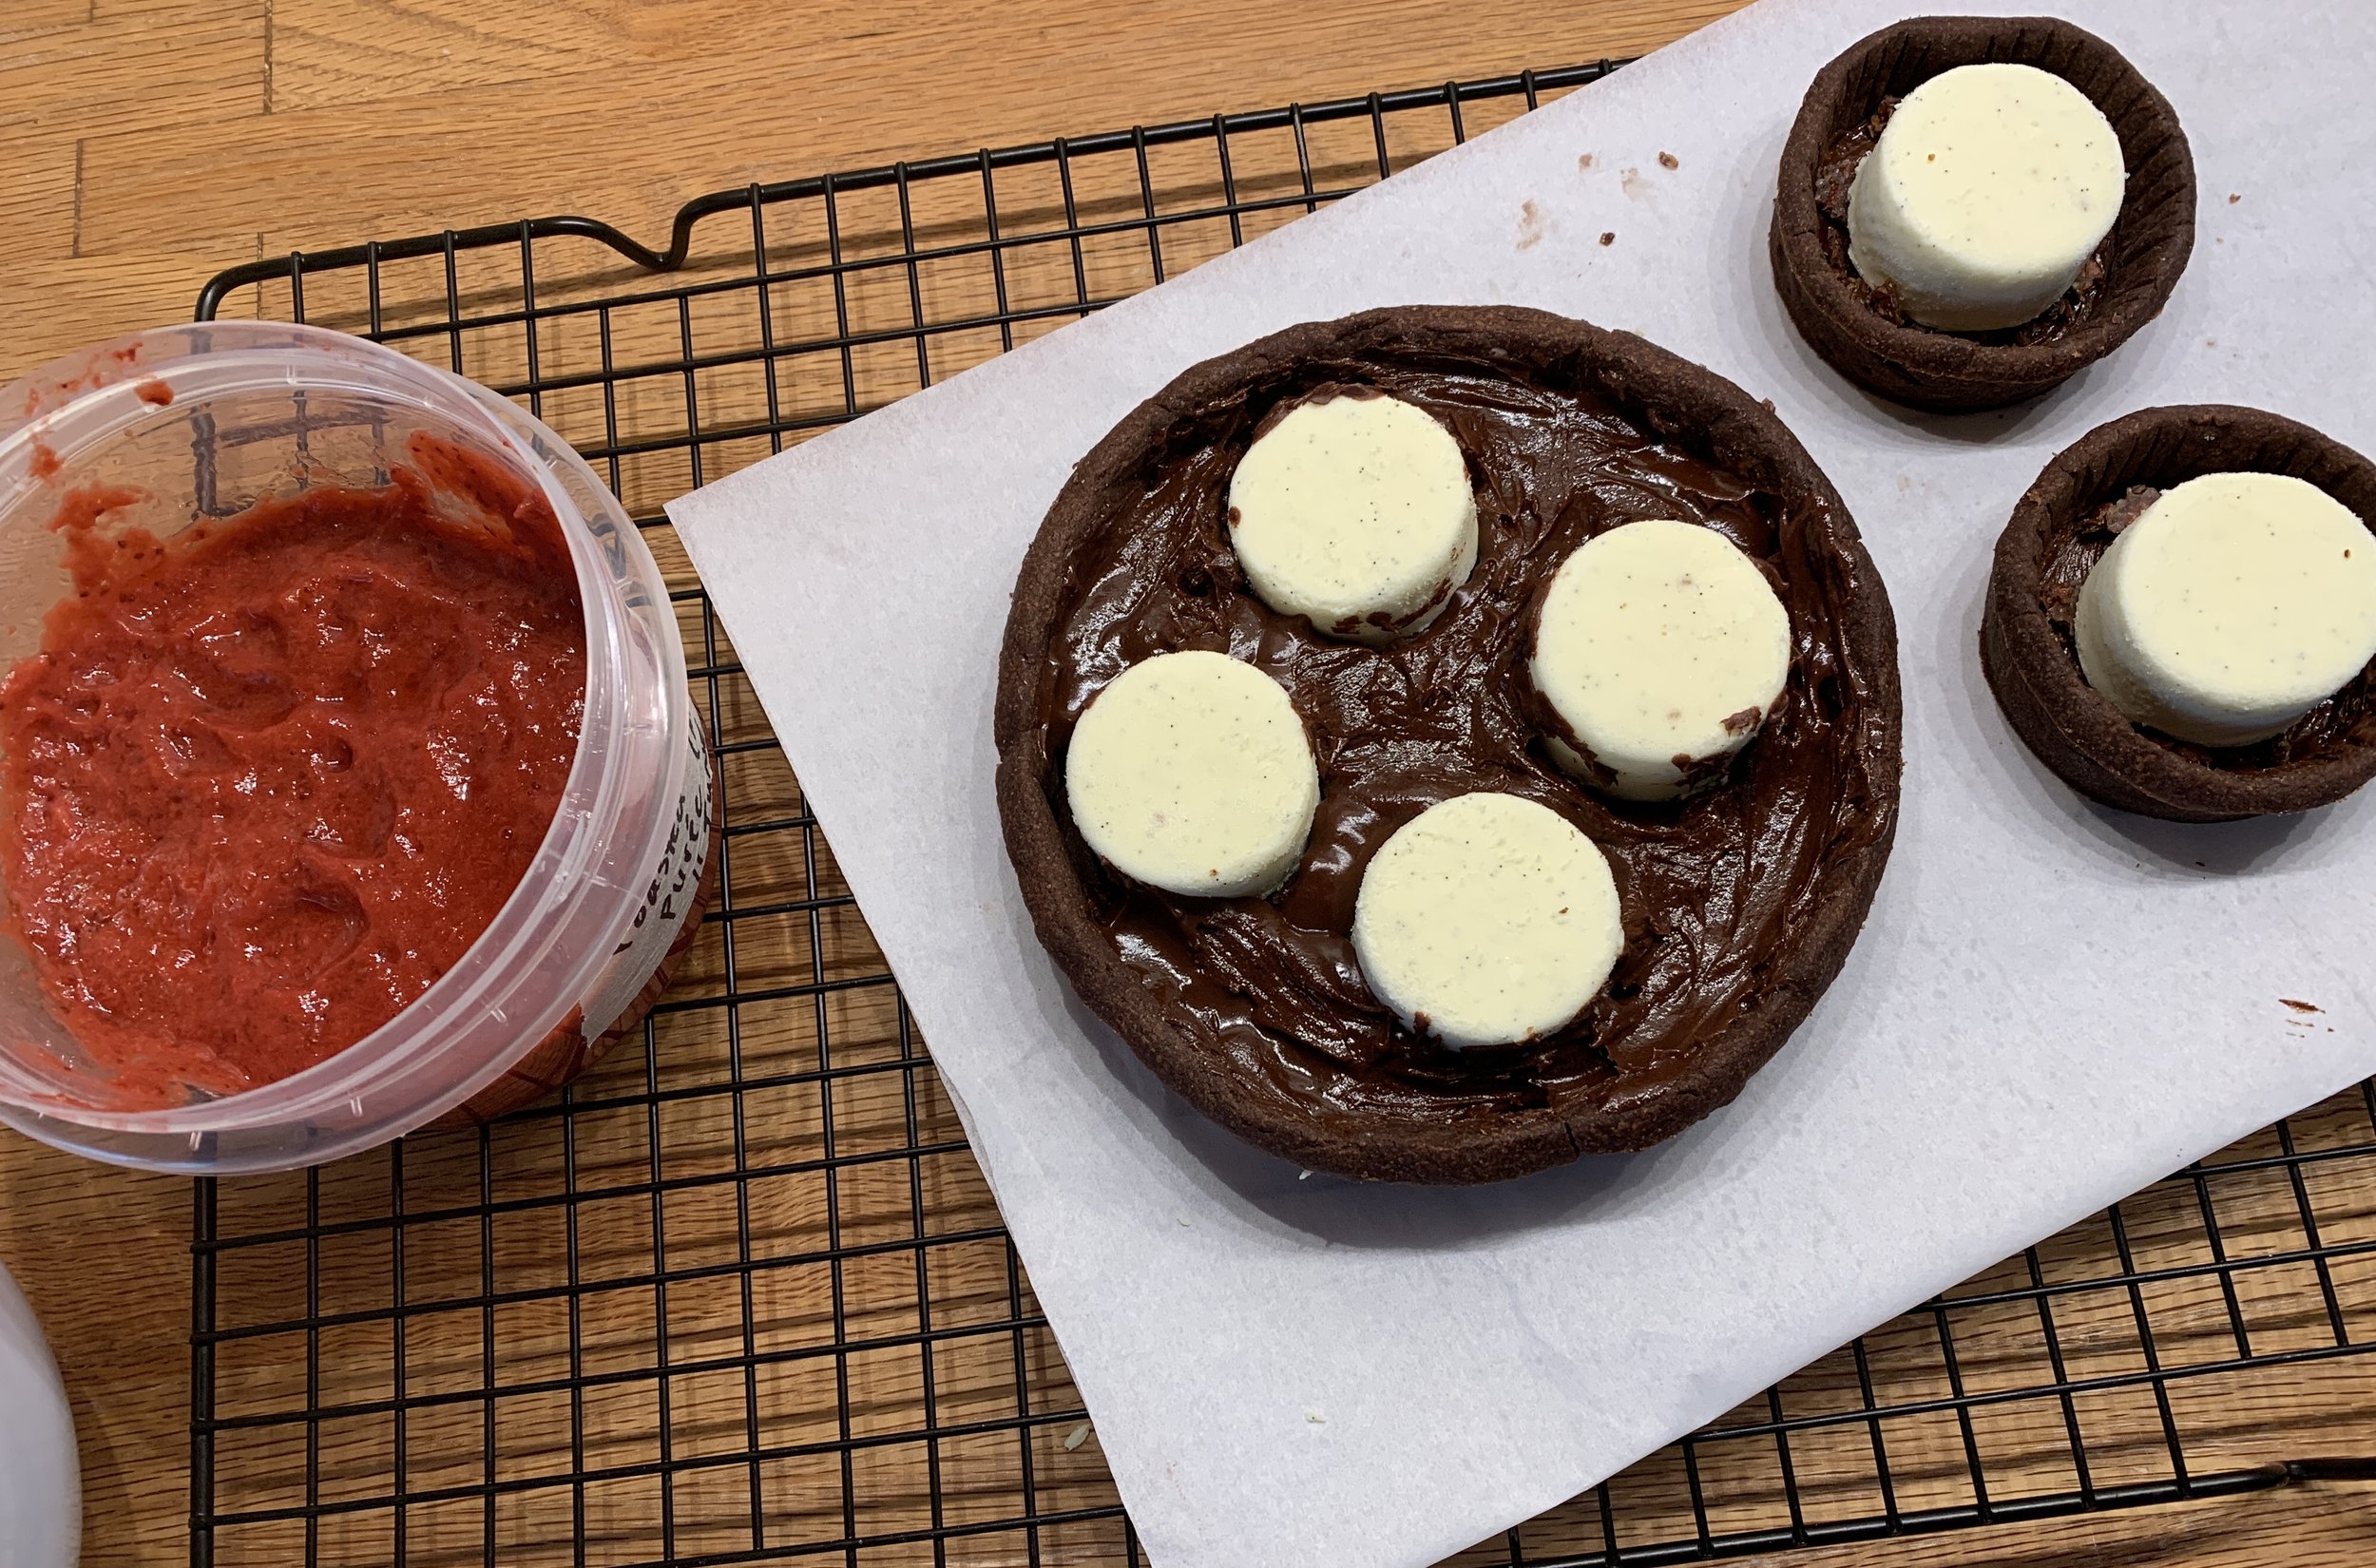
I spooned the ganache around as best I could. It’s a tad messy but will be covered up so no one’s the wiser. You could pipe it in too but I wasn’t in the mood.

I added a generous soup spoon full of strawberry purée to the chilled white chocolate ganache (used 120g heavy cream to 40 g white chocolate) and whipped it up to soft peaks. For the sharing size tart I piped the cream around and over the ricotta discs then topped with fresh raspberries and more crushed nib brittle.

Et voilà - our New Year’s Eve dessert!

Triple chocolate tart with berry cream

Psst . . . . the smaller tarts were used as taste tests. I was able to spread the softened ricotta flush into the tartelettes then top with a bit of berry cream and nib brittle for a midday snack that Steve and I so enjoyed. Yum - the chocolate crust and ganache with the smooth ricotta custard, hint of berry cream and crunchy nibs is just divine.

Happy New Year everyone and may 2022 bring us new adventures and peaceful, happy days!

I’ll leave you with just a hint of the lovely holiday displays at nearby Meijer Gardens


Favorite garnishes part 2: candied citrus

Citrus teacakes

On to part 2 of my favorite garnishes - candied citrus. It takes a bit of time but is a perfect project for a snowy winter day. Put on some music, feel a calm come over you and have fun!

Lemon, lime, grapefruit, orange, tangelo - all are fair game. Check out this post on just one way to use them.

Orange craquelin

To candy citrus peels you’ll need a couple of small to medium sized sauce pans and a medium strainer.

In one pan make a simple syrup using equal parts granulated cane sugar and water (1/2 to 3/4 cup each should be plenty), and in the other one place enough cold water in which to immerse your citrus peels.

Prep the peels by cutting the rind off the fruit, white pith and all, then trimming the pith off (there will invariably be some left) to leave the colored outer skin (the oils and flavor are here!) Cut the peel into matchsticks and place them in the pan with the cold water.

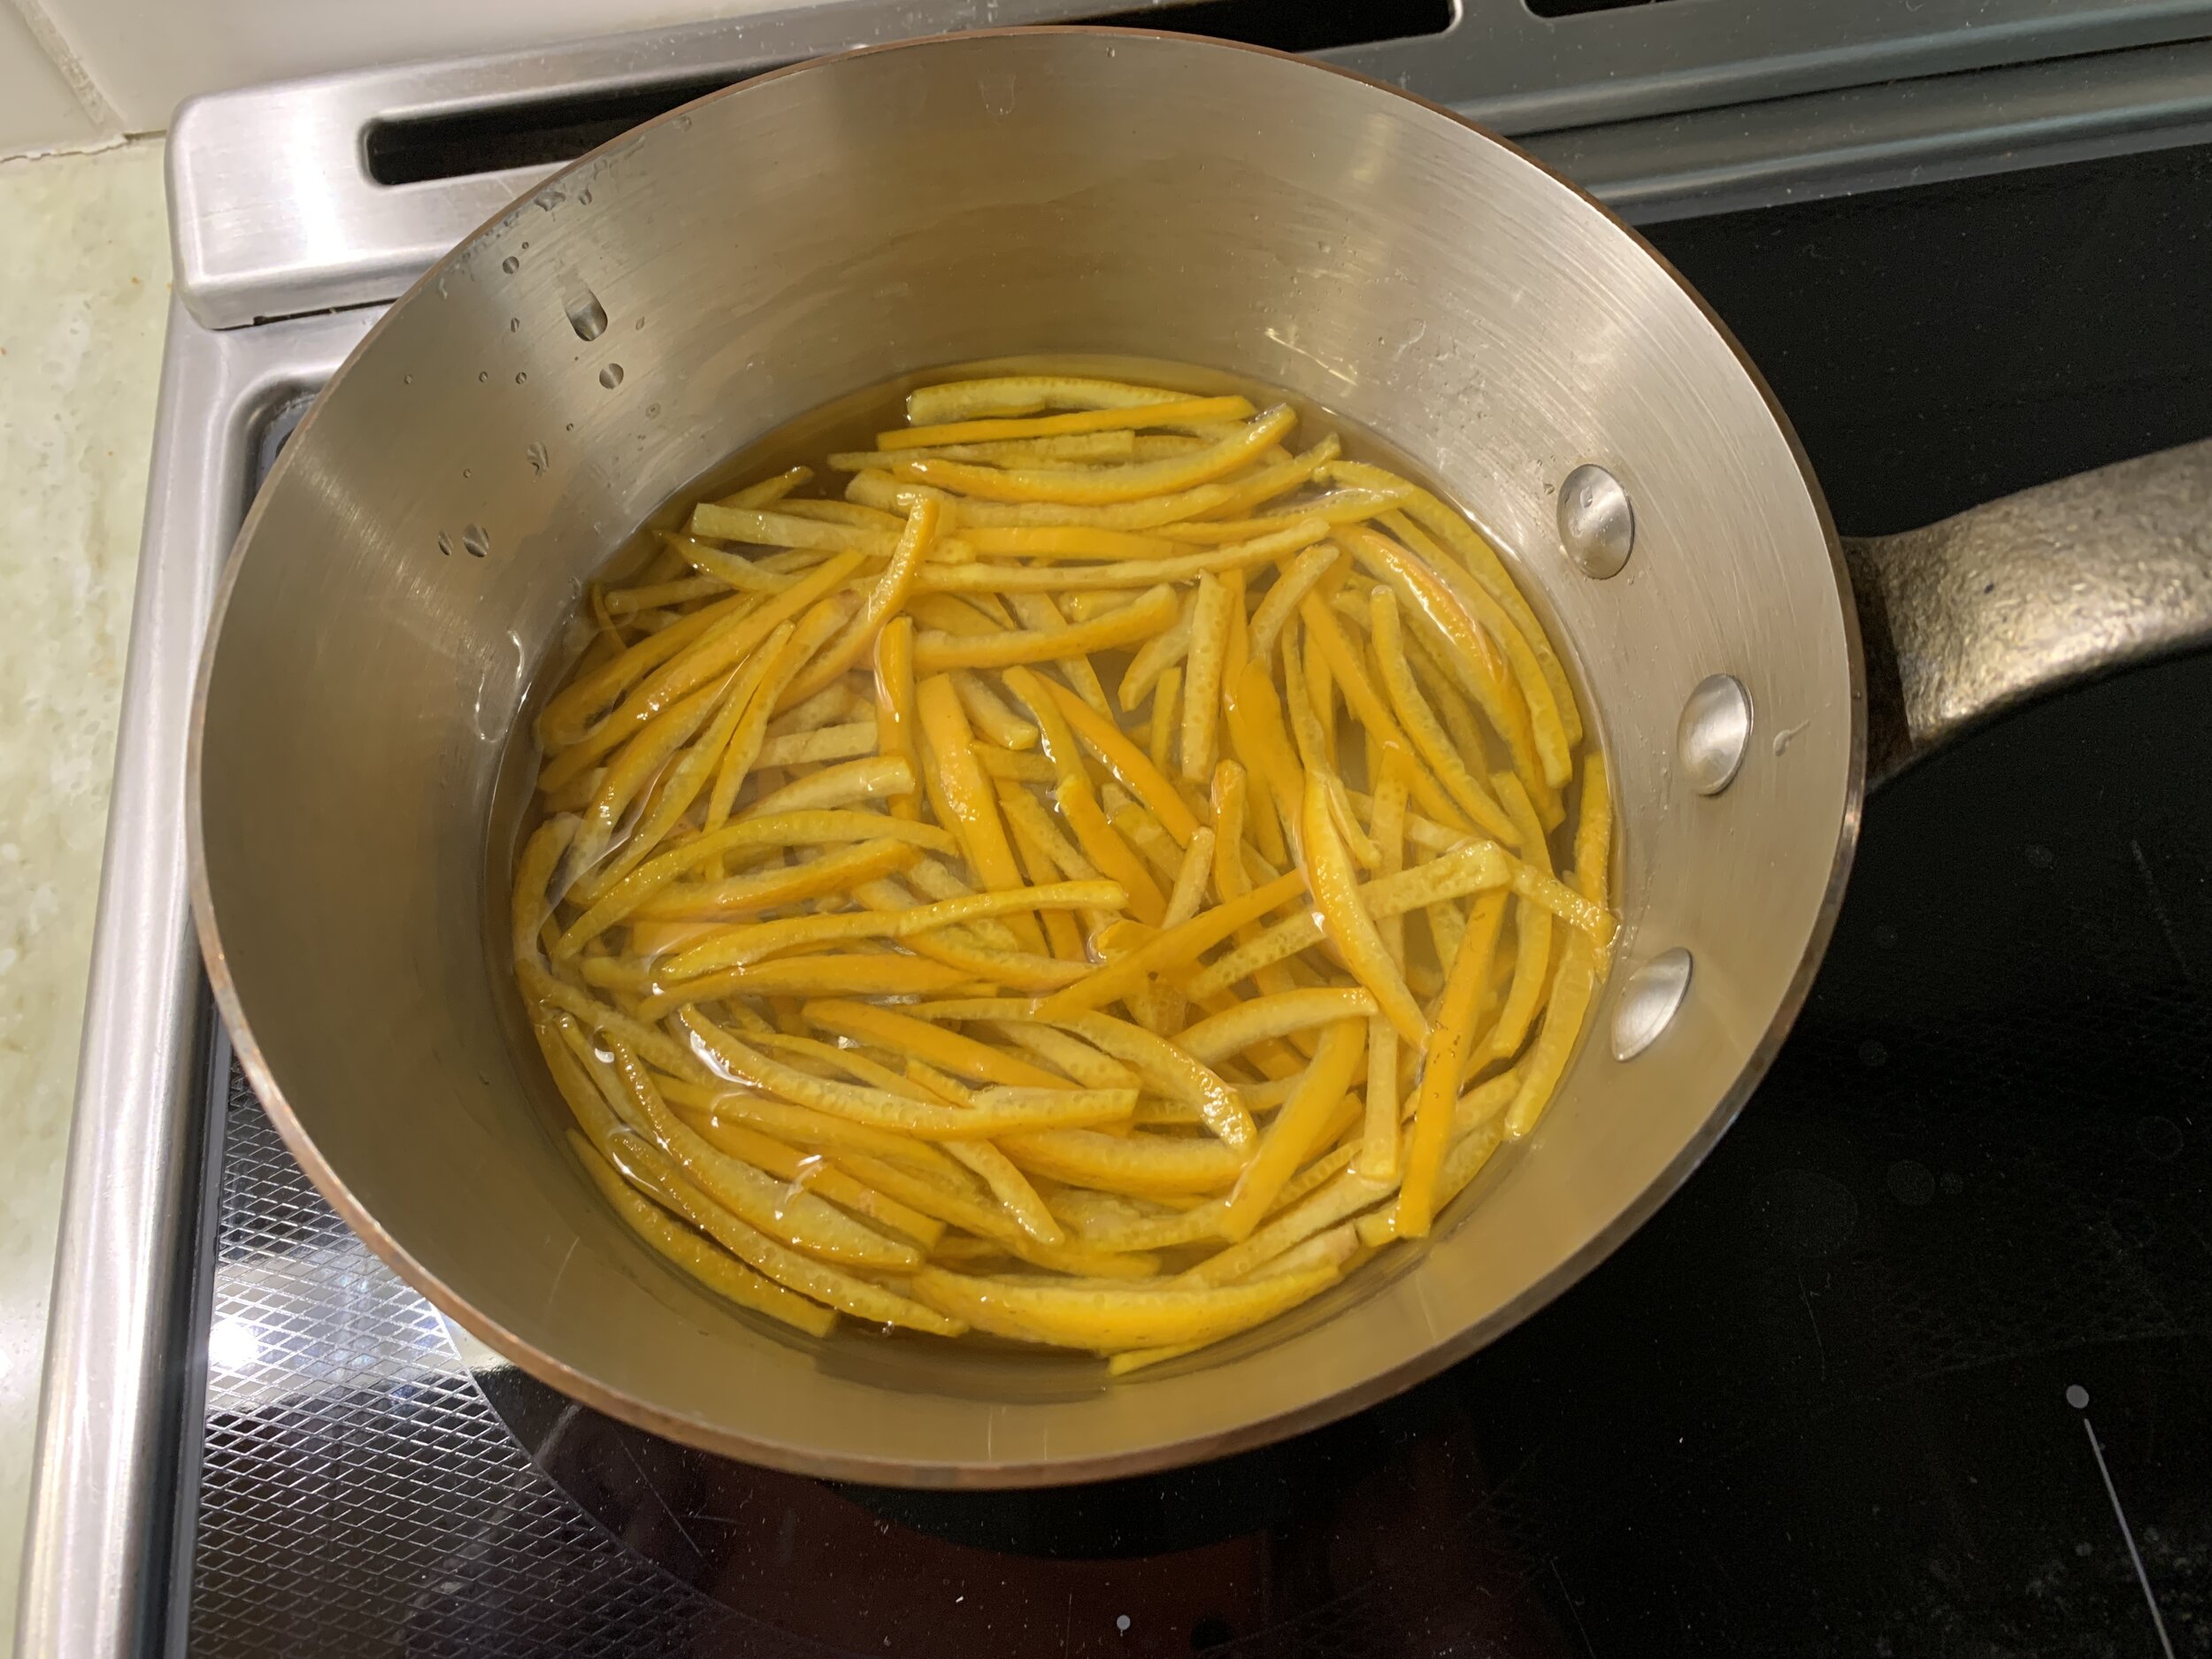
Bring to a boil, strain and rinse, refill the pan with fresh cold water then repeat the process two more times. This helps reduce the bitterness.

Now put the peels into the simple syrup and simmer until softened and translucent. This can take 30 minutes or so. Go ahead and busy yourself with cookie dough or pastry cream or cake batter. You’ve got time.

Starting the process

All softened up - see the difference?

Remove from the heat and let cool. At this point you can store them in the syrup in the fridge for several weeks, using as desired.

You can also separate some out, strain off the syrup and toss them in sugar.

Separate and place them on a wire grid to dry then store in a covered container at room temperature for a couple of weeks.

Either the sugared and dried rinds or the soft and refrigerated-in-syrup rinds are great for a garnish on a tartelette or teacake. Or chop them up finely and add to your cake batter, cookie or brioche dough or Swiss meringue buttercream. You be the judge.

Hint: the sugared/dried pieces are lovely with a small piece of chocolate and a few candied nuts for a satisfying after meal treat when you’re looking for just a little something.

Meanwhile, feel the calm and peace of the holiday season. We all deserve it.

My handmade angel shoes

Favorite garnishes part 1: candied nuts

Lightly candied sliced almonds

Lightly candied sliced almonds

Wow! It seems like this one’s been awhile in the making. Let’s just say that life has a way of taking us on a variety of paths and unknowns.

Now let’s talk about garnishes! It’s time to take your pastries and desserts to the next level with . . . . . . . Crunchies!!

Whether you choose cookie crumbs, candied citrus, nutty crumbles, brittles or candied nuts, they’ll all add that extra splash your creations deserve. Use as garnishes on top of ice cream, teacakes, baked fruit and custard desserts or tuck them into creamy layers between your favorite cake slices and you’ll be the happier for it. It’s the little things that make all the difference.

I’ve touched on many of these when writing about different projects over the years, but now I’ve attempted to organize some of my favorites in separate posts so as not to overwhelm with too much info.

Let’s talk nuts. I’ll explain three approaches to candied nuts. Generally you’ll need the stove top and in some cases the oven. I find silicone mats perfect for these projects - no sticking plus easy cleanup.

Start with a clean slate, as it were - use raw, non-salted, non-roasted nuts. I typically have almonds, pecans, walnuts, pistachios and hazelnuts in my larder and, unless I know I’m going to use them within a few weeks, I keep them in the freezer up to six months to preserve freshness.

Here we go. The first approach calls for making a syrup on the stovetop, stirring in your choice of nuts (whole or sliced) and then baking in the oven to crisp things up. Sounds good.

Heat your oven to 350ºF. In a small saucepan stir together 1/4 cup (50 g) sugar, 2 tablespoons water, 1 tablespoon corn syrup and a large pinch of kosher salt. Bring it to a boil over medium heat then remove from the heat and stir in 1.5 cups (~ 200g) of nuts until coated. Then spread the mix out on a parchment or silicone lined 1/2 sheet pan and bake for 5 minutes. Stir them up and bake another 8-10 minutes until golden brown. Let cool and store in an airtight container at room temp. They should last several weeks and are great for garnishing ice cream, custards, crisps, tarts or whatever your little heart desires. Even your morning oatmeal. And they’re not bad all by themselves!!

Cherry almond Breton tartelettes with almond crunchies

The next approach (which I refer to as the egg white method) uses a bowl, whisk, rubber or silicone (my preferred) spatula and the oven (no stovetop). I particularly love making pistachios this way, coarsely chopped and blended into my favorite Breton shortbread dough for just the right touch of crunch. Yum.

Halve or double the recipe to suit your needs. Prep note - you’ll be toasting and cooling the nuts first before blending them into the egg white mixture and then back into the oven. You can do the toasting a few days ahead of time and store the nuts at room temperature in a covered container.

Heat the oven to 300 - 325ºF depending on the nuts you’re using (325º for whole almonds, walnuts and hazelnuts; 300º for pecans and pistachios which tend to burn more easily). Spread 2 cups (about 227 g / 8 ounces) of nuts in a single layer on a sheet pan and toast them about 8-10 minutes to bring out the fragrance. Let cool. Keep the oven on at the same temperature at which you toasted the nuts.

If you’re like me and save your egg whites for various purposes, this is just one way to use ‘em. In a medium bowl whisk 1/2 or ~ 16 g (give or take) of a large egg white with about 75 g of granulated sugar and a pinch of salt until the mixture has thickened and looks like a loose meringue. Don’t fret about the egg white - using one large white will simply give you a frothier coating.

NOTE: change things up by using brown sugar instead of white and adding spices like ginger, cardamom, cinnamon or coriander (or a mix!) for a tasty option.

Blend the nuts into the mix and spread out on a parchment lined pan.

Bake 20-30 minutes, stirring every 10 minutes or so until the egg white mixture appears dry and crunchy, coating the nuts. Let cool and store in a covered container at room temperature for a couple of weeks.

Use whole as a teacake topper; coarsely crush/chop as a garnish for your favorite ice cream; pulse them up in a food processor and blend into buttercream for your favorite layered cake or dessert creation.

Cocoa hazelnut teacakes with white chocolate-mascarpone cream

Buttercream anyone?

The last method also involves toasting the nuts first so have your oven ready. The nuts should be warm when blending them into the caramel for which you’ll need a medium-large saucepan. Have a silicone-mat-lined or buttered baking sheet on which to spread the caramelized nuts. This is akin to making brittle (coming up in a future garnishes post) but no baking soda here.

During my schooling at Le Cordon Bleu in Paris and internship at Pâtisserie Pascal Pinaud, we referred to this concoction as nougatine - caramelized nuts, spread out and cooled, then ground up into crunchy goodness for layering the many entremets that the French love to make and eat. Here’s just one entremet example.

I’m making a pistachio nougatine here. I’ve toasted 170 g / 6 oz pistachios and have them waiting warmly on the side. Have a silicon spatula lightly oiled at the ready.

Place 300 g / 1.5 cups granulated sugar and 60 ml / 1/4 cup water in your saucepan on low to dissolve the sugar.

Once the sugar is dissolved turn the heat up to medium high and bring to a boil.

Cook the sugar to a lovely medium amber. The image below is almost there. When I get close, I give it another 30 seconds or so to reach my desired color. Don’t wait too long - you don’t want burned sugar. After you’ve done it a bunch of times, you just know when to snatch it off the heat.

Remove the caramel from the heat and stir in the nuts with the oiled spatula. Scrape out onto the silpat lined sheet pan and spread into a single layer. Don’t hesitate - just do it.

Let cool. Your options now are to break it up into smaller pieces (a mallet is great for this!) as a topping for ice cream or process it to medium fine crumbs and use it as a garnish or layer for your chosen dessert.

Pistachio nougatine

WARNING! Please be careful when breaking this up since edges of caramel can be extremely sharp. Believe me, I’ve been there.

That’s it for now. You have a number of things in your dessert armamentarium that will add just that special touch. Go for it.

Next time - candied citrus . . . . . and more to follow that. All in due time.

On a final note, as noted at the beginning of this post, it’s taken me awhile to get this one finished. Life events tend to trap our attention when we least expect it. The main thing is to stay positive, stay safe and have a wonderful holiday season.

See you next time around!

A last gasp of bittersweet

Late autumn update - the holidays are coming!

In the japanese garden at Meijer gardens

Hi all. It’s still autumn here in West Michigan with the remaining late season colors as striking as ever.

I’ve been baking here and there and working on some holiday ideas. Keeping it simple, think classic shortbread, teacakes and tartes. Pumpkin, pear, chocolate and pecan are a few of the tastes I’m imagining.

I’ve added Earl Grey and espresso nib to the shortbread menu. Choose four flavors for either the 2 dozen or 4 dozen gift boxes. This year I have a new petite box holding 12 cookies (single flavor or choose up to 4 flavors), perfect as hostess gifts or just that perfect little something for teachers, co-workers or as stocking stuffers.

Petite box example

Teacakes are deelish: caramel apple and chocolate ganache are de riguer at the moment and now pumpkin, pear cocoa hazelnut and orange pistachio are on the docket. Hmmmm . . . . . sounds pretty good, don’t you think?

Caramel apple and chocolate ganache teacakes, boxed

Caramel nut tart here we come. If you’e a nut lover like I am and you’ve never experienced this one, now’s the time to give it a try. Chock full of nuts baked in a lovely, not too sweet caramel, it’s like the best nut bar you’ve ever had.

Caramel nut tart sharing size (5.5 inches)

Now’s the time to plan ahead for the holidays. Check out the menu page and contact me if there’s something that looks good.

Happy planning! Stay safe and stay well.

Japanese garden again

Chocolate babka buns

3B564E9B-75EC-46B6-BE88-1E49DA77C0B2_1_201_a.jpeg

These are NOT the prettiest pastry in the case BUT! They are dee-licious. Mmmmmm!!

I was on a mental chocolate bun kick, trying to decide what chocolate-y goodness I might create for “Pastry Friday” at a nearby assisted/independent living facility. Thinking of something twisty or swirled, babka came to mind as the basic idea but this time in individual bun form.

I wrote a series of babka posts during the spring of 2017 but haven’t returned to that particular pastry for awhile now. It’s time.

I had a chocolate babka recipe in my files from Sur La Table teaching days - it was one we never ended up making in class, but I saved it nonetheless. The filling looked very intriguing but different from other filling iterations I’ve seen. The ingredient portions had me wondering so I went to the “trusty” internet to google “best chocolate babka filling”. And what to my wondering eyes did appear? A NYT article/recipe on chocolate babka by Melissa Clark that was EXACTLY the same as this particular SLT version. My oh my, how intriguing is that?

At any rate, I decided to go for it and go for it I did.

The dough is a brioche like number that gets a first rise and then an overnight in the fridge - gotta develop that flavor! Compared to my usual brioche recipe in which I keep ingredients cold, Melissa’s is less enriched with half the milk (slightly warmed), one less egg and about half the butter (egg and butter at room temperature.) Vanilla and nutmeg add some wonderful flavor too.

Here’s the dough after initial mixing;

A513BC37-F037-4D25-9B93-C37CF3F182F5_1_201_a.jpeg

and after a 2 hour rise.

43BEF7DB-6207-48A4-A33C-DBCC08485C79_1_201_a.jpeg

Gently deflate, form a ball then wrap and refrigerate overnight.

3F21B2CB-C431-4C9C-9ABE-16A2E407B833_1_201_a.jpeg

There are three more things that have to be prepared for assembly and final garnishing. They can all be prepared the day before and refrigerated, but I found it easiest to do it the day of baking.

The filling is fudge-y and oh so tasty. Make it 30 or 40 minutes ahead of taking the dough out of the fridge, since it has to set up a bit to make it perfectly spreadable. I reduced the sugar in Melissa’s recipe from 100 g to 50 g. Here’s how it goes: medium saucepan; 50 g sugar, 180 ml heavy cream, pinch kosher salt; simmer, stirring on and off for 5 minutes to dissolve sugar; scrape into a bowl and blend in 170 g chopped dark chocolate (66% is nice), 113 g unsalted butter (cubed and at room temp) and 2 teaspoons vanilla extract until smooth; cool to room temp.

The chocolate streusel is for final garnishing just before the bake so you can put that together easily during the proof. Here’s how it goes: stir 60 g all purpose flour (or whole wheat pastry if you have some), 45 g granulated sugar, 11 g cocoa powder (Dutch processed is my go to) and 1/2 teaspoon kosher salt together in a bowl; stir in 64 g melted butter with a fork to form large moist clumps. Melissa adds 50 g mini chocolate chips too but I left those out. Set aside.

Next is a simple syrup that will be brushed on after the bake. Here’s how it goes: combine 2/3 cup granulated sugar with 2/3 cup water in a small saucepan; bring to a simmer and simmer a few minutes to dissolve the sugar. Set aside.

When ready to proceed with roll out and assembly, remove the dough from the fridge and divide it in half (it won’t have risen much). Going for a yield of 18 portions, I had my 3” Fat Daddio cake pans buttered and coated with raw sugar standing by. P.S. I have only 12 Fat Daddio pans and used 6 ramekins in addition.

4EAB6249-6954-4053-AA40-E50A18694B61.jpeg

The next few steps are the same as if you were making classic babka in loaf pans. Work with one half at a time, keeping the other half in the fridge until ready.

Roll each half into a 9”x18” rectangle.

2D5509E8-3C5A-41A2-BF50-7B12EEA493C3_1_201_a.jpeg

Spread half the chocolate fudge mixture on each. Heaven.

15A3A31A-1E42-4C95-9CF4-E241AECC8A94_1_201_a.jpeg

Roll into a tight coil then place on parchment and into the freezer for 15 minutes or so.

Rolling, rolling, rolling . . .

Rolling, rolling, rolling . . .

Place the chilled log on your work surface, seam side down, and slit it right down the middle, turning the pieces outward to expose the filling. I used my trusty bench scraper.

6C393F37-46FB-4700-A98C-01C3211816D2_1_201_a.jpeg

Now twist the 2 pieces around each other, keeping the filling facing up.

I gave the twist a good final snugging up before dividing.

Here’s where I veer away from the classic loaf babka. I cut each twist into nine 2” lengths for a total yield of 18 portions. Tuck each piece into the prepared pans.

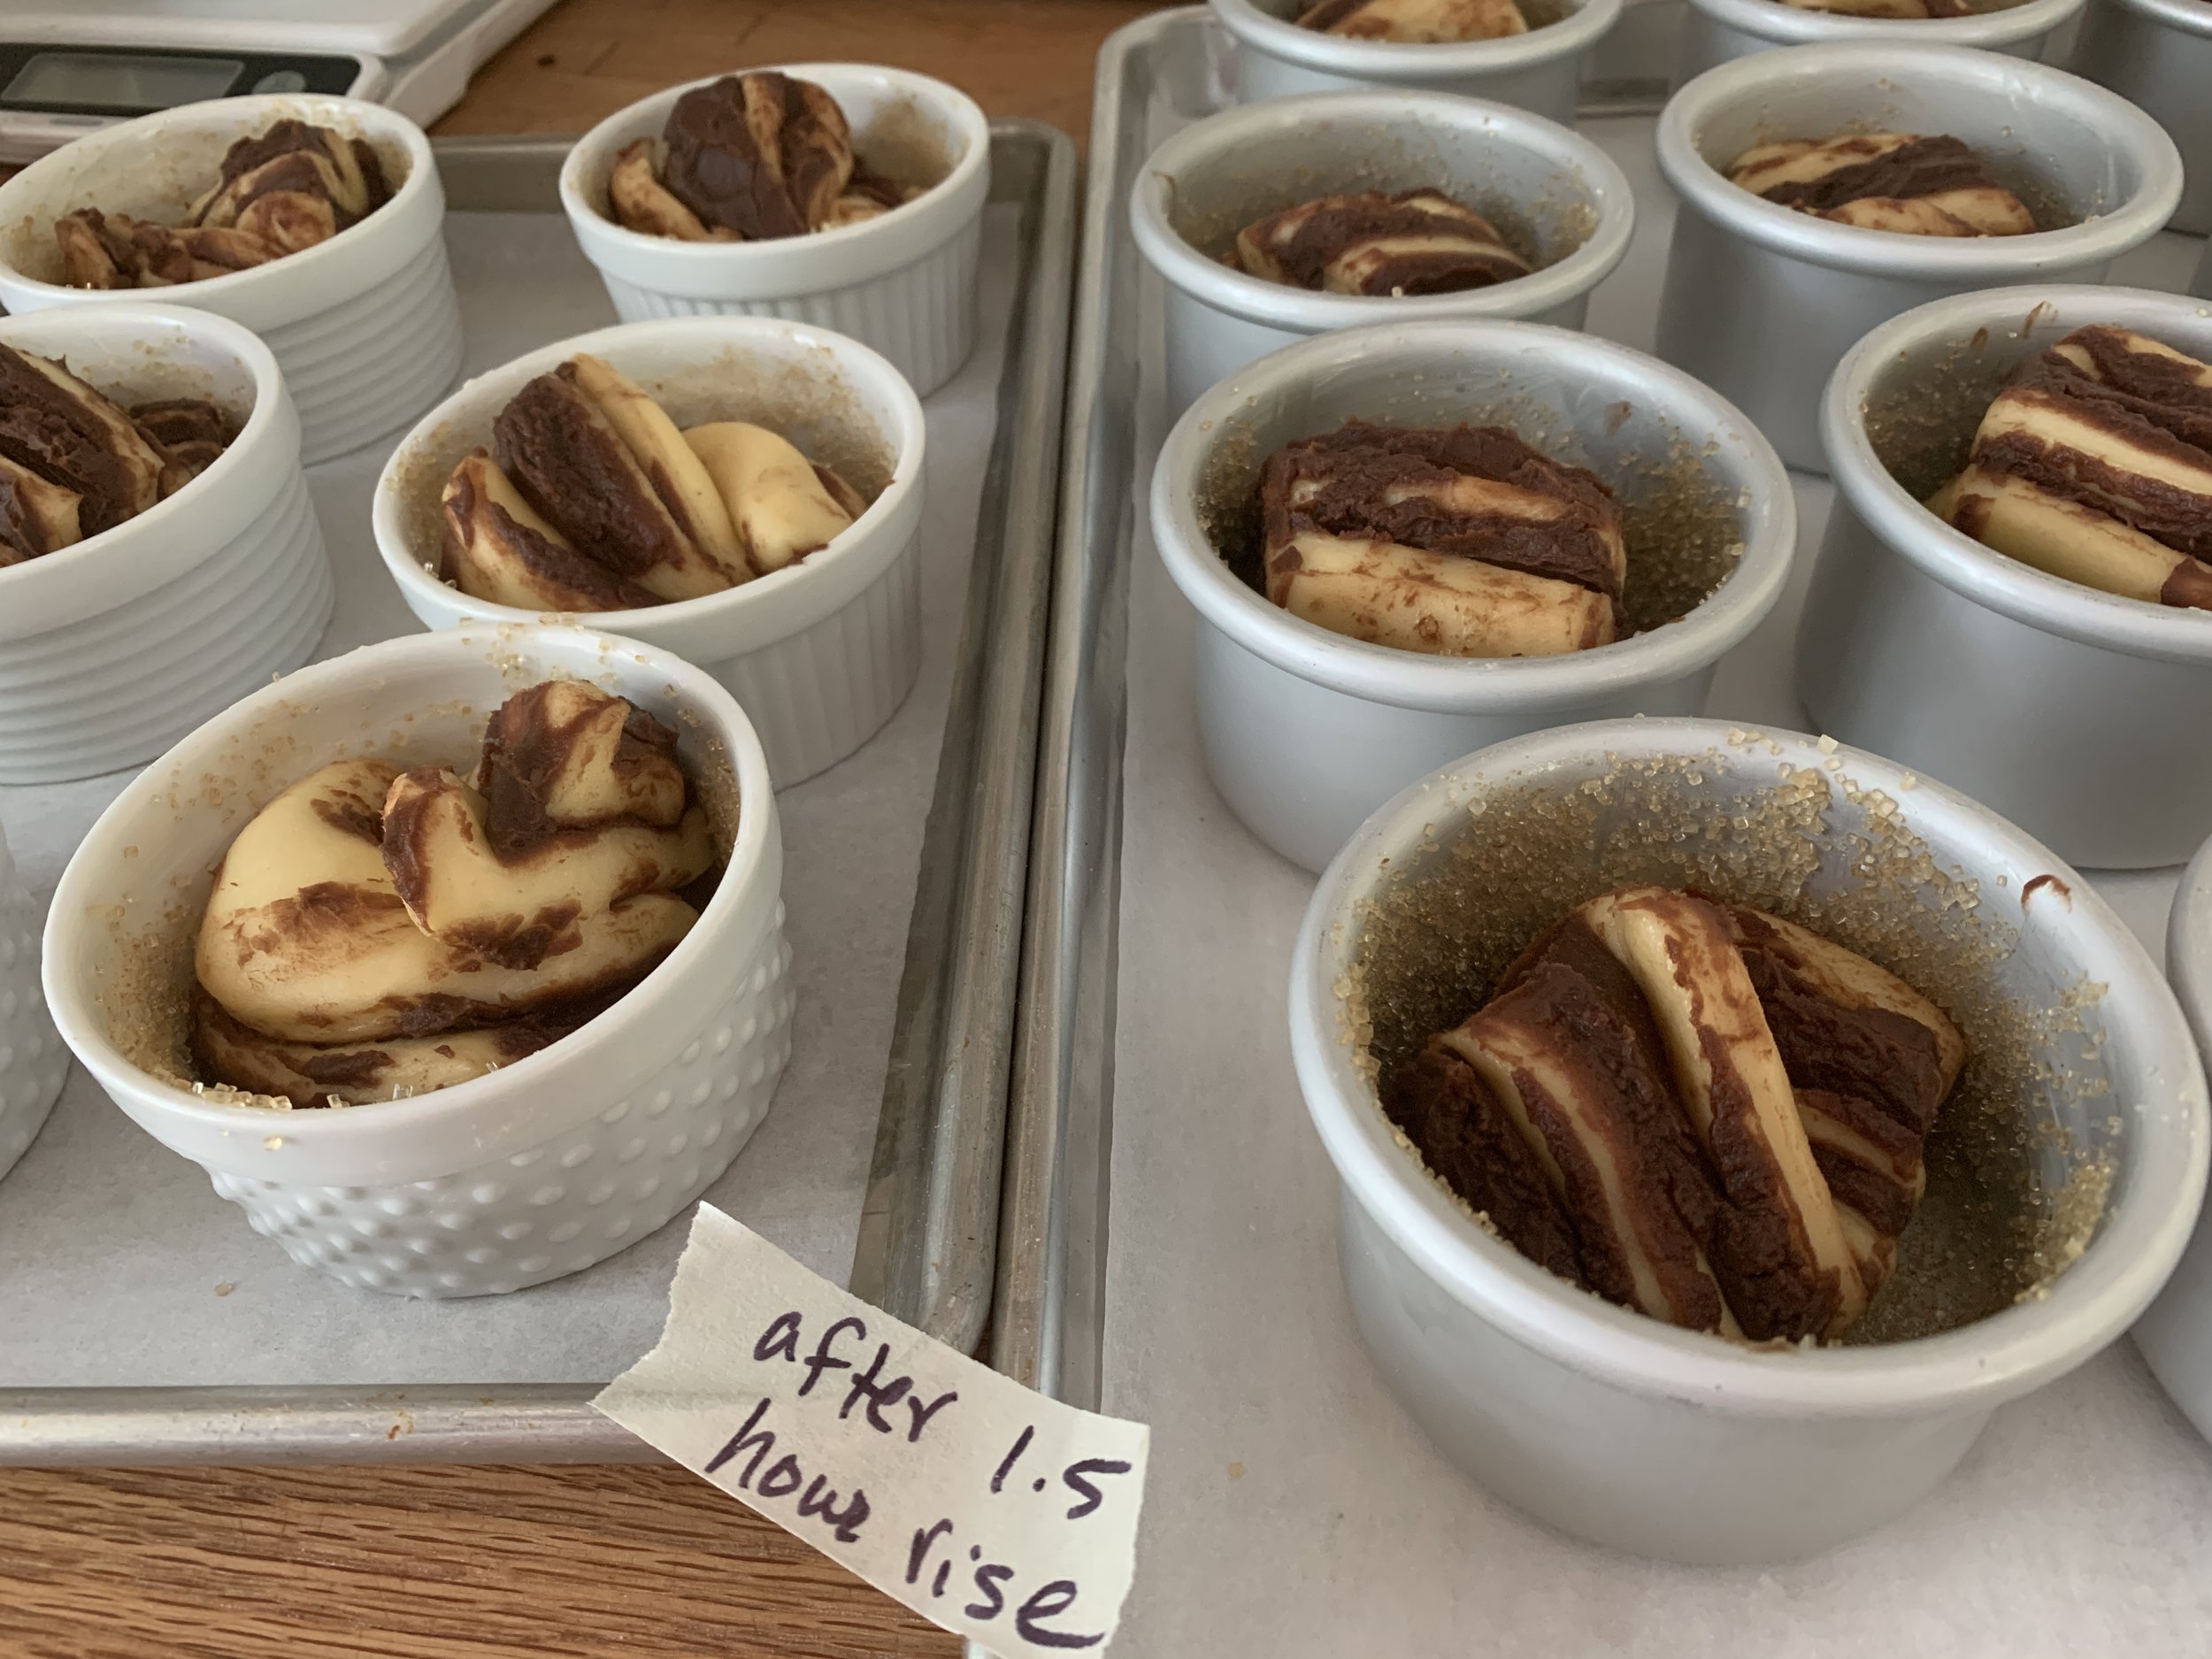
Cover with lightly buttered film wrap and let rise for 1 to 1.5 hours. At about an hour in, heat the oven to 350ºF.

They won’t achieve a significant doming and filling the pan type of rise but you should appreciate puffiness.

Just before going into the oven, divide the streusel over the tops of the buns using a fork and your fingers to separate clumps a bit.

Bake about 20-25 minutes, rotating the trays half way through. NOTE: if you’re making two full size loaf babkas, baking time is 40-50 minutes.

I look for browning of the dough edges and a tester coming out clean. It’s a bit messy with the chocolate and streusel so aim the tester into dough (rather than chocolate goo) as much as possible.

Just out of the oven, brush with simple syrup as best you can. The streusel and chocolate on top makes it a bit tricky, but I tried to focus the syrup on the obvious browned dough edges.

Let sit about 10 minutes then ease out of the pans/ramekins with a small offset spatula, running it around the edges to loosen the crunchy bits.

At first I was afraid these would fall apart like a pull-apart roll but as I gently released them and placed them on a cooling grid, they held their shape just fine.

Once fully cooled they maintained their integrity very nicely. Whew!

Taste test time!!

Based on the exterior appearance, I thought I’d find more chocolate inside. Not so, but the subtle swirls in the oh so tenderly textured dough, the hint of saltiness in the streusel and the all around delicious flavor of the whole are a winner in my book - and Steve agrees!!

You can use the same approach with your own favorite brioche or cinnamon roll type dough. Just go for it!

Meanwhile, autumn colors are finally appearing much later than usual. Here are a few images from some of the colorful inside displays at nearby Meijer Gardens.

Enjoy and I’ll “see” you next time around.

Coriander buttermilk "bouchon"

4EB2E90F-732A-47F2-9372-9D24BF4EDB79.jpeg

If you’re dreaming of the perfect buttermilk pancake and donut hole rolled into one, this is it! Moist with hints of nutmeg, coriander and ginger, these small bites go down so smoothly that you’ll clamor for more. I first made these in 2012 in my small shop inside Hope Artiste Village in Pawtucket RI. When Steve and I saw them, we immediately knew what they should be called.

Bouchon is the French word for cork, and the champagne cork shape develops as they bake in small round flexi-molds. The key is to fill the wells enough so that the top poofs out over the edges as the cakes rise, giving that signature look.

C96BA31E-C45A-4E25-A209-745282A6BE15.jpeg

The process is your basic creaming method of cake prep. In a nutshell: cream butter and sugar, add eggs and vanilla, blend in dry ingredients alternating with wet (1/3 dry, 1/2 wet, 1/3 dry, 1/2 wet and end with 1/3 dry), scraping down after each addition.

In the plan ahead phase, bring 170 g / 6 ounces unsalted butter, one cup buttermilk and 2 large eggs to room temperature. While not a complete deal breaker, this will cut down on any curdling that can occur during mixing when things are too cold.

Heat the oven to 425ºF.

In a medium bowl whisk 200 g all purpose flour, 146 g whole wheat pastry flour, 3/4 teaspoon salt, 1.5 teaspoons baking powder, 1/4 teaspoon baking soda, 1 teaspoon ground coriander, 1 teaspoon freshly grated nutmeg (I eyeball it and probably end up using less) and 1/4 teaspoon ground ginger.

Place the 170 g room temp butter with 75 granulated sugar and 67 g dark brown sugar in the bowl of a stand mixer fitted with the paddle. Cream for 2-3 minutes and scrape down the bowl.

F6A292E1-B87B-4ADD-BCA7-89C3082631D9_1_201_a.jpeg

Add the eggs, one by one, as well as a teaspoon of vanilla extract. Do the dry/wet additions as mentioned above.

In the image above you can see the Demarle Flexipan mold 2266 I use for this - at purchase it is a 48 well mold, but I cut it in half to fit on a half sheet pan. I probably haven’t mentioned this for some time now, but I always set silicone flexi-molds on a wire grid on the sheet pan. This allows for better oven heat circulation and more even baking.

This cake batter is quite thick so I use a wide round tip (20 mm / 3/4” diameter) to pipe and hold my offset spatula in the other hand to cleanly “cut” the batter away from the tip as I go. Works like a charm.

1C7EFC8F-AE31-46CC-AB97-ECDAC5D20ACF.jpeg

Pipe the batter to nearly the top of each mold with a nice dome at the finish. Not having made these for some time, I had to fine tune my piping as I went. The yield varies but I typically get 32-34 cakes from a recipe. I ended up with 42 this time which tells me I need to be more generous with my piping for the next go. Gotta get those cork tops!

10882B23-27EA-4C10-AE5F-A41B616508ED.jpeg

Bake about 15 minutes until golden. The cakes should feel firm when gently pressed on top.

While the cakes bake, melt 4 tablespoons butter in a small bowl; in another small bowl mix 1/2 cup sugar with 1 teaspoon ground coriander, 1/4 teaspoon ground ginger and a few grates of fresh nutmeg.

Once out of the oven, let cool about 5 minutes then pop the cakes out onto the wire racks.

4C546743-233F-4898-AFA3-70A5F8E9D097.jpeg

Working in small batches, dip the tops in the melted butter, give them a couple of minutes for the butter to absorb and then dip/roll them in the coriander sugar mixture.

CD2DC2B3-368E-4767-BEA3-7DCE944F77C1.jpeg
4401CEBC-E22A-49F8-AF99-DC81818DC89E.jpeg

I didn’t dip and roll the whole batch since I wanted to freeze some au naturel to have on hand for later. You never know when a bouchon occasion might arise.

These babies are dense yet light, not too sweet and with just the right warmth from the spices.

B27D230E-B550-4F2A-97EC-F7F9E5FDBEDD.jpeg

My inspiration for making these after a number of years was two-fold: I was dreaming about them and just happened to have some buttermilk in the fridge, plus a weekend visit from sister Joyce for whom I had to have a little treat or two on hand. Thanks for your visit Joybell!

Oh - and let’s not forget that Steve loves them!!

47285A62-0BCD-4763-B726-E79C630FC89A_1_201_a.jpeg

Happy bouchon making everyone and here’s to more autumn baking adventures.

Ciao for now.

Late summer veggie focaccia

74D48926-F6CE-4A7D-8929-BBADB6ED70CA_1_201_a.jpeg

This is what I’m talking about - sweet corn, tomatoes and a delectable focaccia for summer perfection on a sheet pan. Yes!

Even though it’s officially autumn on the calendar, there’s still time to reap summer’s bounty. As a matter of fact, Steve and I have amassed a wonderful stash of sweet corn in the freezer for fall and winter soups, chowders, frittatas, baked corn pudding, cheesy corn muffins and more.

I simply had to give this one a go. Based on the recipe from Melissa Weller’s “A Good Bake”, it’s focaccia with an interesting twist. Whipped cream! Can you believe it??

I’ll go through the steps with you so as to share my experience with the process. If you’re a fan of very detail oriented recipes/instructions, you should put Melissa’s book on your list.

You’ve got the basics of bread making here - flour, water, yeast, salt - put together using my favorite poolish approach.

Make the poolish (blend 120 g bread flour, 1/2 cup room temp water, 1/16 teaspoon instant yeast in a bowl and cover) the evening before so it sits at room temperature overnight for about 12 hours as it “pre”-ferments. You see it below in its bubbly goodness. Let’s hear it for planning ahead, eh?

To make the final dough place 313 g room temperature (70-75ºF) water in the bowl of a stand mixer and add the poolish and 450 g all purpose flour. Mix with the dough hook on low speed for 2-3 minutes. Remove the bowl from the mixer, place a teaspoon/3 g instant yeast and 12 g fine sea salt separately on top of the dough and let sit uncovered for 30 minutes. This allows the dough to autolyse (flour and water have a chance to start developing gluten before introducing the salt and yeast to the mix).

Autolyse step

Autolyse step

Return to the stand mixer with the dough hook, mix on low speed for a couple of minutes then increase to medium speed for three minutes. Remove the dough hook and bowl from the stand, cover the bowl with plastic wrap and let ferment for 2 hours. Turn once half way through.

The following images give you a sense of what’s happening.

Dough at the end of mixing

Dough at the end of mixing

The one hour mark

The one hour mark

End of bulk fermentation

End of bulk fermentation

Focaccia tends to be what I call a rough and tumble sort of dough - I think you can appreciate that in the photos above.

Now it’s time to pan it up! Have a half sheet pan on hand, pour 75 g (5-6 tablespoons) extra-virgin olive oil into it and spread it around evenly with your hands. Another thing about focaccia - LOTS of olive oil!!

Using a bowl scraper, scrape the dough onto the sheet pan in a pile and coat it with oil. Let it rest 20 minutes then proceed with stretching and dimpling it with your fingertips to work it into the corners and edges. It’s fun!

It will start to spring back so give it another 20 minute rest.

First stretch and dimple

First stretch and dimple

Finish stretching and dimpling to get the dough into the corners of the pan. Now set it aside to proof about 45 minutes.

Ready to top!

Ready to top!

Heat the oven to 425ºF. Meanwhile whip 3/4 cup heavy cream to stiff peaks, dollop it onto the dough and gently spread it with an offset spatula.

Cream dolloped

Cream dolloped

Cream spread - oh boy!!

Cream spread - oh boy!!

Let’s assume that any health benefits from the olive oil are pretty much erased by the whipped cream. You gotta live, right?

To top - a pint of small, sweet variety tomatoes, halved and placed over the cream . . . . . .

55261DC8-59F6-43BB-9BE7-8F32837339A4_1_201_a.jpeg

then sprinkle on the kernels cut off of one ear of corn . . . . . .

9550A64A-5B70-4A5A-8EDD-82157FF8AEE2_1_201_a.jpeg

then sprinkle with 1 1/2 teaspoons flaky sea salt, chopped fresh or dried herbs of choice (we use a salt free pizza seasoning mix) and 1/3 cup grated Pecorino Romano.

68FF46AC-26D6-48DF-970F-3058B72E58AF_1_201_a.jpeg

Bake 30-35 minutes until golden brown, rotating the sheet pan 1/2 way through. Remove the focaccia with a large spatula onto a cooling rack.

I’m here to tell you that even with all of that olive oil, there can be some sticking so use some elbow grease and determination if needed to do the deed. I ended up cutting it in the pan and getting the pieces out without too much trouble with the help of my trusty spatula.

We were so eager to try it that I forgot to snap a picture just out of the oven. Oh well.

74D48926-F6CE-4A7D-8929-BBADB6ED70CA_1_201_a.jpeg

This is good stuff! Just the right thickness, chewy and superb with the fresh veggies. We enjoyed it with a simple green salad and cut the rest (save for two pieces) to freeze for later.

The next day for lunch we warmed those two pieces up with an egg on top - about 20-25 minutes in a 350 oven to set the egg then a short broil to lend just the right crunch. Delicious!

F22E4103-9EEE-4560-9EEA-A7802D180A4A_1_201_a.jpeg

Enjoy autumn everyone. It’s my favorite time of year, and I hope you love it too!

Roadside asters

Roadside asters

Late summer update

toms.JPG

August is almost over! Baking continues now and again, tucked in amongst hosting out-of-state family visitors, hot/humid weather, household and outdoor projects and the occasional country drive to feel the wind in our hair. Through it all I always circle back to the kitchen and thought I’d share a few of the treats I’ve made of late.

This time of year the likes of peaches, blueberries, tart cherries, tomatoes and sweet corn enter into my baking projects.

Thinking of tarts? Grab your favorite pâte brisée, create your filling and go for it!

For a savory treat, blind bake the crust, let cool, fill with a whipped goat cheese/ricotta filling and top with roasted tomatoes and fresh thyme. I think you’ll like it.

Roasted tomato goat cheese tartelettes

Roasted tomato goat cheese tartelettes

Blue, blue, blueberries!! These are individual versions of the double blueberry tart I wrote about here. I tweaked my pâte brisée by replacing some of the all purpose flour with whole wheat pastry/spelt/rye flours which resulted in a delectable crust that seemed so right with the blueberries. Love it.

Fresh blueberry tartelettes

Fresh blueberry tartelettes

On another tart note, how about fresh raspberry tarts - pâte sucrée d’amandes with frangipane (blend of crème pâtissiére and crème d/amande) baked in, topped with fresh raspberries and finished off with raspberry coulis glaze - delicious!

0AA7B2F6-7CDF-4DE8-9EDC-DD867161A2AE_1_201_a.jpeg

Back to the savory side, here’s pizza topped with local fresh corn, tomatoes, broccoli, cauliflower and our go to favorite grated fontina cheese (soooo much better than traditional mozzarella in our book). Thanks Cheese Lady! TIP - pop the cheese into the freezer for 30-40 minutes then grate - it’s much easier.

0C3A3125-8F31-4850-BDEF-30AE95CF1D1C_1_201_a.jpeg

Here are individual cherry puff feuilletées, a twist (hah!) on the free form cherry tart using the same components (puff pastry and tart cherry filling) but in a different form.

Tart cherry feuilletées

Tart cherry feuilletées

My go to favorite cakes of late, based on a financier like recipe (no brown butter here) - these are blueberry lime with roasted strawberry Swiss meringue buttercream - both petite and standard versions. Change up the flavors to reflect the seasons. Mmmmm!

Petite

Petite

Standard

Standard

While these have nothing to do with fresh summer produce, you should know by now that I have to include some of my favorite laminated pastries.

Classic butter croissants can’t be beat. Pay close attention to the steps, how you handle the dough, the resting and rising times. They’re all so important in achieving the lovely airy center with crispy exterior.

0C8EC535-4E36-42BE-AB7C-6D726607D3BC.jpeg
EDB2D40A-5745-432E-97E9-D9EEAF6F0CA6_1_201_a.jpeg

Next up - maple glazed cinnamon buns made with laminated Danish dough. I’ve done versions of this sort of thing many times, yet some treats simply bear repeating (just like the croissants!).

I made the laminated dough this go around by adding 120 g butter to the dough and using 180 g for my butter block. Putting the dough through one 4-fold and one 3-fold yielded some lovely layers.

For the filling (I’m always tweaking the mixture) blend 100 g dark brown sugar, 2 tablespoons maple syrup, 42 g melted butter, 3 tablespoons flour, 4 teaspoons cinnamon (I use King Arthur’s Vietnamese version), a pinch of salt and a splash of vanilla extract. Feel free to go up to 2 tablespoons cinnamon to amp up the flavor.

Roll the finished dough into a 10” x 17”-ish rectangle with the long side parallel to the work surface. Spread the filling evenly and roll up into a log. Trim ends a tad, cut 16 one inch slices and place cut sides up/down into buttered muffin tins or open rings.

I have some 80 mm one inch high open tart rings that I love for this type of pastry. They hold the dough just right to allow for rising and preserving a pleasing round bun shape in the oven.

Bake about 18 minutes at 350ºF. Mix 3 tablespoons maple syrup with 3/4 cup confectioner’s sugar and thin with a bit of cream or milk to your desired consistency. I prefer thinner for a not too heavy coating.

Scrumptious, tender and buttery, lightly glazed - just what the doctor ordered!

EEE73D18-1EEF-4085-A779-F7A721EE1451.jpeg

Even though it’s HOT here right now, I can’t help but dream of apples, pears, nuts, pumpkins and more as the seasons continue to change.

Hang in there folks! We can do it. Here’s to a beautiful autumn.

apples.JPG

Peaches and cream Breton tart

355913C0-8010-427E-A0FB-B2737EDBF1EC.jpeg

Oooh my, soooo good! My favorite Breton dough, a thin layer of peach jam, fresh Michigan peaches and an easy custard all baked up into a golden buttery treat. What more could you want on a summer August day?

freshpeach.JPG

August and fresh peaches go hand and hand for me. Growing up, my early August birthday dessert choice was most often pound cake with fresh peaches and ice cream. Oh those memories.

Being in a tart mood as I planned some assorted treats for folks down the street, I knew a Breton dough base would be just the thing. While I typically make individual portions for such occasions, my brain asked - how about slices for a change? Two rectangle tart forms coming right up.

I’ve written several times about the beauty of using Breton dough for its versatility. Bake it thick and plain to create a gateau Breton, roll it more thinly and bake it topped with jammy fruit and crumble or make simple crisp cookies to go with your afternoon tea.

When making Breton tarts, I lean towards a thicker base crust to put the texture somewhere between cookie and cake. Thicker more cake-y, thinner more crisp.

As you see below, the straight sided form is slightly wider so I gauged my dough quantity to give me a thickness of about 3/8”, ending up with 400 g of dough for the slighter smaller fluted form and 475 g for the straight sided one. Butter the forms (it helps so much with removal later - trust me).

Place the dough between plastic wrap and roll or press it into its rough shape . . . . .

F09E8623-62B2-40E8-A6EC-C20565FCF917_1_201_a.jpeg

then transfer it into the form, pressing it evenly and also building up an edge to provide a dam for the upcoming custard. Please note - I left the bottom out of the fluted form - I’ll come back to that later.

D6C66C6B-EC81-42F3-9CA8-935074C19A70_1_201_a.jpeg

Once both forms are “doughed” up, place plastic wrap directly on the dough surface to cover and chill until ready for assembly. The lining step is one you can complete even a couple of days ahead if desired. While the chilling step isn’t absolutely essential, I find that dough always bakes a bit better when it’s cold going into a hot oven.

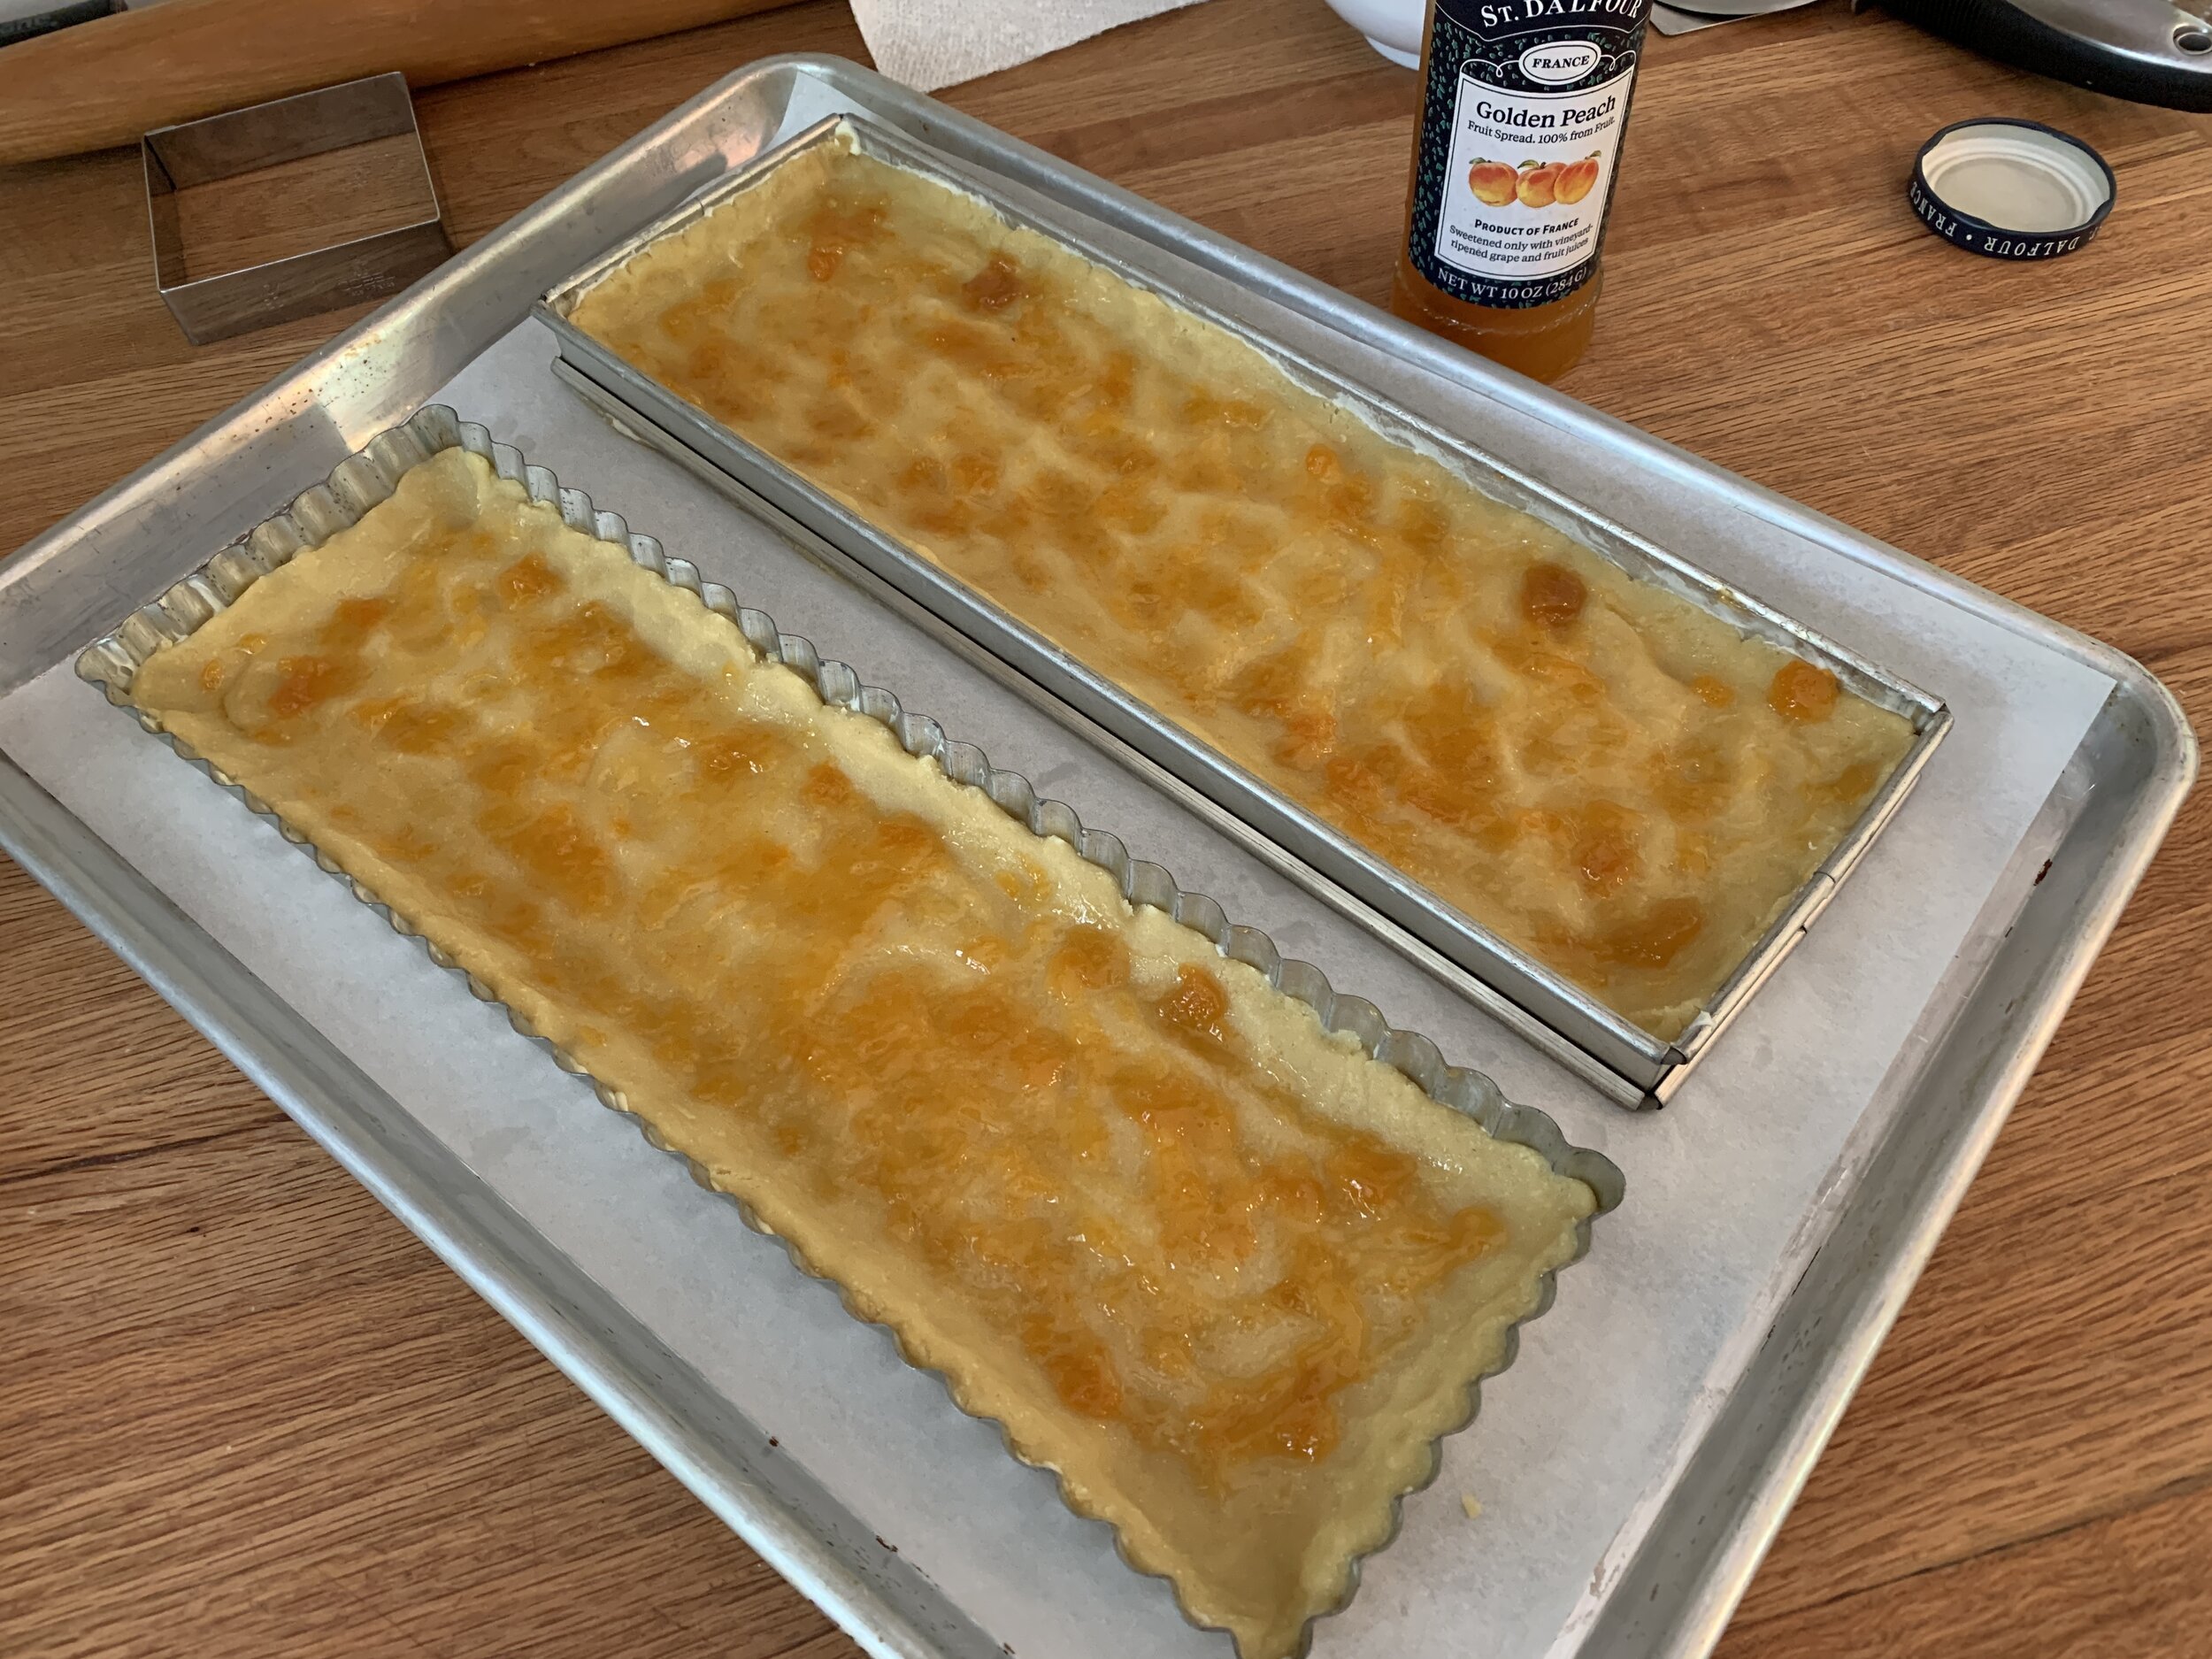
Heat the oven to 350ºF. Spread a thin layer of peach jam over the dough and bake about 20 minutes to set the dough. You should see the dough risen up and starting to brown a bit.

A quick jam note - every year I contemplate a jump onto the jam making band wagon, yet thus far that process hasn’t finagled its way into my summer repertoire. There are some wonderful jams to be found on well stocked supermarket shelves. I lean toward French made brands like St. Dalfour and Bonne Maman which both offer an interesting line up of flavors.

Before baking

Before baking

The par-baking gives me just the amount of time I need to prep my fruit and make my easy custard.

Par-baked

Par-baked

For the custard: in a medium bowl whisk together 80 g cane sugar, 160 ml heavy cream, 2 large eggs, 1.5 tablespoons all purpose flour, 25 g almond flour, 1/2 teaspoon ground coriander, a few grates of fresh nutmeg and a splash of vanilla extract. You can leave out the spices if you prefer and, instead of vanilla, add 1/2 tablespoon of peach brandy or your favorite almond liqueur.

The beauty of this custard filling is not only its ease of preparation but you can whip it up earlier in the day and hold it in the fridge - when ready, give it a quick re-whisk to bring it all back together.

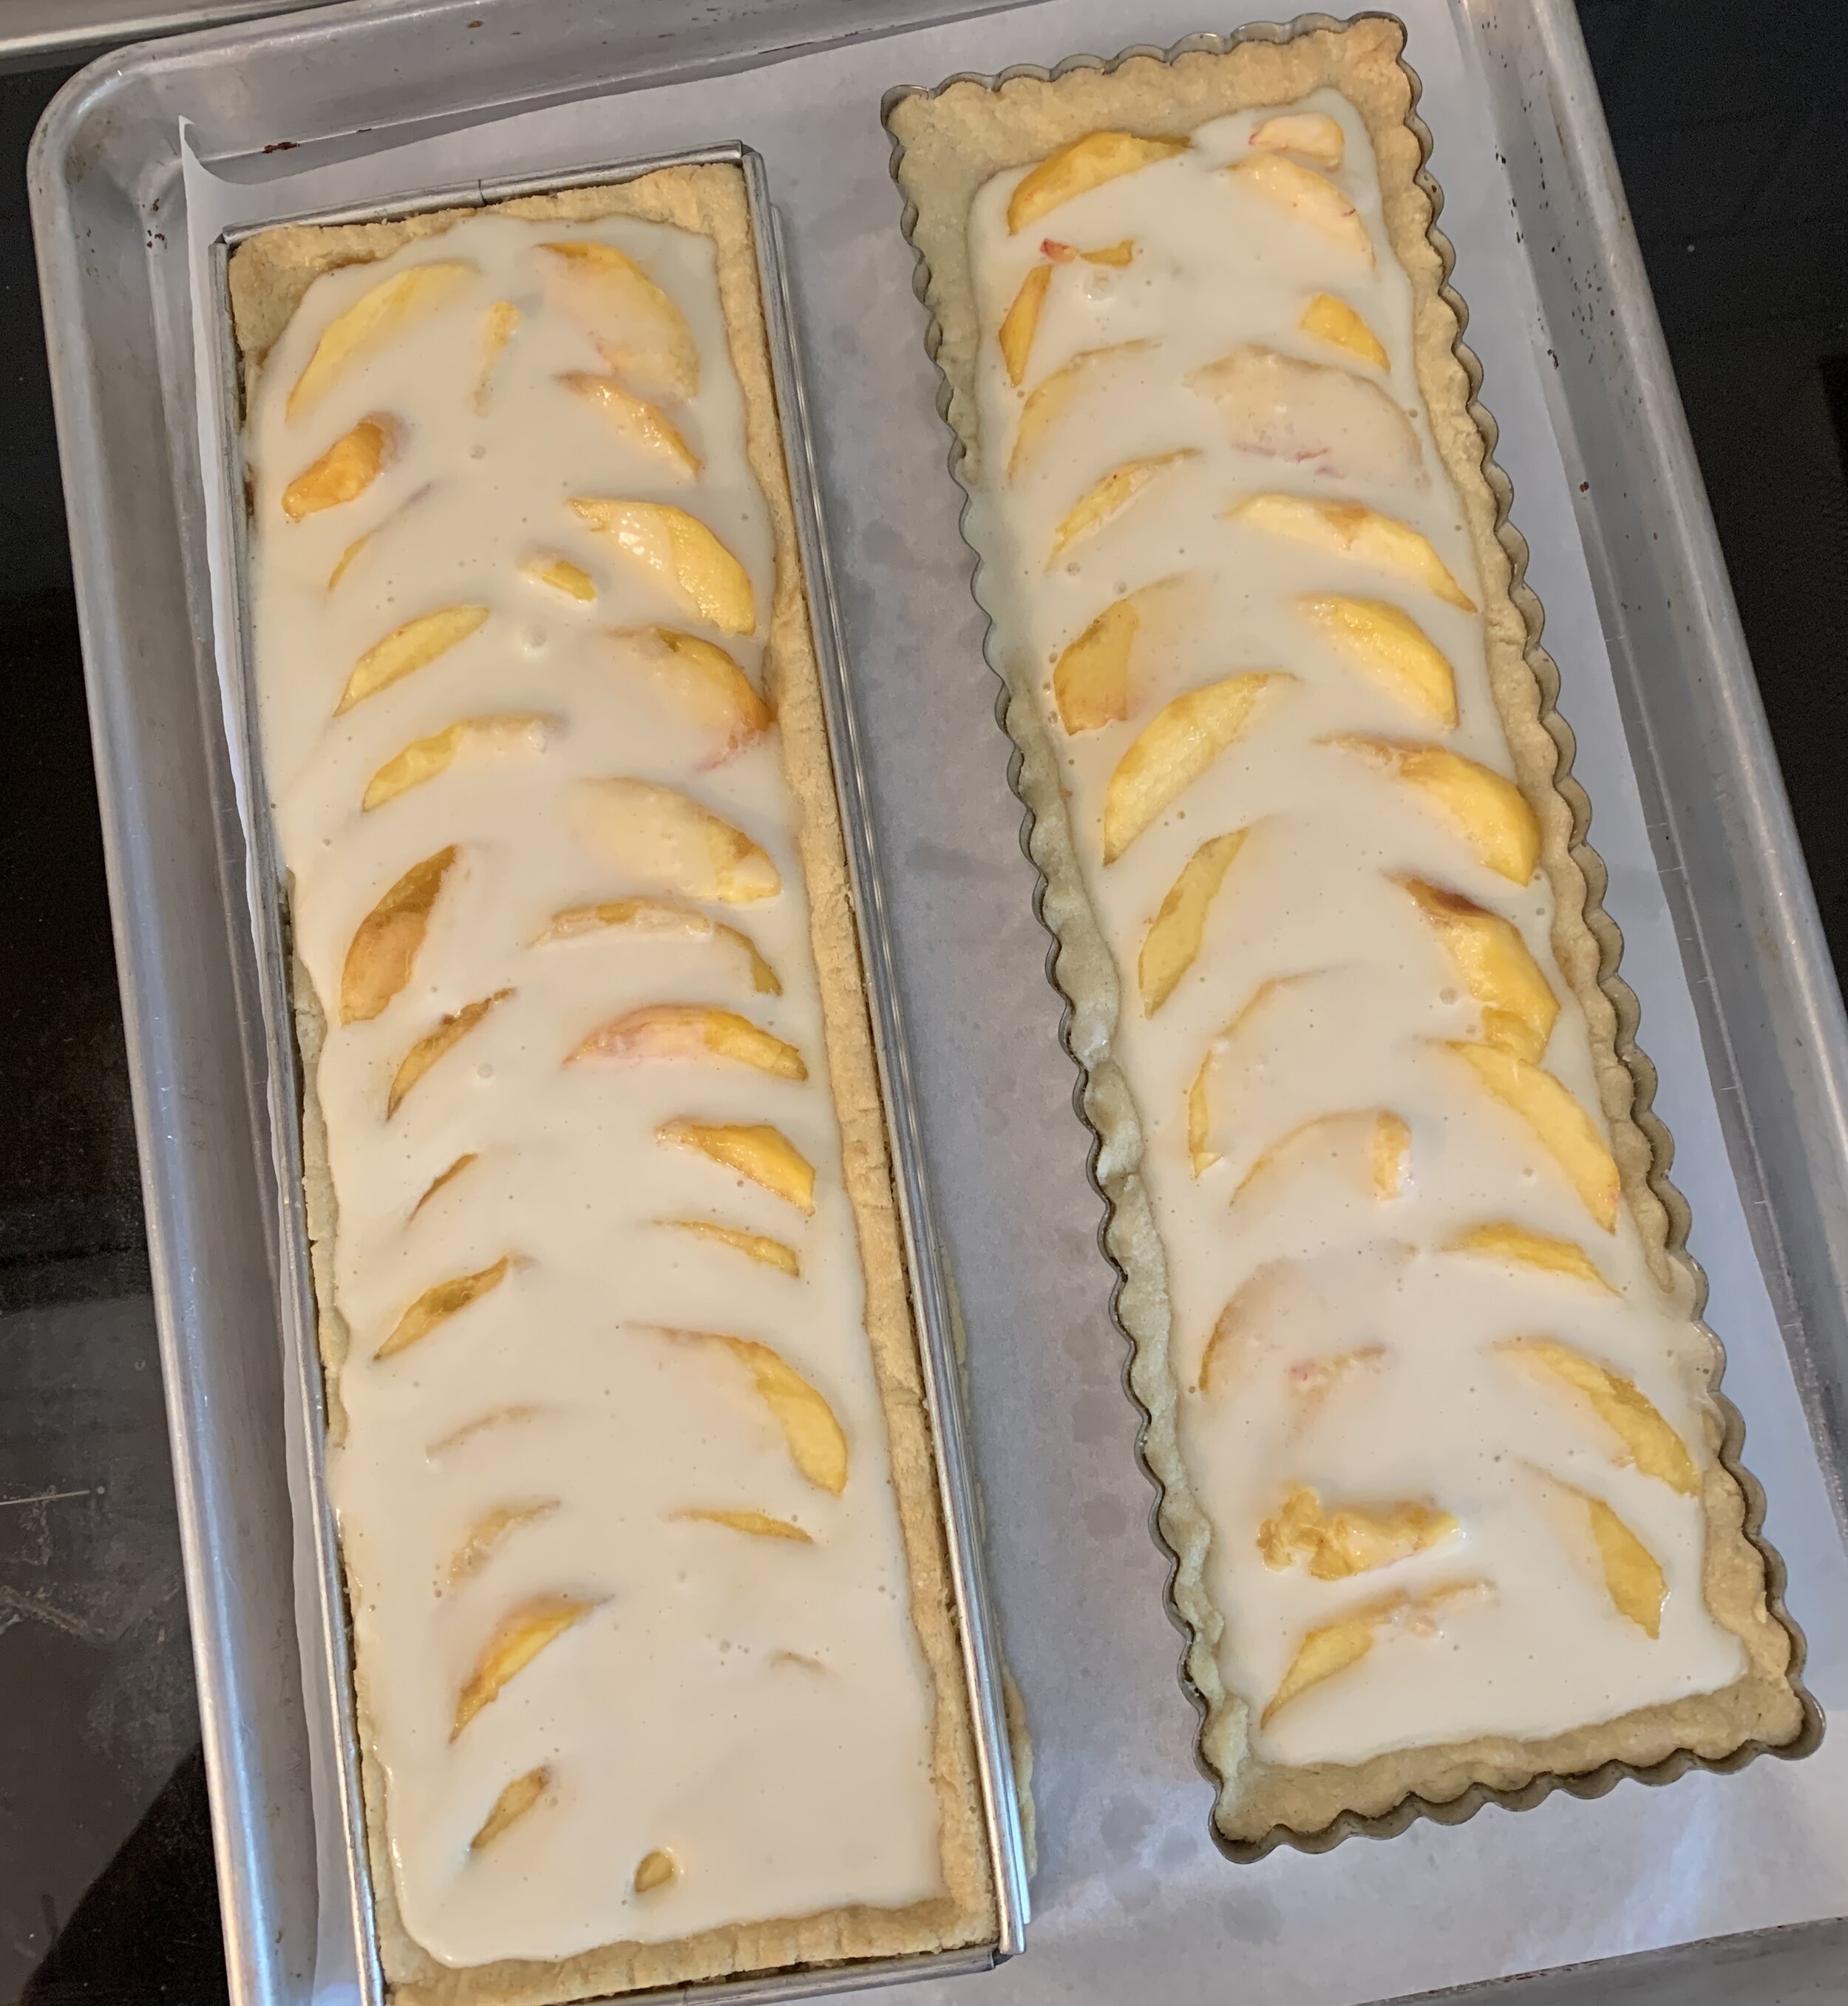
Two ripe peaches for each tart were perfect - peel, slice and line them up something like this.

6725A105-FC4B-4F06-91A4-71705D7221B3_1_201_a.jpeg

Carefully pour the custard over the peaches as far up to the edges as you can without overflowing (whoops - a little bit there on the left). There will most likely be a bit of custard left.

Bake for 10-15 minutes to start setting the custard and then you should be able to add the remainder, drizzling it over the top. Don’t worry it you don’t use quite all of it.

9429E1D2-7360-4F79-A075-943AADEBB4D5_1_201_a.jpeg

Bake for an additional 20-30 minutes until the custard is set, a bit puffy and nicely golden.

DA09ED48-CC3E-4917-B595-6837AE62F78C_1_201_a.jpeg

Looking pretty good!

84835AF6-7939-4620-BBDA-36233EEBF64C.jpeg

Cool for 5-10 minutes then gently loosen the edges using a paring knife or offset spatula to reduce the stick factor from any stray custard. As noted on the left above, Breton dough can sometimes sneak out under the edges of open tart forms during baking - just trim away any edge bits.

Cool an additional 30 minutes or so. The straight sided open form should lift off pretty easily. With a removable bottom fluted form, double check that the curvy edges are free before pushing the bottom up to lift it out of the form. Let cool to room temperature.

NOTE: you may have noticed I baked my fluted tart WITHOUT the removable bottom. I find the crust browns more thoroughly that way. For ease of release, I pop it into the freezer for 20-30 minutes to finish cooling and firm it up. It’s much less fragile that way and is easier to remove from the form.

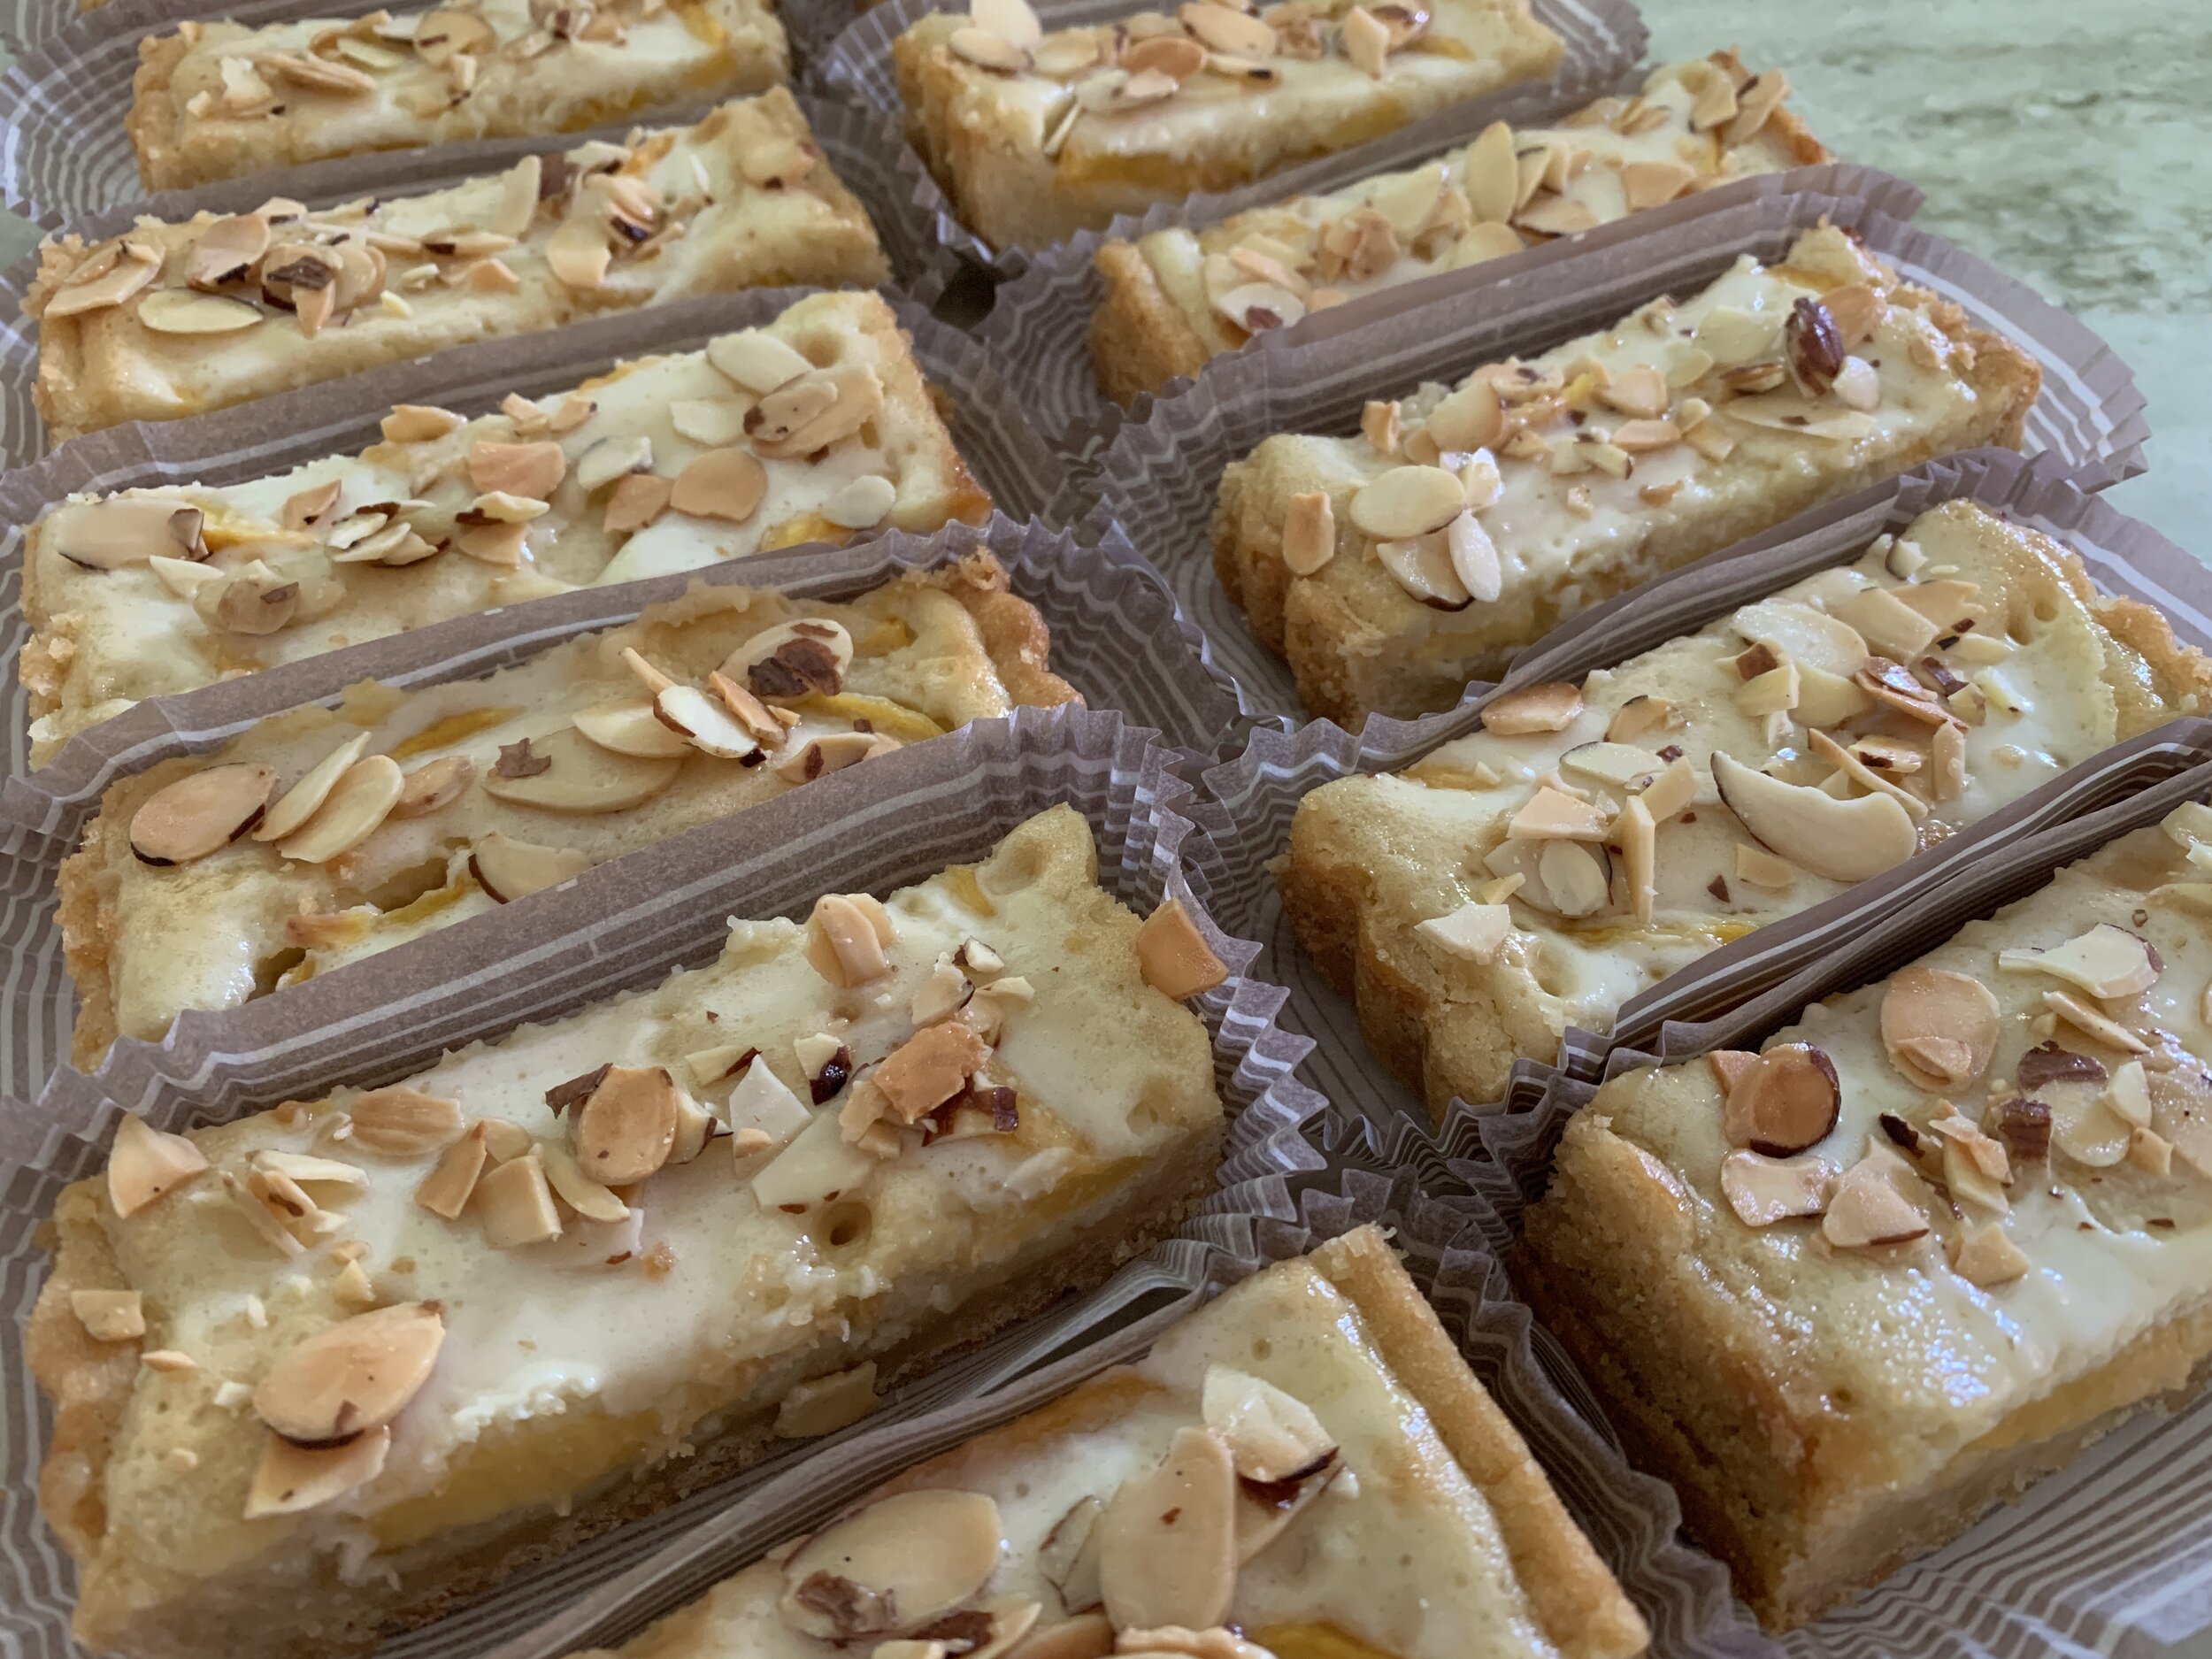
This tart keeps in the fridge a couple of days at least. Slice into rectangles and top with candied almonds for serving.

For the almonds: oven at 350ºF; parchment lined sheet pan; place 1/2 cup sliced almonds in a medium saucepan along with 1/4 cup sugar, 1/4 cup water and 1/4 teaspoon kosher salt; bring to a boil over medium heat and cook 1 minute; strain (discard the liquid) and spread the nuts on the prepared sheet pan; bake ~15 minutes, stirring half way through, until nicely browned; let cool. Keep in a covered container at room temperature and enjoy as a garnish on whatever you fancy!

8840E1FD-D534-45A8-B58F-95015ACC7E98_1_201_a.jpeg

Let’s just say that all of those who tasted these delectable slices (including Steve, the tasting maestro!) were very happy indeed. I love that.

8BAAE9EE-5D38-4BC1-8915-242E77AABF0D.jpeg

Summer’s waning, autumn’s coming. Meanwhile please take care of yourselves and those you love.

Lovely color at nearby Meijer Gardens

Lovely color at nearby Meijer Gardens

Tarte au lait au chocolat (milkshake tart)

62D32CAF-56C5-4ED8-B572-542D217C532D.jpeg

It’s time for more tart fun. This nine inch tart is an amped up version of what I called a chocolate milkshake tart back in the day when I was the pastry chef at Gracie’s in Providence RI. It’s a bit over the top from my usual not-too-sweet approach to baking and pastry, but most chocolate lovers won’t say no to a piece.

The chocolate pâte sucrée is fully baked (the only oven use portion of the program) and can be done earlier in the day of assembly or even a few days ahead and held in the freezer until ready. I placed mine on a doily covered cardboard cake round since it was being delivered to someone else, but you can place it on your favorite platter or plate as you wish.

A necessary part of the make ahead-ability is to make a milk chocolate ganache with 140 g milk chocolate and 260 g heavy cream then chill it down thoroughly. Plan for a good 4 hour chill, but you can make it a day or two ahead and keep it refrigerated as well. It will ultimately be whipped and is the essence of the milkshake nature of this tart.

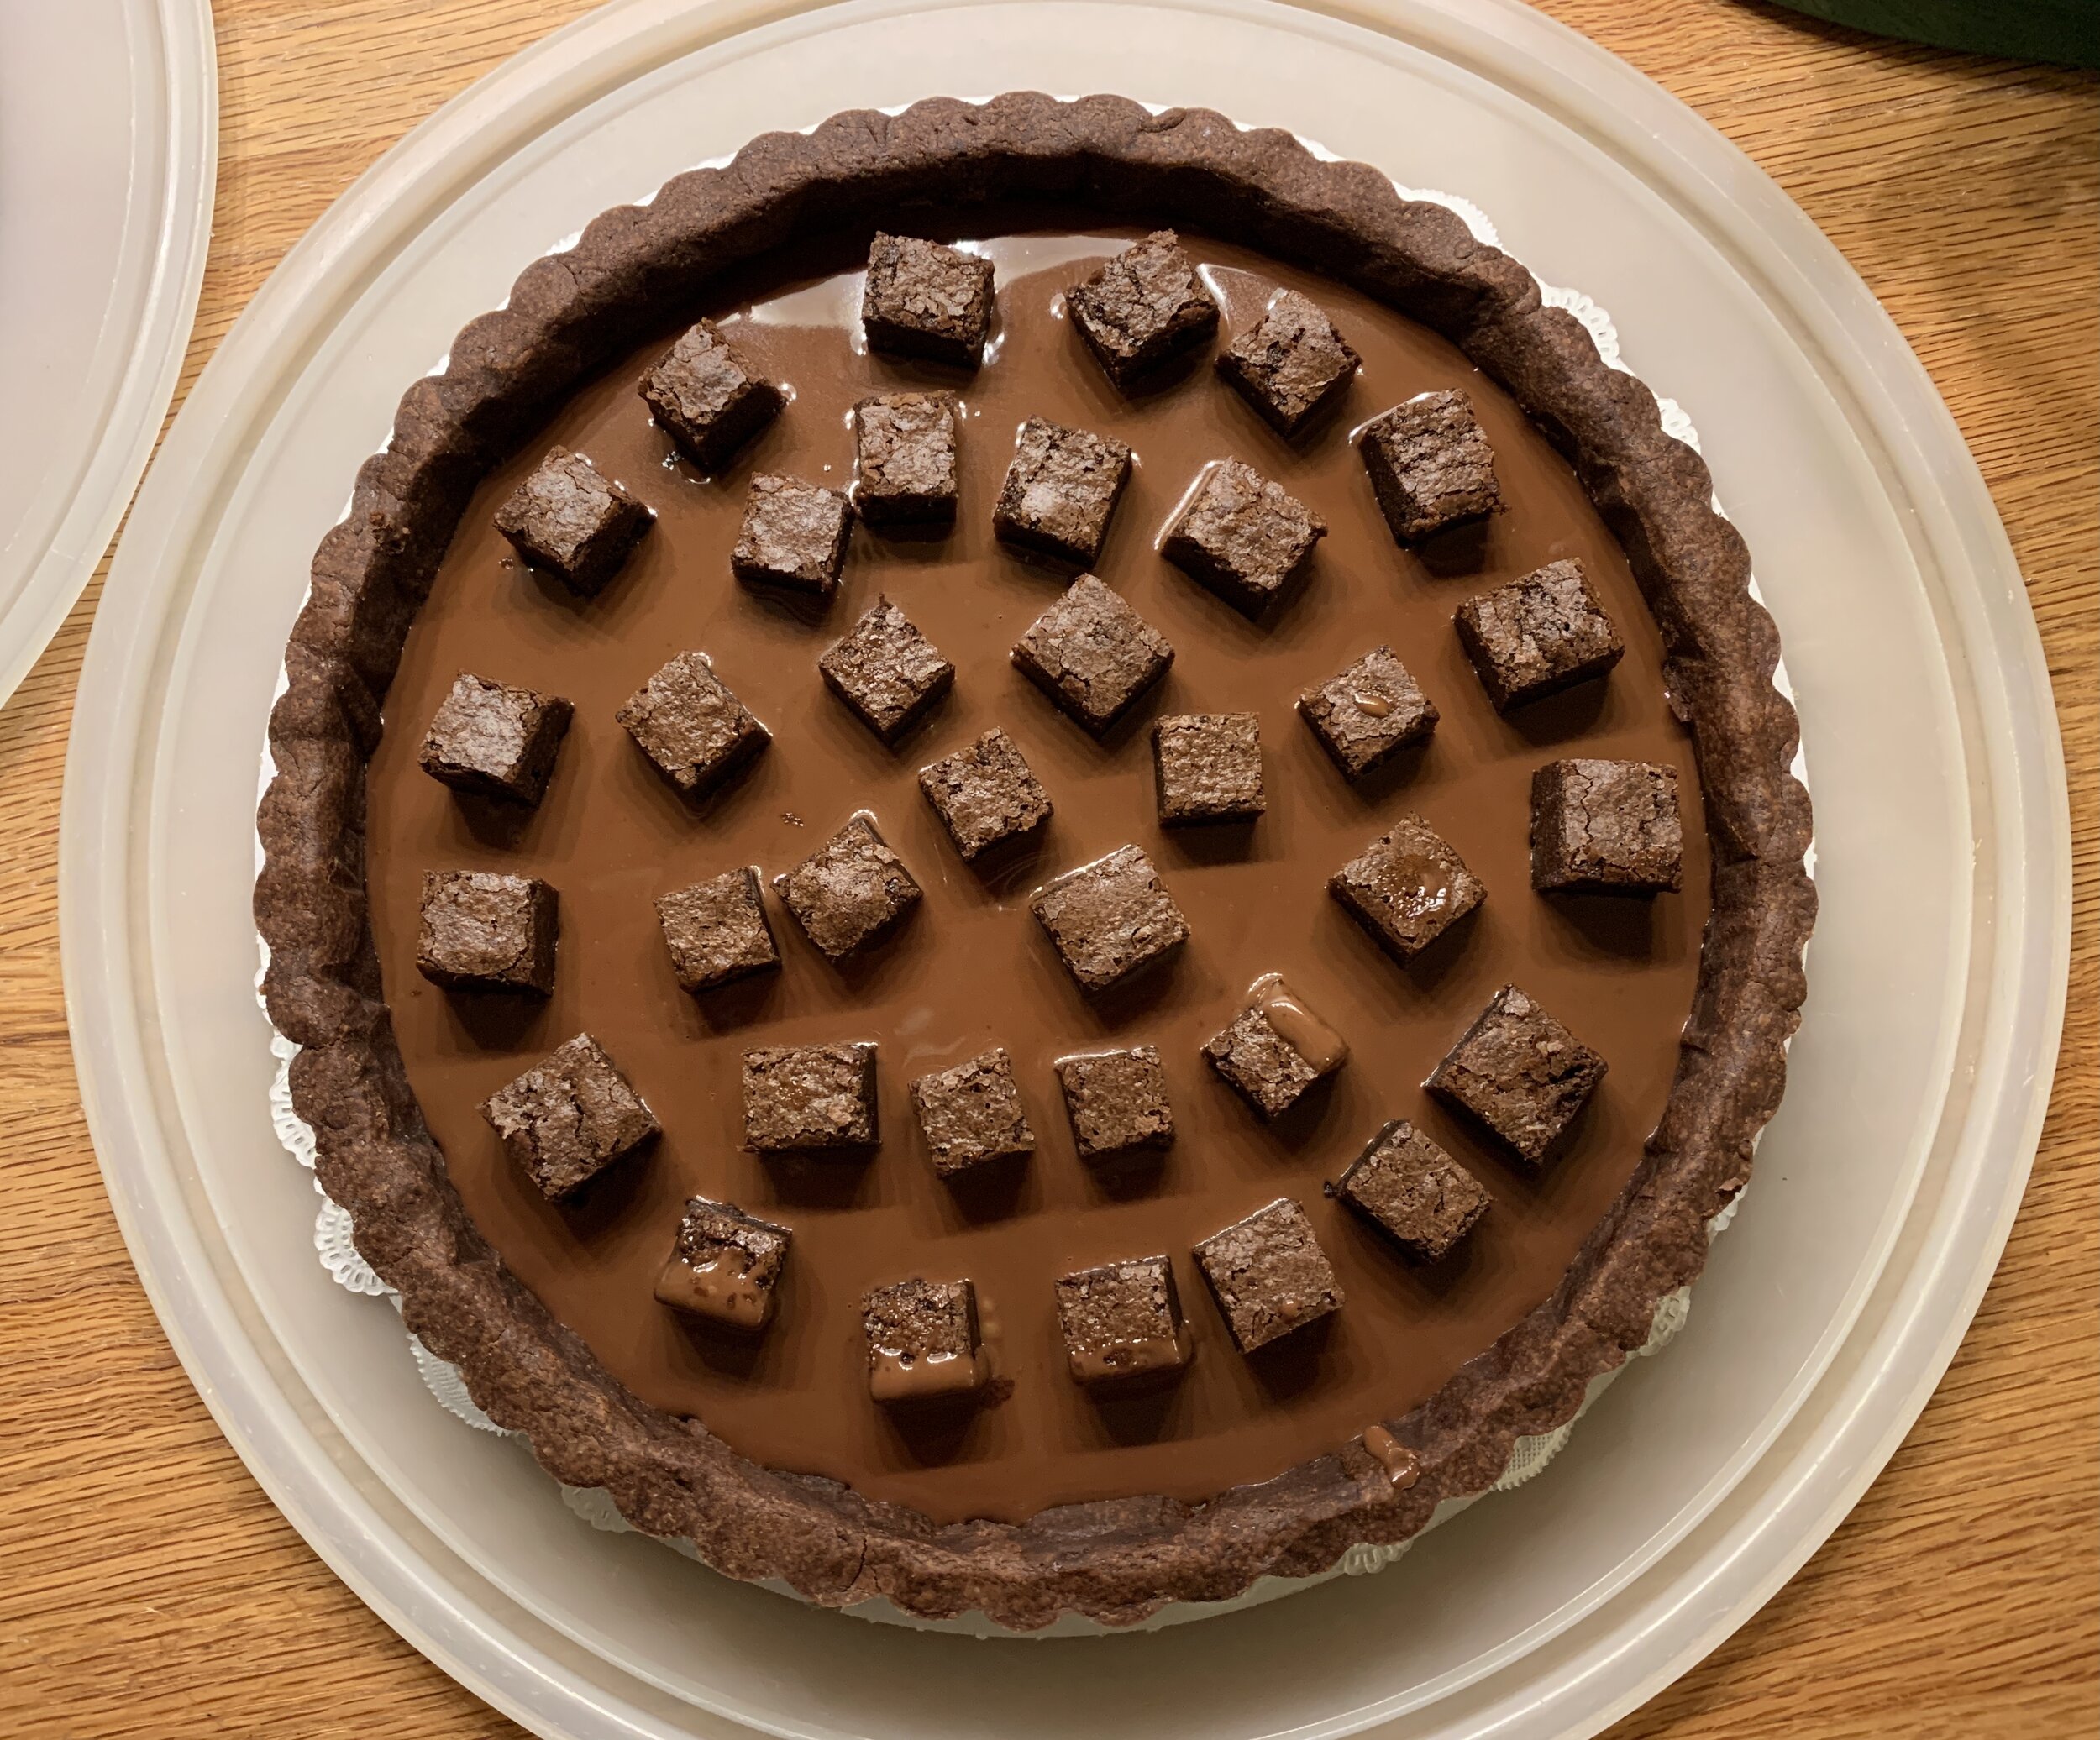
When you’re ready to go, have your prepared crust at the ready. Now make a dark chocolate ganache with 2 parts (by weight) dark chocolate to 3 parts (by weight) heavy cream. For the thin layer in this tart I used 100 g chocolate to 150 g heavy cream but you can certainly make a larger quantity if you have other ganache plans going on in your head - ganache keeps in the fridge for many days. Gently rewarmed, you can dip choux puffs into it, drizzle it over ice cream or make a bunch of smaller tarts for a dessert table. And that’s just the beginning.

Pour the warm ganache into the baked crust then, using your own favorite brownies (I’m a fudge-y fan myself), dot brownie cubes all around. Chill it an hour or so to set the ganache.

CACB2DD7-5FF8-4BD0-B4DB-9651A20AF2C5_1_201_a.jpeg

Time to whip the milk chocolate cream - yay! You’re going for medium firm peaks.

99CA8F25-AAAB-43CF-A874-E5719B8E2544.jpeg

I piped the cream using a star tip to give it the circular zen-garden-like ridges. As you pipe be sure to let the cream sort of fall among the brownie pieces so you have a nice fill of cream throughout the tart. Don’t be too fussy with it all.

C35C3169-43F5-417F-8EFE-E22F9694745A_1_201_a.jpeg

Garnish with caramel drizzle and a sprinkle of chocolate cookie crumbs and you’re all set. Hold in the fridge until time to serve and enjoy your creation. Now that’s some tasty creamy, crunchy, caramel-y, fudge-y goodness!

While we still have some summer left, have a grand time whatever you do. Cheers!

Queen Anne’s lace along my walking route

Queen Anne’s lace along my walking route

Canadian butter tart trials

Please note: when this post first published, the text mistakenly read the “left half of the pan was eliminated”. That has been corrected to “the right half”. Apologies!

7E720EA9-E600-4B82-8506-5CFE869FBB1B_1_201_a.jpeg

It’s so cool when I come across something new (for me) in the baking and pastry world and not long thereafter I receive a request to make just that very thing. The ever popular Canadian butter tart is one of those. It’s kismet!

75D12CD5-87C8-4AB1-97B9-53891244E0A0_1_201_a.jpeg

It turns out that a local Grand Rapidian has a Canadian friend who adores butter tarts, and she wanted to gift some to said friend for her birthday, a lovely gesture indeed. Being confident that I could deliver, I took to reviewing a number of recipes including one from NYT (the one I remembered reading not too long ago.)

For my money I’d call it a sugar tart since the filling and taste experience are indeed quite sweet (true confession - a bit over the top for me!).

As I reviewed the dough portion of a number of recipes, I found most of them contained whole egg or yolk in addition to the typical crust components of flour, butter and ice cold water. Some used a combo of lard and butter and some went with my preferred method - all butter.

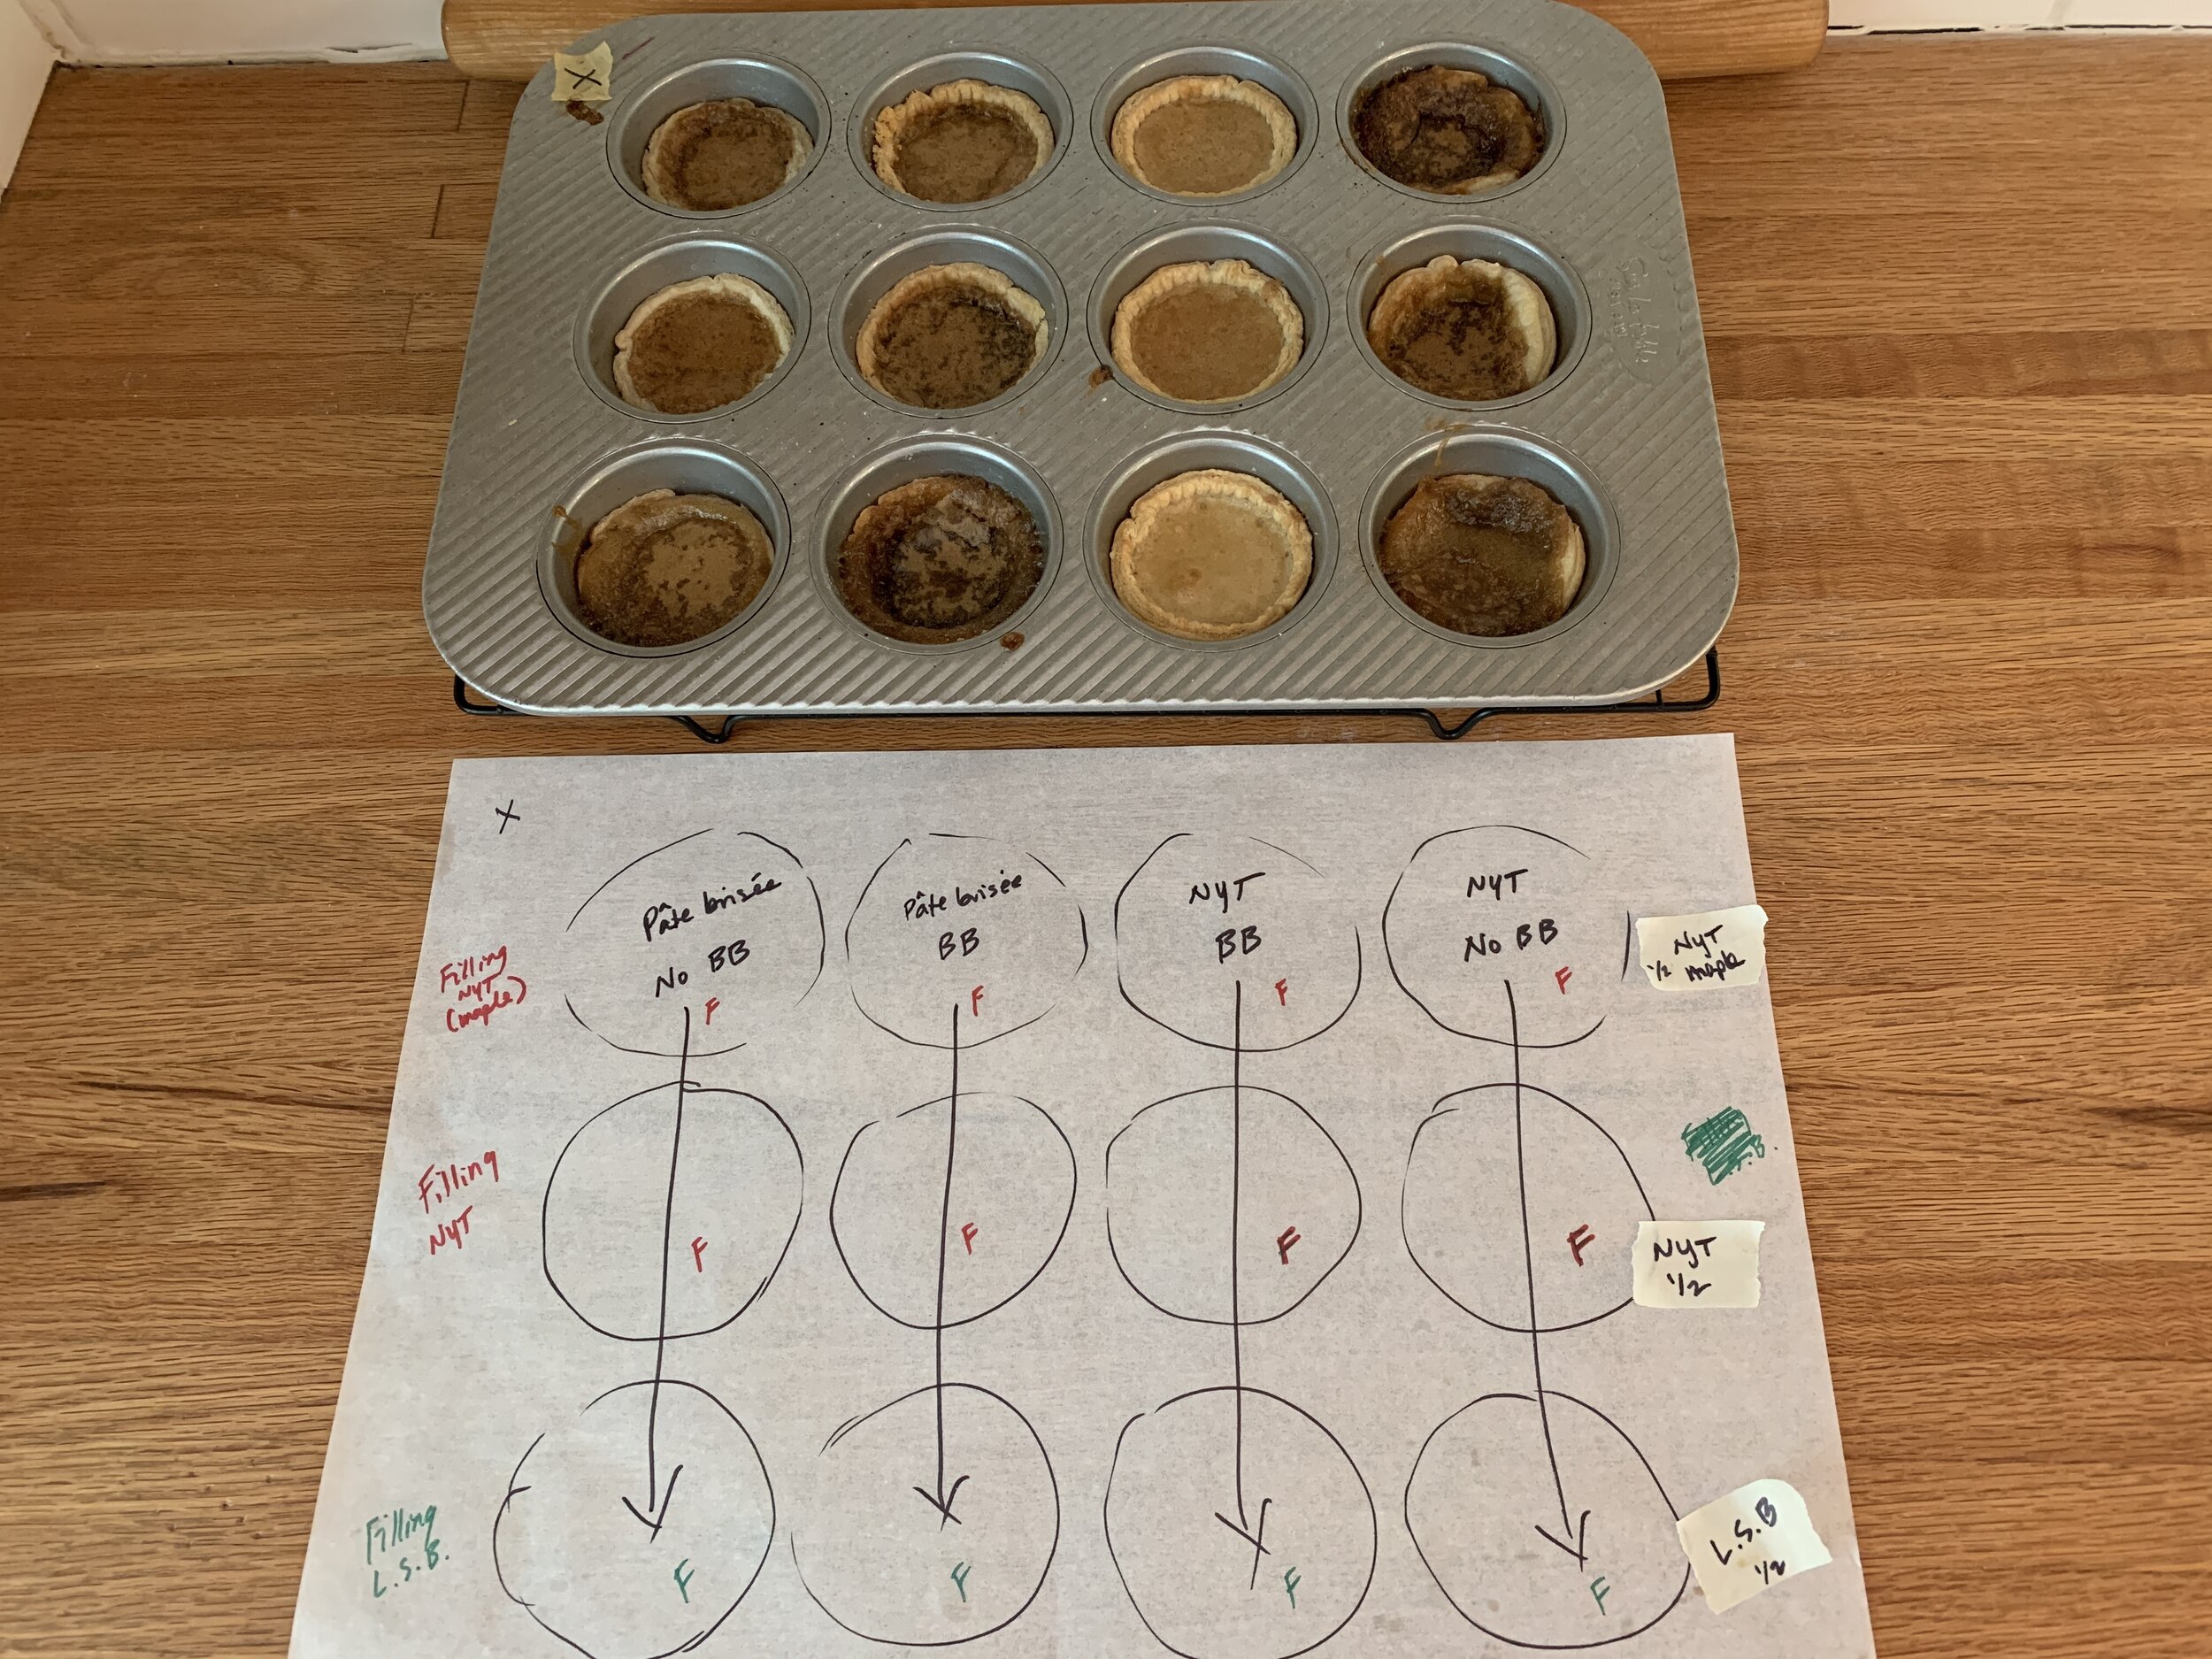
I decided to follow the recipe from the NYT article and compare the dough with my standard pâte brisée (no egg). For the filling I made two versions of NYT’s and found another filling that spoke to me from the site Little Sweet Baker - less sugar and more butter plus a splash of cream - it’s a BUTTER tart after all!

Mine is certainly not a scientific study but simply my way of sharing my inaugural (and limited) experience with the butter tart world. The results are frankly hard to fully explain in terms of why a certain filling baked the best in a particular dough. Hmmm.

BCA2FDCE-D7CC-47AE-B473-E7B4997E938C.jpeg

I blind baked the two doughs by lining a standard muffin tin (3 wells for each dough), freezing it to firm up the dough, then lining with papers and using sugar in place of dried beans as my weight, a tip learned from Stella Parks of “Brave Tart” fame. While the sugar doesn’t toast for very long this way, you can still save the sugar and use it in your shortbread or tart dough recipes to give them a hint of toasty-ness.

Once the blind baked shells were cool, I lined the remaining empty wells, 3 with each dough and proceeded with the fillings.

When making the filling, it is suggested that one use very soft or melted/cooled butter and blend the filling by hand so as to avoid incorporating air into the mix, resulting in a final, enhanced gooey-ness. I chose to keep it simple, not adding nuts or raisins as some iterations do.

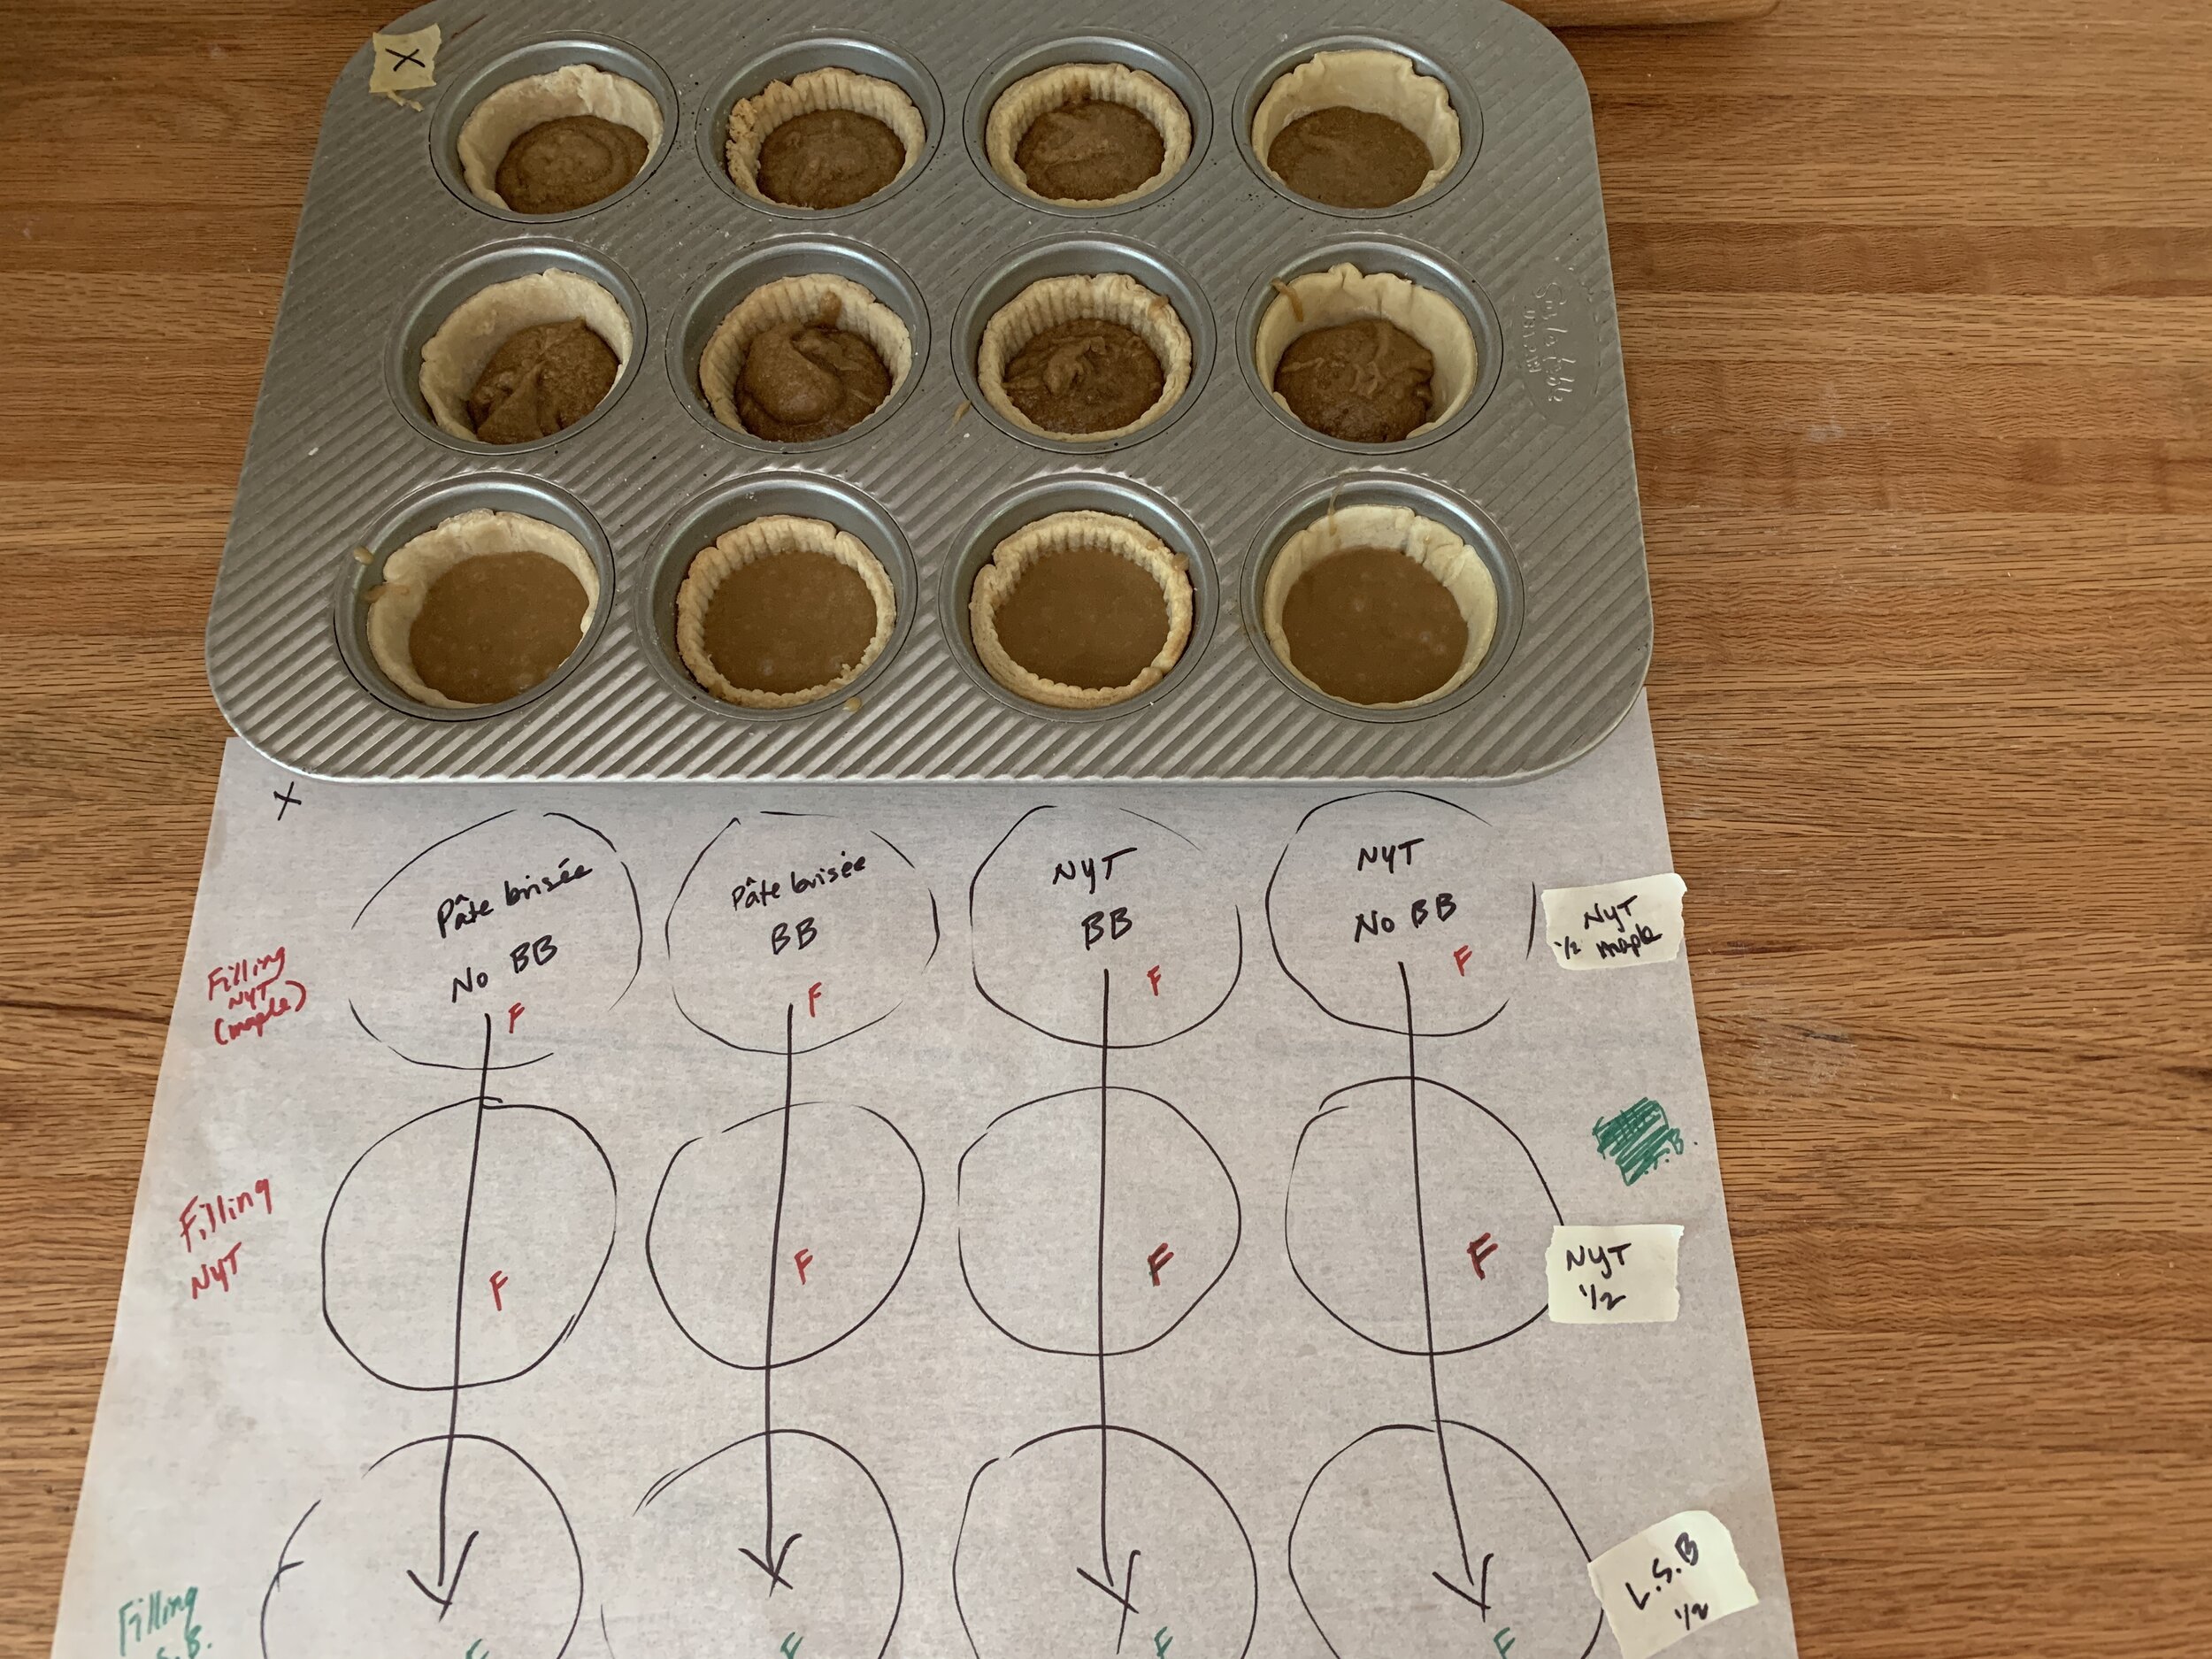
The full NYT recipe blends 200 grams brown sugar ( I used dark) with 1/2 teaspoon salt; blend in 57 g soft, unsalted butter by hand until smooth, followed by 1 large egg and a teaspoon vanilla (pretty easy, eh?). The second NYT version I made replaces the 200 g brown sugar with 150 g brown sugar and 1/4 cup maple syrup with the remaining ingredients the same (meant to result in a runnier filling that some reportedly prefer).

Little Sweet Baker’s filling blends 150 g brown sugar with 75 g melted and cooled butter; add in 1 large egg, I teaspoon vanilla and 1 tablespoon heavy cream. Again, easy-peasy.

For my testing purposes I used half recipes (for the egg, whisk up one egg then weigh out 25 g which is about half a large egg.)

05F8FDD1-B805-48C9-8C25-1618A97E8A27_1_201_a.jpeg

I guestimated about 28 g or so of filling for each tart and proceeded to dole the different fillings into the shells. Remember the central 6 wells are blind baked and the outer 6 are not.

B9F5ED14-AF96-49BA-AAE3-B23C5C2DEA8A.jpeg

Here they are, all filled up and ready to go.

129D2521-A69F-4682-8608-0983D39927B3_1_201_a.jpeg

Bake at 400ºF for about 13-15 minutes for a gooier result or up it to 17-19 minutes for a firmer result. I went for the gooey time frame - you want the crust to be nicely browned and the filling looking set and deeper brown. What surprised me is the stark difference in the color of the third (from the left) column of tarts (the NYT blind baked ones) - much lighter golden vs the deep caramel-y brown of the others.

7E720EA9-E600-4B82-8506-5CFE869FBB1B_1_201_a.jpeg

Once baked, run a small offset spatula (my FAVE tool!) around the edges to loosen any sticky goo before it hardens. Then let them cool completely, lift them out of the tins and enjoy.

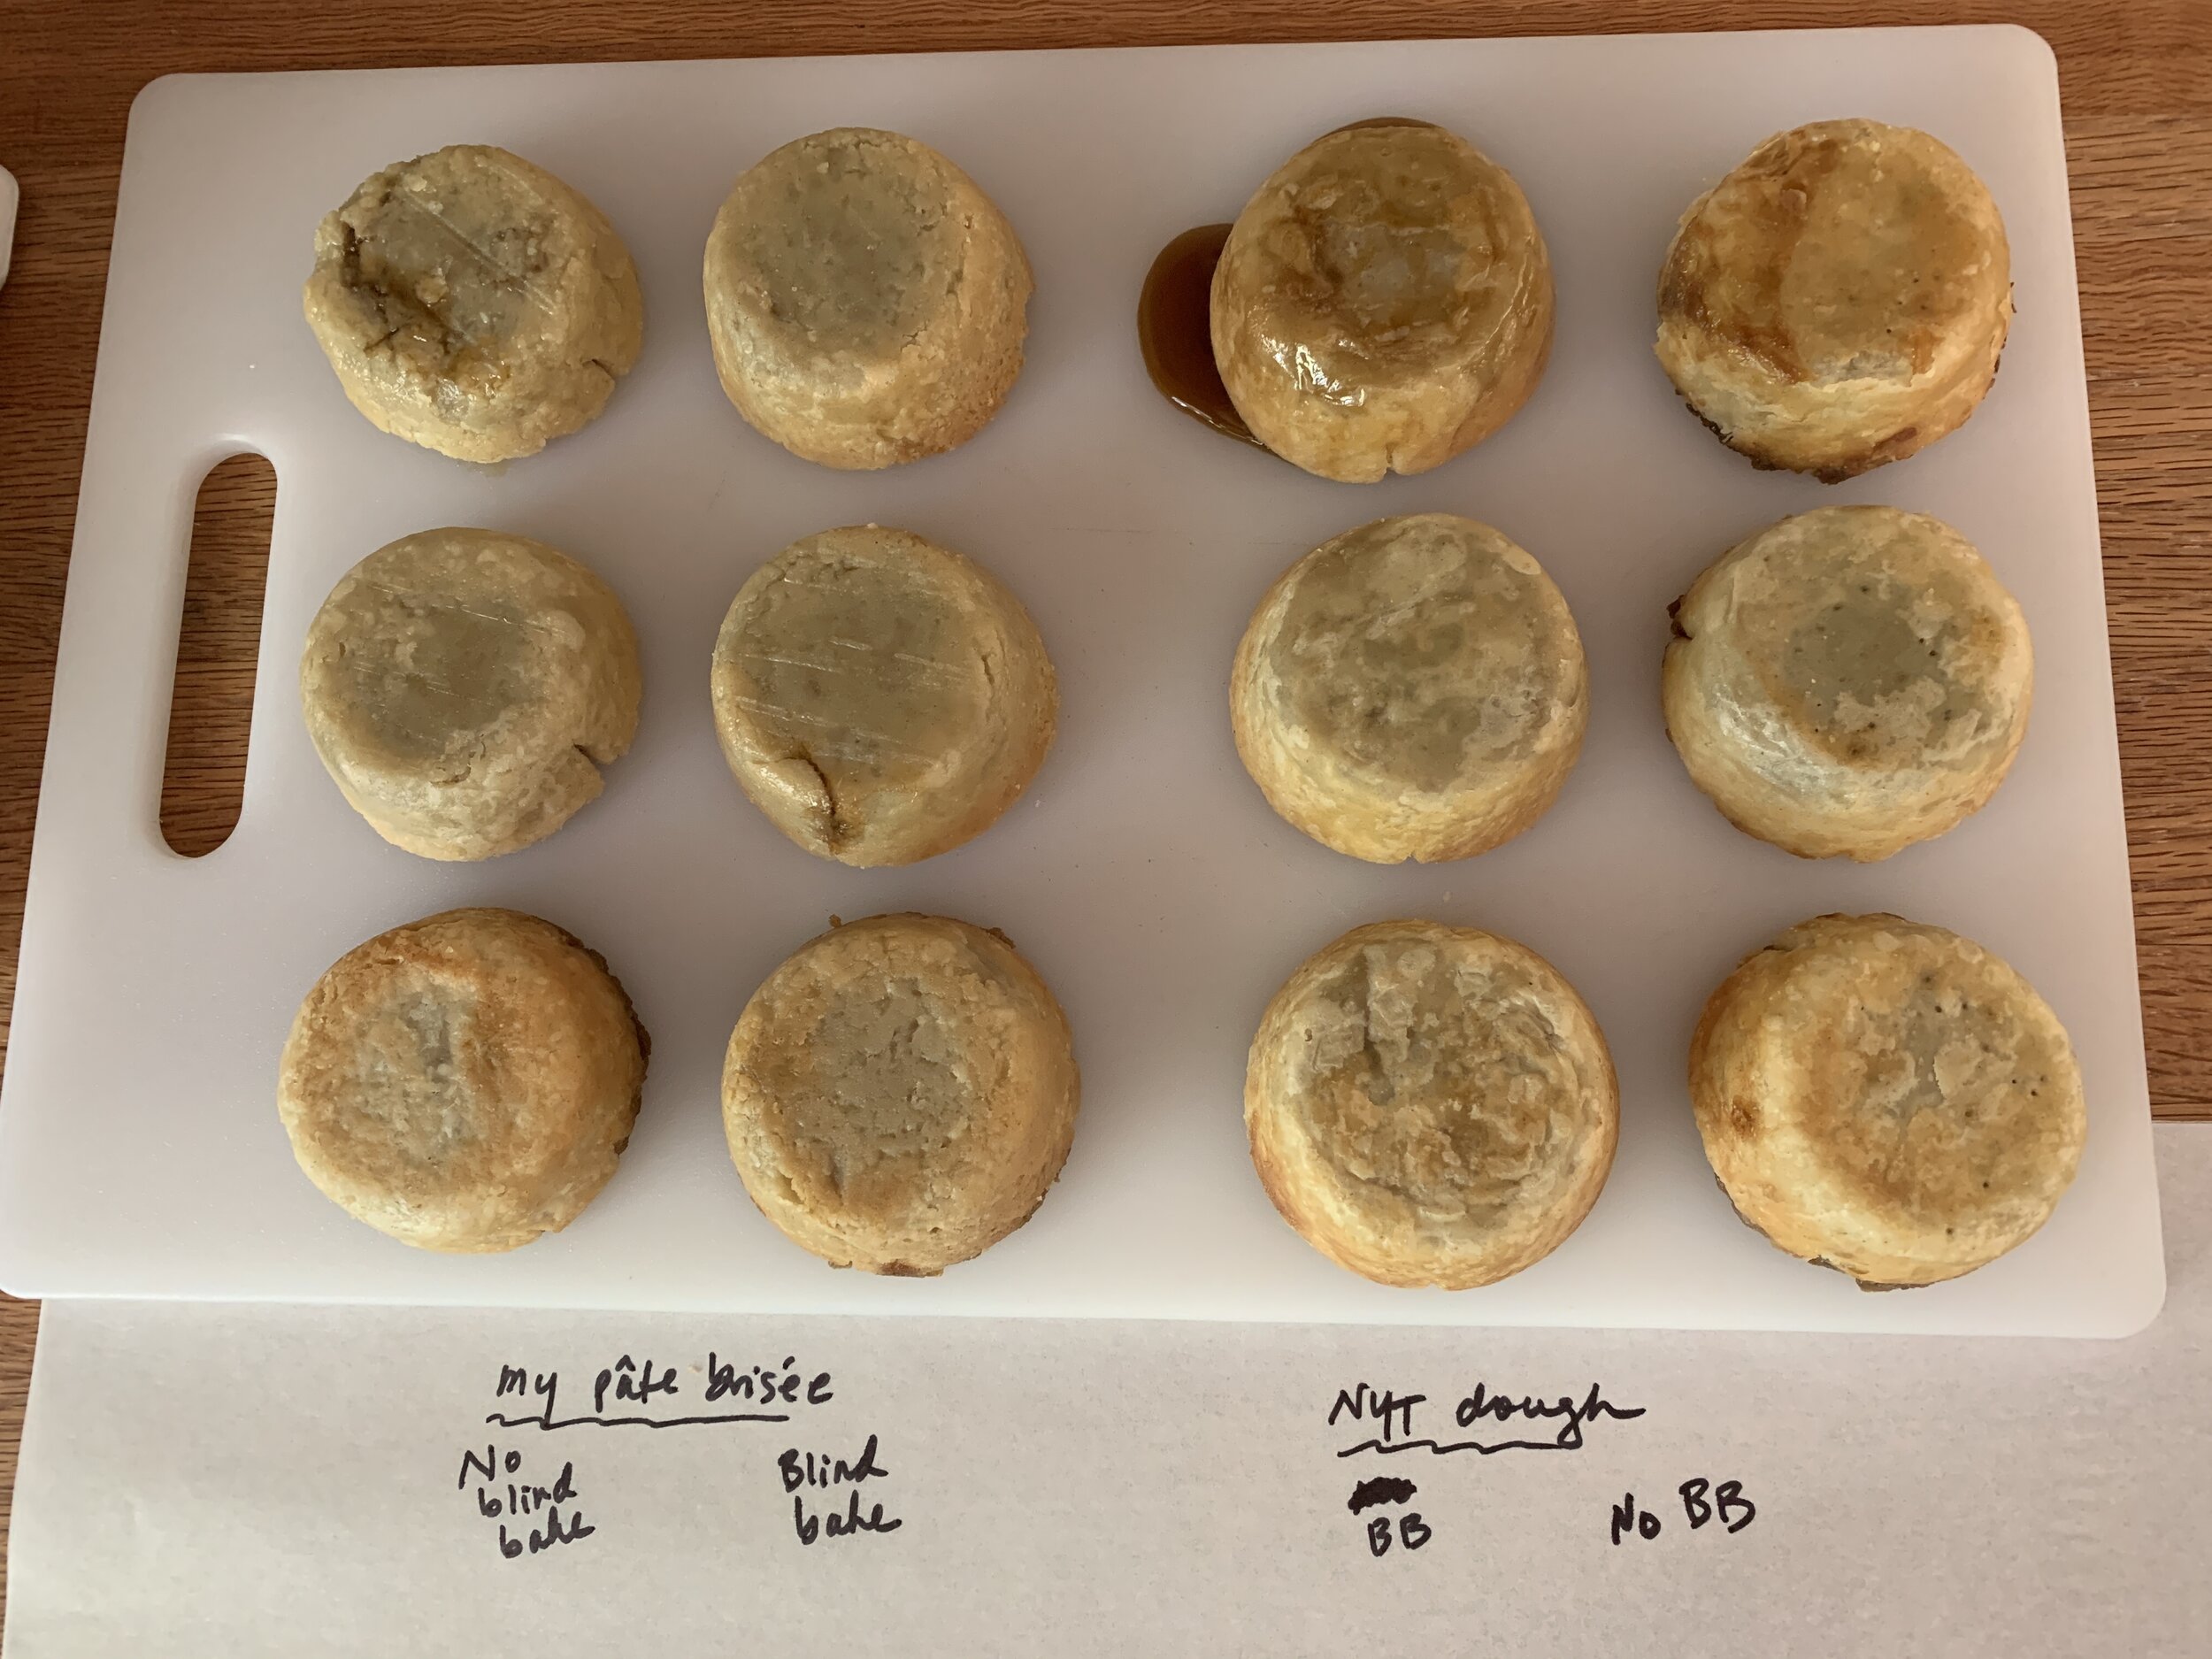
I turned them all out upside down (note the filling oozing out of the top, 3rd to the left tart) to assess the bottom crusts. I must say I’d be hard pressed to tell which were blind baked and which were not if I didn’t already know.

B84A839E-4F7F-4A4F-A429-E12A71FB5393_1_201_a.jpeg

Time to taste! Steve was a good sport for this one - we agreed that too many tastes became quite overwhelming with the sweetness of it all.

There was no rhyme nor reason to which fillings baked up runny and which gooey - you can see below that the NYT dough/blind baked threesome yielded a runny result for all three fillings. Go figure! Lucy I just can’t ‘splain it.

4082F727-347A-4D56-8C36-62E7E4175C95_1_201_a.jpeg

The NYT dough was unpleasant in the mouth - chewy and less flaky than good old pâte brisée - and the maple syrup filling was simply too runny. Due to those two things, the right half of the pan was eliminated.

Our final analysis: the pâte brisée plus Little Sweet Baker filling won the day, and it didn’t seem to matter at all whether the crust was blind baked first.

EA001655-E6C2-444E-8B93-8C5CA2AE515F_1_201_a.jpeg
257BA32C-31D0-41D7-99A5-4FB46E1C7D49_1_201_a.jpeg

For my final round of butter tart baking for the actual birthday order I used my classic pâte brisée, no blind baking needed. I upped the Little Sweet Baker filling recipe by 50% since I found the base recipe meant for 12 tarts to be meager. Of course, let’s remember I’d had no prior experience making these but it just felt right.

The final bake: 400ºF for 7 minutes; rotate the pan 180º and bake another 5 minutes; decrease to 375ºF and bake another 3 minutes. Since I had 12 of these for the order, I didn’t have an extra one to cut into but . . . . . imagine the end result looking like the close up above with a skosh more filling to enjoy. Sounds pretty darn good to me.

Et voilà! All boxed up and ready to go. And the feedback from the Canadian birthday girl: “a big hit”! Yippee!!

75D12CD5-87C8-4AB1-97B9-53891244E0A0_1_201_a.jpeg

Any tips or tricks of the trade from all of you butter tart aficionados are welcome!
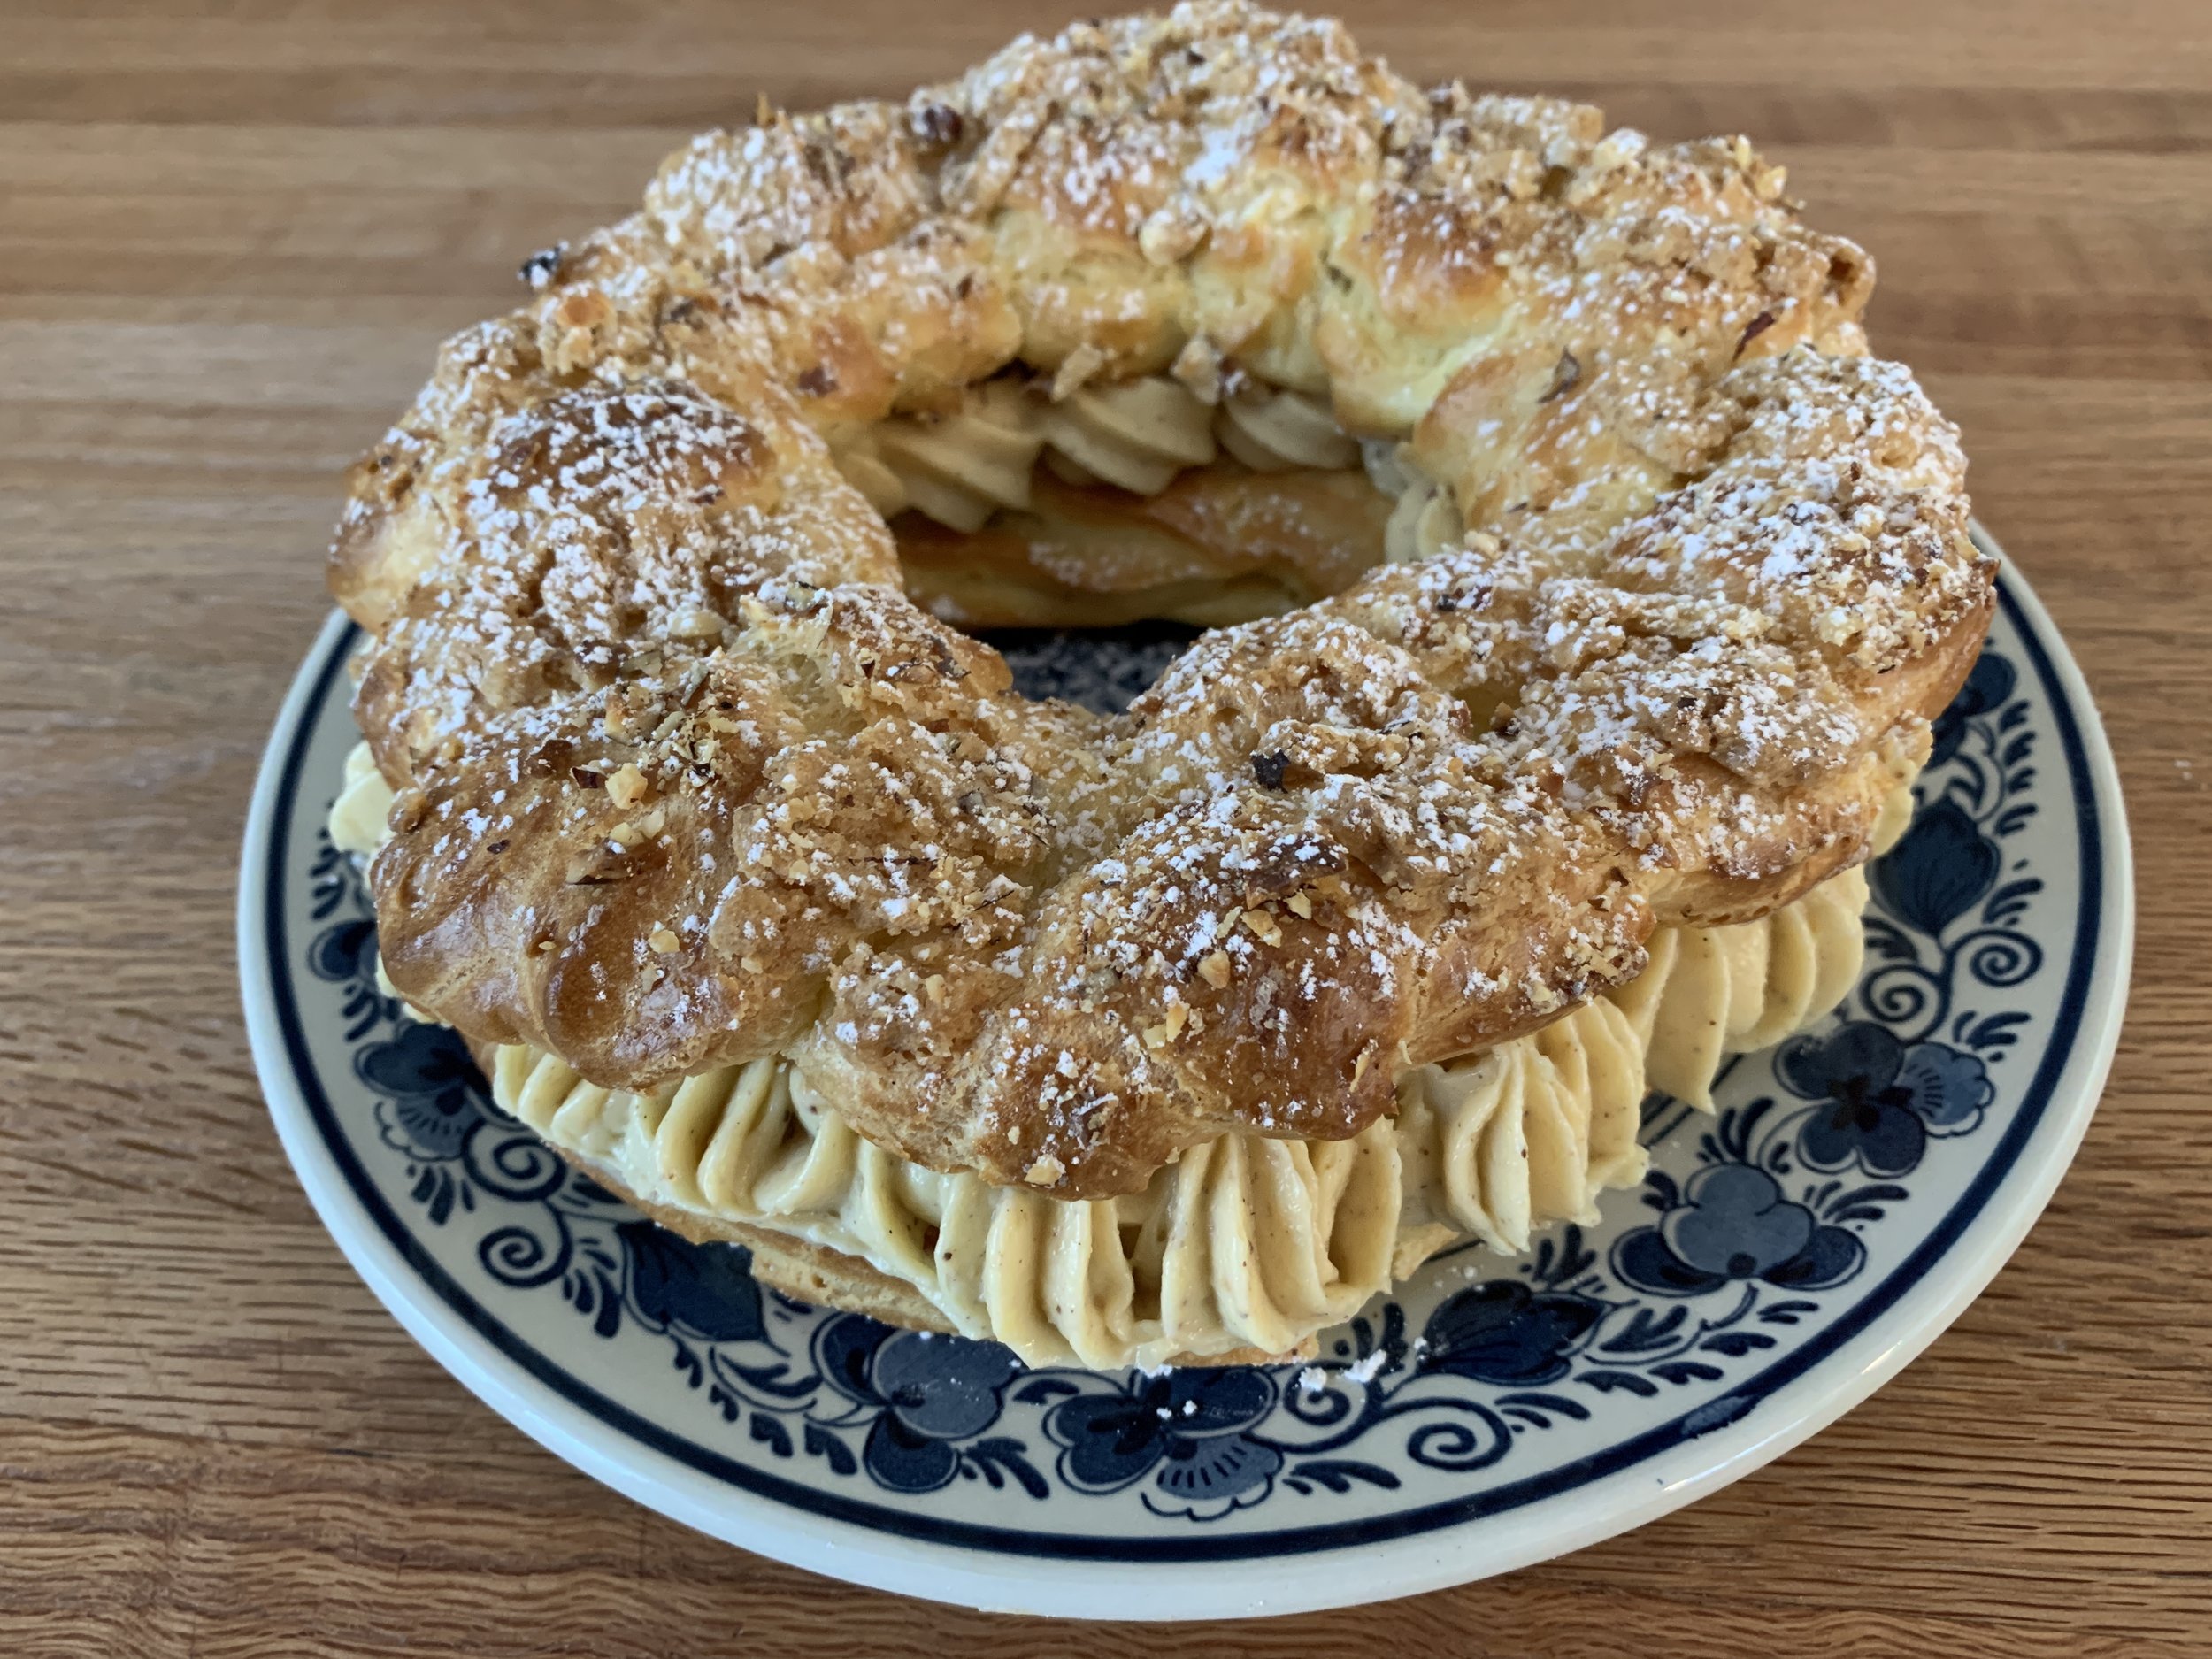
Stay healthy everyone!!

Strawberry lime cream stacks with berry sauce

1CEF2EC6-8A05-4229-B697-E2F4B07926D7.jpeg

Oh boy! This one was fun indeed!! Remember the vanilla chocolate dacquoise I wrote about recently? Well, here’s another creation using leftovers and ingredients that needed to be used. This time lime curd from a teacake project, mascarpone (tarte aux fraises fraîches project) and a block of cream cheese just sittin’ in the fridge.

My inspiration often comes from things I happen to have on hand, and let’s be honest - how often do we buy something simply because we have a coupon for it, not knowing exactly what we might do with it? I do! That’s how cream cheese often comes into the equation - good old Philly.

Truth be told, I’m a sucker for custards, particularly baked versions like crème brulée and pots de crème, so I tweaked a ricotta/cream cheese recipe I’ve used a number of times to create a mascarpone version instead. Cue in roasted strawberries and you’ve got yourself something pretty fantastic.

6CE95A7F-CDBB-4949-93A6-571846A9CA52.jpeg

I took advantage of west Michigan’s strawberry season to roast up a bunch and purée them. So tasty in ice cream (yum!) but also to freeze to have on hand for whatever. Here it is quick and dirty - clean, hull, cut up a quart of strawberries into equal pieces. Toss them in 2 tablespoon brown sugar (light or dark, either way), spread out on a silicone mat and bake in a 300ºF oven for 30 to 45 minutes, stirring every 10 minutes or so until juices appear thickened and jammy. Let cool (things will thicken up), then purée.

Where am I going with all this you might ask? OK - cookie base/roasted strawberry mascarpone custard/lime cream/stacked with graham crumbs and caramel/topped with mixed berry sauce. Whoa!

It’s all about planning. The custard/cream can be done ahead and frozen for up to a couple of weeks. The base can be shortbread, meringue or cake depending on your vision. I always have caramel sauce in my fridge and graham or cookie crumbs of various sorts in my freezer.

Lemon or lime curd (just sub in lime juice for lemon) is great for making a citrus cream (2 parts curd to 1 part whipped cream) that can be doled out into silicone molds and frozen until your plan for use starts to take shape. In this case I blended 260 g lime curd with 130 g whipped cream and filled 8 of my favorite muffin shaped wells about 1/2 way. The mold, seen below, is Silikomart’s SF028. My favorite source for this line of molds is Kerekes at Bake Deco.com

7B856BB7-DA6C-4362-8E20-F90B6CA21199.jpeg

I baked my mascarpone custard in the same sized mold (I have several at my disposal!) then cooled and froze the rounds until ready for assembly.

Now for the base. I chose Breton dough for mine, rolling and cutting the rounds a bit larger than the diameter of the molds. Breton dough contains baking powder so the cookies do spread. Just out of the oven, simply trim them up with the same cutter and you have the perfect base on which to set the custard stack. And you can save the crumbs for garnish too!

NOTE: I’d roll the cookies out more thinly next time - although a delicious cookie, it didn’t yield well to a fork. Something flat is best for stacking so a more tender crumbly shortbread or either sponge cake or dacquoise rounds would all work well here.

5009F1B2-A686-45DA-8BD2-3F73DD2ADC31.jpeg

Let’s assemble! Cookie bases in papers (again for ease of placing on an individual serving plate) and components at the ready . . . . . .
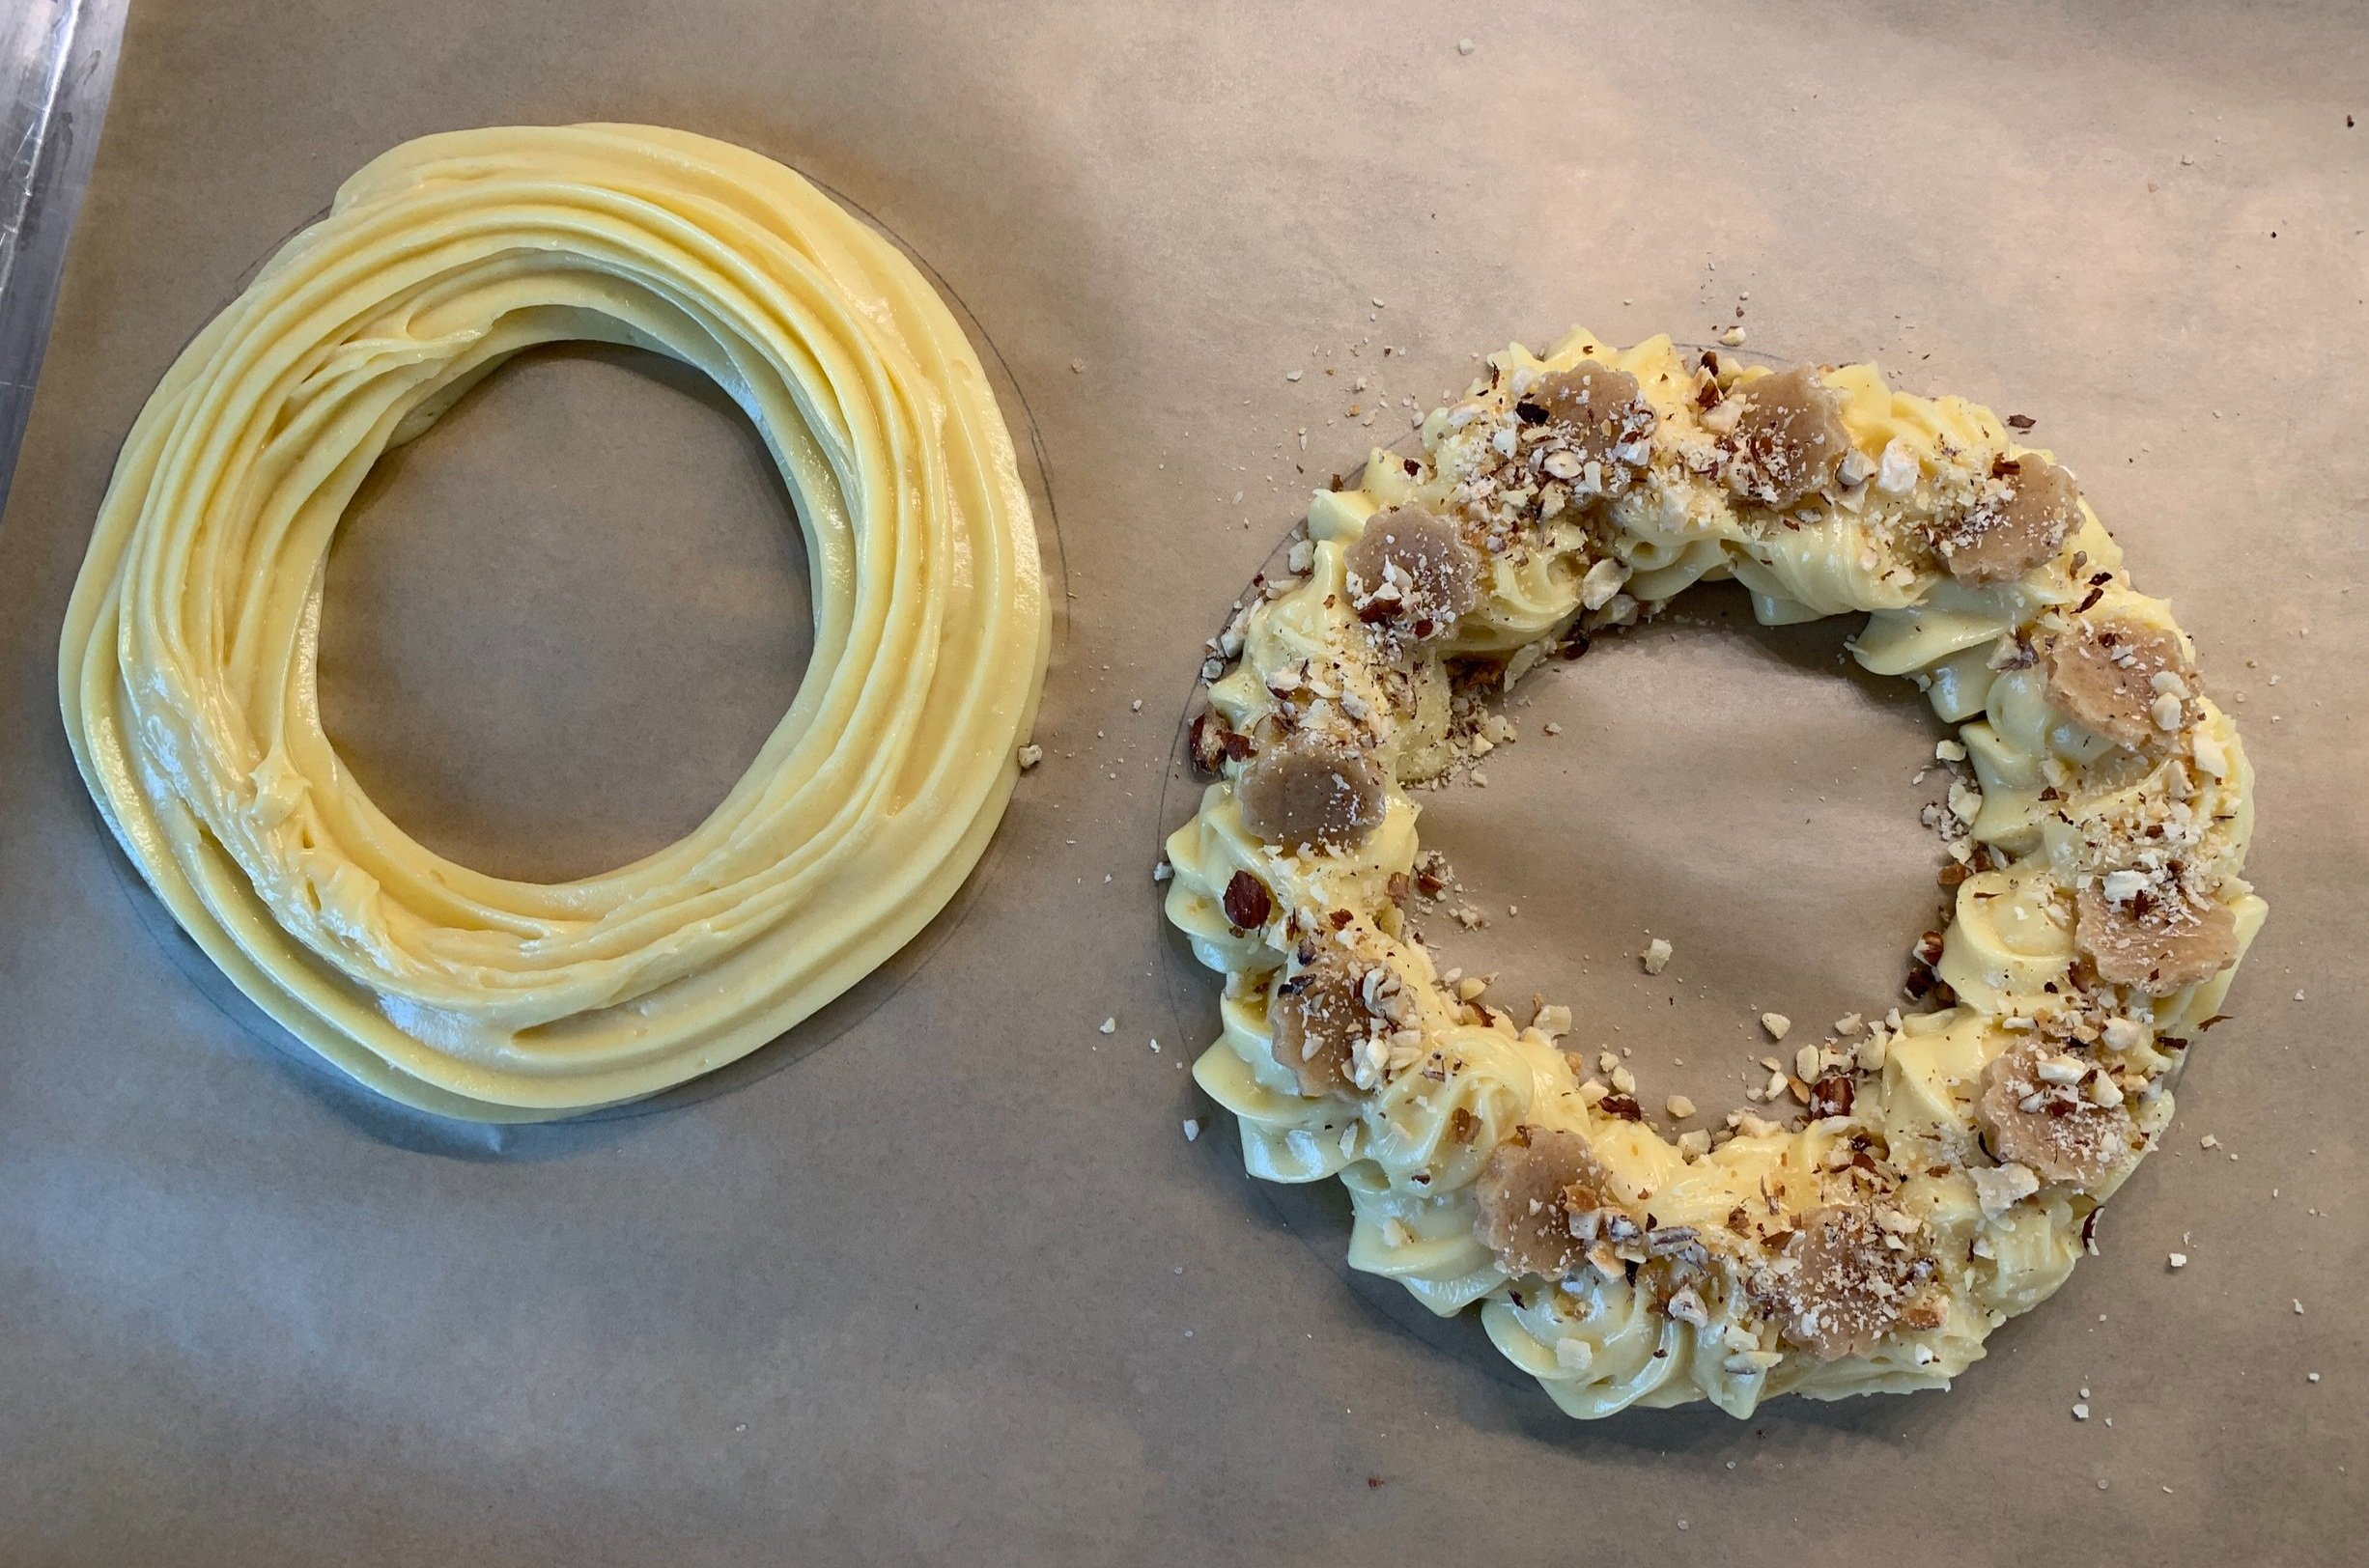
EF28C1C4-6D04-4E4D-8A9A-180A9DD5E969.jpeg

Caramel drizzle topped with strawberry custard. . . . . .

36327C7C-47CE-4CE0-9814-E5D20CEE3850.jpeg

then more caramel drizzle topped with graham crumbs and finished off with lime cream.

C99D2574-D86C-4F3D-B620-6CDC63164A48_1_201_a.jpeg

All stacked up!

C8C2DF0C-412D-4F39-999F-5990848F49DE_1_201_a.jpeg
 
5831E154-8200-4B9D-A895-70674E871FFE.jpeg

Plan your assembly a few hours ahead of serving to give the custards time to thaw in the fridge. Don’t worry, they’ll hold their shape. Just before serving add whatever garnish you have in mind. I drizzled more caramel and spooned berry sauce over the top with a sprinkling of graham crumbs on the plate.

Delicious all the way around.

News flash! We’re moving into blueberry season - can’t wait!

E621EB9E-3BC4-4CA9-B002-CF2910B169F7.jpeg